💻 이 글은
Xcode Version 13.3.1,fastlane 2.205.2를 바탕으로 작성하였습니다.
배포 자동화란
요즘 CI / CD 라는 말을 자주 들어보셨을 겁니다!
지속적 통합 (Continuous Integration) 와 지속적 배포 (Continuous Deployment 또는 Delivery) 를 의미하는데요,
오늘은 fastlane 으로 CD 에 해당하는 배포 자동화 (Deployment Automation) 하는 방법을 알아보겠습니다.
그런데.. 배포 자동화가 왜 필요할까요??
기존의 배포 방식을 살펴봅시다!
- 코드를 작성하고
- 버전과 빌드를 올리고
- Dependecy 들을 업데이트 하고
- 빌드하고
- Analyze 하고
- Archive 하고
- AppStore Connect에 업로드하고
- 슬랙이나 노션을 통해 팀원에게 알리고...
- 정식 배포라면 또 심사를 기다리고..
엄청! 힘들고 어렵지는 않지만.. 시간도 오래 걸리고 귀찮잖아요..
컴퓨터하는 놈들이 어떤 놈들인가요 자동화와 효율성에 미친놈들 아니겠습니까?
그렇기 때문에 위 과정들을 한 줄의 커맨드로 할 수 있게 해주는 fastlane 을 사용하는 방법을 한 번 정리해보겠습니다.
fastlane 🚀
- fastlane Document : https://docs.fastlane.tools
"fastlane is the easiest way to automate beta deployments and releases for your iOS and Android apps."
공식 문서에서 설명하듯 fastlane 은 iOS 와 Android 앱을 테스트 배포 또는 정식 배포를 쉽게 해주는 도구입니다.
Install fastlane
Xcode command line tools 설치
xcode-select --installfastlane 설치
fastlane 은 다양한 방법을 통해 설치할 수 있는데, 저는 Homebrew를 통해 설치했습니다.
brew install fastlaneSetup fastlane
fastlane 을 이용해서 배포 자동화를 하고자 하는 프로젝트의 루트 폴더에서 아래 커맨드를 입력해주세요.
fastlane init이제 어떤 작업을 할지 묻는 메세지가 나올거에요.
(base) ParkGyurim@ParkGyurim-MacBook-Pro [프로젝트이름] % fastlane init
[✔] 🚀
[✔] Looking for iOS and Android projects in current directory...
[10:07:25]: Created new folder './fastlane'.
[10:07:25]: Detected an iOS/macOS project in the current directory: '[프로젝트이름].xcworkspace'
[10:07:25]: -----------------------------
[10:07:25]: --- Welcome to fastlane 🚀 ---
[10:07:25]: -----------------------------
[10:07:25]: fastlane can help you with all kinds of automation for your mobile app
[10:07:25]: We recommend automating one task first, and then gradually automating more over time
[10:07:25]: What would you like to use fastlane for?
1. 📸 Automate screenshots
2. 👩✈️ Automate beta distribution to TestFlight
3. 🚀 Automate App Store distribution
4. 🛠 Manual setup - manually setup your project to automate your tasks
? TestFlight 배포를 자동화 할 것이기 때문에 2번을 선택해주겠습니다!
[10:07:40]: -----------------------------------------------------------
[10:07:40]: --- Setting up fastlane for iOS TestFlight distribution ---
[10:07:40]: -----------------------------------------------------------
[10:07:40]: Parsing your local Xcode project to find the available schemes and the app identifier
[10:07:40]: Resolving Swift Package Manager dependencies...
그러면 얘가 프로젝트도 살펴보고, 패키지 디펜던시도 살펴보고, 시뮬레이터에 빌드도 해보고 뭔가 뚝딱뚝딱 할거에요!
그 과정이 완료되면
[10:08:44]: --------------------------------
[10:08:44]: --- Login with your Apple ID ---
[10:08:44]: --------------------------------
[10:08:44]: To use App Store Connect and Apple Developer Portal features as part of fastlane,
[10:08:44]: we will ask you for your Apple ID username and password
[10:08:44]: This is necessary for certain fastlane features, for example:
[10:08:44]:
[10:08:44]: - Create and manage your provisioning profiles on the Developer Portal
[10:08:44]: - Upload and manage TestFlight and App Store builds on App Store Connect
[10:08:44]: - Manage your App Store Connect app metadata and screenshots
[10:08:44]:
[10:08:44]: Your Apple ID credentials will only be stored in your Keychain, on your local machine
[10:08:44]: For more information, check out
[10:08:44]: 	https://github.com/fastlane/fastlane/tree/master/credentials_manager
[10:08:44]:
[10:08:44]: Please enter your Apple ID developer credentials
[10:08:44]: Apple ID Username:로그인이 필요합니다!
애플 계발자 계정의 이메일과 비밀번호를 입력하고, 이중인증 6자리 코드도 입력해주세요
( 입력된 로그인 정보는 맥의 키체인 내에 저장된다고 하니 걱정하지마세요! )
✅ Logging in with your Apple ID was successful 라는 메시지와 함께 해당 프로젝트가 AppStore Connect에 존재하는지, 버전을 자동으로 올리는지 등등 확인면서 필요한 다른 파일들을 설치합니다!
🔥 이때, 종종
bundle update에서 진행되지 않는 경우가 있는데요
🔥 permission 과 관련된 문제로,sudo fastlane init을 다시 진행해주시면 됩니다!!
[10:43:22]: --------------------------------------------------------
[10:43:22]: --- ✅  Successfully generated fastlane configuration ---
[10:43:22]: --------------------------------------------------------
[10:43:22]: Generated Fastfile at path `./fastlane/Fastfile`
[10:43:22]: Generated Appfile at path `./fastlane/Appfile`
[10:43:22]: Gemfile and Gemfile.lock at path `Gemfile`
[10:43:22]: Please check the newly generated configuration files into git along with your project
[10:43:22]: This way everyone in your team can benefit from your fastlane setup
위와 같은 메시지가 뜨면 fastlane 설치는 완료되었습니다!
이제 해당 폴더에 4가지 파일이 생성되었을겁니다
fastlane/Appfilefastlane/FastfileGemfileGemfile.lock
Deployment Settings
생성된 파일들을 통해서 배포에 필요한 설정을 할 수 있습니다.
Appfile
Appfile 에는 앱의 번들과 개발자 계정, 팀 아이디 가 저장되어 있습니다.
혼자일때는 상관 없지만, 만약 팀원들이 여러 아이디를 사용한다면 번거로울 수 도 있는데, fastlane에서 제공하는 라이브러리 중
.env를 이용하면 환경 변수로 설정하여 관리할 수 있습니다.자세한 구현 방식은 공식문서를 참고해주세요. https://docs.fastlane.tools/advanced/#appfile
- 또는 Match 를 사용할 수 도 있습니다! (2022-06-08)
🚀 [iOS] fastlane 이용한 배포 자동화 (match 편)
Fastfile
Fastfile 에서 배포와 관련된 설정을 할 수 있습니다.
default_platform(:ios)

platform :ios do
  desc "Push a new beta build to TestFlight"
  lane :beta do
    build_app(workspace: "[프로젝트이름].xcworkspace", scheme: "[프로젝트이름]")
    upload_to_testflight
  end
end
default_platform(:ios)
: 기본 플랫폼을 iOS로 설정해주어서 fastlane [lane name] 으로 간편하게 실행할 수 있습니다.
( 원래는 fastlane ios [lane name] 로 실행합니다. )
이제 아래에 platform : ios do ... 로 시작하는 단락에서 어떤 동작을 할지 설정할 수 있습니다!
저는 아까 2번, TestFlight 배포 자동화를 선택해서 lane 에 beta 만 생성 되었네요.
그럼 앱스토어 배포 자동화까지 한다면 아래에 다른 lane 을 추가하면 되겠죠?
지금은 build_app 과 upload_to_testflight 만 있는데 많은 동작을 추가할 수 있습니다.
빌드 버전을 자동으로 올린다든지, slack에 메시지를 남긴다던지.. 등등
아래 공식 문서에서 더 많은 액션과 플러그인을 찾아 추가해보세요!
More fastlane actions
https://docs.fastlane.tools/actions/More fastlane plugins
https://docs.fastlane.tools/plugins/available-plugins
Deployment
이제 모든 설정이 완료되었다면, 배포를 해봅시다.
fastlane [lane name]위 커맨드를 입력하면 배포를 위한 과정이 시작됩니다.
저는 이 과정에서 제 계정이 이중인증을 사용해서
앱 암호 (application specific password)를 입력하라는 빨간 경고가 발생했습니다.이런 경고가 발생하면 https://appleid.apple.com 의 설정해서 앱 암호를 생성하여 입력해주세요!
조금 기다리다보면 완료 메시지를 확인할 수 있습니다!!
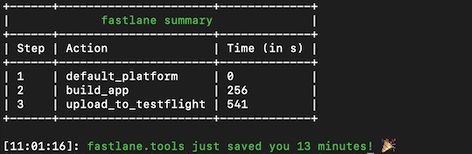
저는 오늘 13분의 시간을 아꼈네요.
TestFlight 에도 정상적으로 업로드된 걸 확인할 수 있습니다!
마무리
오늘은 fastlane 을 사용하여 TestFlight 배포 자동화 를 하는 방법에 대해 알아보았습니다.
한 줄의 커맨드로 귀찮은 과정을 생략할 수 있다는 것 뿐만 아니라, fastlane 은 더 많은 활용 방안이 있습니다.

(CI/CD 파이프라인: 개념, 방법, 장점, 구현 과정 : https://www.redhat.com/ko/topics/devops/what-cicd-pipeline)
fastlane 은 위의 CI / CD 의 모든 과정을 담당할 수 있습니다. 예를 들어, 특정 브랜치에 풀리퀘스가 올라온다면 테스트 코드를 실행하고 머지하고 (CI), 테스트 코드를 통과한다면 빌드를 거쳐 자동으로 빌드 버전과 앱 버전을 올려 배포 (심사 요청) 까지 (CD) ... 그렇게 한다면 정말 많은 시간을 절약할 수 있을 것 같습니다 !!
오늘은 간단하게 빌드와 배포 이 두 과정만 자동화했지만, 더 알아보면 조금 더 효율적인 프로그래밍을 할 수 있을 것 같습니다 👨💻
틀린 정보 또는 궁금한 점이 있다면 댓글 부탁드립니다! 읽어주셔서 감사합니다‼️