

위 이미지를 클릭하면 실제 제가 만든 서비스를 테스트해볼 수 있습니다.
논문 리뷰가 필요한 경우가 많아서, 유튜브 비디오를 요약하는 GPTs 를 만들었다.
혹시나 GPT 가 요점을 잘 못 잡을 수도 있기에 전체 스크립트가 들어있는 url 도 따로 제공 하게끔 만들었다.
아래는 "EBS 다큐프라임 [돈의 얼굴 1부 - 돈을 믿습니까?]" 유튜브 영상을 부탁한 예시이다.

위와 같이 나만의 API서버를 활용해서 action 을 만드는 방법은 아래 포스팅을 참고하자.
[GPTs]나만의 API서버로 독창적인 GPT Action 만들기
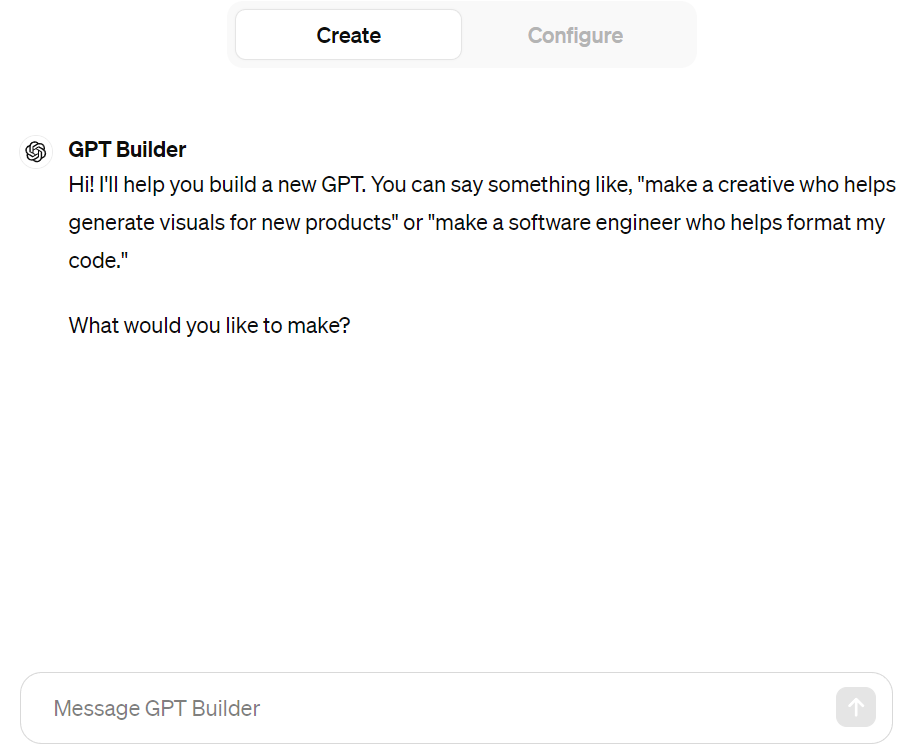
GPTs 들어가기
첫번째 화면
Explore GPTs -> Create

Create
이 부분은 GPT 와 상호작용하며 아래에서 설명할 Configure 등을 알아서 구성하게 만드는 부분이다.
GPT 가 알아서 구성하게 만드는 방법을 그렇게 신뢰하지는 않는 편이다.
그렇기에 아래에서 언급할 스키마를 "직접" 구성하는 방법도 다음 포스팅에 설명하겠다.
Configure
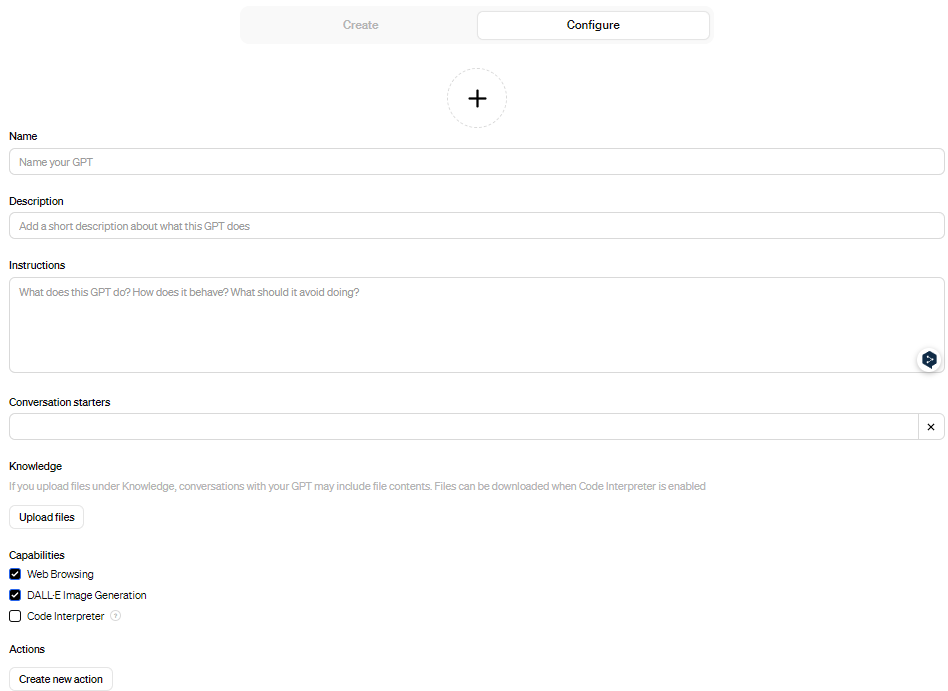
Name, Description, Conversation starters
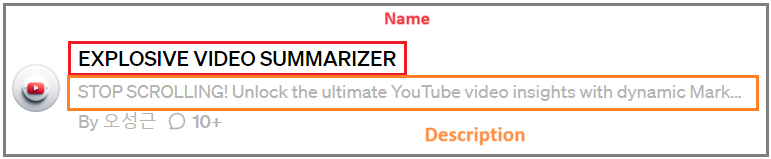
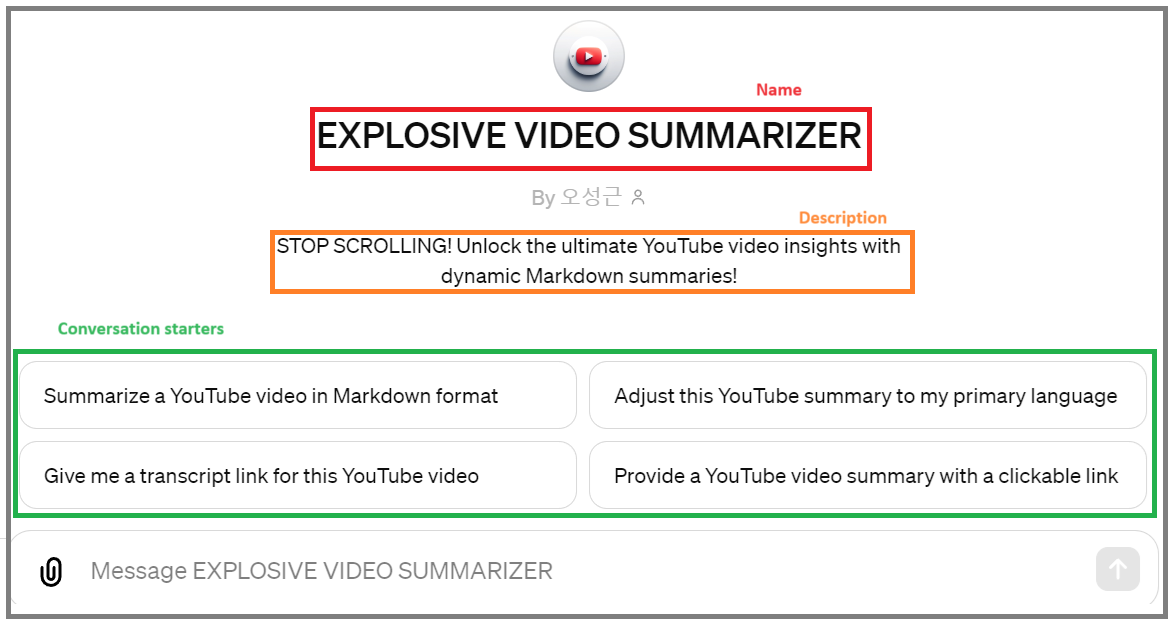
나의 GPTs 를 publish 하면 Name 과 Description 은 아래와 같이 사용 유저들을 위해 표기된다.
Name 에 특정 도메인명이 들어가면 마지막에 publish가 되지 않는다.
우회하는 방법이 있겠지만, 나는 그 방법을 몰라서 아래와 같이 VIDEO 로 적었다...
저 칸에 YouTube 를 적고 싶었다..
Instructions, Knowledge
이 두개가 뭐가 다른건지 헷갈리는 사람 분명히 있다.
뜨끔했는가? 그래서 묶어서 설명해주려한다.
두개 다 영어로 제공하는 것이 가장 퍼포먼스가 좋다고한다.
그리고 두개 다 구성하는 것이 디테일하고 전문적으로 표현하는데 도움이 된다.
- Instructions : GPT 동작 방식 지정
- Knowledge : 구체적인 추가 데이터 참조
Instructions
GPT 가 어떻게 동작해야하는지, 어떤 것을 피해야 하는지에 대한 지침 제공
[ 예시 ]
only provide answer in korean
response quick and accurately
response blog format using "#", "##", ">" in mark down
if there are many main points, using more "#" in mark down
summarize to the main points
if they ask it, provide url address what you refer to
if a topic is about wine, you need to refer 'Knowledge' files in priority
위는 그냥 지금 생각나는대로 적은 예시일 뿐이다.
문법 틀린 것이 있을 수 있으니 양해바란다.
위에서 차례대로
한국어로만 제공
빠르고 정확하게 답변
마크다운 블로그 형식으로 "#", "##", ">" 를 사용해서 응답
만약 주요 요점이 많을시, "#" 를 더 사용할 것
주요 요점들 위주로 요약
만약 묻는사람이 있다면, 너가 참조하는 url 주소를 제공
만약 주제가 와인에 관한 것이라면, 'Knowledge' 파일을 우선적으로 참조
Knowledge
Official doc 을 찾아보면 각 파일의 크기는 최대 512MB, 최대 20개 파일, 2,000,000 개의 토큰을 포함해서 첨부할 수 있다고 나온다.
하지만 어떤 글을 보니 750MB 의 텍스트파일까지도 허용된다고 한다.
그러나 직접 테스트해보기 전까지는 Official doc 만을 믿어라.Official : https://help.openai.com/en/articles/8843948-knowledge-in-gpts
사용가능한 파일 범위
- JSON, XLSX, PDF, HTM, TXT ...
복잡하게 구성하는 것은 성능을 많이 하향시킨다고 한다. 최대한 심플하게 하자.
"150mb Excelsheet 로 업로드 하는 것이 가장 뛰어났다"고 주장하는 어떤 글을 본적이 있다. 하지만 응답 속도도 느려졌다고 하더라.
대표적인 예시는 아래와 같은 파일들을 올릴 수 있다
- 사용하고 싶은 FAQ ( 자주묻는질문 ) 문서
- 헤더가 포함된 엑셀 데이터 셋 ( 헤더가 직관적이지 않다면, 헤더를 설명하는 .docx 도 같이 첨부 )
- JSON 과 같은 메타데이터 ( 위와 같이 따로 헤더 설명하는 .docx 를 첨부하지 않더라도 description 에 구성할 수 있기에 하나의 파일만 첨부할 수 있다 )
Capabilities
- Web Browsing : GPT 가 실시간으로 웹 검색 가능
- DALL-E Image Generation : 요청에 따라 DALL-E 이미지 생성을 해줌
- Code Interpreter : 사용자가 코드를 제공해주면 GPT가 대신 실행해서 return 해줌
Actions
위 Configure 의 가장 아래 Action 섹션의 create new action 을 눌러보자.
아래 이미지처럼 Weather(JSON) 을 누르면 날씨 예제 JSON 포맷형식이 나온다.
그러니까 위의 예시에 색깔을 매치해서 url 을 표기하면 아래와 같다.
https://weather.example.com/location?location=Seoul
디폴트 Weather JSON 스키마
{
  "openapi": "3.1.0",
  "info": {
    "title": "Get weather data",
    "description": "Retrieves current weather data for a location.",
    "version": "v1.0.0"
  },
  "servers": [
    {
      "url": "https://weather.example.com"
    }
  ],
  "paths": {
    "/location": {
      "get": {
        "description": "Get temperature for a specific location",
        "operationId": "GetCurrentWeather",
        "parameters": [
          {
            "name": "location",
            "in": "query",
            "description": "The city and state to retrieve the weather for",
            "required": true,
            "schema": {
              "type": "string"
            }
          }
        ],
        "deprecated": false
      }
    }
  },
  "components": {
    "schemas": {}
  }
}
operationId
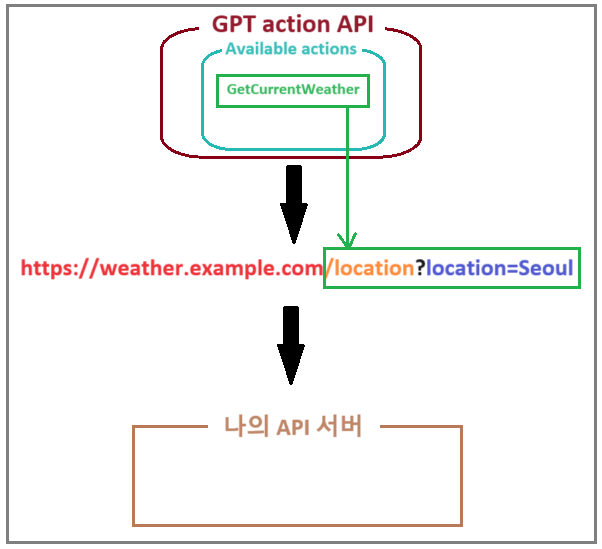
operationId 를 이해하기 위해 단편적인 아키텍처를 그려봤다. 참고로 하나의 키 ( 여기서는 GetCurrentWeather ) 에 여러개의 쿼리스트링도 가능하다.
하나의 키에 여러개의 쿼리스트링 예시 스키마
{
  "openapi": "3.1.0",
  "info": {
    "title": "Get weather data",
    "description": "Retrieves current weather data for a location.",
    "version": "v1.0.0"
  },
  "servers": [
    {
      "url": "https://weather.example.com"
    }
  ],
  "paths": {
    "/location": {
      "get": {
        "description": "Get temperature for a specific location",
        "operationId": "GetCurrentWeather",
        "parameters": [
          {
            "name": "city",
            "in": "query",
            "description": "The city to retrieve the weather for",
            "required": true,
            "schema": {
              "type": "string"
            }
          },
          {
            "name": "date",
            "in": "query",
            "description": "The date for the weather data in YYYY-MM-DD format",
            "required": false,
            "schema": {
              "type": "string",
              "format": "date"
            }
          },
          {
            "name": "unit",
            "in": "query",
            "description": "The unit of temperature (Celsius or Fahrenheit)",
            "required": false,
            "schema": {
              "type": "string",
              "enum": ["C", "F"]
            }
          }
        ],
        "deprecated": false
      }
    }
  },
  "components": {
    "schemas": {}
  }
}
스키마의 그 외 다른 key 에 대한 설명
- title : API 에 대한 타이틀
- Description : 섹션에 대한 설명을 자유롭게 작성
- get : HTTP 메소드 호출 형식
- get 대신에 post, put, delete, options 등 여러가지 형태로 사용가능
- in : 파라미터가 위치하는 곳 지정.
- query, header, path, cookie 형태로 작성
- required : 이 파라미터가 필수인지 여부
- true, false 형태로 적음
- schema | type : 해당 쿼리스트링에서 파라미터 값에 대한 타입
- deprecated : end-point 에 대한 사용 여부.
- true, false 형태로 적음.
- true 로 설정시, API 사용자에게 이 엔드포인트를 사용하지 말고 다른 대안을 찾도록 경고
- false 는 엔드포인트가 제대로 활성 중이라는 의미
- components | schemas : API 요청에 의해 return된 JSON 의 KEY 값에 대한 정의
- type, properties, description 키 구성을 할 수 있음
- 재사용성, 유지보수 용이, 명확한 문서화, 타입 안정성이 장점이다.
Components 에 대한 예시 ( 스킵 가능 )
{
  "openapi": "3.1.0",
  "info": {
    "title": "Get weather data",
    "description": "Retrieves current weather data for a location.",
    "version": "v1.0.0"
  },
  "servers": [
    {
      "url": "https://weather.example.com"
    }
  ],
  "paths": {
    "/location": {
      "get": {
        "description": "Get temperature for a specific location",
        "operationId": "GetCurrentWeather",
        "parameters": [
          {
            "name": "city",
            "in": "query",
            "description": "The city to retrieve the weather for",
            "required": true,
            "schema": {
              "type": "string"
            }
          },
          {
            "name": "date",
            "in": "query",
            "description": "The date for the weather data in YYYY-MM-DD format",
            "required": false,
            "schema": {
              "type": "string",
              "format": "date"
            }
          },
          {
            "name": "unit",
            "in": "query",
            "description": "The unit of temperature (Celsius or Fahrenheit)",
            "required": false,
            "schema": {
              "type": "string",
              "enum": ["C", "F"]
            }
          }
        ],
        "responses": {
          "200": {
            "description": "Successful response with weather data",
            "content": {
              "application/json": {
                "schema": {
                  "$ref": "#/components/schemas/WeatherResponse"
                }
              }
            }
          }
        },
        "deprecated": false
      }
    }
  },
  "components": {
    "schemas": {
      "WeatherResponse": {
        "type": "object",
        "properties": {
          "temperature": {
            "type": "number",
            "description": "Current temperature, formatted according to the specified unit (Celsius or Fahrenheit)"
          },
          "humidity": {
            "type": "number",
            "description": "Current humidity percentage"
          }
        }
      }
    }
  }
}
위와 같은 스키마로 구성되어있다고 가정하자.
https://weather.example.com/location?city=Seoul&date=2024-05-04&unit=C 로 서버에 데이터를 요청했다.
[ 응답 ]
{
  "temperature": 22.5,
  "humidity": 53
}
이제 스키마에 대한 설명을 하겠다
components | schemas의 "WeatherResponse" 부분은 신경쓰지 말자.
적당히 스키마 이름을 알아서 설계한 부분이다.
components 위쪽에 위치한 "responses" 부분의 schema 를 보자. $ref 가 보이는가???
components 아래에 정의한 타입 등을 참조하는 것이다.
사실 components 를 구성해도 안 해도 응답에 차이는 없다.
이 것은 개발자 입장에서 문서적으로 유지보수, 일관성, 다른 API 와 호환성에 용이하기 위해서 필요한 것일 뿐이다.
뭐 엄청난 action 을 만들 것도 아니고, 팀단위로 만들 것도 아니면 굳이 필요 없는 섹션이기도 하다.
조금 더 직관적인 예시를 제공하면 아래와 같다
{
  "paths": {
    "/users": {
      "get": {
        "summary": "Fetches all users",
        "responses": {
          "200": {
            "description": "A list of users",
            "content": {
              "application/json": {
                "schema": {
                  "$ref": "#/components/schemas/UserList"
                }
              }
            }
          }
        }
      }
    }
  },
  "components": {
    "schemas": {
      "UserList": {
        "type": "array",
        "items": {
          "$ref": "#/components/schemas/User"
        }
      },
      "User": {
        "type": "object",
        "properties": {
          "id": {
            "type": "integer"
          },
          "username": {
            "type": "string"
          }
        }
      }
    }
  }
}
Authentication
SSH 키가 필요하다면 여기에 적으면 된다. 하지만 그냥 API 요청을 하기 위한 것이라면 이 부분은 필요 없다.
Privacy policy
Privacy policy 는 API 사용정책을 넣는 곳이다. 사용정책이 포함된 url 을 적어 넣으면 된다. 따로 내가 외부 API를 사용하고 있는 것이 아니라면 그냥 openAPI 사용 정책을 넣으면 된다.
아래 url 복사해서 넣으면 됨