Recoil을 사용하여 실시간으로 알림 목록과 개수를 업데이트하는 기능을 구현해보려고 한다!
1. Atom 생성
먼저, 알림 데이터와 알림 개수를 관리하기 위한 두 개의 atom을 생성한다.
// Atom.js
export const noticeListState = atom({ // 알림 목록 상태 관리
  key: 'noticeListState',
  default: [],
});

export const noticeCountState = atom({ // 알림 개수 상태 관리
  key: 'noticeCountState',
  default: 0,
});
2. 상태 설정 및 데이터 처리
useSocketManager라는 커스텀 훅을 구현하여 이 훅 내에서 Recoil 상태를 설정하고, 알림 데이터를 처리한다.
// useSocketManager.jsx
import { useSetRecoilState } from 'recoil';
import { isConnectSocketState, noticeCountState, noticeListState } from '../recoil/Atom.js';
.
.
.

export function useSocketManager() {
  const setIsConnectSocketState = useSetRecoilState(isConnectSocketState);
  const setNoticeList = useSetRecoilState(noticeListState);
  const setNoticeCount = useSetRecoilState(noticeCountState);

  const getNotice = async () => {
    if (!getLoginUserId()) return;

    try {
      const responseData = await fetchNotification();
      if (responseData.success) {
        setNoticeList(responseData.data); // 전체 알림 데이터
        const newData = responseData.data.filter(
          (notice) => notice['Participants.status'] === 0
        );
        setNoticeCount(newData.length); // 새로운 알림 데이터 개수
      }
    } catch (error) {
      console.error(error);
    }
  };

  useEffect(() => {
    getNotice();
  }, []);
  .
  .
  .

}
2-1. 상태 설정 함수 가져오기
const setNoticeList = useSetRecoilState(noticeListState);
const setNoticeCount = useSetRecoilState(noticeCountState);
→ useSetRecoilState 훅을 사용하여 상태를 설정할 수 있는 함수 noticeListState, noticeCountState를 가져온다.
2-2. getNotice 함수 선언
const getNotice = async () => {→ 전체 알림 데이터와 새로운 알림 데이터 개수를 설정할 함수를 선언한다.
2-3. 알림 데이터 가져오기
const responseData = await fetchNotification();→ fetchNotification() 함수를 호출하여 서버로부터 전체 알림 데이터를 가져와 응답을 처리한다.
2-4. 데이터 세팅하기
setNoticeList(responseData.data); // 전체 알림 데이터
const newData = responseData.data.filter(
  (notice) => notice['Participants.status'] === 0
);
setNoticeCount(newData.length); // 새로운 알림 데이터 개수
→ 응답으로 받은 전체 알림 데이터를 setNoticeList에 설정하고, 사용자가 아직 확인하지 않은 (status가 '0'인) 알림 데이터의 개수를 setNoticeCount에 설정한다.
2-5. useEffect를 통한 getNotice 함수 실행
useEffect(() => {
  getNotice();
}, []);
→ useEffect 훅을 사용하여 컴포넌트가 마운트될 때 getNotice 함수를 실행한다.
3. 알림 리스트 및 이벤트 처리 구현
// Notice.jsx
import { useRecoilValue, useSetRecoilState } from 'recoil';
import { noticeCountState, noticeListState } from '../../recoil/Atom.js';
.
.
.

const Notice = () => {
  const noticeList = useRecoilValue(noticeListState); // 알림 리스트 상태
  const setPastNoticeList = useSetRecoilState(noticeListState); // 지난 알림 리스트
  const setNoticeCount = useSetRecoilState(noticeCountState); // 알림 카운트 상태
  .
  .
  .

  const noticeClickHandler = async (groupId, participantId) => {
  const participantIdString = JSON.stringify([participantId.toString()]);
  try {
    await UpdateNotificationStatus(participantIdString);

    setPastNoticeList((prev) => {
      return prev.map((notice) => {
        if (notice['Participants.participantid'] === participantId) {
          return { ...notice, 'Participants.status': 1 };
        } else {
          return notice;
        }
      });
    });
    setNoticeCount((prev) => prev - 1);

    navigate(`/postmain/${groupId}`);
  } catch (error) {
    console.error(error);
  }
};
3-1. 알림 상태 가져오기
const noticeList = useRecoilValue(noticeListState); // 알림 리스트 상태
const setPastNoticeList = useSetRecoilState(noticeListState); // 지난 알림 리스트
const setNoticeCount = useSetRecoilState(noticeCountState); // 알림 카운트 상태
→ useRecoilValue와 useSetRecoilState 훅을 사용하여 알림 리스트와 알림 카운트 상태를 가져온다.
3-2. noticeClickHandler 이벤트 핸들러 구현
사용자가 알림을 클릭했을 때 noticeClickHandler가 호출되고, 아래와 같이 실행된다.
await UpdateNotificationStatus(participantIdString);→ 알림 상태(사용자가 읽었는지, 안 읽었는지)를 서버에 업데이트한다.
setPastNoticeList((prev) => {
  return prev.map((notice) => {
    if (notice['Participants.participantid'] === participantId) {
      return { ...notice, 'Participants.status': 1 };
    } else {
      return notice;
    }
  });
});
→ 사용자가 알림을 클릭하여 읽었을 경우 해당 알림의 상태를 업데이트하여 지난 알림 리스트로 이동시킨다. 사용자가 클릭한 알림의 participantid와 일치하는 알림의 status를 '1'로 변경하여 읽은 상태로 설정한다.
setNoticeCount((prev) => prev - 1);→ 알림을 클릭한 경우 알림 개수를 1 감소시킨다.
navigate(`/postmain/${groupId}`);→ 사용자가 읽은 알림의 해당 상세 페이지로 이동시킨다.
4. 알림 카운트 표시 구현
새로운 알림이 있을 경우 알림 아이콘 옆에 뱃지가 표시되어 사용자에게 새로운 알림 유무를 알린다.
// footer.js
import { useRecoilValue } from 'recoil';
import { noticeCountState } from '../../recoil/Atom.js';

function Footer() {
  const noticeCount = useRecoilValue(noticeCountState);

  return (
	.
	.
	.

	<NoticeContainer>
    	<StyledNavLink to='/notice'>
      	<IconComponents iconType='inbox' stroke='#4C4C4C' width="23" height="23" viewBox="0 0 23 23" />
      		{noticeCount > 0 && <CountBadge>{noticeCount}</CountBadge>}
    	</StyledNavLink>
    </NoticeContainer>
4-1. 상태 값 가져오기
const noticeCount = useRecoilValue(noticeCountState);→ useRecoilValue 훅을 사용하여 noticeCountState로부터 카운트의 상태 값을 가져온다.
4-2. 알림 카운트 뱃지 설정
{noticeCount > 0 && <CountBadge>{noticeCount}</CountBadge>}→ noticeCount가 0 이상인 경우에만 noticeCount를 가져와 화면에 표시한다.
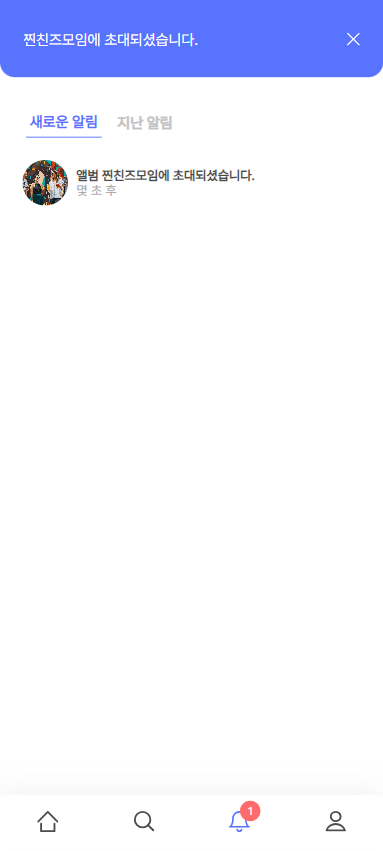
🔔 구현 화면