.png)
Netlify 등의 서비스에 Next.js 프로젝트를 배포하려면 프로젝트 빌드 후 export를 해주어야 한다. export는 정적 페이지를 내보내기 위한 커맨드이다. 정적 페이지로만 이루어져 있다면 next build && next export를 해주는 것만으로도 간단히 Netlify에 페이지를 배포할 수 있다.
next export allows you to export your app to static HTML, which can be run standalone without the need of a Node.js server.
링크
따라서 getServerSideProps 등의 SSR을 위한 기능을 사용하면 export에 실패한다.
// [id].tsx
function TestPage({ id }) {
  return <div>{id}</div>;
}

export const getServerSideProps = (ctx) => {
  const { id } = ctx.query;
  return { props: { id } };
};
export default TestPage;
getServerSideProps를 사용하는 SSR 페이지이다. 이런 페이지가 포함되어 있는 상태에서 next export하면,
Error occurred prerendering page "/[id]". Read more: https://nextjs.org/docs/messages/prerender-error
Error: Error for page /[id]: pages with `getServerSideProps` can not be exported. See more info here: https://nextjs.org/docs/messages/gssp-export
    at /Users/user/Project/react-mobile-web-boilerplate/node_modules/next/dist/export/worker.js:227:27
    at async Span.traceAsyncFn (/Users/user/Project/project-name/node_modules/next/dist/telemetry/trace/trace.js:60:20)
이런 에러가 발생한다.
그래서 Netlify에서 Next.js를 위한 빌드 플러그인을 제공한다. 이 링크로 들어가면 원하는 프로젝트에 플러그인을 설치할 수 있다.
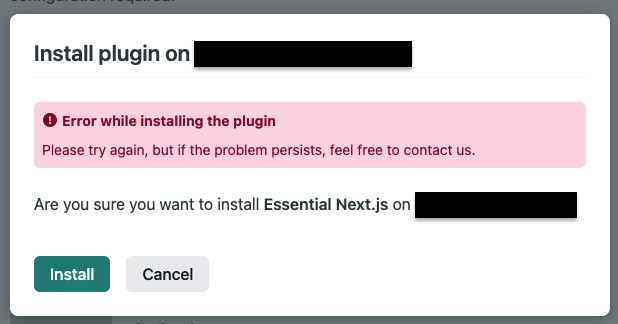
하지만 오류가 발생하고...
이렇게 Netlify UI에서 오류가 발생한다면 프로젝트 내에서 직접 플러그인 설정을 해줄 수 있다.
1. netlify.toml 파일 생성
[build]
  command = "npm run build"
  publish = "out"

[[plugins]]
  package = "@netlify/plugin-nextjs"
2. 플러그인 라이브러리 설치
npm install --save @netlify/plugin-nextjs또는
yarn add @netlify/plugin-nextjs참고
- netlify-plugin-nextjs 깃허브
- 원래는 플러그인이 아니라 next-on-netlify라는 npm 패키지가 있었고, 이때는 next.js의 서버를 serverless로 바꾸어 빌드해서 배포했다고 한다. 이 방법을 쓰면 next-on-netlify 실행 중에
Error: Cannot find module 'next/dist/next-server/server/config'에러가 발생하기도 했고, 플러그인을 사용하는 편이 더 간단해서 플러그인을 사용했다. 더 자세한 내용은 NextJS on Netlify with SSR

https://oooooroblog.com 으로 이사갔어요