spotify api access_token 얻기 로그인 기능 구현하기 (프론트엔드에서 구현, supabase)
음악을 소재로 프로젝트를 진행하기로 마음먹고 여러 음악 api를 찾아봤을 때 처음에는 soundcloud의 api를 사용하려고 했는데, api 신청을 위한 공식사이트의 구글폼을 확인했더니 더이상 제공하지않는다는 글을 보고 Spotify API를 사용하기로 했다.
https://developer.spotify.com/documentation/web-api/tutorials/getting-started
위의 공식문서 자료를 보고 순서대로 하면 access_token을 얻을 수 있다.
1. CREAR AN APP

Spotify API를 내 프로젝트에서 사용하기 위해서는 Client ID및 Client Secret를 발급받아야 한다.
공식 사이트의 Dashboard에서 'CREATE AN APP' 버튼을 눌러 앱을 생성하면 키 값을 얻을 수 있다.
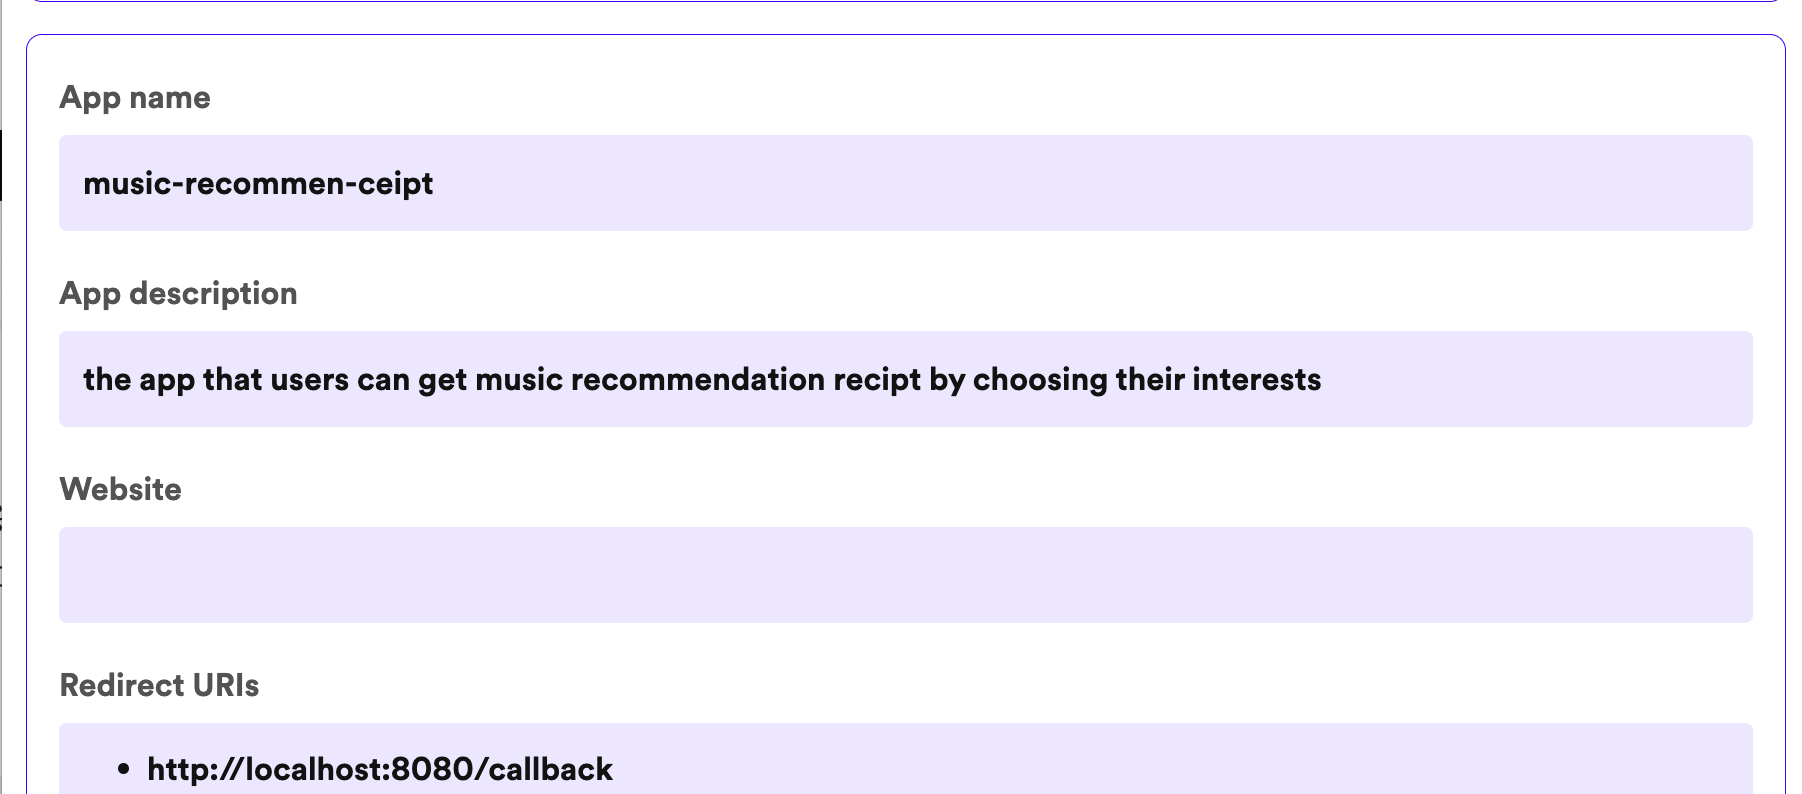
Redirect URI는 일단 http://localhost:8080/callback 로 설정했고, Dashboard에서 나중에 수정 및 추가가 가능하다.
2. access_token 발급

Spotify Web API는 OAuth 2.0 방식으로 되어있다. 리소스에 접근하기 위해선 access_token이 필요했기 때문에 위 이미지와 같은 Client Credentials Grant 방식으로 받아왔다. 아래 로직은 Getting started with Web API를 보고 작성했다.
import axios from 'axios';

const BASE_URL = 'https://accounts.spotify.com/api/token';

export const getAccessToken = async () => {
  const authParam = {
    grant_type: 'client_credentials',
    client_id: import.meta.env.VITE_SPOTIFY_CLIENT_ID,
    client_secret: import.meta.env.VITE_SPOTIFY_CLIENT_SECRET,
  };

  try {
    const res = await axios.post(BASE_URL, new URLSearchParams(authParam).toString(), {
      headers: {
        'Content-Type': 'application/x-www-form-urlencoded',
      },
    });
    window.localStorage.setItem('token', res.data.access_token);
    return res.data;
  } catch (error) {
    console.error(error);
    throw error;
  }
};
이 로직으로는 access_token만 가져올 수 있다!!
음악 추천 서비스를 만들기 위해 사용할 api는 해당 access_token만 있어도 구현할 수 있지만, 음악 재생 기능 및 커뮤니티를 만들기 위해서는 해당 토큰만으로는 기능을 구현할 수 없다!
사용자가 로그인해야 사용할 수 있는 기능(유저 프로필, 음악 재생 등)들은 아래와 같은 Authorization Code Grant 방식으로 가져온 access_token과 refresh_token이 필요하다.
3. 로그인 기능 구현 (access_token, refresh_token 얻기)
공식문서의 Authorization Code Tutorial과 spotify의 github의 express 프레임워크를 사용한 예제 코드를 뜯어보며 이해할 수 있었다.
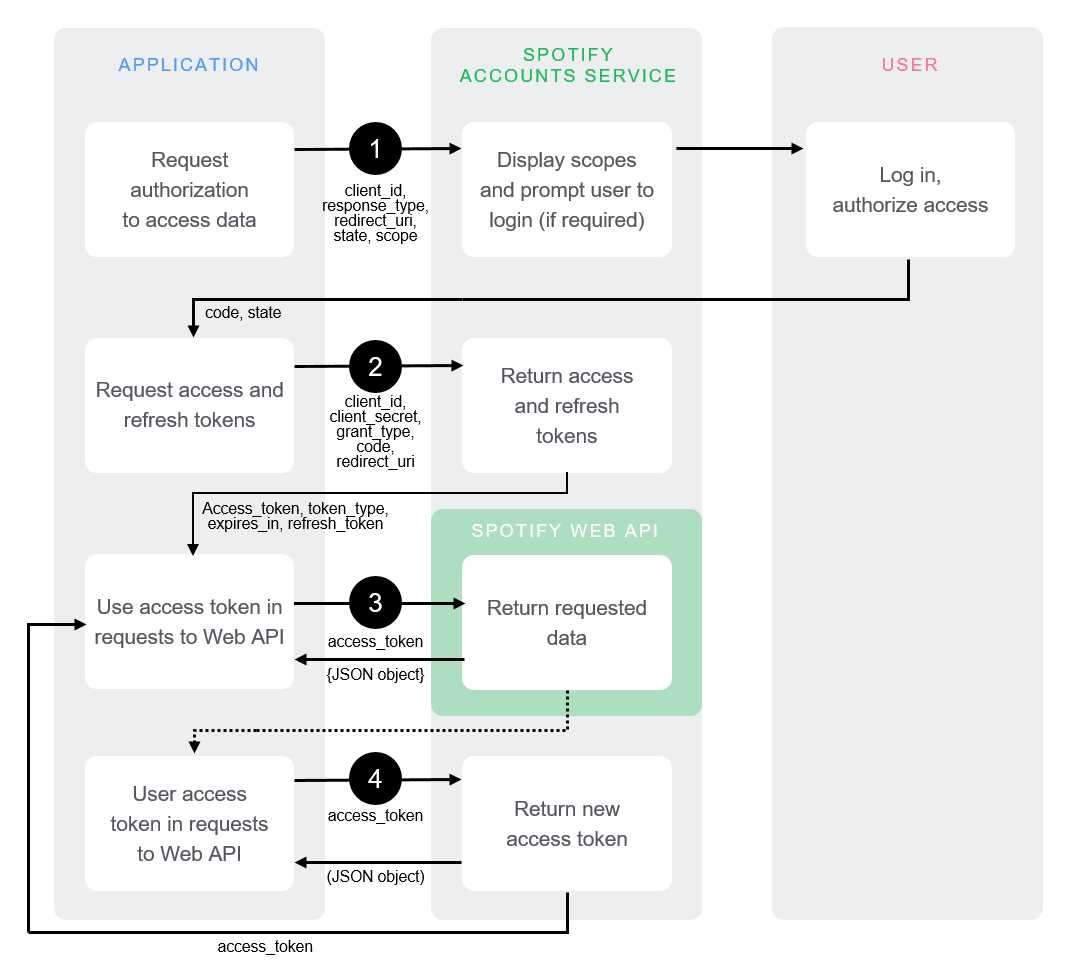
APPLICATION = 우리가 지금 만들고 있는 앱을 의미한다
USER = 우리 앱에 로그인하려는 유저를 의미한다.
예제 로직의 흐름을 보자면 (사용자 🩷 / 개발자 🩵 / 스포티파이 💚)
- 🩷: 로그인 버튼을 눌러 로그인을 요청한다.
- 🩵: ❶의 값들과 함께 사용자를 Spotify 로그인 URL로 보낸다.
- 🩷: 사용자는 Spotify 페이지에서 로그인하고 권한을 부여한다.
- 💚: redirect URL로 설정된 우리 앱의
/callbackURL로 이동시킨다. - 🩵: 이때 우리는
code,state를 전달받는다. - 🩵:
code,state를 포함한 ❷의 값들로 다시 spotify api에 요청해서access_token,refresh_token를 받을 수 있다.
코드와 함께보자면
- 사용자는 로그인 버튼을 눌러 로그인을 요청한다.
<a href="/login" class="btn btn-primary">Log in with Spotify</a>- 개발자는 ❶의 값들과 함께 사용자를 Spotify 로그인 URL로 보낸다.
// login 엔드포인트로의 GET 요청을 처리
app.get('/login', function (req, res) {
   // 생성된 'state'를 'spotify_auth_state'라는 이름의 쿠키에 저장 (CSRF공격을 방지하기 위해 사용)
  var state = generateRandomString(16);
  res.cookie(stateKey, state);

  // 사용자에게 요청할 권한(scope)을 정의합니다.
  var scope = 'user-read-private user-read-email';

  // 사용자를 Spotify 인증 URL로 보냄
  res.redirect(
    'https://accounts.spotify.com/authorize?' +
      querystring.stringify({
        response_type: 'code', // 인증 코드 플로우를 지정합니다.
        client_id: client_id,
        scope: scope, //권한
        redirect_uri: redirect_uri,
        state: state, //보안을 위해 생성된 랜덤 state
      })
  );
});- 사용자는 위 로직에서 리턴된 Spotify authorize 페이지에서 로그인하고 권한을 부여한다.
- 권한이 부여되면 spotify가 redirect URL로 설정된 우리 앱의
/callbackURL로 이동시킨다.
- 이때 개발자는
code,state를 전달받는다.
app.get('/callback', function (req, res) {

  var code = req.query.code || null;
  var state = req.query.state || null;
  var storedState = req.cookies ? req.cookies[stateKey] : null;
...code,state과 함께 ❷의 값들로 다시 spotify api에 요청해서access_token,refresh_token를 받을 수 있다.
app.get('/callback', function (req, res) {

  var code = req.query.code || null;
  var state = req.query.state || null;
  var storedState = req.cookies ? req.cookies[stateKey] : null;

  if (state === null || state !== storedState) {
    //state_mismatch 에러처리 로직...
  } else {
    //쿠키 클리어
    res.clearCookie(stateKey);
    //post 옵션 지정
    var authOptions = {
      url: 'https://accounts.spotify.com/api/token',
      form: {
        code: code,
        redirect_uri: redirect_uri,
        grant_type: 'authorization_code',
      },
      headers: {
        'content-type': 'application/x-www-form-urlencoded',
        Authorization:
          'Basic ' + new Buffer.from(client_id + ':' + client_secret).toString('base64'),
      },
      json: true,
    };

     //post 옵션과 함께 포스트 요청
    request.post(authOptions, function (error, response, body) {

      //요청 성공시 access_token, refresh_token 얻기 성공!
      if (!error && response.statusCode === 200) {
        var access_token = body.access_token,
          refresh_token = body.refresh_token;
      }
});- 이제
access_token,refresh_token를 사용해서 사용자 정보 얻기 등의 Spotify Web API에 접근할 수 있다!
        // access token을 사용해 Spotify Web API의 사용자 정보 얻기
        var options = {
          url: 'https://api.spotify.com/v1/me',
          headers: { Authorization: 'Bearer ' + access_token },
          json: true,
        };

        request.get(options, function (error, response, body) {
          console.log(body);
        });
4. 프론트에서 spotify 로그인 로직 구현하기
위의 로직은 OAuth 2.0에 해당하는, 로그인을 다른 웹사이트로 위임하는 사용자 인증 방식 방식으로, 위 예제에서 express를 사용했듯이 Back의 로직이 필요하다.
따라서 Next.js 공부 겸 사용할 수도 있지만, 팀원 모두 Next.js가 초면인 상황에서 프론트 3명이서 3주 프로젝트에 이를 도입하기 망설여졌다.
이때 공식문서의 PKCE방식의 tutorial을 보고, Back의 로직이 사용되지 않고 Front단에서 구현이 가능하다는 이야기를 듣고 해당 로직으로 구현하기로 했다.
이 역시 github의 예제와 함께 이해할 수 있었다!
여기서 OAuth 2.0 PKCE는 간단히 말해서 Authorization Code Grant 방식에서 Client Secret을 이용하던 것을 일회용 암호(code_verifier, code_challenge )를 이용하는 것으로 변경한 것이다.
이 블로그 글을 보면 OAuth 2.0와 OAuth 2.0 PKCE의 차이에 대해 이해할 수 있다.
어쩌다보니 supabase
PKCE 로직을 다 이해한 뒤 이를 사용하려 했지만, 서비스를 추가적으로 기획하면서 커뮤니티를 위한 DB가 필요해졌고 백없이 DB를 다룰 수 있는 supabase를 사용하기로 결정되었다.
처음에는 spotify token을 얻는 로직과 supabase에서 spotify로 로그인했하는 로직을 따로 구현해야하나 했는데, supabase로 로그인했더니 provider_token과 provider_refresh_token값으로 제공해주고 있었다.
살짝 허무해졌긴하지만 그래도 일련의 과정을 통해 공부한게 많아서 재밌고 좋았다!!😊
supabase에서 refresh_token 자동화
현재로서 궁금한 건
supabase로 로그인한 상태에서는 spotify 공식문서의 refresh_token을 얻는 방식으로 요청해봤는데 오류는 없으나 Response가 refresh_token을 제외한 새로운 access_token값만 전달해준다. 🤔 왜일까.
(참고로 PKCE 방식으로 요청 시 오류가 발생하는 걸 보니 supabase에서는 OAuth2.0 방식으로 token을 얻는 듯하다.)
supabase에서 토큰을 리프래시하는 로직이 있나 확인하기 위해 Docs를 읽어도 Session에 대한 글을 읽어보면 세션을 종료하는 상황과 해당방식이 보안에 좋은 장점에 대해 이야기하고 있다.
실제로 spotify로 supabase에 로그인 했을 때 supabase에 대한 access_token과 refresh_token을 반환하면서 이에 대한 만료기한 역시 스포티파이와 마찬가지로 1시간이었기에 supabase와 spotify 둘다 refresh Token이 필요한 상황이다.
결론적으로 따로 토큰을 리프래시하는 로직이 따로 존재하지않는 듯하다. 하지만 로그인한 상태에서 로그인 로직을 다시 실행시키면 새 access_token과 refresh_token을 반환한다! 따라서 현재로서는 사용자가 1시간 이상 사용했을 때 toast를 띄워 안내 후 재로그인을 시키거나, tokenVaild 로직을 구현해 자동으로 재로그인하도록 할 예정이다.
https://developer.spotify.com/documentation/web-api/tutorials/getting-started
https://supabase.com/docs/guides/auth/sessions#frequently-asked-questions
https://supabase.com/docs/guides/auth/social-login/auth-spotify
https://kang-ju.tistory.com/entry/Spotify-API-%EC%82%AC%EC%9A%A9%EA%B8%B01-%EC%95%B1-%EC%83%9D%EC%84%B1-%EB%B0%8F-%EB%A1%9C%EA%B7%B8%EC%9D%B8-%EA%B8%B0%EB%8A%A5-%EA%B5%AC%ED%98%84#%EC%95%B1%20%EC%83%9D%EC%84%B1-1
https://velog.io/@eunddodi/Spotify-%EC%86%8C%EC%85%9C-%EB%A1%9C%EA%B7%B8%EC%9D%B8-%ED%95%98%EA%B8%B0-1%ED%8E%B8
https://velog.io/@entry_dsm/%EB%A1%9C%EA%B7%B8%EC%9D%B8-%EB%82%9C-%EB%B6%80%EB%9F%BD%EC%A7%80%EA%B0%80-%EC%95%8A%EC%96%B4

Hi, I don't understand Korean so was only able to read your article via google translate.
Thank you for this great writeup!
Regarding the last section of your article, I've encountered a similar issue using the official Spotify Typescript Web API SDK (https://github.com/spotify/spotify-web-api-ts-sdk).
Due to Supabase and Spotify being separate entities, It was hard to figure out how to authenticate properly with the "provider_token" and "provider_refresh_token" returned by the Supabase session. I was unsure which of the four grant types/flows Supabase was using to acquire those tokens.
Reading through this issue in the official repository (https://github.com/spotify/spotify-web-api-ts-sdk/issues/79) helped me a lot. One of the commenters even forked the official repo to merge his fix (for non-PKCE flow).
I'm still trying to find a way to auto refresh the token after expiry (1 hour), love to hear your thoughts on it.
Hope this can provide some insights and keep up the good work. Cheers!