0. CRA사용하기
create-reacta-app을 사용하면 어려운 세팅없이 바로 리액트를 사용할 수 있다. appName에는 폴더이름을 작성하면 된다. 필자는 보통 client로 이름을 지정한다.
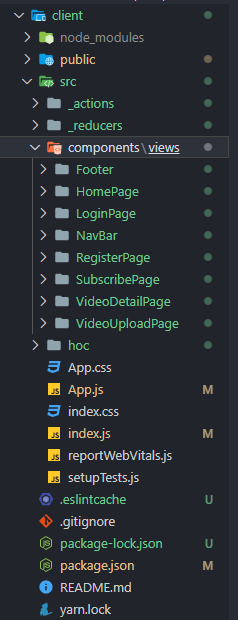
npx create-react-app appName0. 폴더구조
핵심은 _actions, _reducers, component/views, hoc다.
0. 사용하는 모듈
원래 Material-UI를 사용했었는데 이번 프로젝트에서 react-bootstrap을 사용하게 되어서 이를 사용했다.
1. redux초기 세팅하기
index.js에서 redux를 사용할 수 있도록 초기세팅을 한다. createStore과 applyMiddleware를 함께 사용해서 redux 익스텐션과 promise, thunk를 사용할 수 있도록 한다.
Provider로 컴포넌트를 감싸주고 store를 만든다. 이후 인자로 리듀서와 사용할 익스텐션을 넣는다.
import React from "react";
import ReactDOM from "react-dom";
import "./index.css";
import App from "./App";
import reportWebVitals from "./reportWebVitals";
import { createStore, applyMiddleware } from "redux";
import { Provider } from "react-redux";
import reduxThunk from "redux-thunk";
import reduxPromise from "redux-promise";
import Reducer from "./_reducers";

const createStoreWithMiddleware = applyMiddleware(
  reduxThunk,
  reduxPromise
)(createStore);

ReactDOM.render(
  <React.StrictMode>
    <Provider
      store={createStoreWithMiddleware(
        Reducer,
        window.__REDUX_DEVTOOLS_EXTENSION__ &&
          window.__REDUX_DEVTOOLS_EXTENSION__()
      )}
    >
      <App />
    </Provider>
  </React.StrictMode>,
  document.getElementById("root")
);

reportWebVitals();
루트 리듀서는 combineReducers를 사용해서 만든다. 여기 리듀서들이 들어간다.
import { combineReducers } from "redux";
//import user from "./user_reducer";

const rootReducer = combineReducers({
  //user
});

export default rootReducer;
3. 로그인과 회원가입 컴포넌트를 만든다
여기서 주의해야할 점은 redux를 통해 만들어서 전역에서 user정보를 가져올 수 있게 해야 한다느 것이다. 그 외는 다 쉽다. 고로 action 함수와 reducer만 작성하겠다.
import { LOGIN_USER, REGISTER_USER, AUTH_USER } from "./types";
import axios from "axios";

export const loginUser = (loginData) => {
  //객체를 넣었는데 어떻게 된건지 확인하기ㅏ
  const request = axios
    .post("/api/users/login", loginData)
    .then((response) => response.data);
  return {
    type: LOGIN_USER,
    payload: request,
  };
};

export const registerUser = (registerData) => {
  const request = axios
    .post("/api/users/register", registerData)
    .then((response) => response.data);
  return {
    type: REGISTER_USER,
    payload: request,
  };
};

export const authUser = () => {
  const request = axios
    .get("/api/users/auth")
    .then((response) => response.data);
  return {
    type: AUTH_USER,
    payload: request,
  };
};
import { LOGIN_USER, REGISTER_USER, AUTH_USER } from "../_actions/types";
export default function (state = {}, actions) {
switch (actions.type) {
case LOGIN_USER:
return { ...state, success: actions.payload };
break;
case REGISTER_USER:
return { ...state, success: actions.payload };
break;
case AUTH_USER:
return { ...state, userData: actions.payload };
break;
default:
return state;
break;
}
}
4. auth hoc를 만든다.
import { useEffect } from "react";
import { authUser } from "../_actions/user_action";
import { useDispatch } from "react-redux";
//null 아무나 가능
//false 로그인한면 접근 불가능
//true 로그읜 해야 가능

function withAuthHoc(WrappedComponents, option, adminRoute = null) {
  const AuthenticationCheck = (props) => {
    const dispatch = useDispatch();
    useEffect(() => {
      dispatch(authUser()).then((response) => {
        //Not Loggined in Status
        if (!response.payload.isAuth) {
          if (option) {
            props.history.push("/login");
          }
          //Loggined in Status
        } else {
          //adminRoute이 false면 자기를 return 한다. 즉 그냥 렌더링한다
          //adminRoute을 true로 설정했는데 idAdmin이 false면 /으로 보낸다.
          if (adminRoute && !response.payload.isAdmin) {
            props.history.push("/");
          }
          //Logged in Status, but Try to go into log in page
          else {
            if (option === false) {
              props.history.push("/");
            }
          }
        }
      });
    }, []);
    return <WrappedComponents {...props} />;
  };
  return AuthenticationCheck;
}

export default withAuthHoc;
props를 사용하게 되면 withRouter로 감싸주는 것을 잊지 말아야 한다. 이후 auth hoc를 다른 컴포넌트에 연결해준다.

블로그 이전 했습니다: https://techpedia.tistory.com