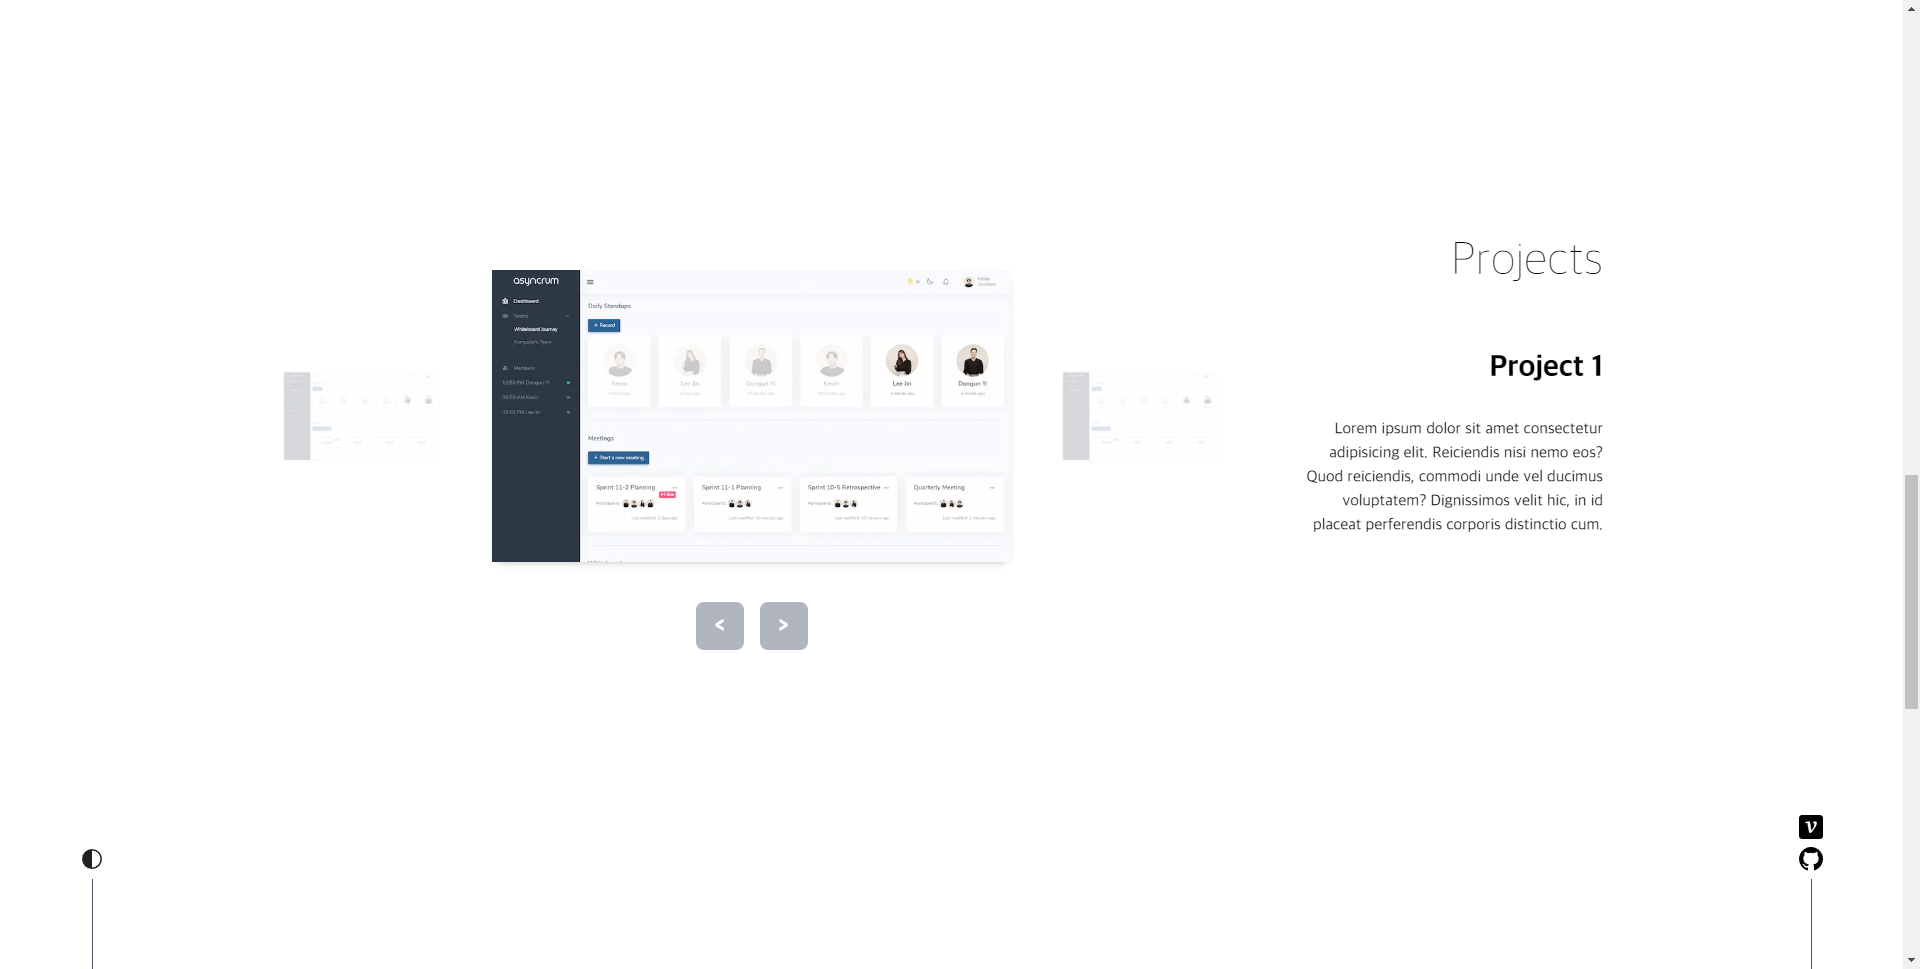
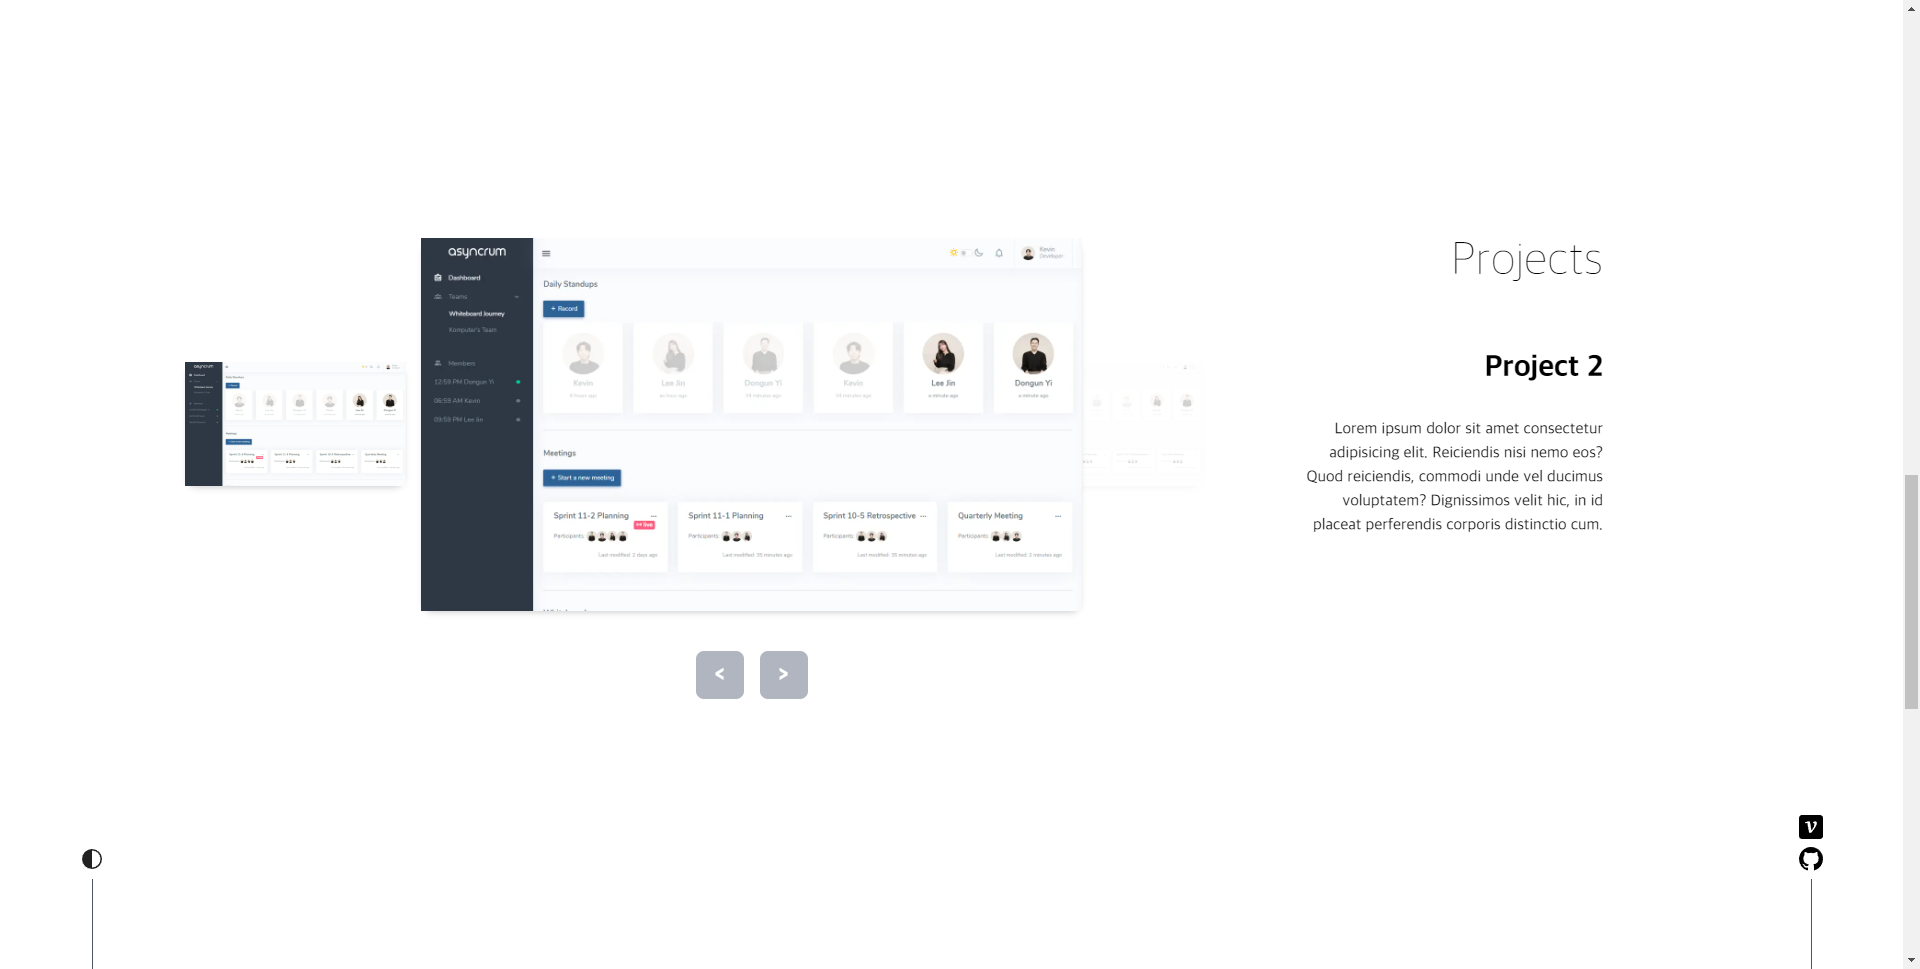
Project
화면 왼쪽에는 프로젝트 프리뷰 사진, 오른쪽에는 프로젝트 이름과 설명을 보여줄 것이다.
Carousel을 직접 구현하면서 Framer Motion을 써보겠다고 시간이 꽤 걸렸다.
기초 공사
가장 먼저 Project 타입과 더미 데이터를 만들어줬다.
// components/Contents/Projects/types.ts

export interface Project {
  id: number;
  title: string;
  description: string;
  previewImage: string;
  url: string;
}
// components/Contents/Projects/data.ts

import { Project } from './types';

export const projectData: Project[] = [
  {
    id: 1,
    title: 'Project 1',
    description:
      'Lorem ipsum dolor sit amet consectetur adipisicing elit. Reiciendis nisi nemo eos? Quod reiciendis, commodi unde vel ducimus voluptatem? Dignissimos velit hic, in id placeat perferendis corporis distinctio cum.',
    previewImage: '/images/preview_asyncrum.png',
    url: 'https://github.com',
  },
  {
    id: 2,
    title: 'Project 2',
    description:
      'Lorem ipsum dolor sit amet consectetur adipisicing elit. Reiciendis nisi nemo eos? Quod reiciendis, commodi unde vel ducimus voluptatem? Dignissimos velit hic, in id placeat perferendis corporis distinctio cum.',
    previewImage: '/images/preview_asyncrum.png',
    url: 'https://github.com',
  },
  {
    id: 3,
    title: 'Project 3',
    description:
      'Lorem ipsum dolor sit amet consectetur adipisicing elit. Reiciendis nisi nemo eos? Quod reiciendis, commodi unde vel ducimus voluptatem? Dignissimos velit hic, in id placeat perferendis corporis distinctio cum.',
    previewImage: '/images/preview_asyncrum.png',
    url: 'https://github.com',
  },
  {
    id: 4,
    title: 'Project 4',
    description:
      'Lorem ipsum dolor sit amet consectetur adipisicing elit. Reiciendis nisi nemo eos? Quod reiciendis, commodi unde vel ducimus voluptatem? Dignissimos velit hic, in id placeat perferendis corporis distinctio cum.',
    previewImage: '/images/preview_asyncrum.png',
    url: 'https://github.com',
  },
];
Project 메인 컴포넌트
메인 wrapper를 flex로 만들어 왼쪽엔 Carousel, 오른쪽엔 텍스트 공간을 만들었다.
// components/Contents/Projects/Projects.tsx

import { useState } from 'react';
import ContentWrapper from '../ContentWrapper';
import Carousel from './Carousel';
import ProjectText from './ProjectText';
import { projectData } from './data';

const Projects = () => {
  const [activeIndex, setActiveIndex] = useState(0);

  return (
    <ContentWrapper style="flex justify-between">
      <Carousel projects={projectData} activeIndex={activeIndex} setActiveIndex={setActiveIndex} />
      <div className="mr-[100px] max-w-[300px] text-right">
        <h1 className="mb-16 text-5xl font-thin">Projects</h1>
        <ProjectText projects={projectData} activeIndex={activeIndex} />
      </div>
    </ContentWrapper>
  );
};

export default Projects;
텍스트
특별한 건 없이 About에서와 비슷하게 구현했다.
// components/Contents/Projects/ProjectText.tsx

import { Project } from './types';

interface Props {
  projects: Project[];
  activeIndex: number;
}

const ProjectText = (props: Props) => {
  const { projects, activeIndex } = props;

  return (
    <>
      <p className="mb-8 text-3xl font-extrabold">{projects[activeIndex].title}</p>
      <p className="font-base mb-8">{projects[activeIndex].description}</p>
    </>
  );
};

export default ProjectText;
Carousel
Framer Motion을 처음 써보는 거라 많이 헤맸다.
리팩토링이 필요해보이는데 이미 시간이 많이 늦어서 오늘은 어려울 것 같다 (새벽 4시).
// components/Contents/Projects/Carousel.tsx

import { AnimatePresence, motion, Variants } from 'framer-motion';
import { useState } from 'react';
import PageButton from './PageButton';
import ProjectCard from './ProjectCard';
import { Project } from './types';

interface Props {
  projects: Project[];
  activeIndex: number;
  setActiveIndex: React.Dispatch<React.SetStateAction<number>>;
}

const Carousel = (props: Props) => {
  const { projects, activeIndex, setActiveIndex } = props;

  const [currentDirection, setCurrentDirection] = useState(1);

  const positions = ['left', 'center', 'right'];

  const visibleItems = [...projects, ...projects].slice(
    activeIndex === 0 ? activeIndex + projects.length - 1 : activeIndex - 1,
    activeIndex === 0 ? activeIndex + projects.length + 2 : activeIndex + 2,
  );

  const variants: Variants = {
    enterExit: { scale: 0, opacity: 0 },
    center: ({ position }) => {
      let xVal = 0;

      if (position === 'left') xVal = 100;
      if (position === 'right') xVal = -100;

      return {
        scale: 1,
        zIndex: position === 'center' ? 1 : 0,
        x: xVal,
        opacity: position === 'center' ? 1 : 0.2,
      };
    },
    hover: ({ position }) => {
      let xVal = 0;

      if (position === 'left') xVal = -15;
      if (position === 'right') xVal = 15;

      return { opacity: 1, x: xVal, transition: { duration: 0.5 } };
    },
  };

  const handleClick = (direction: number) => {
    setActiveIndex((prevIndex) => {
      let nextIndex = prevIndex + direction;

      if (nextIndex < 0) return projects.length - 1;
      if (nextIndex === projects.length) return 0;
      return nextIndex;
    });
    setCurrentDirection(direction);
  };

  return (
    <div className="flex flex-col items-center">
      <div className="mb-8 flex items-center">
        <AnimatePresence mode="popLayout" initial={false}>
          {visibleItems.map((project) => {
            const position = positions[visibleItems.indexOf(project)];
            return (
              <motion.div
                className={`flex h-fit min-w-0 items-center justify-center rounded-xl shadow-md ${position === 'center' ? 'w-3/5' : 'w-1/5'} `}
                key={project.title}
                layout
                custom={{
                  position,
                  currentDirection,
                }}
                variants={variants}
                initial="enterExit"
                animate="center"
                exit="enterExit"
                whileHover="hover"
                transition={{ duration: 0.8 }}
              >
                <ProjectCard project={project} position={position} handleClick={handleClick} />
              </motion.div>
            );
          })}
        </AnimatePresence>
      </div>
      <div className="buttons">
        <PageButton direction={-1} text="<" handleClick={handleClick} />
        <PageButton direction={1} text=">" handleClick={handleClick} />
      </div>
    </div>
  );
};

export default Carousel;
Carousel 리턴문의 map 안에 있는 motion.div를 통째로 ProjectCard로 만들어서 뺐더니 모션 버그가 생겨서 우선은 아래와 같이 구현해놨다.
원래는 ProjectCard가 WithLink 안에 있는 코드 뿐이었는데, 가운데가 아닌 옆에 있는 카드를 클릭해도 링크로 이동되는게 불편하기도 하고 직관적이지 않다고 생각했다. 기왕 바꾸는 김에 뭔가 더 생동감 있는 애니메이션을 주고 싶어서 Carousel에 hover variant도 만들어서 붙여줬다.
같은 프로젝트에 여러 개의 preview를 넣을 수 있게 하는 방법도 고려중이다.
// components/Contents/Projects/ProjectCard.tsx

import { motion } from 'framer-motion';
import Image from 'next/image';
import Link from 'next/link';
import { Project } from './types';

interface Props {
  project: Project;
  position: string;
  handleClick: (direction: number) => void;
}

const ProjectCard = (props: Props) => {
  const { project, position, handleClick } = props;
  const { title, previewImage, url } = project;

  const WithLink = () => {
    return (
      <Link href={url}>
        <Image src={previewImage} alt={title} width="800" height="450" />
      </Link>
    );
  };

  const WithButton = () => {
    return (
      <Image src={previewImage} alt={title} width="800" height="450" onClick={() => handleClick(position === 'left' ? -1 : 1)} className="cursor-pointer" />
    );
  };

  return <motion.div>{position === 'center' ? <WithLink /> : <WithButton />}</motion.div>;
};

export default ProjectCard;
페이지 버튼은 테스트하면서 사용했었는데 별로 마음에 안 들어서 추후 디자인을 바꾸든 없애든 조치를 취할 것이다.
// components/Contents/Projects/PageButton.tsx

import { motion } from 'framer-motion';

interface Props {
  direction: number;
  text: string;
  handleClick: (direction: number) => void;
}

const PageButton = (props: Props) => {
  const { text, direction, handleClick } = props;

  return (
    <motion.button
      whileTap={{ scale: 0.9 }}
      onClick={() => handleClick(direction)}
      className="m-2 h-12 w-12 rounded-lg border-transparent bg-gray-400 p-2 text-xl font-black text-white opacity-80"
    >
      {text}
    </motion.button>
  );
};

export default PageButton;
결과
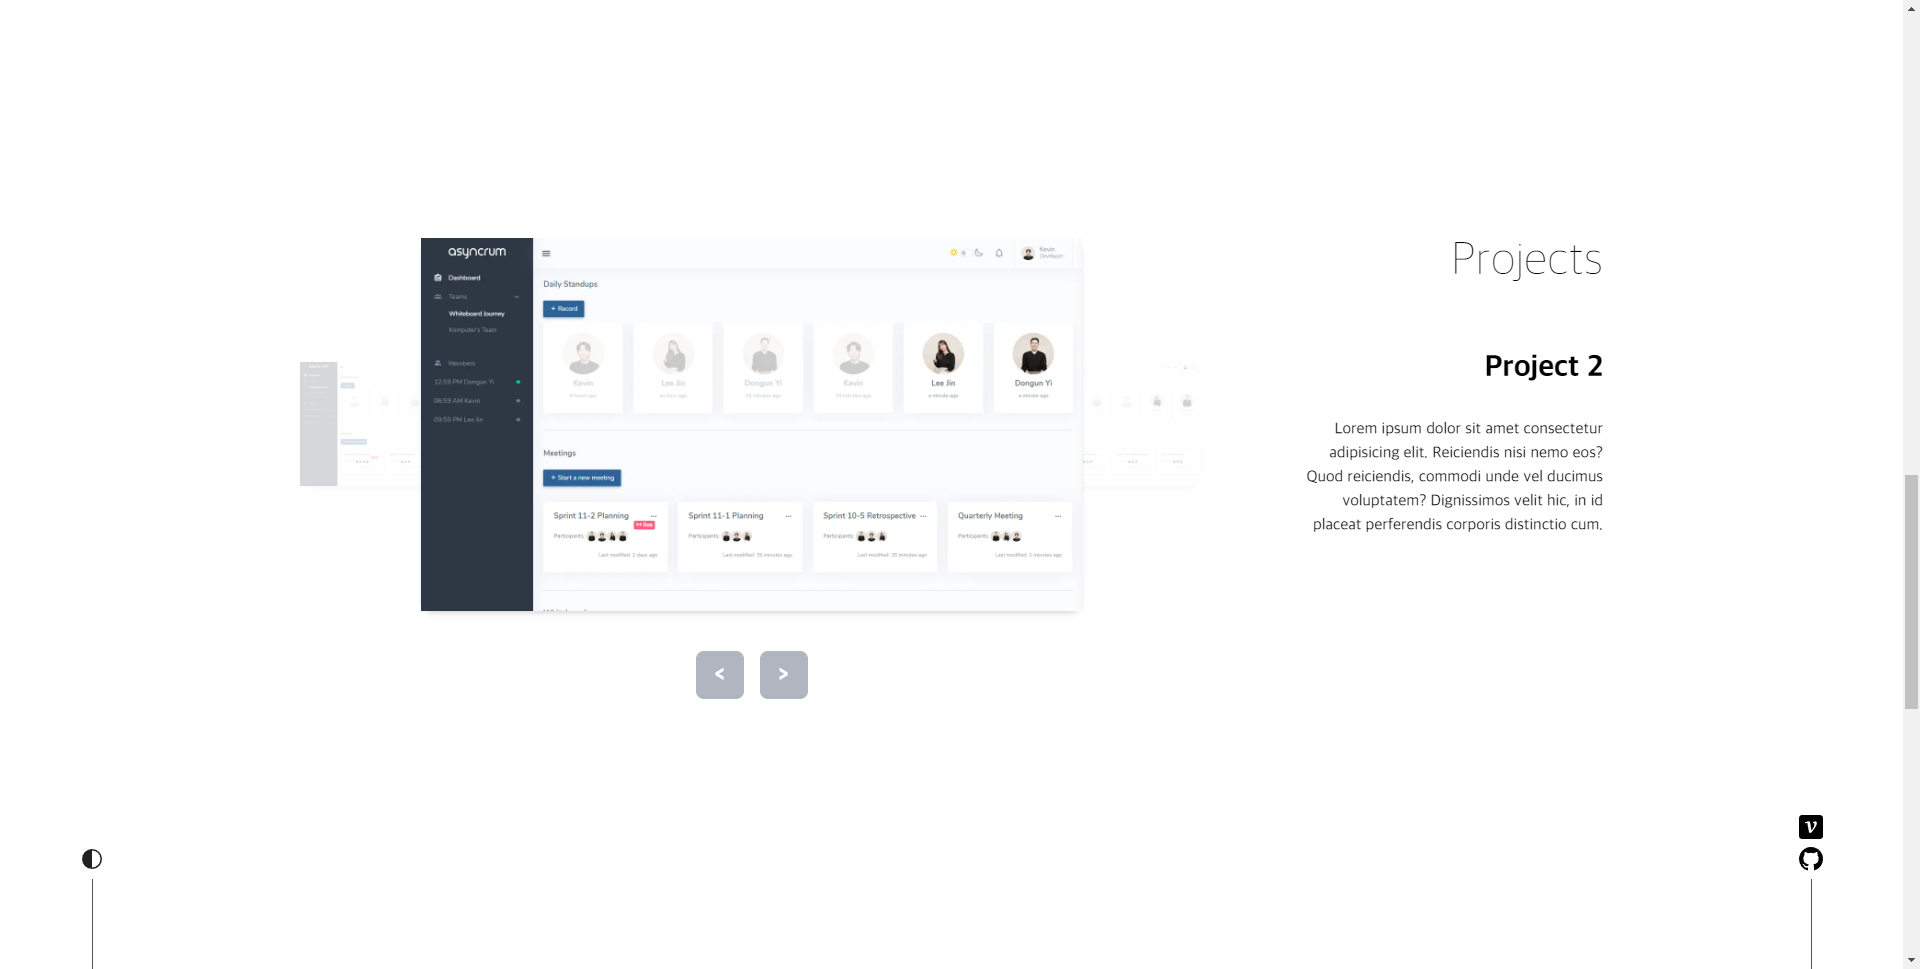
위 스크린샷은 기본 상태, 아래 스크린샷은 왼쪽 hover 상태다.
Framer Motion이 일단 재밌게 느껴졌고 잘 다룰 수 있게 되면 할 수 있는게 너무 많아질 것 같다. 더 공부할 것이다. (ChatGPT를 새로운 라이브러리/프레임워크 습득할 때 쓰니까 정말 효율적인 것 같다)
이제 남은 부분은 메뉴 이동과 다크 모드, 그리고 디자인 정도가 될 것 같다.