JUnit
자바언어에서 사용되는 테스트를 위한 프레임워크
사용법
pom.xml 파일에 junit dependency 등록
<project xmlns="http://maven.apache.org/POM/4.0.0" xmlns:xsi="http://www.w3.org/2001/XMLSchema-instance"
  xsi:schemaLocation="http://maven.apache.org/POM/4.0.0 http://maven.apache.org/xsd/maven-4.0.0.xsd">
  <modelVersion>4.0.0</modelVersion>

  <groupId>org.edwith.webbe</groupId>
  <artifactId>calculatorcli</artifactId>
  <version>0.0.1-SNAPSHOT</version>
  <packaging>jar</packaging>

  <name>calculatorcli</name>
  <url>http://maven.apache.org</url>

  <properties>
    <project.build.sourceEncoding>UTF-8</project.build.sourceEncoding>
  </properties>

  <dependencies>
    <dependency>
      <groupId>junit</groupId>
      <artifactId>junit</artifactId>
      <version>4.12</version>
      <scope>test</scope>
    </dependency>
  </dependencies>
  <build>
        <plugins>
            <plugin>
                <artifactId>maven-compiler-plugin</artifactId>
                <version>3.7.0</version>
                <configuration>
                    <source>1.8</source>
                    <target>1.8</target>
                    <encoding>utf-8</encoding>
                </configuration>
            </plugin>
        </plugins>
    </build>
</project>
테스트 클래스
-
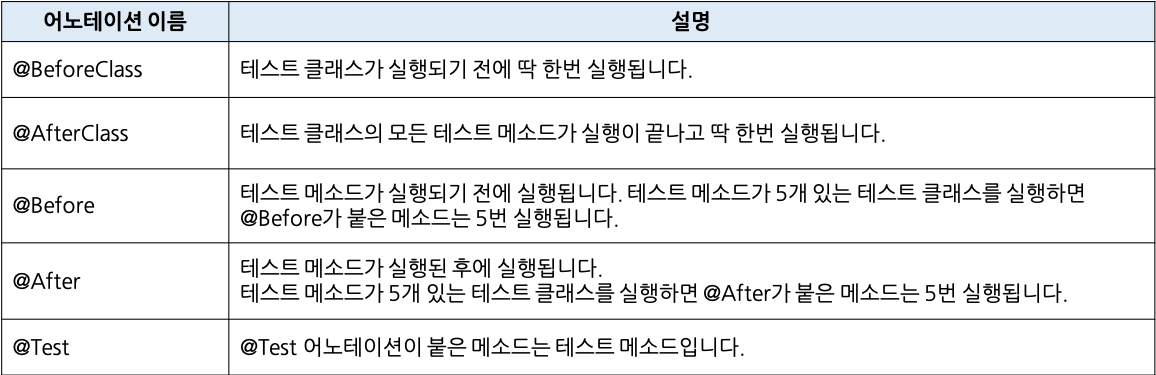
@BeforeClass
테스트 클래스가 실행되기 전 @BeforeClass가 붙은 메소드가 실행됨 -
@Before
테스트 메소드가 실행되기 전에 @Before가 붙은 메소드가 실행됨 -
@Test
테스트 클래스에 존재하는 각각의 메소드에 붙여줘야 함, @Before 메소드가 실행된 후 @Test가 붙은 메소드가 실행됨 -
@After
@Test가 붙은 메소드가 실행된 후 @After가 붙은 메소드가 실행됨 -
@AfterClass
Before, Test, After의 세 메소드가 순차적으로 실행된 후에 @AfterClass가 붙은 메소드가 실행되고 프로그램은 종료됨
테스트 클래스 예제
src/test/java에 CalculateServiceTest 클래스를 생성한다.
CalculateServiceTest.java
package org.edwith.webbe.calculatorcli;

import org.junit.Assert;
import org.junit.Before;
import org.junit.Test;

public class CalculatorServiceTest {
	CalculatorService calculatorService;

	@Before
	public void init() {
		this.calculatorService=new CalculatorService();
	}
	@Test
	public void plus() throws Exception{
		//given
		int v1= 10;
		int v2=5;

		//when
		int result = calculatorService.plus(v1, v2);

		//then
		Assert.assertEquals(15, result);
	}

	@Test
	public void divide() throws Exception{
		//given
		int v1=10;
		int v2=5;

		//when
		int result = calculatorService.divide(v1, v2);

		//then
		Assert.assertEquals(2, result);
	}

	@Test
	public void divideExceptionTest() throws Exception{
		int v1 = 10;
		int v2= 0;

		try {
			calculatorService.divide(v1, v2);
		}catch(ArithmeticException ae) {
			Assert.assertTrue(true);
		}
		Assert.assertFalse(false);
	}
}
Assert
- test한 결과값이 원하는 결과값과 같은지 확인할 수 있는 메서드
Assert.assertEquals(expected, actual);에서 expected와 actual이 같으면 정상적으로 테스트 완료, 다르면 테스트 실패
테스트 실행
클래스 자체를 실행해 모든 메서드를 실행할 수도 있고, 메서드를 지정하여 테스트할 수도 있다.
다음은 실행 화면이다.
.png)
REFERENCES
https://www.boostcourse.org/web326/lecture/58976?isDesc=false