인터페이스
-Js에서 객체를 쓰듯 동적으로 객체를 사용하는 것은 Ts에서 불가능하므로 인터페이스로 객체의 구조를 만들어두고 프로퍼티와 타입을 수정하면서 객체처럼 사용해야함.
//타입 변수 지정 가능, 이 타입으로 할당시 아래 문자들만 입력 가능.
type Score = 'A' | 'B' | 'C' | 'D';

interface Student{
  name: string;
  age: number;
  [grade:number] : Score;
}


let student: Student{
  name: 'kim',
  age: 18,
//grade : Score 형태
  1 : 'A',
  2 : 'C'
}
(1) 개요
-변수나 함수, 그리고 클래스가 지켜야 하는 코드 내 계약(약속, 규칙)을 정의하는 방법.
-인터페이스에 선언된 멤버 또는 메소드를 무조건 구현해야한다. → 일관성을 유지할 수 있다.
-직접 인스턴스를 생성할 수 없고 모든 메소드는 추상 메소드이다. ( 하지만 abtract 키워드를 쓰지 않는다. 추상 클래스에서 쓰는 것이다! )
- 추상 메소드 이므로, 내부의 로직은 포함하지 않는다!
- abstract는 계층 관계를 가지는 복제품, 인터페이스는 계층과 관계 없이 옵션을 추가하는 설계도.
1) 추상클래스 vs 인터페이스
추상 클래스는 일반 클래스와 달리 추상 메소드가 포함된 클래스로 일반 메소드를 포함
추상 클래스는 상속을 통해 추상 메소드의 구현을 강제하여 자식 클래스에서 일부 동작을 구현
추상 클래스는 프로그램의 전체 구조를 잡기 위해 사용
vs
인터페이스는 모든 메소드가 추상 메소드여야함
인터페이스는 모든 구현에 대한 계약을 작성해둔 것
인터페이스는 기본적인 설계도로써 개발 협업에서 사용하기 용이
(2) 목적
-변수, 함수, 클래스에 대한 타입 체크
-타입의 이름을 짓고 코드 안의 계약을 정의, 프로젝트 외부에서 사용하는 코드의 계약을 정의하는 강력한 방법.
-계약 정의 대상
- 객체의 스펙(속성과 속성의 타입)
- 함수의 스펙(파라미터, 반환 타입 등)
- 배열과 객체에 접근하는 방식
- 클래스
interface Person {
    name: string
}
//변수
let animal: Person = {name: "rabbit"};
//함수
function greeting(person: Person): void {
    console.log(`Hello ${person.name}`);
}
//클래스
class Member implements Person {
    constructor (
        public name: string
    ) { }
}
//배열
interface Person {
    [index: number]: string;
}
let people: Person = ["rabbit", "cheshire", "queen"];
(3) 정의 방법
-interface 키워드를 사용하여 정의한다.
-함수 파라미터의 타입으로 인터페이스를 쓸 수 있다. → 복잡한 파라미터 체크가 필요 없다.
-인터페이스끼리도 extends로 상속을 할 수 있다.
-interface를 통해 함수 파라미터 프로퍼티를 정의할 수 있다. 정의한 프로퍼티 값을 누락하거나 정의하지 않는 값을 인수로 전달 시 컴파일 에러가 발생한다.
// 인터페이스의 정의 - 필드 뿐만 아니라 메소드도 포함할 수 있다.
// 추상 메서드처럼 작성하나, abstract 키워드를 붙이지 않는다.
interface IPerson {
name: string;
sayHello(): void;
}

class Person implements IPerson {
// implements 인터페이스에서 정의한 프로퍼티의 구현 키워드
// 인터페이스를 구현한 클래스
	constructor(public name: string) {
      this.name = name;
    }
// 인터페이스에서 정의한 추상 메소드 반드시 구현해야함.
	sayHello() {
		console.log(`Hello ${this.name}`);
	}
}
function greeter(person: IPerson): void {
	person.sayHello();
}
const me = new Person('Lee');
greeter(me); // Hello Lee
-인터페이스를 구현하는 클래스는 인터페이스의 필드, 메소드를 반드시 구현해야한다.
-인터페이스는 직접 인스턴스를(객체가) 생성할 수 없다.
interface properties
- 컴파일러는 프로퍼티의 두 가지 요소를 검사한다.
-필수요소 프로퍼티의 유무
-프로퍼티 타입
-아래 예약어로 프로퍼티를 세밀하게 컨트롤 할 수 있다
- ?(optional properties)
- readonly(readonly properties)
- Optional properties
-프로퍼티 선언 시 이름 끝에 ?를 붙여서 표시
-인터페이스에 속하지 않는 프로퍼티의 사용을 방지하면서 사용 가능한 프로퍼티를 기술할 때 사용
-객체 안의 몇 개의 프로퍼티만 채워 함수에 전달하는 "option bags" 같은 패턴에 유용
interface SquareCongfig{
  color?: string
  width?: number
}

function createSquare(config: SquareConfig): {color: string, area: number}{
  let newSquare = {color: "white", area: 100}
  if(config.color){
    newSquare.color = config.color;
  }
  if(config.width){
    newSquare.area = config.width * config.width;
  }
  return newSquare;
}
//프로퍼티에 옵셔널을 선언했으므로 width를 누락해도 에러 발생 안 함.
let mySquare = createSquare({color: "black"});- Readonly properties
-객체가 처음 생성될 때만 값 설정(수정)이 가능하고 이후 설정 불가능.
-프로퍼티 앞에 readonly를 붙여 사용
interface Point{
  readonly x: number
  readonly y: number
}

let point: Point = {x:10, y:20}
point.x = 5;
//Cannot assign to 'x' because it is a read-only property.
(1) readonly vs const
-공통점 : 생성 후에 배열 변경하지 않음을 보장
-변수는 const, 프로퍼티는 readonly 사용
let arr: number[] = [1, 2, 3, 4];
let readonly_arr: ReadonlyArray<number> = arr;

readonly_arr[0] = 12; //Error
readonly_arr.push(5); //Error
readonly_arr.length = 100; //Error
interface와 함수/클래스, 확장
-Ts에서 인터페이스는 함수, 클래스에서 사용할 수 있다.
- 함수 : Js 객체가 가질 수 있는 넓은 범위의 형태를 기술, 프로퍼티로 객체를 기술하는 것 외에도 인터페이스는 함수 타입을 설명.
-함수의 인자의 타입과 반환 값의 타입을 정의
-함수의 타입을 정의할 때에도 사용
interface Add{
  (param1: number, param2: number): number;
}

let mySeach: Add = function (x, y){
  //변수로 직접 함수 값이 할당되었기 때문에 인수 타입 생략 가능
  //Ts의 contxtual typing이 인수 타입 추론
  return result x+y;
}- 클래스 : 클래스가 특정 통신 프로토콜을 충족하도록 명시적으로 강제하는 방식으로 사용
-클래스가 특정 계약(contract)을 충족하도록 명시적으로 강제
-선언한 인터페이스를 클래스 뒤에 implements하여 사용하며, 클래스는 인터페이스에 명시된 추상 메소드를 반드시 구현해야함
- implements : 인터페이스에서 정의한 프로퍼티의 구현 키워드
interface Car{
  color: string;
  wheels: number;
  go(): void;
}
// Constructor가 없는 경우
class Bmw implements Car{
  color: 'black';
  wheels: 4;
  start(){
    console.log('home')
  }
}

// Constructor를 사용할 경우
class Bmw implements Car{
  constructor(clr: string, whl: number){
    this.color = clr;
    this.wheels = whl;
  }
  start(){
    console.log('home')
  }
}

const b = new Bmw('black', 4);
console.log(b);
b.start();

// 생성자로 넣은 부분만 출력이 된다.
[LOG]
Bmw : {
  "color" : "black",
  "wheels" : 4
}
[LOG]
"home"- interface 확장
-클래스와 마찬가지로 인터페이스간의 확장이 가능함 : extends
-인터페이스 확장시 확장한 인터페이스는 확장 대상의 기능을 구현하지는 않는다.(인터페이스 기본 성질: 설계도)
-하지만 extends를 사용한 인터페이스를 구현하는 클래스는 해당 인터페이스와 extends의 대상이 되는 인터페이스의 기능을 구현해야한다.
interface Car{
  color: string;
  wheels: number;
  go(): void;
}

interface Oil{
  km: number;
}

interface Benz extends Car, Oil{
  //여러 개 확장도 가능함
  made: string;
}

const Benz: Benz = {
  constructor(clr: string, whl: number){
    this.color = clr;
    this.wheels = whl;
  }

  go(){
    console.log('gym');
  };

  km: 300;

  made= 'Germany';
}- hybrid 타입
-여러 가지 타입의 조합이 가능
-아래 코드와 같이 함수 타입이면서 객체 타입을 정의할 수 있는 인터페이스도 구현 가능
interface Counter{
  (start: number): string
  interval: number
  reset(): void
}

function getCounter(): Counter{
  let counter = function (start: number) {} as Counter
  // as: 타입 단언을 위한 문법, 타입을 컴파일러가 추론하지 않도록 프로그래머가 직접 지정.
  counter.interval = 123;
  counter.reset = function = function () {}
  return counter;
}

let c = getCounter();
c(10);
c.reset();
c.interval = 5.0;
//counter 인터페이스는 함수로서 호출도 가능하고 여러 프로퍼티도 지님
-as 키워드 : 타입 단언을 위한 문법, 타입을 컴파일러가 추론하지 않도록 프로그래머가 직접 지정.
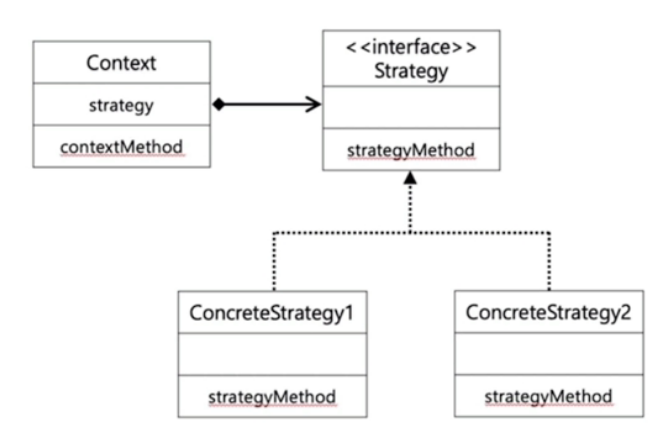
디자인 패턴(Strategy pattern)
1.interface를 활용한 디자인 패턴(Strategy pattern)
-객체가 할 수 있는 행위들을 전략(strategy)으로 만들어두고 동적으로 행위의 수정이 필요한 경우 전략 개체를 새로 생성(ConcreteStrategy1, 2)하거나 바꿔 변경/주입하여 행위의 수정이 가능한 패턴.
예시) 자판기 결제 방법을 현금-> 카드 결제로 변경할 때 Pay 메소드 구현 변경이 필요
※메소드 수정 방식의 문제점(이경우 pay 메소드)
-pay 메소드의 조건문을 이용해 분기를 추가하면 확장성이 떨어짐 : OCP를 위배(OOP 설계 원칙)
- 개방-폐쇄 원칙(OCP, Open-Closed Principle) : '소프트웨어 개체(클래스, 모듈, 함수 등등)는 확장에 대해 열려 있어야 하고, 수정에 대해서는 닫혀 있어야 한다
-시스템이 커져서 확장될 경우 연동되는 시스템에도 영향줄 가능성 존재 : Pay 메소드 내의 코드량이 많아져 내부 로직 복잡해짐.
-디자인 패턴으로 문제 해결 가능.
-인터페이스를 이용해 결제를 하는 것 자체는 고정적으로 두고, 결제 방법(전략)을 인터페이스를 이용해 구현. 예를 들어 결제를 하는 행위를 implements 하되 현금으로 결제하는 메소드, 카드로 결제하는 메소드를 구분해서 구현하는 것.
interface PaymentStrategy{
	pay(): void
}

class CardPaymentStrategy implements PaymentStrategy{
  pay(): void{
    console.log("card pay");
  }
}

class CardPaymentStrategy implements PaymentStrategy{
  pay(): void{
    console.log("cash pay");
  }
}

class VendingMachine{
  private paymentStrategy: PaymentStrategy
  //(property)VendingMachine.paymentStrategy: PaymentStrategy
  //: interface PaymenStrategy

  setPaymentStrategy(paymentStrategy: PaymentStrategy){
    this.paymentStrategy = paymentStrategy
    //(property)VendingMachine.paymentStrategy: PaymentStrategy = (parameter)paymentStrategy: PaymentStrategy
  }

  pay(){
    this.paymentStrategy.pay();
    //(property)VendingMachine.paymentStrategy: PaymentStrategy
    //(method)PaymentStrategy.pay(): void
  }
}

const vendingMachine = new VendingMachine();

vendingMachine.setPaymentStrategy(new CashPaymentStrategy());
//(method)VendingMachine.setPaymentStrategy(paymentStrategy: PaymentStrategy):void
//constructor CashPaymentsStrategy(): CashPaymentStrategy
vendingMachine.pay(); //현금 결제

vendingMachine.setPaymentStrategy(new CardPaymentStrategy());
vendingMachine.pay(); //카드 결제
제네릭
• 함수, 인터페이스, 클래스에 재사용성을 더해준 기능
• 함수, 인터페이스, 클래스를 정의한 사람이 아닌 사용하는 사람이 필요한 타입을 제공하는 방식
• 특정 구조를 가진 함수, 인터페이스, 클래스를 다양한 타입을 적용시킴으로 사용성을 극대화
-재사용성이 높은 컴포넌트를 만들 때 자주 활용되는 특징
-일반적인 정적 타입 언어는 함수나 클래스를 정의할 때 타입을 선언해야 하지만 제네릭을 이용해 코드가 수행될 때 타입이 명시되도록 할 수 있다.
- 사용
-코드를 작성할 때가 아니라 코드가 수행될 때 타입을 명시하여 하나의 타입만이 아닌 다양한 타입을 사용할 수 있도록 하는 기법이다.
-코드를 작성할 때 식별자를 써서 아직 정해지지 않은 타입을 표시.
- 일반적으로 식별자는 <T, U, V>등 사용, 필드 이름의 첫 글자를 쓰기도 함
- 사용 이유
(1) 재사용성이 높은 함수와 클래스를 생성 가능
-'여러 타입에서 동작이 가능'하여 한 번의 선언으로 다양한 타입에 재사용할 수 있다.
-코드의 가독성이 향상된다.
(2) 오류를 쉽게 포착 가능
-any는 타입을 사용시 컴파일 시 타입을 체크하지 않아 관련 메소드의 힌트를 사용할 수 없다. 또한 컴파일 시에 컴파일러가 오류를 찾지 못한다.
-제네릭도 nay처럼 미리 타입을 지정하지는 않으나 타입을 체크하므로 컴파일러가 오류를 찾을 수 있다.
(3) 예시
예시ⓐ
-typescript는 함수 또는 클래스를 정의하는 시점에 매개변수나 반환값의 타입을 선언해야한다.
-아래와 같은 선입선출, 즉 먼저 들어온게 먼저 나가는 큐의 구조를 코드로 작성해보았다.
class Queue {
	protected data: any[] = [];

	push(item: any) {
		this.data.push(item);
	}

  pop() {
	return this.data.shift();
	}
}
const queue = new Queue();

queue.push(0);
queue.push('1'); // 의도하지 않은 실수!

console.log(queue.pop().toFixed()); // 0
console.log(queue.pop().toFixed()); // Runtime error
-이 큐 클래스는 데이터를 빼낼 때, 그 값이 숫자일 거라고 생각해, 반올림하는 메소드를 적용하였다.(toFixed)
-이때, 이 큐 클래스는, 어떤 타입도 될 수 있는 배열인 any 타입의 배열을 자료형으로 가지는, 필드 data가 있다. 이 data 필드는 어떤 타입도 올 수 있는 배열이기 때문에, 배열 안에는 다양한 타입의 데이터가 포함되어 있다.
-따라서 이 큐에는 숫자가 아닌 데이터도 포함될 수 있고, 숫자 아닌 데이터에 toFixed를 적용하면 에러가 난다.
-이 문제를 해결하기 위해 아래와 같이 숫자를 처리하는 NumberQueue 클래스를 정의하였다.
class Queue {
	protected data: any[] = [];
	push(item: any) {
		this.data.push(item);
	}

  pop() {
	return this.data.shift();
	}
}

// Queue 클래스를 상속하여 number 타입 전용 NumberQueue 클래스를 정의
class NumberQueue extends Queue {
// number 타입의 요소만을 push한다.
	push(item: number) {
	super.push(item);
	}

	pop(): number {
		return super.pop();
	}
}
const queue = new NumberQueue();
queue.push(0);
// 의도하지 않은 실수를 사전 검출 가능
// error TS2345: Argument of type 'string' is not assignable to parameter of type 'number'.
// queue.push('1');
queue.push(+'1'); // 실수를 사전 인지하고 수정할 수 있다
console.log(queue.pop().toFixed()); // 0
console.log(queue.pop().toFixed()); // 1
-하지만, 모든 타입에 대해서 각 타입에 대한 큐를 지원하는 것은 좋지 않다.
예시ⓑ
class Queue<T> { // Queue클래스는 지금은 정확히 정할 수 없는 타입 T를 사용한다.
	protected data: Array<T> = []; // 타입 T 배열을 자료형으로 갖는다.
	push(item: T) {
		this.data.push(item);
	}

	pop(): T | undefined {
      // 이 pop 메소드는 타입 T 혹은 undefined를 반환한다.
		return this.data.shift();
	}
}

// number 전용 Queue - 제네릭 T의 자리를 특정 타입으로 선언하여 객체로 생성하였다.
const numberQueue = new Queue<number>();

numberQueue.push(0);
// numberQueue.push('1'); // 에러 - 의도하지 않은 실수를 사전 검출 가능
numberQueue.push(+'1'); // 실수를 사전 인지하고 수정할 수 있다

// ?. => optional chaining
// 이 값이 존재한다면 . 다음을 수행한다.
// 존재하지 않는다면(null, undefined), 그 값(null, undefined)을 반환한다.
// https://www.typescriptlang.org/docs/handbook/release-notes/typescript-3-7.html#optional-chaining
console.log(numberQueue.pop()?.toFixed()); // 0
console.log(numberQueue.pop()?.toFixed()); // 1
console.log(numberQueue.pop()?.toFixed()); // undefined

// string 전용 Queue -> 제네릭을 통해 다양한 타입을 적용할 수 있다.
const stringQueue = new Queue<string>();
stringQueue.push('Hello');
stringQueue.push('World');


console.log(stringQueue.pop()?.toUpperCase()); // HELLO
console.log(stringQueue.pop()?.toUpperCase()); // WORLD
console.log(stringQueue.pop()?.toUpperCase()); // undefined
// 커스텀 객체 전용 Queue
const myQueue = new Queue<{name: string, age: number}>();
myQueue.push({name: 'Lee', age: 10});
myQueue.push({name: 'Kim', age: 20});
console.log(myQueue.pop()); // { name: 'Lee', age: 10 }
console.log(myQueue.pop()); // { name: 'Kim', age: 20 }
console.log(myQueue.pop()); // undefined- 제네릭으로 함수와 클래스 만들기
(1) 제네릭을 이용한 함수 생성
//배열을 입력 받아 정렬 후 반환하는 제네릭
function sort<T>(items: T[]): T[]{
  return items.sort();
}

const nums: number[] = [1, 2, 3, 4]
const chars: string[] = ["a", "b", "c", "d"]
//실행시 타입 자유화.
sort<number>(nums);
sort<string>(chars);
(2) 제네릭을 이용한 클래스 생성
class Queue<T> {
  protected data: Array<T> = [];
  push(item:T) {
    this.data.push(item);
  }
  pop():T | undefined{
    //배열에 값이 없을 수도 있으므로 undefined 추가
    return this.data.shift();
  }
}
//넘버 타입만 가질 수 있게 제니릭의 실행 타입 선언
const numberQueue = new Queue<number>();

numberQueue.push(0)
numberQueue.push("1") // 의도치 않은 실수 사전 검출 가능
numberQueue.push(+"1")// 컴파일 전 실수를 사전인지 후 수정 가능
Union type
- 개요
-" | " 를 사용해 두 개 이상의 타입을 선언하는 방식
-유니온과 제네릭 모두 여러 타입을 다룰 수 있다
-유니온은 선언한 타입들이 가지는 공통된 메소드만 사용할 수 있다.
-'리턴 값이 하나의 타입이 아닌 선언된 전체 유니온 타입으로 지정'된다.
// 1. union
const printMessage = (message: string | number) => {
  //파라미터 안쪽에 지정
  return message;
}

const message2 = printMessage(1234);
const message2 = printMessage("aaaa");

//string과 number가 가지는 공통된 메소드만 사용 가능하므로 아래의 length는 에러가 일어난다.
// Error : length does not exist on type string | number
message1.length;

// 2. generic
const printMessage 2 = <T>(message : T) =>{
  //파라미터 바깥에 지정
  return message;
}

const message3 = printMessage2<string>("bbbb");
message3.length;//오류 안남
제약조건(Constraints/keyof)
- 개요
-원하지 않는 속성에 접근하는 것을 막기 위해 제네릭에 제약조건을 사용한다.
-extends 키워드를 사용.
(1) constraints : '특정 타입들로만' 동작하는 제네릭 함수를 만들 때 사용
-Generic T에 제약 조건을 설정한다.(문자 or 숫자)
-제약 조건을 벗어나는 타입 선언시 에러가 발생
const printMessage = <T extends string | number>(message : T): T =>{
  //string, number외의 타입이 오는 경우 에러 발생.
  return message;
}

printMessage<string>("bbbb");
printMessage<number>(1);
// Error : Type 'boolean' does not satisfy the constraint 'string | number'.
printMessage<boolean>(false);
message3.length;
(2) keyof : 두 객체를 비교할 때 사용
-객체의 키에 제약 조건을 걸 수 있음
const getProperty = <T extends object, U extends keyof T>(obj: T, key: U) => {
  //T의 타입은 object로 제한, U에 들어오는 값이 T타입의 키에 포함되어있지 않다면 에러 발생.
  return obj[key]
}

getProperty( {a:1, b:2, c:3}, "a");
// 문제 없음
getProperty( {a:1, b:2, c:3}, "z");
// Error : Argument of type ' "z" ' is not assignable to parameter of type ' "a" | "b" | "c" '
-제네릭 T는 키 값이 a, b, c만 존재하는 객체.
-U의 값인 'z'가 T의 키 값에 존재하지 않아 오류 발생
디자인 패턴(Factory Pattern with Generics)
- 팩토리 패턴 개요
-객체를 생성하는 인터페이스만 미리 정의하고 인스턴스를 만드는 것은 서브 클래스가 하는 패턴.
-여러 개의 서브 클래스를 가진 슈퍼 클래스가 있을 때 입력에 따라 하나의 서브 클래스의 인스턴스를 반환한다.
(1) 팩토리 패턴
interface Car{
  drive(): void
  park(): void
}

class Bus implements Car{
  drive(): void{}
  park(): void{}
}

class Taxi implements Car{
  drive(): void{}
  park(): void{}
}

class CarFactory{
  static getInstance(type: string): Car{
    //생성시키고자 하는 type에 따라 생성하는 클래스를 반환.
    //이 코드의 경우 car의 tpye이 추가 될때마다 getInstance 코드에 case문을 추가 해야하는 단점이 존재한다.
    switch(type){
      case "bus": return new Bus();
      default : return new Taxi();
    }
  }
}
//이렇게 구현함으로써 bus, taxi 클래스를 직접 new Instance화 하지 않고 CarFactory의 함수를 호출함으로써 객체를 생성.
const bus = CarFactory.getInstance("bus");
const taxi = CarFactory.getInstance("taxi");
(2) 제네릭을 활용한 팩토리 패턴
interface Car{
  drive(): void
  park(): void
}
class Bus implements Car{
  drive(): void{}
  park(): void{}
}
class Taxi implements Car{
  drive(): void{}
  park(): void{}
}
class Suv implements Car{
  drive(): void{}
  park(): void{}
}

class CarFactory{
  static getInstance<T extends Car>(type: {new():T}):T{
    //제네릭을 이용해 getInstance 메소드가 여러 서브 클래스를 타입으로 가질 수 있게(타입을 반환만 할 수 있게) 만들고 타입을 넘겨주도록 작성하면 새로운 타입이 추가되어도 getInstance를 수정할 필요가 없다.
    return new type();
  }
}

//static을 지정해줌으로써 CarFactory 클래스의 getInstance 메소드를 밖에서 바로 사용이 가능하다
const bus = CarFactory.getInstance(Bus);
const taxi = CarFactory.getInstance(Taxi);