
다트의 꽃, OOP 개발을 위한 클래스형 문법을 배워보자!!! 가장 어려우면서 가장 집중해야하는 부분이다! ㅠ
Dart에서 클래스는 데이터와 데이터를 조작하는 함수를 포함하는 일종의 청사진(blueprint)이다. 클래스를 사용하면 객체를 생성하고 이 객체를 사용하여 데이터를 저장, 조작, 쿼리할 수 있기에 객체들을 만들고, 관리하고 사용하는 방법을 아는 것이 중요하다!!
클래스 선언 및 인스턴스 생성
바로 예시를 뜯어먹어보자.
class Player {
  String name = 'rhino';
  int xp = 1500;

  void sayHello() {
    print('Hello. my name is $name');
  }
}

void main() {
  var player = Player();
  print(player.name); // rhino
  player.sayHello(); // Hello. my name is rhino
  player.name = 'rhinoceros';
  player.sayHello(); // Hello. my name is rhinoceros
}- 클래스
Player생성 Player의 인스턴스 생성. 인스턴스는 당연히 객체다!- 인스턴스를 할당한 변수
player를 씹고 뜯고 맛보고 즐기기
이런 식으로 하면 된다. 많이 익숙하지?
this의 사용
근데 다른 언어의 OOP와의 차이점이 this를 안쓰는 모습이다. 다트에서는 this를 안써도 알아서 추적해주기에 안써도 된다. 애초에 다트에서 this를 쓰지말라고 권고하고 있기도 한다.
만약 아래와 같은 경우는 써야한다.
class Player {
  String name = 'rhino';
  int xp = 1500;

  void sayHello() {
  	var name = "faker"
    print('Hello. my name is $name');
  }
}
void main() {
  var player = Player();
  print(player.name); // rhino
  player.sayHello(); // Hello. my name is faker
  player.name = 'rhinoceros';
  player.sayHello(); // Hello. my name is faker
}
이렇게 사용되기 때문에 저때는 Player의 클래스 변수인 name을 잡기 위해 this(Player)를 사용해야한다.
class Player {
  String name = 'rhino';
  int xp = 1500;

  void sayHello() {
  	var name = "faker";
    print('Hello. my name is ${this.name}');
  }
}
이렇게!
이제 우리가 지금까지 배웠던 문법들을 적용시키면 된다.
Constructor
위의 Player 클래스를 다시 가져와보자.
class Player {
  final String name = 'rhino';
  int xp = 1500;

  void sayHello() {
    print('Hello. my name is $name');
  }
}

void main() {
  var player = Player();
  print(player.name); // rhino
  player.sayHello(); // Hello. my name is rhino
  player.name = 'rhinoceros';
  player.sayHello(); // Hello. my name is rhinoceros
}name과 xp의 값이 인스턴스에선 변경하지 못하기 때문에 그 값을 받아주는, 변경 가능한 값을 인스턴스에서 사용하기 위한 생성자 함수를 열어주는 것이다.
class Player {
  late final String name;
  late int xp;

  Player(String name, int xp) {
    this.name = name;
    this.xp = xp;
  }

  void sayHello() {
    print('Hello. my name is $name and xp is $xp');
  }
}name,xp의 기본값을 제거Player의 생성자 함수Player작성, 생성자 함수는 부모인 클래스 함수와 이름이 같아야함- 생성자
Player에 파라미터 작성 후 파라미터 변수인name과xp를 클래스Player의 변수에 할당 name과xp는 인스턴스 할당 후 만들거기 때문에late를 붙였고,final이 있기에name은 무조건 값이 있어야함.
뭔말인지 좀 헷갈리겠지만 그냥 흐름상 클래스 함수 변수에 생성자 함수 변수를 할당시켜 연결한 것이다.
이제 인스턴스에서 접근 후 생성자 함수의 파라미터를 건들여 클래스 함수에서 선언된 변수까지 건들일 수 있게 됐다!
물론 선언된 인스턴스 스코프에서의 (클래스에서 선언된)변수의 값을 변경하는 것이다. 클래스 함수 자체의 변수는 인스턴스에서 변경되지 않는다.
결과물을 보자!
void main() {
  var player = Player("rhino", 100);
  player.sayHello(); // Hello. my name is rhino and xp is 100
  var player2 = Player('rhinoceros', 1000);
  player2.sayHello(); // Hello. my name is rhinoceros and xp is 1000
}
이렇게 인스턴스에서 (클래스에서 선언된)변수의 값을 인스턴스 스코프 안에서 변경하고 사용할 수 있게 됐다!
더 줄일 수 있다. 줄임의 언어 Dart
class Player {
  final String name;
  int xp;

  Player(this.name, this.xp)
  ...
이렇게 파라미터로 그냥 this를 넣어버려서 1줄로 끝냈다. 위에서 late를 써줘야했지만 여기서는 안써도 된다. 이렇게 줄일 수도 있다!
참고: 왜 late의 사용 차이가 있는 것일까?
갑자기 궁금한 점이 생겨서 구글링을 해보았다. 같은 파라미터로서 변수로 쓰였는데 late를 사용하고 말고의 차이가 왜 생기는 걸까?
Player(this.name, this.xp)는 생성자에서 인자로 전달받은 name과 xp를 사용하여 멤버 변수를 초기화하기 때문에 초기화가 되며, late 키워드를 사용하지 않아도 됩니다.
반면에 Player(String name, int xp)는 생성자 내부에서 멤버 변수 name과 xp를 초기화하지 않고, 따로 대입문으로 값을 할당해줘야 합니다. 그러므로 late 키워드를 사용하여 나중에 초기화하겠다는 의도를 나타내야 합니다.
즉, 파라미터로 바로 넣어주지 않으면 초기화가 되지 않으니 늦은 초기화라도 하라고 late를 넣어주어 컴파일 오류를 날 수 있는 상황에서 오류가 명시적으로 나오게 작성하는 것이다.
참고: late의 사용 용도 복습
변수를 나중에 초기화할 때 사용되며, 해당 변수가 나중에 초기화된다는 사실을 코드상으로 명시함으로써 컴파일러가 초기화되지 않은 변수에 접근할 때 컴파일 오류를 발생시키도록 하는 것.
참고: 그동안의 문법 적용 클래스 작성
걍 late 복습하면서 그간 헷갈리는 const, final 등을 위 코드에 적용시켜봤다.
// Player 클래스를 정의.
class Player {
  // 불변인 멤버 변수 name과 xp를 선언.
  final String name;
  final int xp;

  // 생성자에서 name과 xp를 받아서 멤버 변수에 할당.
  const Player(this.name, this.xp);
}

void main() {
  // player 변수를 const로 선언하고, 'rhino' 이름과 1500 XP를 가지는 Player 객체를 생성.
  var player = const Player('rhino', 1500);
  // player의 name 멤버 변수를 출력. 결과는 'rhino'.
  print(player.name);
  // player 변수에 새로운 'rhinoceros' 이름을 갖는 Player 객체를 const로 생성하여 할당.
  // const로 생성한 player 객체는 불변이므로, 이전 객체와 다른 새로운 객체가 생성.
  player = const Player('rhinoceros', 1500);
  // player의 name 멤버 변수를 출력. 결과는 'rhinoceros'.
  print(player.name);

  // dynamicPlayer 변수를 final로 선언하고, 'rhino' 이름과 1500 XP를 가지는 Player 객체를 생성.
  var dynamicPlayer = Player('rhino', 1500);
  // dynamicPlayer의 name 멤버 변수에 'rhinoceros' 값을 할당.
  // dynamicPlayer는 final로 선언되었지만, 멤버 변수는 불변이 아니기 때문에 값을 변경 가능.
  dynamicPlayer.name = 'rhinoceros';
  // dynamicPlayer의 name 멤버 변수를 출력. 결과는 'rhinoceros'.
  print(dynamicPlayer.name);

  // nullablePlayer 변수를 Player 클래스의 Nullable 객체로 선언.
  // 이 변수는 아직 초기화되지 않았으므로, null 값을 가짐.
  Player? nullablePlayer;
  // nullablePlayer의 name 멤버 변수를 출력. nullablePlayer가 null 값을 가지므로, 결과는 null.
  print(nullablePlayer?.name);

  // uninitializedPlayer 변수를 선언.
  // 이 변수는 초기화되지 않은 상태이므로, null 값을 가짐.
  var uninitializedPlayer;
  // uninitializedPlayer에 'rhino' 이름과 1500 XP를 가지는 Player 객체를 생성하여 할당.
  uninitializedPlayer = Player('rhino', 1500);
  // uninitializedPlayer의 name 멤버 변수를 출력. 결과는 'rhino'.
  print(uninitializedPlayer.name);
}
Named Constructor Parameters
당연히 파라미터에 Named를 붙일 수 있다. 3개 이상이면 Named를 쓰는 게 훨씬 효율적이라고 전 시간에 알아두었다. 다음 예시를 보자.
class Player {
  final String name;
  int xp;
  String team;
  int age;

  Player(this.name, this.xp, this.team, this.age);

  void sayInfo() {
    print('My name is $name and xp is $xp and team is $team and age is $age');
  }
}

void main() {
  var player = Player("rhino", 100, 'gray', 25);
  player.sayInfo();
  // My name is rhino and xp is 100 and team is gray and age is 25
}
이렇게 변수가 4개로 됐고, 파라미터를 4개 받는 생성자 함수가 있다. 좀 헷갈릴 수도 있어서 Named를 붙여보자.
class Player {
  final String name;
  int xp;
  String team;
  int age;

  Player({
      required this.name,
      required this.xp,
      required this.team,
      required this.age,
  });

  void sayInfo() {
    print('My name is $name and xp is $xp and team is $team and age is $age');
  }
}

void main() {
  var player = Player(name: "rhino", xp: 100, team: 'gray', age: 25);
}- Named의 필수 요소인 중괄호{}를 파라미터에 붙이기
- 선언한 인스턴스에 Named 붙이기
null에러가 생길 것이니required작성
name이 null일 수도 있습니다.
이렇게 하면 순서에 상관없이 키:값으로 써줄 수 있어 좋다! 애초에 플러터에서 이렇게 대부분 사용한다! 개꿀!
Named Constructors
위의 파라미터에 Named를 붙이는 것과는 다르다! 말 그대로 Constructor에 이름을 붙여주는 작업을 하는 것을 뜻한다!
어떨 때 사용하는 것일까? Constructor들이 내가 정한 값으로 property를 초기화 시킨 Player를 주기를 원할 때 사용한다. 즉, 사용자가 데이터를 줄 때, 내가 어디로 받는 지의 데이터를 고정시킬 때? 를 뜻하는 것이다.
Named Constructors
말로는 모르겠으니 예시를 보자.
class Player {
  final String name;
  int xp, age;
  String team;

  Player({
    required this.name,
    required this.xp,
    required this.team,
    required this.age,
  });

  Player.createBluePlayer({
    required this.name,
    required this.age,
  })  : this.xp = 0,
        this.team = "blue";
  Player.createRedPlayer({
    required this.name,
    required this.age,
  })  : this.xp = 0,
        this.team = "red";

  void sayInfo() {
    print('My name is $name and xp is $xp and team is $team and age is $age');
  }
}

void main() {
  var blueplayer = Player.createBluePlayer(
    name: "rhino",
    age: 25,
  );
  var redPlayer = Player.createRedPlayer(
    name: "rhinoceros",
    age: 30,
  );
  blueplayer.sayInfo();
  // My name is rhino and xp is 0 and team is blue and age is 25
  redPlayer.sayInfo();
  // My name is rhinocerous and xp is 0 and team is red and age is 30
}
이걸 보고 설명이 개떡 같았지만 그래도 좀 알아들을 수 있었을까?
왜 이렇게 썼냐면 팀 블루와 레드를 나누고, xp = 0인 것부터 시작한 것이다. 팀 별로 나눴다는 포인트가 중요하다. 블루 팀원과 레드 팀원 2명을 만든 것.
가장 특이한 부분이 ⭐️Constructor를 활용해 파라미터를 그대로 받으며 고정할 파라미터는 Constructor 밖(), 콜론을 붙여 값과 함께 써줘 초기화한 것이다. 이 문법 진짜 특이하다?
(Positional 문법의)Named Constructors
또한 positional로 적용할 수 있다.
class Player {
  final String name;
  int xp, age;
  String team;

  Player({
    required this.name,
    required this.xp,
    required this.team,
    required this.age,
  });

  Player.createBluePlayer({
    required this.name,
    required this.age,
  })  : this.xp = 0,
        this.team = "blue";

  Player.createRedPlayer(
    String name,
    int age,
  )   : this.age = age,
        this.name = name,
        this.xp = 0,
        this.team = "red";

  void sayInfo() {
    print('My name is $name and xp is $xp and team is $team and age is $age');
  }
}

void main() {
  var blueplayer = Player.createBluePlayer(
    name: "rhino",
    age: 25,
  );
  var redPlayer = Player.createRedPlayer("rhinoceros", 30);
  blueplayer.sayInfo();
  redPlayer.sayInfo();
}createRedPlayer를 보면 안다. Positional로 변경하며 콜론 뒤에 4개를 다 써줬고, main()부분의 redPlayer도 그에 맞게 설정해준 모습이다.
이 positional을 쓰는 방법이 나중에는 오히려 더 득세한다. 편하다고! 쨌든 이렇게 있으니 기억해두자.
지금까지 요약
실제 API 데이터를 받는 변수를 선언하여 어떻게 데이터 처리를 하는지 예시를 들며 요약하겠다.
var apiData = {
    "data": [
      {
        "name": "John",
        "xp": 100,
        "age": 25,
        "team": "Team A",
      },
      {
        "name": "Mary",
        "xp": 200,
        "age": 30,
        "team": "Team B",
      },
      {
        "name": "Steve",
        "xp": 300,
        "age": 35,
        "team": "Team C",
      },
      {
        "name": "Sara",
        "xp": 400,
        "age": 40,
        "team": "Team D",
      },
    ]
  };
API 데이터를 받는 객체 데이터는 위와 같다. 클래스로 받아보자.
클래스 생성 및 초기화 작업
class Player {
  final String name;
  int xp, age;
  String team;

  Player.fromJson(Map<String, dynamic> playerJson)
      : name = playerJson['name'],
        xp = playerJson['xp'],
        team = playerJson['team'],
        age = playerJson['age'];

  void sayInfo() {
    print('My name is $name and xp is $xp and team is $team and age is $age');
  }
}- class
Player생성: 변수 4개 - constuctor 만들어서 초기화하기
playerJson으로 객체 지정 및 클래스 변수들 초기화 작업 지정
이렇게 만들었다. 가장 핵심은 Named Constructor를 만들어서 playerJson객체를 지정해 초기화를 했다는 것이다.
main() 작성
void main() {
  apiData['data']?.forEach((playerJson) {
    var player = Player.fromJson(playerJson);
    player.sayInfo();
  });
}- 다트에도
forEach가 있기 때문에 사용 playerJson을 파라미터로 사용 후fromJson에 할당player로 인스턴스 구현 및 사용
간단하다! 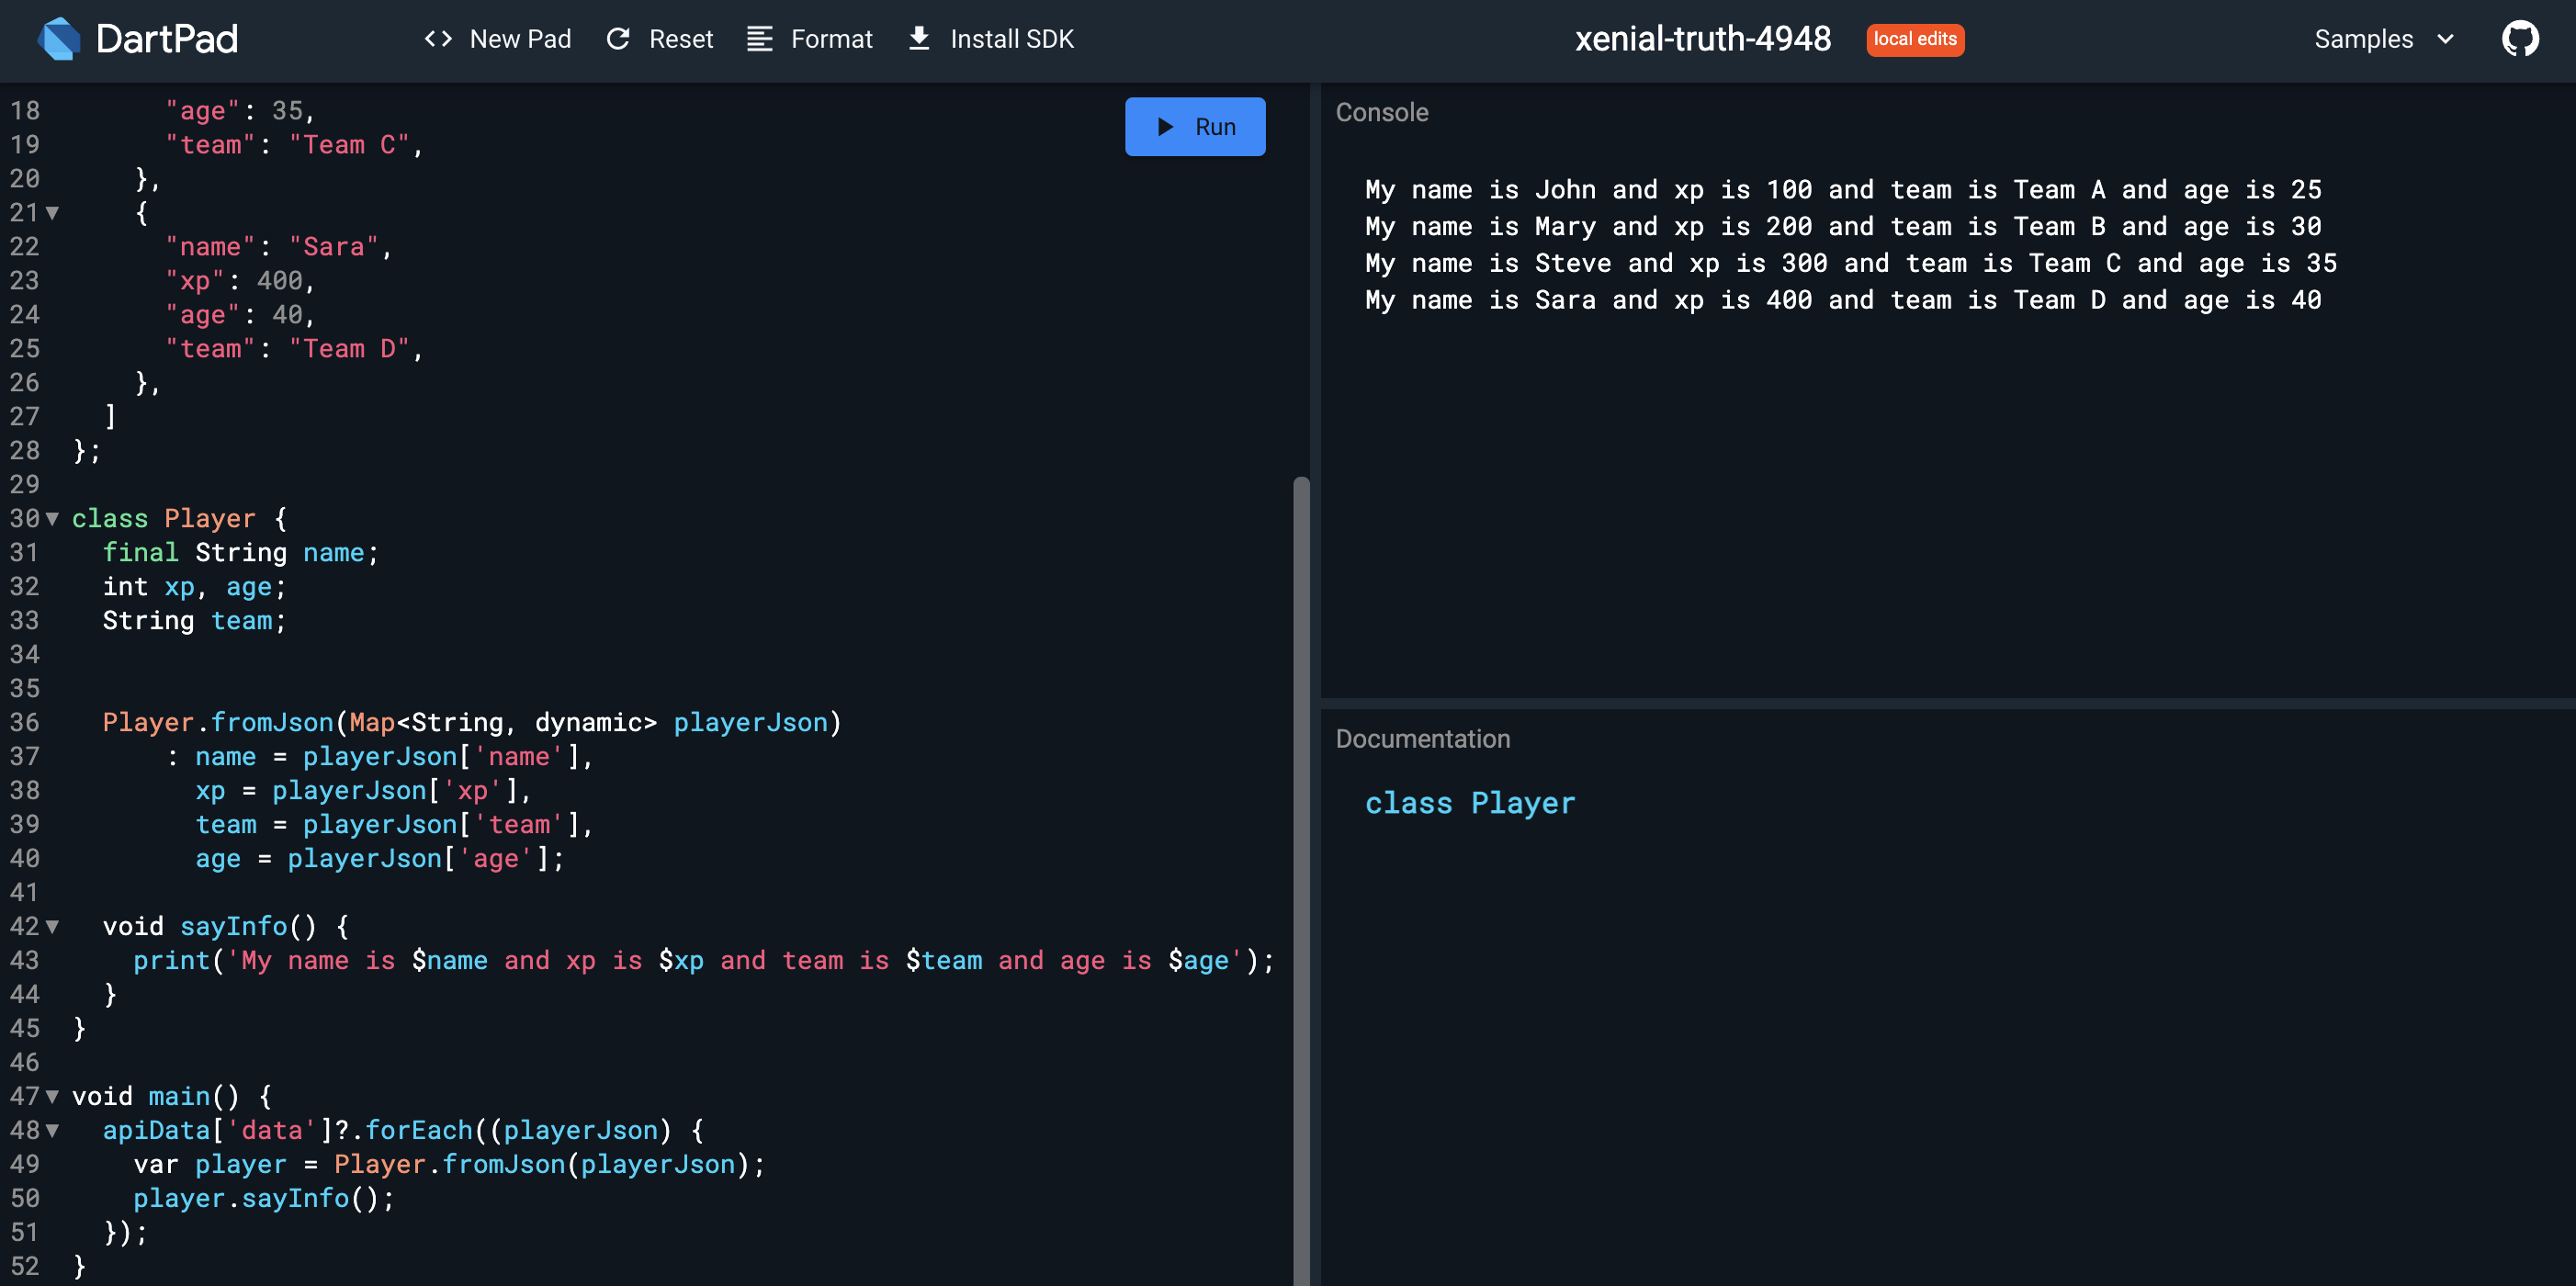
짠!
Cascade Notation
다트의 Syntax Sugar의 일종이다. 위에서 봤던 Constuctor + :와 ??, ??=와 비슷한 것이다.
Dart 언어에서 객체의 메소드나 속성에 연속적으로 접근할 수 있도록 하는 기능
..연산자를 사용하여 객체의 속성이나 메소드를 연속적으로 호출
예시르 보자.
class Player {
  String name;
  int xp, age;
  String team;

  Player({
    required this.name,
    required this.xp,
    required this.team,
    required this.age,
  });

  void sayInfo() {
    print('My name is $name and xp is $xp and team is $team and age is $age');
  }
}

void main() {}
위같은 클래스가 있다. 이제 main을 작성하자면
void main() {
  var rhino = Player(name: 'Rhino', xp: 100, team: 'AF', age: 25);
  rhino.name = 'Rhinoceros';
  rhino.xp = 100022;
  rhino.age = 30;
  rhino.sayInfo();
}
이렇게 작성을 했다. 변수를 직접 변경하려고 하니 3줄이 추가됐고 여러번 반복이 된다. 이때 Cascade Operator를 쓸 수 있다.
void main() {
  var rhino = Player(name: 'Rhino', xp: 100, team: 'AF', age: 25)
    ..name = 'Rhinoceros'
    ..xp = 100022
    ..age = 30
    ..sayInfo();
}
이렇게 말이다! 특징은 세미콜론을 써주지 않고 그대로 이어서 썼다. 그 앞의 인스턴스나 다른 변수들을 자동으로 추적해주기에 정말 좋은 문법 설탕이다!! 물론 객체에서만 쓰이는 건 아니지만 객체에서 제일 많이 쓰이니 알아두자.
Enums
열거형(Enumeration)의 약어로, 상수의 집합을 정의하는 데이터 형식
프로그램에서 사용하는 상수들을 한 곳에 모아 정의할 때 사용
약간 TS의 타입 별칭이랑 비슷한 자료형이다.(type color = 'red' | 'blue') 타입 선언 뿐만 아니라 애초에 값을 정해주기에 버그를 줄일 수 있다.
enum Team { AF, AS, EU, NA }위 처럼 선언하여 사용하면 된다.
enum Team { AF, AS, EU, NA }

class Player {
  String name;
  int xp, age;
  Team team;

  Player({
    required this.name,
    required this.xp,
    required this.team,
    required this.age,
  });

  void sayInfo() {
    print('My name is $name and xp is $xp and team is $team and age is $age');
  }
}

void main() {
  var rhino = Player(name: 'Rhino', xp: 100, team: Team.AF, age: 25)
    ..name = 'Rhinoceros'
    ..xp = 100022
    ..team = Team.EU
    ..age = 30
    ..sayInfo();
}
큰 변경점을 아래와 같다.
- enum
Team을 선언 및team에 적용. - 인스턴스 선언할 때,
Team.~이렇게 사용해야함. - 다시 할당할 때도
Team.~하고 할당해야됨.
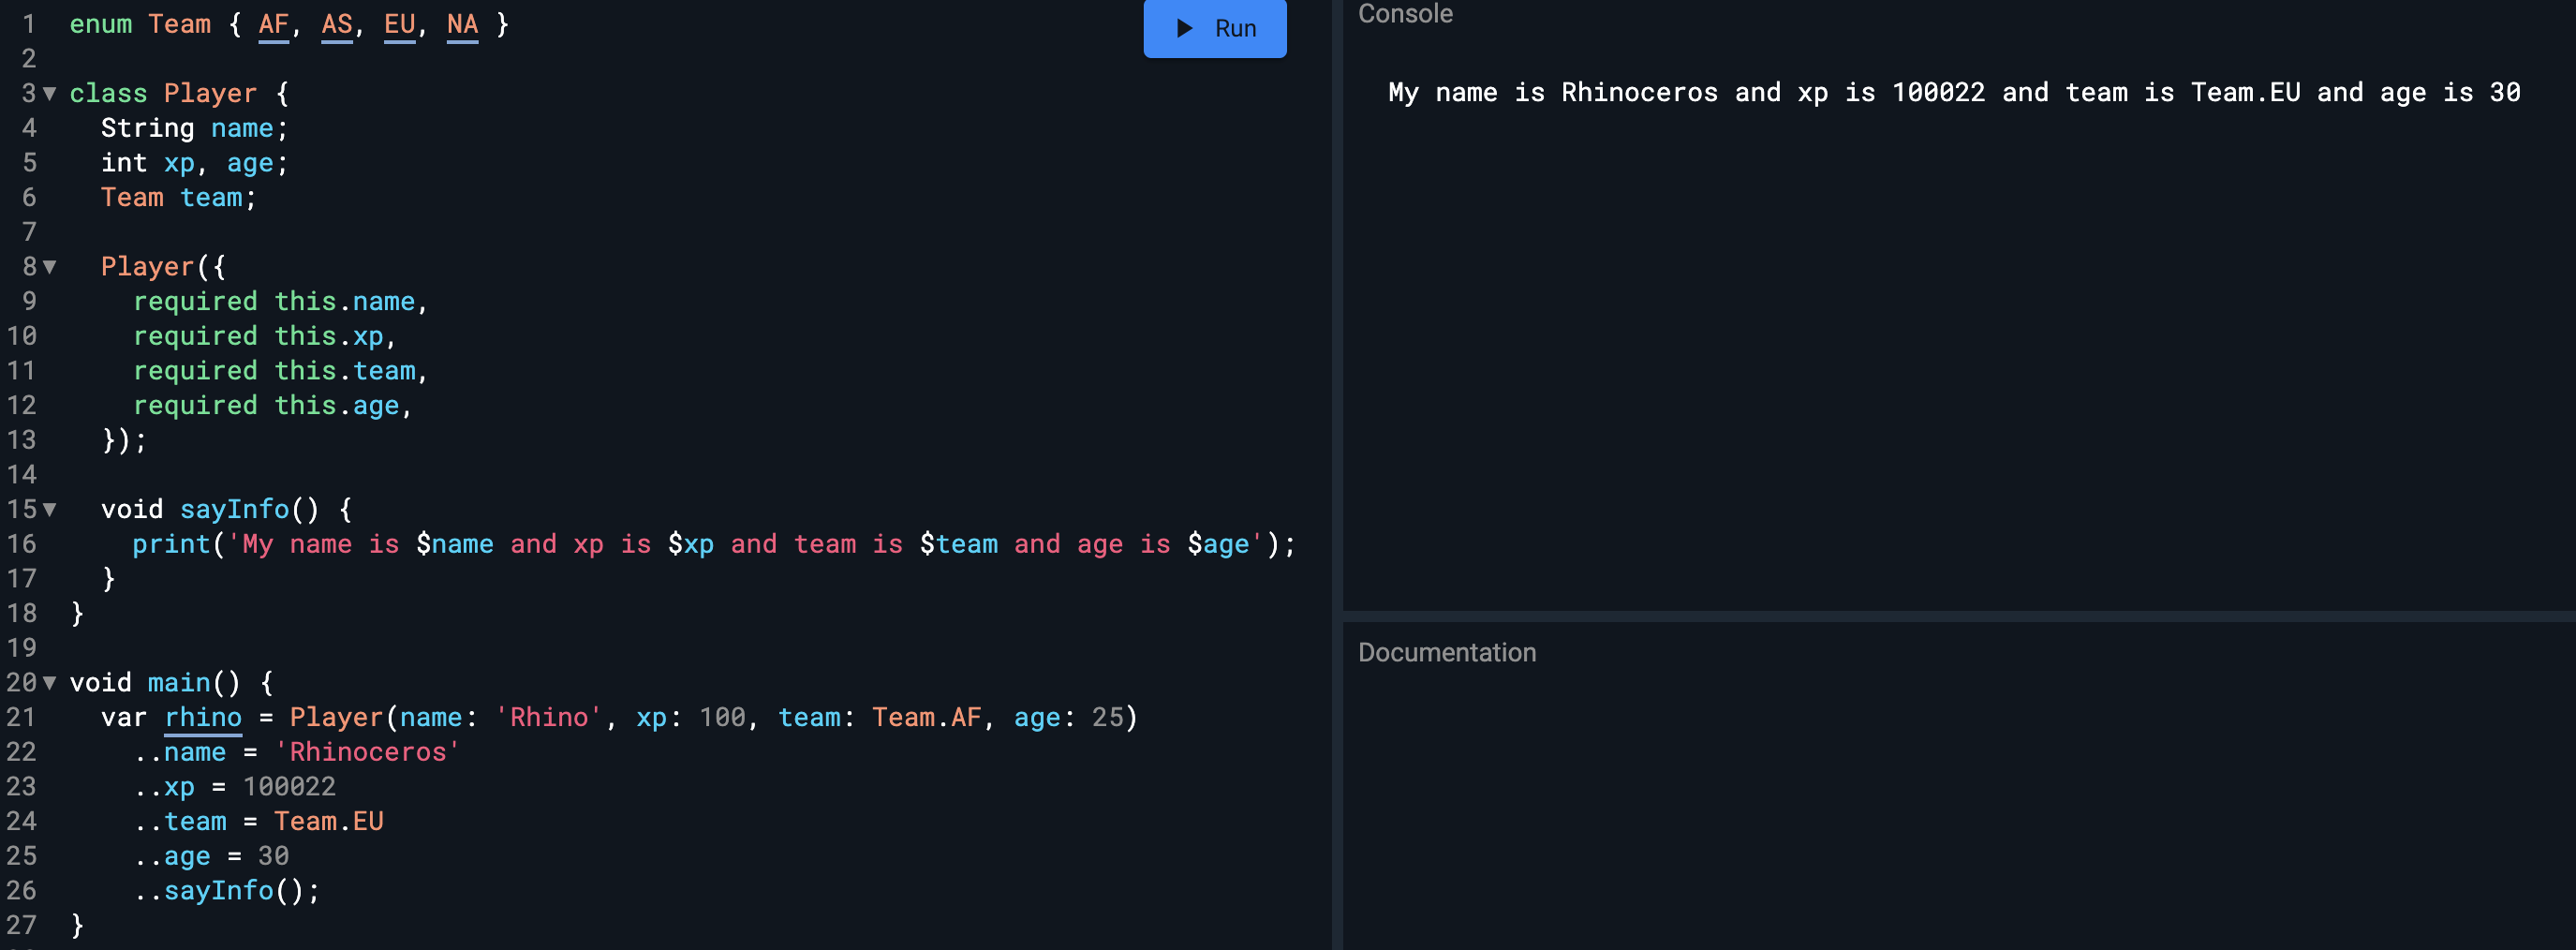
결과물을 봤을 때 좀 이상하지 않는가? Team.EU가 그대로 나왔다. 저거는 나중에 조건을 추가하여 문자열로 리턴하게끔 해주면 된다.
enum Team { AF, AS, EU, NA }

extension TeamExtension on Team {
  String get name {
    switch (this) {
      case Team.AF:
        return 'AF';
      case Team.AS:
        return 'AS';
      case Team.EU:
        return 'EU';
      case Team.NA:
        return 'NA';
      default:
        return '';
    }
  }
}

class Player {
  ...
  void sayInfo() {
    print('My name is $name and xp is $xp and team is ${team.name} and age is $age');
  }
}

void main() {
  var rhino = Player(name: 'Rhino', xp: 100, team: Team.AF, age: 25)
    ..name = 'Rhinoceros'
    ..xp = 100022
    ..team = Team.EU
    ..age = 30
    ..sayInfo();
}
위처럼 말이다. 쨌든 저렇게 값을 지정하여 사용할 수도 있다! 끝!
Abstract Classes
TS의 Abstract Classes이랑 비슷하다!
인스턴스를 직접 생성할 수 없고, 다른 클래스에서 상속 받아 구현해야하는 클래스
클래스 간의 역할을 정해주는 느낌임. 클래스의 청사진, 설계도를 담당하는 역할
추상 클래스를 상속 받는 클래스는 추상 클래스의 모든 추상 메서드를 반드시 구현
추상 클래스는 abstract 키워드를 이용하여 정의한다. 추상 클래스는 일반 메서드와 추상 메서드(abstract method)를 모두 가질 수 있다.
위에서 말했듯이 추상 클래스를 상속 받는 클래스는 추상 클래스의 모든 추상 메서드를 반드시 구현해야 한다. 만약 구현하지 않는다면, 해당 클래스는 추상 클래스로 선언돼야 한다.
추상 클래스는 인스턴스를 직접 생성할 수 없으므로, 사용하려면 구현된 하위 클래스에서 인스턴스를 생성해야 한다.
백문이 불여일견. 전 코드에 이어 써보며 예시를 보면서 체득해보자.
abstract class Human {
  void walk() {}
}

enum Team { AF, AS, EU, NA }

class Player extends Human{
  String name;
  int xp, age;
  Team team;

  Player({
    required this.name,
    required this.xp,
    required this.team,
    required this.age,
  });

  void sayInfo() {
    print('My name is $name and xp is $xp and team is $team and age is $age');
  }
}Human이라는 추상화 클래스, 그 안walk라는 메소드 생성walk메소드는void를 반환하는 함수- 클래스
Player는Human을 받음
위 코드는 지금 에러가 뜬다.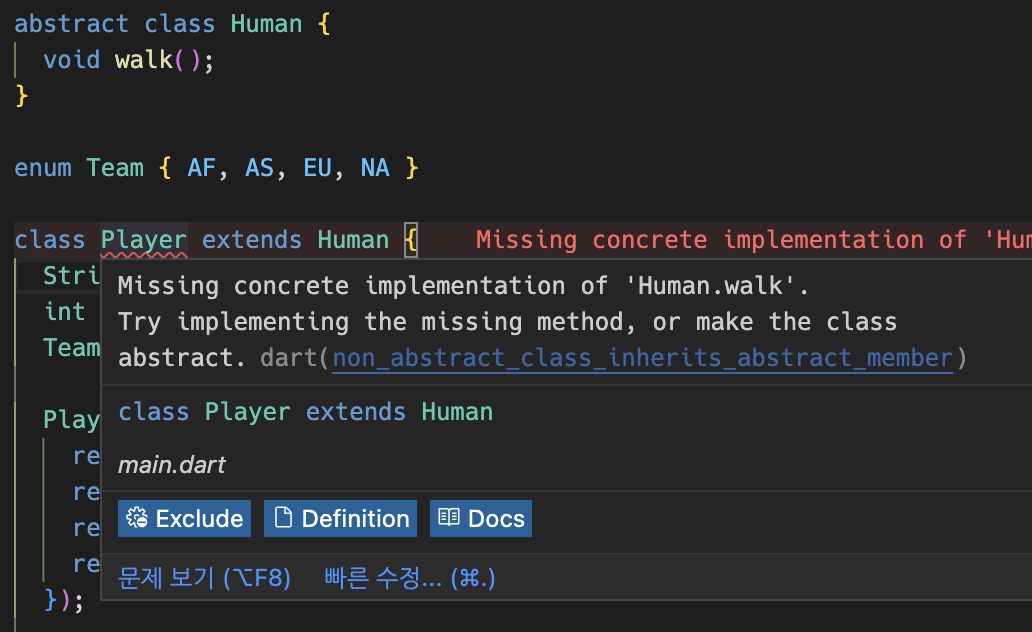
Human의 walk 메소드가 구현이 되지 않아서 그렇다. 구현까지 해주자.
class Player extends Human {
  ...
  void walk() {
    print('Player is walking');
  }
}
이런 식으로 말이다. 재사용 및 청사진이므로 클래스를 복사해도 된다.
class Coach extends Human {
  void walk() {
    print('Coach is walking');
  }
}
위처럼 말이다! 쉽다!
Inheritance
OOP의 가장 좋은 기능이 아닐까 싶다.
클래스(class) 간에 코드를 재사용하기 위한 기능
한 클래스가 다른 클래스의 속성(property)과 메서드(method)를 상속받을 수 있음
아까부터 썼던 extends 키워드로 클래스끼리 상속받는다.
어떤 클래스의 메소드와 변수(속성)을 받아서 다른 클래스에 주는 식이고, 만약 속성을 써야한다면 super를 써서 부모 클래스의 속성을 가져와야한다. 다른 언어의 OOP들도 비슷한 개념이다.
class Human {
  final String name;
  int age;

  Human(this.name, this.age);

  void sayHello() {
    print('Hi, my name is $name and I am $age years old.');
  }
}
클래스 Human에는 속성 name, age와 메소드 sayHello가 있다. 여기에 클래스를 또 추가해보자.
enum Team { red, blue }

class Player extends Human {
  final Team team;

  Player(String name, int age, this.team) : super(name, age);
}

void main() {
  var player = Player('Rhino', 25, Team.red);
  player.sayHello();
}
enum Team을 쓰고, Human을 상속받는 Player를 추가했다. 가장 핵심적으로 봐야할 것은
extends Human을 써서 상속받음super를 써서 부모 클래스인Human의 속성을 가져옴. 속성 그대로 콜론을 쓰며 초기화 작업을 했음.Player인스턴스를 선언 후 안에는 없지만sayHello()함수를 쓰는 main 함수
당연히 Named Parameter로 쓸 수 있다.
class Human {
  final String name;
  int age;

  Human({required this.name, required this.age});
  void sayHello() {
    print('Hi, my name is $name and I am $age years old.');
  }
}

enum Team { red, blue }

class Player extends Human {
  final Team team;

  Player({required String name, required int age, required this.team})
      : super(name: name, age: age);
}

void main() {
  var player = Player(name: 'Rhino', age: 25, team: Team.red);
  player.sayHello();
}super에도 콜론을 써서 named를 쓰는 모습이다.
만약 위 코드에서 sayHello를 자식 클래스에서 수정하고 싶다면 어떻게 해야할까? 바로 super 키워드를 써주면 된다.
class Player extends Human {
final Team team;
Player({
required String name,
required int age,
required this.team,
}) : super(name: name, age: age);
void sayHello() {
super.sayHello();
print('I am on the ${team.toString().split('.').last} team.');
}
}super키워드의 메소드를 사용하면서sayHello호출- 새
print를 선언하며 같이 써주기 @override는 자식에서 부모의 속성이나 메소드를 쓰면 써주는 어노테이션인데, 안써줘도 오류는 안나지만 재정의된 것임을 명시해주는 것을 권장하기에 작성
Mixins
클래스가 다른 클래스에서 믹스인하여 사용할 수 있는 기능을 제공
Mixin 클래스는 일반적으로 다른 클래스에서 공통적으로 사용하는 기능을 포함
코드의 재사용성을 높일 수 있음
클래스 이름 앞에 mixin 키워드를 사용하여 정의된다. Mixin 클래스는 다른 클래스에서 상속할 수 없으며, 대신 with 키워드를 사용하여 클래스에 Mixin을 추가할 수 있다!
extends랑 다르게 상속도 뭣도 아닌 그냥 메소드나 프로퍼티를 가져오는 거라 더 가볍다. 약간 TS의 import 느낌? 플러터의 플러그인을 사용할 때 with를 더 많이 사용한단다.
class Strong {
  final double strengthLevel = 1500.99;
}

class QuickRunner {
  void runQuick() {
    print('I am running very fast!');
  }
}

class Tall {
  final double height = 1.99;
}

class Player extends Human with Strong, QuickRunner {
  ...
}

class Hero with Strong, QuickRunner {}

class Horse with Strong, QuickRunner, Tall {}
이런 식으로 Strong, Tall 등의 클래스들을 선언하고 쓰고 싶은 클래스에 with 키워드를 삽입해 재사용할 수 있다.
void main() {
  var player = Player(name: 'Rhino', age: 25, team: Team.red)
  ..sayHello();
  print(player.strengthLevel);

  var horse = Horse()
  ..runQuick();
  print(horse.height);
}
위처럼 player나 horse에서 runQuick() 메소드, height 프로퍼티 등을 쓰는 모습이다.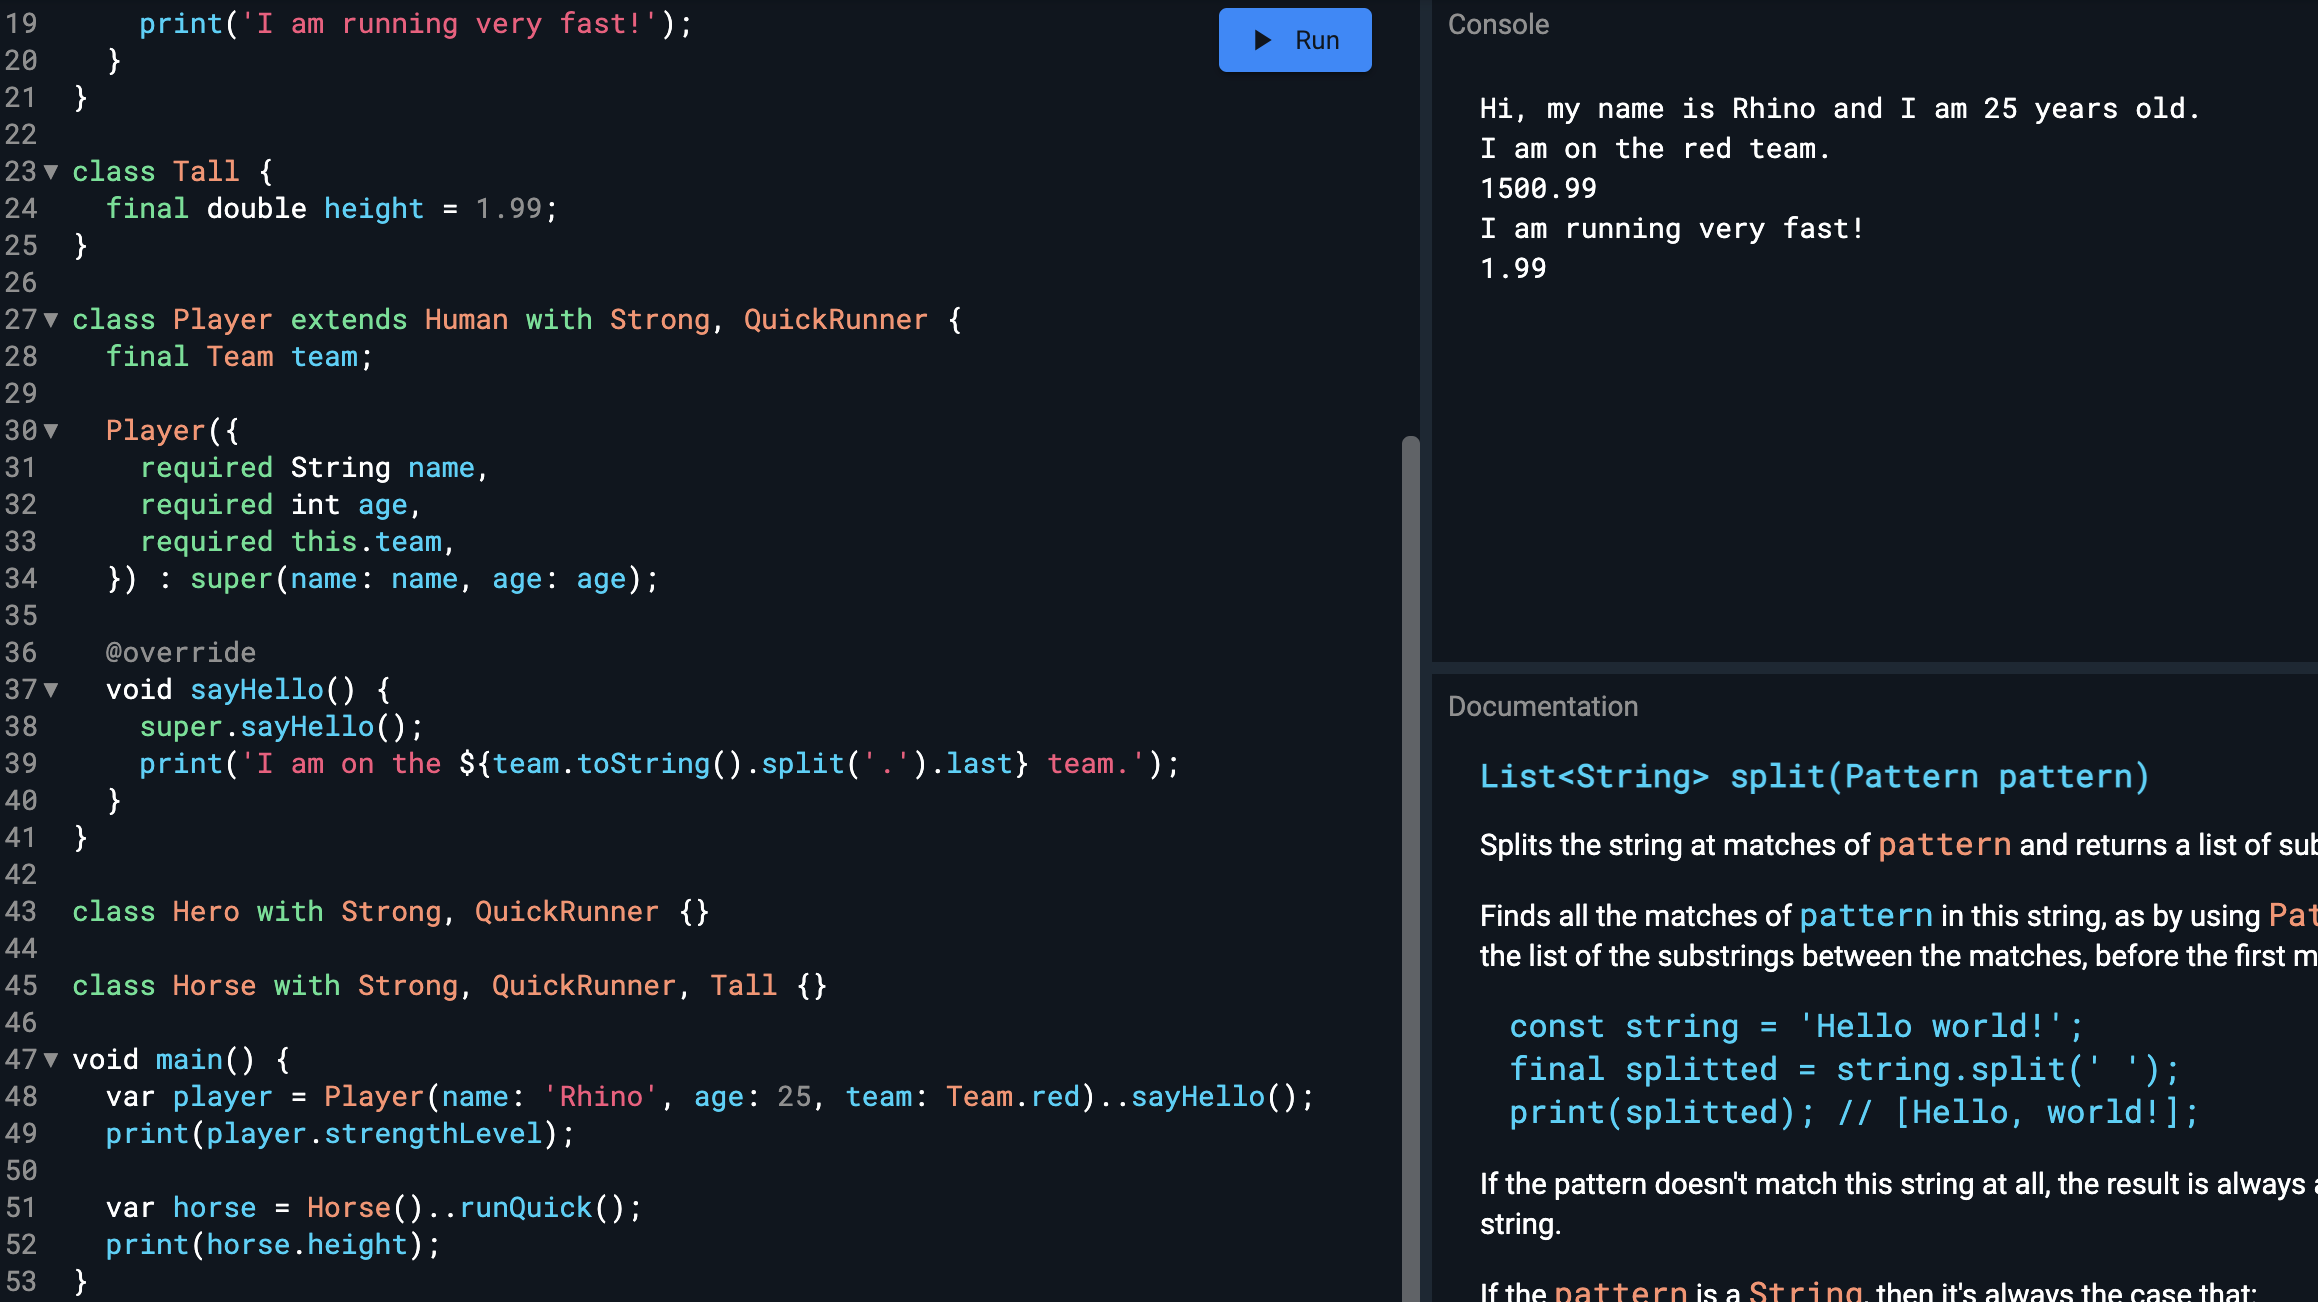
결론
다트의 기본 문법은 이제 끝났다! 정말 쉽고 간편한 언어인 거 같다. 문법만 보더라도 개발자들을 위한 핫한? 기능들이 전부 들어가있는 모습이다.
이거 공부하면서 TS를 공부했던 것이 얼마나 다행이었는지 모른다. JS에는 없는데 TS로 오면서 생긴 기능들이 다트에도 다 있고 심지어 더 편한 것들도 있었다! 이야! 오히려 TS의 진화형 언어가 아닌가 싶었다.
이제 플러터로 넘어가겠다. See you next time!


this 없는 건 좋네요 ㅋㅋ 잘 보고 갑니돵