Redux는 액션을 이용한 효율적인 상태관리 라이브러리 특히 전역으로 관리하기 편하다.
Redux-Toolkit은 Redux를 만든 곳에서 공식적으로 효율적인 Redux 개발을 위해 만들어진 툴킷
Redux 작성하는 코드를 간단하게 작성, Redux 보다 훨씬 효율적이므로 사용을 권장
그럼 Redux를 언제 사용하면 좋을까?
- 여러 위치, 많은 양의 상태가 있습니다.
- 자주 업데이트되는 상태.
- 복잡한 상태 업데이트 논리.
- 협업.
본격적으로 Redux배우기
아래는 "(state, action) => newState" 형태의 리듀서입니다.
const initialState = { value: 0 }

function counterReducer(state = initialState, action) {
  if (action.type === 'counter/increment') {
    // state 복사
    return {
      ...state,
      // 새로운 밸류와 합께 업데이트
      value: state.value + 1
    }
  }
  // 별도의 액션이 없다면 그대로 반환
  return state
}
이를 이용하려면 먼저 store라는 객체를 불러와야합니다.
import { configureStore } from '@reduxjs/toolkit'

const store = configureStore({ reducer: counterReducer })

console.log(store.getState())
store에서 상태를 업데이트하는 유일한 방법은 store.dispatch() 입니다. 또 getState()를 사용해 state를 호출할 수 있습니다.
store.dispatch({ type: 'counter/increment' })

console.log(store.getState())
// {value: 1}
일반적으로는 작업생성자를 호출해서 사용할 것 입니다.
const increment = () => {
  return {
    type: 'counter/increment'
  }
}

store.dispatch(increment())

console.log(store.getState())
만약 반복적인 작업을 피하고싶다면 아래와 같이 사용하는 것도 방법입니다.
const selectCounterValue = state => state.value
const currentValue = selectCounterValue(store.getState())
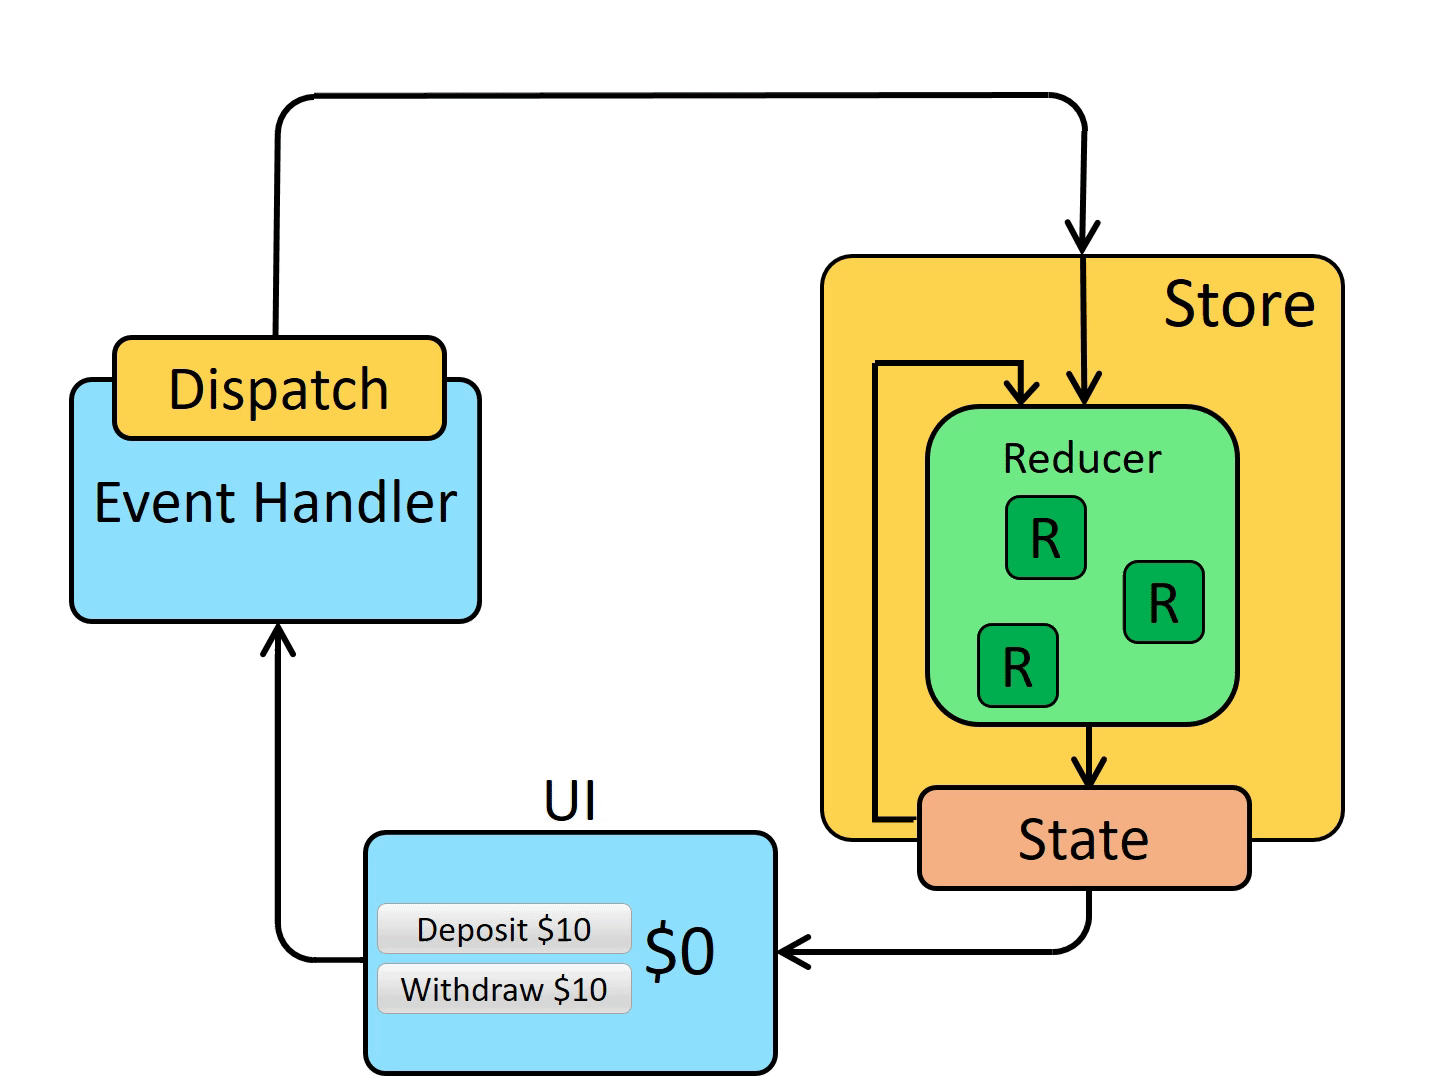
console.log(currentValue)react에서 데이터의 단반향 흐름을 생각해봅시다.
1. 상태는 특정 시점의 앱 상태를 설명합니다.
2. UI는 해당 상태를 기반으로 렌더링됩니다.
3. 어떤 일이 발생하면(예: 사용자가 버튼을 클릭하는 경우) 발생한 상황에 따라 상태가 업데이트됩니다.
4. 새로운 상태에 따라 UI가 다시 렌더링됩니다.
Redux에서는 이를 더 자세히 구별합니다.
- 초기 설정:
1.1 Redux 저장소는 루트 리듀서 기능을 사용하여 생성됩니다.
1.2 store는 루트 리듀서를 한 번 호출하고 반환 값을 초기 값으로 저장합니다.
1.3 state UI가 처음 렌더링되면 UI 구성 요소는 Redux 스토어의 현재 상태에 액세스하고 해당 데이터를 사용하여 무엇을 렌더링할지 결정합니다.
1.4 또한 향후 매장 업데이트를 구독하여 상태가 변경되었는지 알 수 있습니다. - 업데이트:
2.1 사용자가 버튼을 클릭하는 것과 같이 앱에서 어떤 일이 발생합니다.
2.2 앱 코드는 다음과 같이 Redux 스토어에 작업을 전달합니다.dispatch({type: 'counter/increment'})
2.3 statestore는 이전 과 현재로 리듀서 기능을 다시 실행 action하고 반환 값을 새 것으로 저장합니다.
2.4 state은 등록된 UI의 모든 부분에 상점이 업데이트 되었음을 알립니다.
2.5 스토어의 데이터가 필요한 각 UI 구성 요소는 필요한 상태 부분이 변경되었는지 확인합니다.
2.6 변경된 데이터를 보는 각 구성 요소는 새 데이터로 강제로 다시 렌더링하므로 화면에 표시되는 내용을 업데이트할 수 있습니다.

Redux 공식 홈페이지 데이터흐름 gif
Redux App 구조 알아보기
import { createSlice } from '@reduxjs/toolkit'

export const counterSlice = createSlice({
  name: 'counter',
  initialState: {
    value: 0,
  },
  reducers: {
    increment: (state) => {
      state.value += 1
    },
    decrement: (state) => {
      state.value -= 1
    },
    incrementByAmount: (state, action) => {
      state.value += action.payload
    },
  },
})

export const { increment, decrement, incrementByAmount } = counterSlice.actions

export const incrementAsync = (amount) => (dispatch) => {
  setTimeout(() => {
    dispatch(incrementByAmount(amount))
  }, 1000)
}

export const selectCount = (state) => state.counter.value

export default counterSlice.reducer
위의 예제를 통해 React와 Redux가 소통하는 법을 알아보도록 합시다.
위에서 store에는 counter: {value:0} 가 있는 것을 알 수 있습니다.
또 리듀서를 통해 increment, decrement, incrementByAmount 3가지 작업이 있다는 것을 알 수 있습니다.
이는 DevTools을 통해 전부 확인 할 수 있고 incrementByAmount작업은 payload또한 확인할 수 있습니다.
또 DevTools을 통해 무엇이 디스페치에 영향을 주었는지 Diff를 통해 value가 변화한 모습도 볼 수 있습니다.
그러면 파일구조를 살펴보겠습니다.
/src
index.js: 앱의 시작점
App.js: 최상위 React 구성 요소
/app
store.js: Redux 스토어 인스턴스 생성
/features/counter
Counter.js: 카운터 기능에 대한 UI를 보여주는 React 컴포넌트
counterSlice.js: 카운터 기능을 위한 Redux 로직
먼저 store는 "configureStore" ReduxToolkit의 기능을 사용하여 생성됩니다.
아래처럼 reducer를 인수로 념겨줘야 합니다.
import { configureStore } from '@reduxjs/toolkit'
import counterReducer from '../features/counter/counterSlice'

export default configureStore({
  reducer: {
    counter: counterReducer
  }
})
만약 더많은 리듀서를 가지는 블로그라면 아래와 같은 것 입니다.
import { configureStore } from '@reduxjs/toolkit'
import usersReducer from '../features/users/usersSlice'
import postsReducer from '../features/posts/postsSlice'
import commentsReducer from '../features/comments/commentsSlice'

export default configureStore({
  reducer: {
    users: usersReducer,
    posts: postsReducer,
    comments: commentsReducer
  }
})
그럼 가져오는 리듀서에 대해 알아볼면
import { createSlice } from '@reduxjs/toolkit'

export const counterSlice = createSlice({
  name: 'counter',
  initialState: {
    value: 0
  },
  reducers: {
    increment: state => {
      state.value += 1
    },
    decrement: state => {
      state.value -= 1
    },
    incrementByAmount: (state, action) => {
      state.value += action.payload
    }
  }
})

export const { increment, decrement, incrementByAmount } = counterSlice.actions

export default counterSlice.reducer
위에서 처음 알아볼 것은 이전 처럼 {type: "counter/increment"} 가져오지 않는다는 것인데 위처럼 createSlice사용해 name을 통해서 반복적인 작업을 줄일 수 있습니다.
리듀서의 규칙을 적용했습니다.
규칙 1. state및 action인수를 기반으로 새 상태 값만 계산해야 합니다.
규칙 2. 기존 값을 복사 하고 복사된 값을 변경하여 불변 업데이트를 수행해야 합니다.
규칙 3. 비동기 로직 또는 기타 "side effects"을 수행해서는 안 됩니다.
위의 규칙을 지겨야하는 이유는 이후에 테스트, 직관적인 로직, 버그, Redux DevTools를 올바르게 사용할 수 있도록 합니다.
또 비동기 사용을 하고싶다면 redux-thunk을 사용해야합니다. 다행히도 Redux Toolkit의 configureStore기능은 이미 자동으로 설정되어 있으므로 바로 사용하면 됩니다.
예를 들면 아래처럼 외부의 값을 받아올 수 있습니다.
const fetchUserById = userId => {
  return async (dispatch, getState) => {
    try {
      const user = await userAPI.fetchById(userId)
      dispatch(userLoaded(user))
    } catch (err) {
    }
  }
}
이제 이렇게 만들어진 리듀서를 컴포넌트에서 어떻게 이용할까요?
import React, { useState } from 'react'
import { useSelector, useDispatch } from 'react-redux'
import {
  decrement,
  increment,
  incrementByAmount,
  incrementAsync,
  selectCount
} from './counterSlice'
import styles from './Counter.module.css'

export function Counter() {
  const count = useSelector(selectCount)
  const dispatch = useDispatch()
  const [incrementAmount, setIncrementAmount] = useState('2')

  return (
    <div>
      <div className={styles.row}>
        <button
          className={styles.button}
          aria-label="Increment value"
          onClick={() => dispatch(increment())}
        >
          +
        </button>
        <span className={styles.value}>{count}</span>
        <button
          className={styles.button}
          aria-label="Decrement value"
          onClick={() => dispatch(decrement())}
        >
          -
        </button>
      </div>
      {/* omit additional rendering output here */}
    </div>
  )
}
먼저 useSelector의 쓰임을 알아 보겠습니다.
useSelector의 역할은 store에서 특정 데이터조각을 추출하는데 있습니다.
다음 dispatch는 말 그래도 dispatch하는데 있습니다.
이쯤에서 생각하면 굳이 store에 넣어야하나라고 생각할 수 있습니다. 꼭 그런건 아닙니다. 본인 생각에 이 데이터가 전역에서 사용한다면 넣어야하지만 그것이 아니라면 꼭 넣는것 보다는 state로 이용하는 편이 좋겠습니다. 위에 const "[incrementAmount, setIncrementAmount] = useState('2')"처럼 말이죠
이를 위한 가이드도 존재합니다.
ㅁ 애플리케이션의 다른 부분에서 이 데이터를 관리합니까?
ㅁ 이 원본 데이터를 기반으로 추가 파생 데이터를 만들 수 있어야 합니까?
ㅁ 여러 구성 요소를 구동하는 데 동일한 데이터가 사용되고 있습니까?
ㅁ 이 상태를 주어진 시점으로 복원할 수 있다는 점에서 가치가 있습니까?
ㅁ 데이터를 캐시하시겠습니까(굳이 데이터를 다시 요청할 것입니까?)?
ㅁ UI 구성 요소를 리로드하는 동안 이 데이터를 일관되게 유지하시겠습니까?