📗목차
- 1. Route로 회원가입 컴포넌트 경로 설정
- 2. Membership 컴포넌트 구현
- 3. onChange 이벤트 핸들링
- 4. 비밀번호 일치 여부 확인하기
- 5. 회원가입 버튼
- 6. 회원가입 버튼 색상이 활성화될 때만 제출되기
- 7. 휴대폰 번호 입력 시 자동 하이픈(-) 넣기
- 전체 코드
기존 프로젝트의 스타일을 styled-components로 하거나 CSS로 하였는데, 현재는 CSS를 모두 SCSS로 수정하였다. SCSS로 바꾼 이유는 SCSS의 특징인 셀렉터의 중첩 기능 때문이었다. 중첩 기능 덕분에 편하고 가독성 좋은 코드를 작성할 수 있었다.
일반적인 CSS로 코드를 작성하였을 때는 중복되는 셀렉터로 인해 코드가 길어지고 가독성이 떨어졌었다.
이제 회원가입 페이지를 구현해볼 생각이다.
1. Route로 회원가입 컴포넌트 경로 설정
먼저 Membership.tsx 파일을 생성해준다.
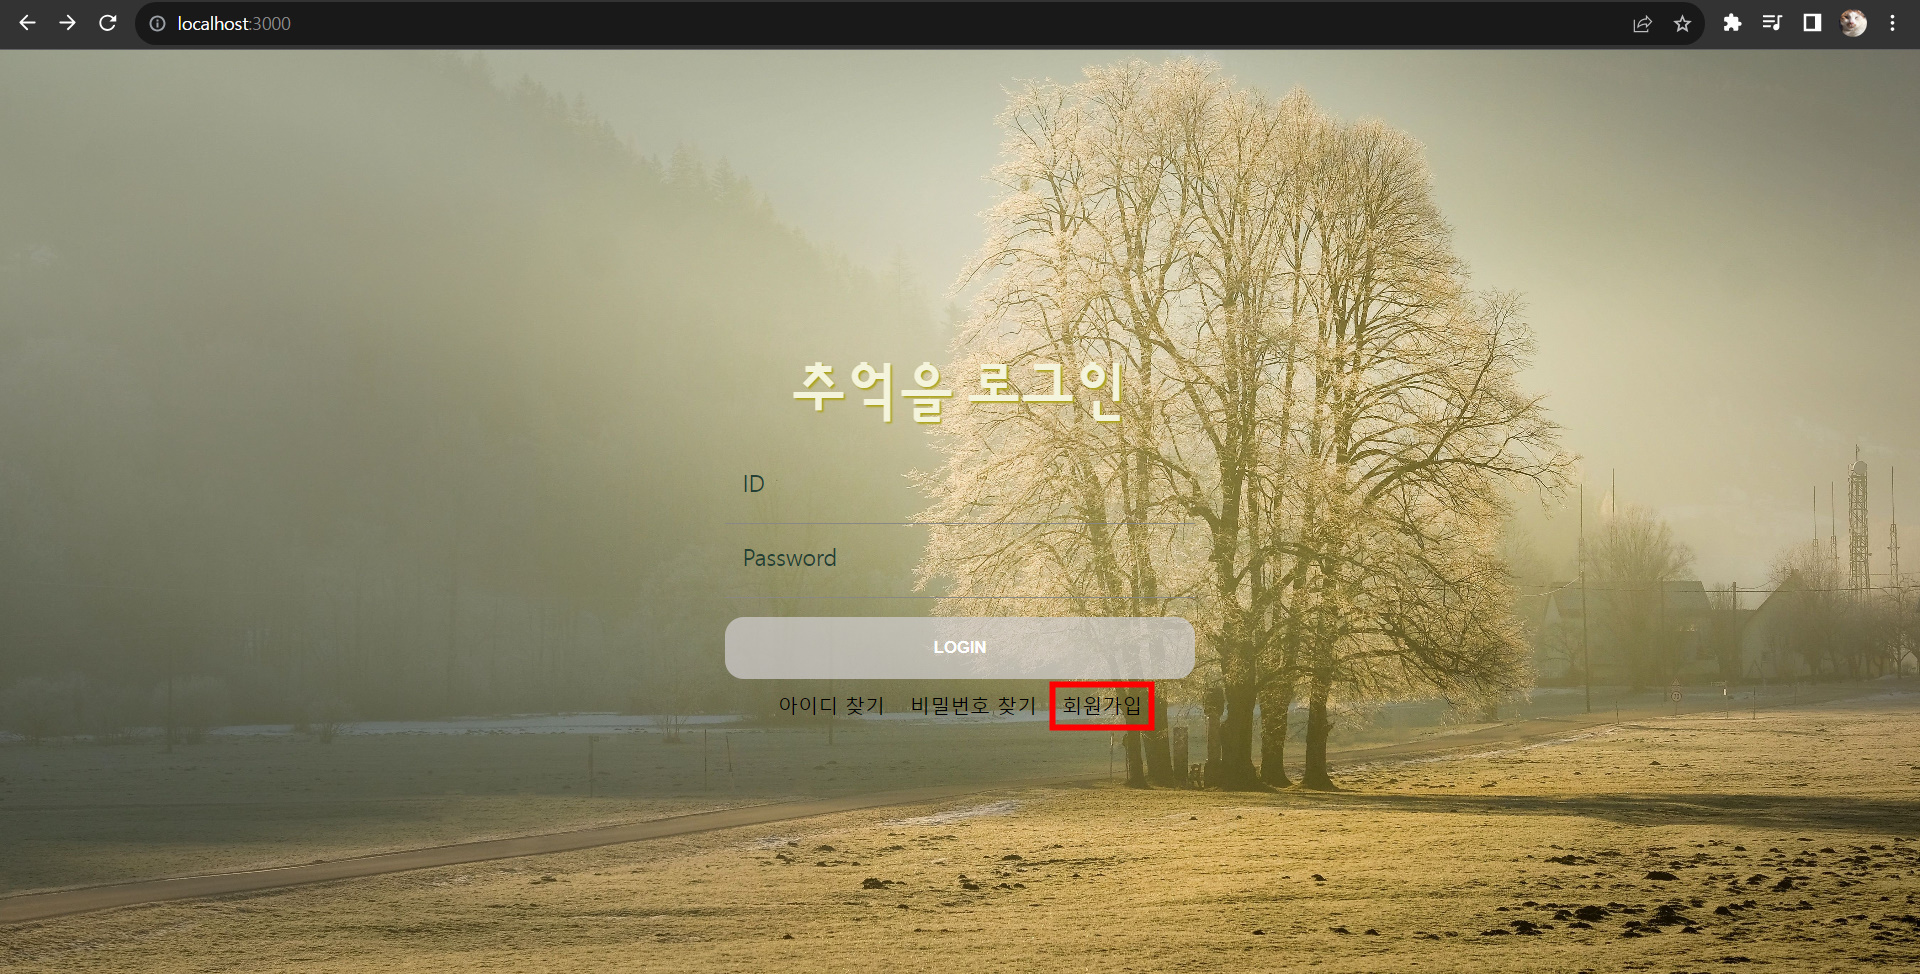
그럼 다음 LoginBox 컴포넌트에서 회원가입 링크를 만들어 주자. (빨간색 네모친 부분)
아래 코드를 살펴보자.
LoginBox 컴포넌트의 return문
return (
    <div className="LoginBox">
        <section className="login-form">
            <h1>추억을 로그인</h1>
            <form onSubmit={handleFormSubmit}>
                ...
				...
  				// 생략
                <button
                    className={`btn-login ${isActive ? 'active' : 'inactive'}`}
                    disabled={!isActive}
                >
                    LOGIN
                </button>
            </form>

            <div className='link'>
                <Link to="/hint">아이디 찾기</Link> // 임시 링크
                <Link to="/hint">비밀번호 찾기</Link> // 임시 링크
                <Link to="/membership">회원가입</Link>
            </div>
        </section>
        <Routes>
            <Route path="/album" element={<Album />} />
            <Route path="/membership" element={<Membership />}></Route>
            <Route path="/hint" element={<Hint />}></Route> // 임시 라우트
        </Routes>
    </div>
)
Membership 컴포넌트의 path를 설정해주고 회원가입 링크를 만들었다.
그 다음 App 컴포넌트에서도 Membership 컴포넌트의 path를 설정해주자.
import { Routes, Route } from 'react-router-dom';
import LoginBox from './Component/LoginBox';
import Hint from './Component/StyledComponents/Hint';
import Membership from './Component/StyledComponents/Membership';
import Album from './Component/Album';

const App = () => {
  return (
    <>
      <Routes>
        <Route path="/" element={<LoginBox />}></Route>
        <Route path="/album" element={<Album />}></Route>
        <Route path="/hint" element={<Hint />}></Route>
		<Route path="/membership" element={<Membership />}></Route>
      </Routes>
    </>
  );
}

export default App;
이제 Membership.tsx 파일로 돌아가서 회원가입 페이지를 구현해보겠다.
2. Membership 컴포넌트 구현
회원가입 페이지는 SCSS를 사용하지 않고 CSS in JS인 styled-components를 사용하였다. props를 이용하여 동적으로 스타일링 해야되는 부분이 많아 styled-components를 택하게 되었다.
Membership.tsx
import React, { useState, useEffect, useCallback } from 'react';
import { useNavigate } from 'react-router-dom';
import styled, { css } from 'styled-components';

const MembershipBox = styled.div`
    width: 450px;
    height: 460px;
    font-size: 15px;
    background-color: rgba(255, 179, 128, 0.8);
    border-radius: 5px;
    margin: 0 auto;
`;

const H1 = styled.h1`
    text-align: center;
`;

const Form = styled.form`
    margin-top: 20px;
`

const Label = styled.label<{ id?: string }>`
    font-size: 14px;
    margin-left: 60px;
    ${props =>
      props.id === "phoneLabel" &&
      css`
        margin-left: 35px;
    `}
`;

const Input = styled.input`
    display: block;
    width: 70%;
    height: 35px;
    background: #F5F5F5;
    border: 1px solid rgba(114, 143, 157, 0.93);
    border-radius: 5px;
    padding-left: 15px;
    margin: 0 auto;
    margin-top: 5px;
    margin-bottom: 10px;
    ${props =>
     props.name === 'username' &&
     css`
       width: 70%;
       margin-left: 56px;
    `}
    &:focus {
        outline: none;
        border: 1px solid orange;
        box-shadow: 0 0 4px orange;
    }
`;

const Conlumn = styled.div`
    display: inline-block;
    width: 100%;
    height: 70px;
    margin: 0 auto;
`;
const ColumnName = styled.div`
    display: inline-block;
    width: 38%;
`;
const ColumnPhone = styled.div`
    display: inline-block;
    width: 55%;
    margin-left: 2px;
`;

const Register = styled.button<{ checked: boolean }>`
    display: block;
    margin: 0 auto;
    width: 45%;
    height: 35px;
    border: none;
    border-radius: 5px;
    margin-top: 15px;
    margin-bottom: 5px;
    &:active {
        background-color: rgba(17, 48, 69, 0.25);
    }
    ${props =>
      props.checked === true &&
      css`
        background-color: #d8db31;
    `}
`;

const Back = styled.button`
    display: block;
    margin: 0 auto;
    background-color: mintcream;
    width: 15%;
    height: 20px;
    border: none;
    border-radius: 5px;
    color: purple;
    font-weight: bold;
    font-size: 13px;
    &:active {
        background-color: rgba(17, 48, 69, 0.25);
        color: black;
    }
`;

const Membership = () => {
    const navigate = useNavigate();

    return (
        <>
            <MembershipBox>
                <H1>회원가입</H1>
                <Form>
                    <Label>아이디</Label>
                    <Input
                        type="text"
                        name="id"
                        required
                    />

                    <Label>비밀번호</Label>
                    <Input
                        type="password"
                        name="password"
                        required
                    />

                    <Label>비밀번호 확인</Label>
                    <Input
                        type="password"
                        name="password_confirm"
                        required
                    />

                    <Conlumn>
                        <ColumnName>
                            <Label>이름</Label>
                            <Input
                                type="text"
                                name="username"
                                required
                            />
                        </ColumnName>

                        <ColumnPhone>
                            <Label id="phoneLabel">휴대폰 번호</Label>
                            <Input
                                type="text"
                                name="phone"
                                required
                            />
                        </ColumnPhone>
                    </Conlumn>

                    <Register>회원가입</Register>
                    <Back type="button" onClick={() => navigate('/')}>back</Back>
                </Form>
            </MembershipBox>
        </>
    );
}

export default Membership;
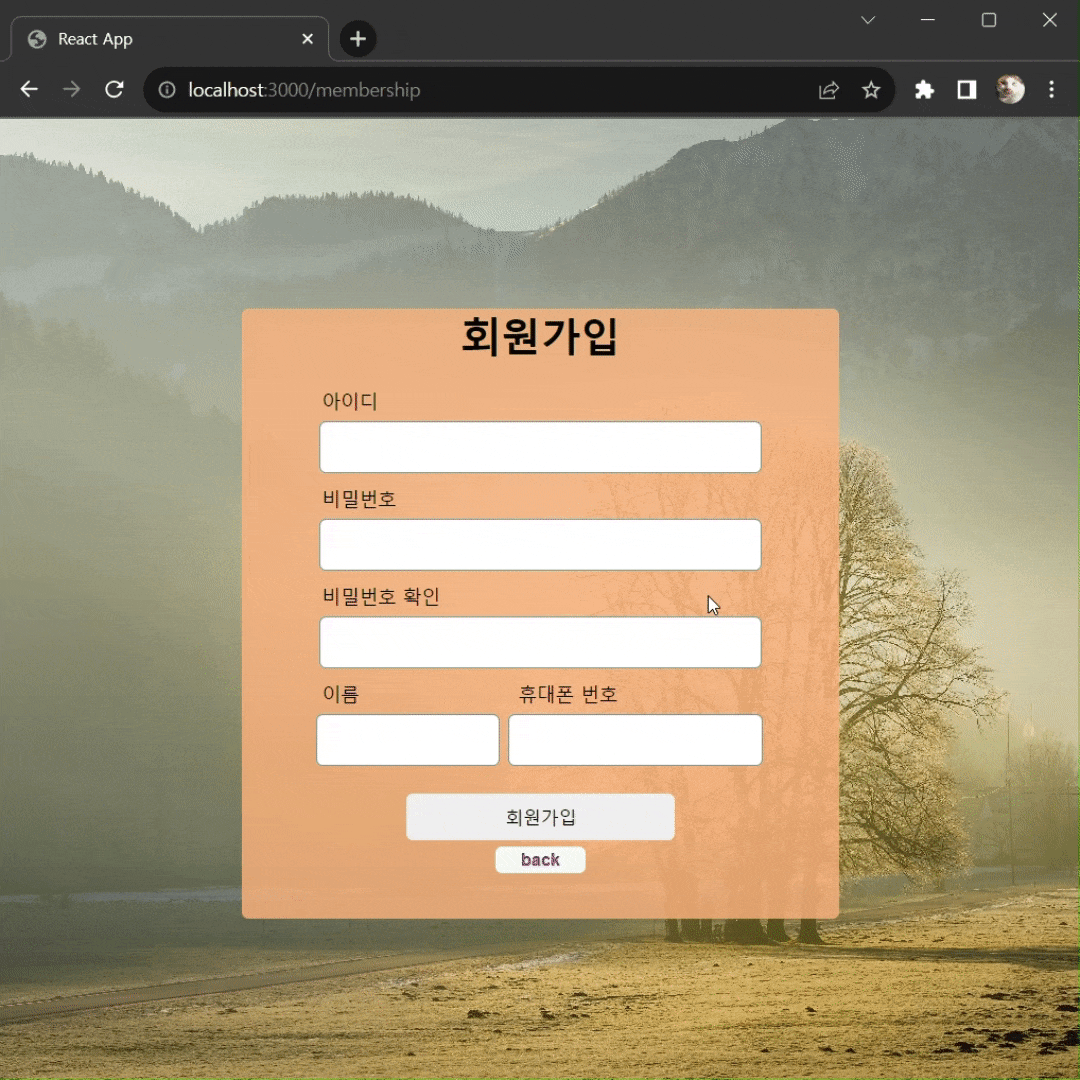
위의 코드에 대한 결과 페이지이다.
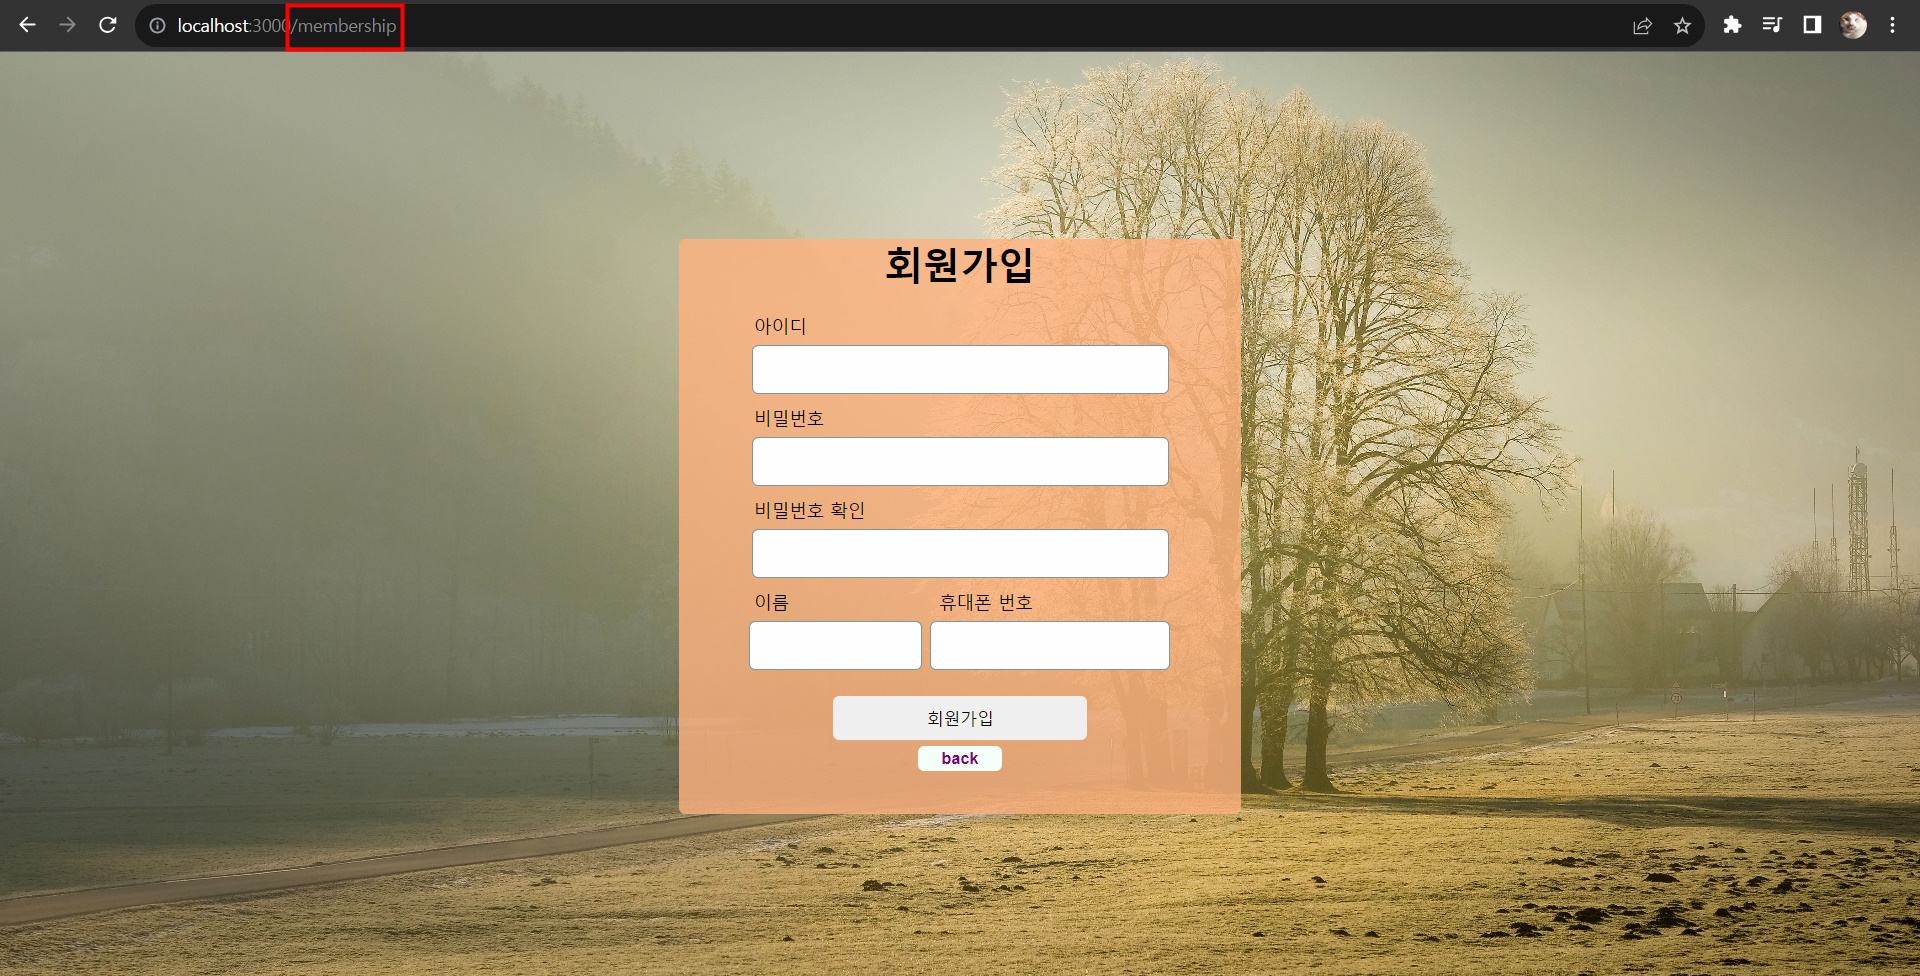
회원가입 페이지 화면과 경로를 확인할 수 있다.
위의 코드에 맞는 이벤트 핸들링과 각 상태 변수들을 하나씩 구현해보도록 하겠다.
3. onChange 이벤트 핸들링
1) form 상태 변수 정의하기
interface FormState {
    id: string,
    password: string,
    password_confirm: string,
    username: string,
    phone: string,
};

const Membership = () => {
  const [ form, setForm ] = useState<FormState>({
      id: '',
      password: '',
      password_confirm: '',
      username: '',
      phone: ''
  });
  const { id, password, password_confirm, username, phone } = form;
  .
  .
  .
  // 생략
}
먼저 상태 변수를 정의해준 다음, 그에 맞는 타입을 설정하기 위해 FormState 인터페이스를 정의한다.
2) onChange 이벤트 핸들러를 사용하는 상태 업데이트
const handleInputChange = useCallback((e: React.ChangeEvent<HTMLInputElement>) => {
    setForm(prev => ({
        ...prev,
        [e.target.name]: e.target.value
    }));
}, []);handleInputChange는 각각의 input에 입력한 값을 상태 변수에 저장하기 위한 함수이다. e.target.name은 해당 input 태그의 name 속성을 의미한다.
아래의 코드를 보면 Input 태그의 name 속성에 각각 값이 들어간 것을 확인할 수 있다. input에 입력한 값을 불러와서 상태 변수에 저장하기 위한 것이다.
form 태그 내부 input 속성 확인하기
<Form>
    <Label>아이디</Label>
    <Input
        type="text"
        name="id"
        onChange={handleInputChange}
        required
    />

    <Label>비밀번호</Label>
    <Input
        type="password"
        name="password"
        onChange={handleInputChange}
        required
    />

    <Label>비밀번호 확인</Label>
    <Input
        type="password"
        name="password_confirm"
        onChange={handleInputChange}
        required
    />

    <Conlumn>
        <ColumnName>
            <Label>이름</Label>
            <Input
                type="text"
                name="username"
                onChange={handleInputChange}
                required
            />
        </ColumnName>

        <ColumnPhone>
            <Label id="phoneLabel">휴대폰 번호</Label>
            <Input
                type="text"
                name="phone"
                onChange={handleInputChange}
                required
            />
        </ColumnPhone>
    </Conlumn>

	<Register>회원가입</Register>
    <Back type="button" onClick={() => navigate('/')}>back</Back>
</Form>
이렇게 name 속성에 값을 넣는 것과 handleInputChange 함수를 생성해서 onChange 이벤트를 적용한 것은 나중에 서버에 폼을 제출하기 위해서도 사용된다.
4. 비밀번호 일치 여부 확인하기
회원가입을 하기 위한 필수적인 절차 중 "비밀번호 재확인"이다.
사용자가 처음에 입력한 비밀번호를 제대로 알고 있는지 확인하기 위해 다시 입력하도록 하는 기능을 만들어 볼 것이다.
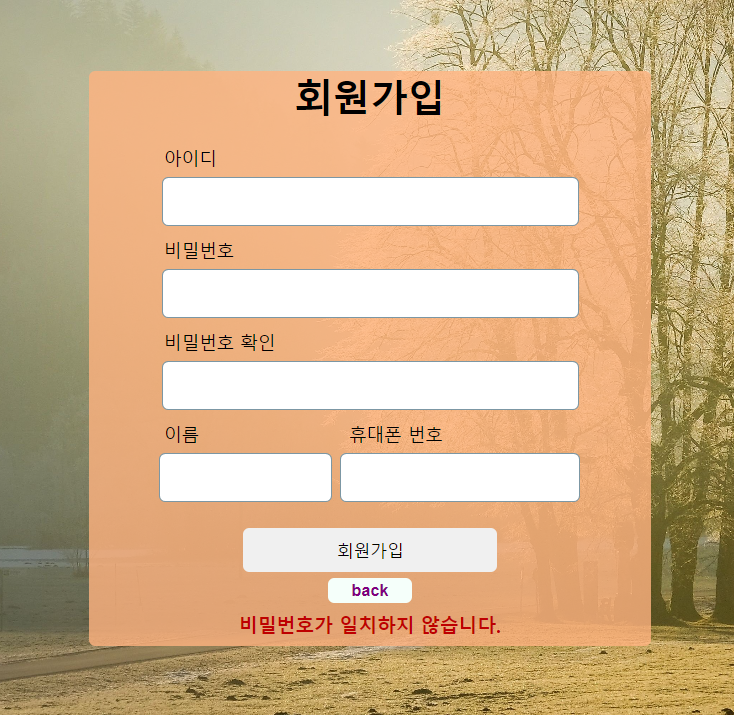
위의 폼 태그 안에 처음 입력한 비밀번호와 재입력한 비밀번호가 같지 않을 때 불일치 문구를 보이게 하는 태그를 만들어 보겠다.
1단계
const Check = styled.div<{ checked: boolean }>`
    display: none;
    ${props =>
      props.checked === false &&
      css`
        display: block;
        color: #be0000;
        font-weight: bold;
        text-align: center;
        margin-top: 8px;
    `};
`;

const Membership = () => {
	// 생략
	<Check checked={false}>비밀번호가 일치하지 않습니다.</Check>
}
우선 checked 속성 값을 false로 지정해둔 상태로 두면
다음과 같은 화면이 나타난다.
이제 props를 이용하여 동적으로 스타일을 입혀 보자.
다음 단계는 false로 수동 설정한 checked 속성의 값을 상태 변수로 바꾸는 것이다. 그러기 위해서 상태 변수를 정의해보겠다.
2단계
interface ActiveState {
    confirmPassword: boolean,
    registerBtn: boolean
}

const Membership = () => {
  // 비밀번호 불일치 문구 & 회원가입 버튼 색상 => 활성화 상태 변수
  const [ isActive, setIsActive ] = useState<ActiveState>({
      confirmPassword: true, // 기본 설정값 (비밀번호 일치)
      registerBtn: false // 기본 버튼 비활성화 색상 설정
  });
  const { confirmPassword, registerBtn } = isActive;
  .
  . // 생략
  .
}
registerBtn은 밑에 설명해두겠다. → 5. 회원가입 버튼
confirmPassword 상태 변수를 기본 true로 정의한다.
이제 1단계와 2단계를 합쳐보자.
3단계: 1단계 + 2단계
const Check = styled.div<{ checked: boolean }>`
    display: none;
    ${props =>
      props.checked === false &&
      css`
        display: block;
        color: #be0000;
        font-weight: bold;
        text-align: center;
        margin-top: 8px;
    `};
`;

interface ActiveState {
    confirmPassword: boolean,
    registerBtn: boolean
}

const Membership = () => {
  // 비밀번호 불일치 문구 & 회원가입 버튼 색상 => 활성화 상태 변수
  const [ isActive, setIsActive ] = useState<ActiveState>({
      confirmPassword: true, // 기본 설정값 (비밀번호 일치)
      registerBtn: false // 버튼 비활성화 설정값
  });
  const { confirmPassword, registerBtn } = isActive;
  .
  .	// 생략
  .

  return(
    .
    . // 생략
    .
    <Check checked={confirmPassword}>비밀번호가 일치하지 않습니다.</Check>
  )
};
confirmPassword true로 정의한 이유는 그렇게 하면 처음 페이지가 렌더링 됐을 때 confirmPassword 변수가 true인 상태여서 비밀번호 불일치 문구가 보이지 않기 때문이다.
이제 마지막으로 비밀번호란과 비밀번호 확인란의 값이 같지 않을 때 confirmPassword 값이 false로 바뀌게 설정해보겠다.
4단계
useEffect(() => {
    setIsActive(prev => ({
        ...prev,
        // 값이 같으면 비밀번호 불일치 문구 숨기기
        confirmPassword: password_confirm === password,
}, [password_confirm, password, confirmPassword]);
이제 비밀번호 일치 여부를 확인할 수 있다.
아래의 결과 화면을 봐보자.
5. 회원가입 버튼
이번에는 회원가입 버튼 색상 활성화 기능을 구현해보겠다.
1단계
const Register = styled.button<{ checked: boolean }>`
    display: block;
    margin: 0 auto;
    width: 45%;
    height: 35px;
    border: none;
    border-radius: 5px;
    margin-top: 15px;
    margin-bottom: 5px;
    &:active {
        background-color: rgba(17, 48, 69, 0.25);
    }
    ${props =>
      props.checked === true &&
      css`
        background-color: #d8db31; /* 노란색 */
    `}
`;

interface ActiveState {
    confirmPassword: boolean,
    registerBtn: boolean
}

// 비밀번호 불일치 문구 & 회원가입 버튼 색상 => 활성화 상태 변수
const [ isActive, setIsActive ] = useState<ActiveState>({
    confirmPassword: true, // 기본 설정값 (비밀번호 일치)
    registerBtn: false // 기본 버튼 비활성화 색상 설정
});
const { confirmPassword, registerBtn } = isActive;
registerBtn 상태 변수는 기본 false로 정의한다.
2단계
useEffect(() => {
    setIsActive(prev => ({
        ...prev,
        // 값이 같으면 비밀번호 불일치 문구 숨기기
        confirmPassword: password_confirm === password,

        // id, password, password_confirm, username, phone 값이 모두 있으면 회원가입 버튼 색상 활성화
        register:
            id !== '' && password !== ''
            && password_confirm !== '' && username !== ''
            && confirmPassword === true // 비밀번호 불일치 문구까지 안 보여야 회원가입 버튼 색상 활성화
            && phone !== ''
    }));
}, [id, password_confirm, password, username, confirmPassword, phone]);

<Register checked={registerBtn}>회원가입</Register>
각각 id, password, password_confirm, username, phone이 해당하는 input 요소의 value가 모두 비어있지 않고, 비밀번호가 일치하면(confirmPassword가 true이면) registerBtn 상태가 true가 된다.

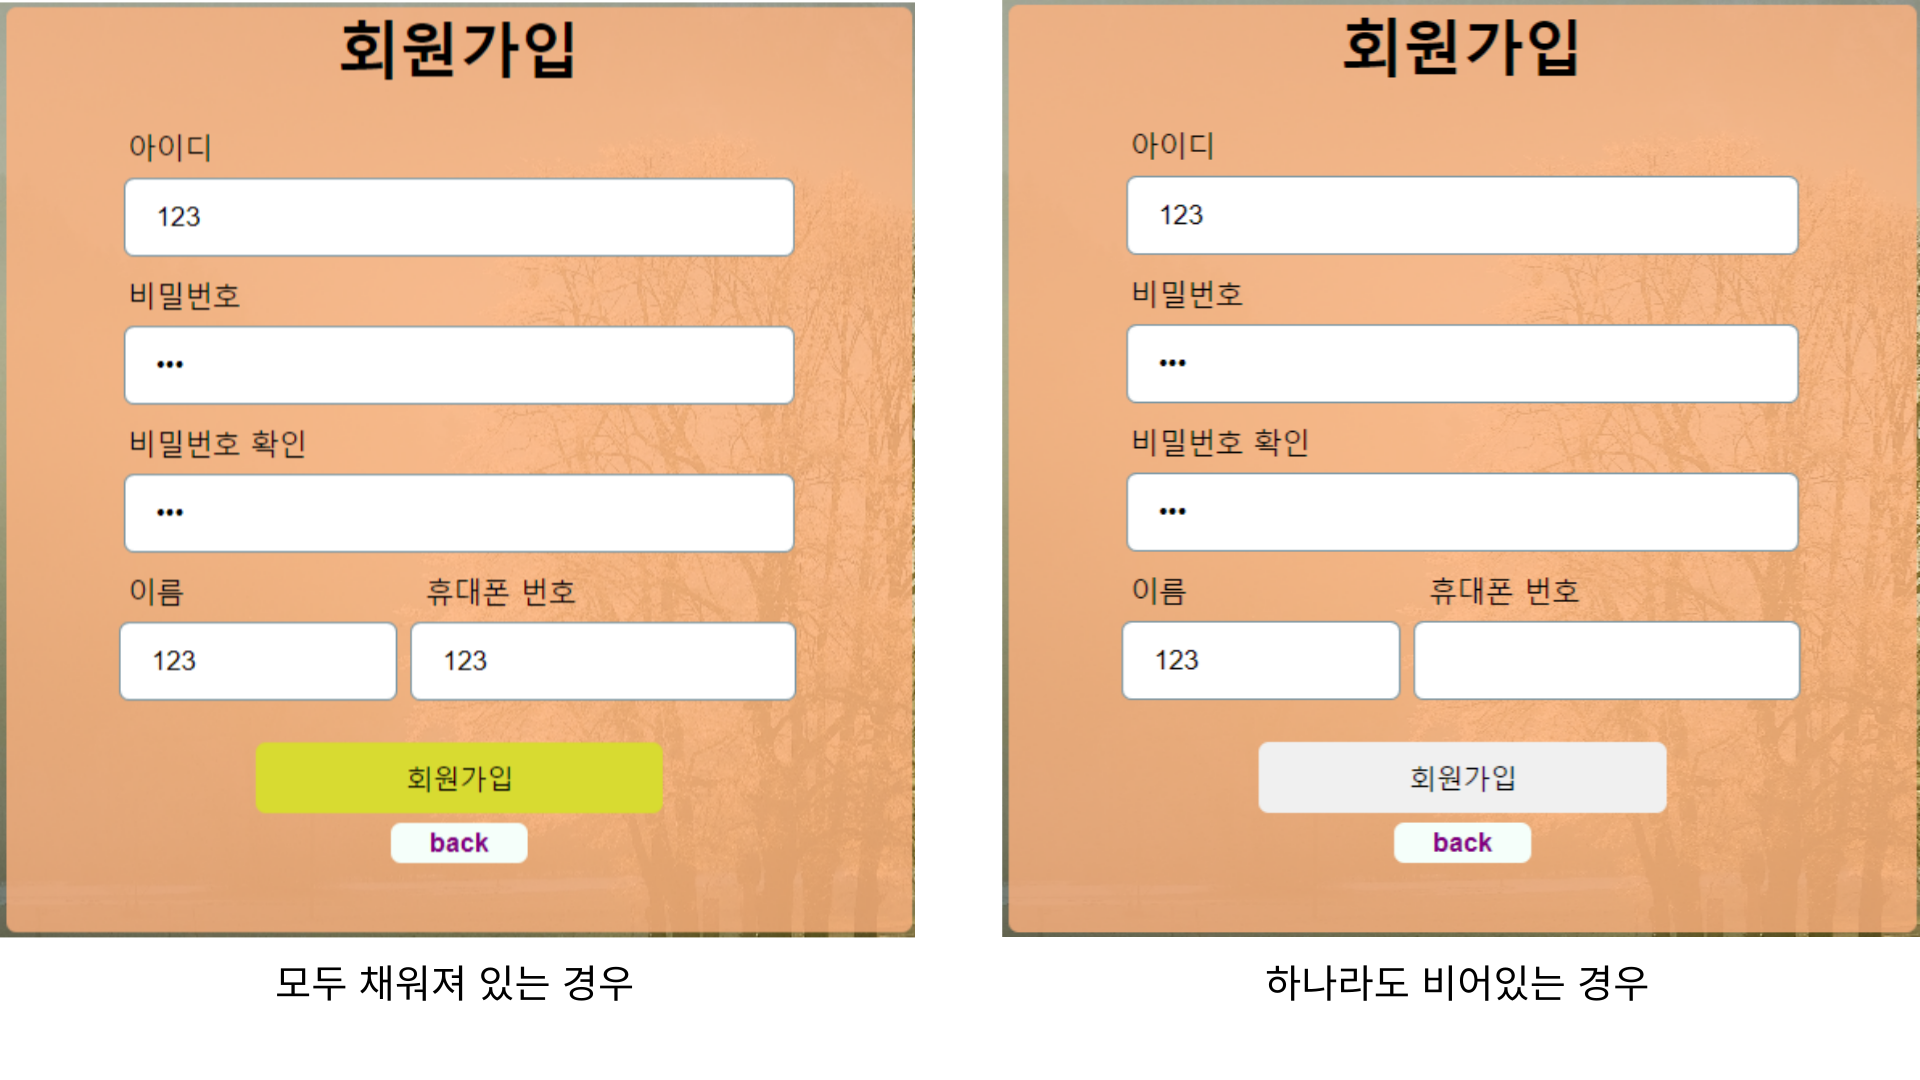
이렇게 버튼 색상이 바뀌는 것을 확인할 수 있다.
6. 회원가입 버튼 색상이 활성화될 때만 제출되기
이제 마지막으로 회원가입 버튼 색상이 노랗게 변한 상태에만 제출이 가능하도록 구현할 것이다.
이건 간단하다.
<Form onSubmit={(e) => registerBtn === false && e.preventDefault()}>
    ... // 생략
</Form>
form의 onSubmit 이벤트 핸들링으로 registerBtn가 false일 경우 제출을 막게하면 된다.
즉, registerBtn 버튼 색상이 노랗지 않을 때 제출을 못 하게 막는다.
7. 휴대폰 번호 입력 시 자동 하이픈(-) 넣기
기존 handleInputChage 함수
const handleInputChange = useCallback((e: React.ChangeEvent<HTMLInputElement>) => {
    setForm(prev => ({
        ...prev,
        [e.target.name]: e.target.value
    }));
}, []);
기존의 onChange 이벤트 핸들링은 input에 입력한 값들을 해당 상태 변수에 반영해주는 역할을 한다.
그럼 이번에는 휴대폰 번호를 입력할 때 자동으로 하이픈이 생기도록 기능을 구현해보겠다.
자동 하이픈 기능을 넣은 handleInputChange 함수
const handleInputChange = useCallback((e: React.ChangeEvent<HTMLInputElement>) => {
    const { name, value } = e.target;

    if (name === "phone") {
        // 휴대폰 번호 입력 시 자동으로 하이픈 추가
        const phoneNum = value.replace(/[^0-9]/g, '').replace(/^(\d{0,3})(\d{0,4})(\d{0,4})$/g, '$1-$2-$3')
                              .replace(/(\-{1,2})$/g, '');
        setForm(prev => ({ ...prev, [name]: phoneNum }));
    } else {
        setForm(prev => ({ ...prev, [name]: value }));
    }
}, []);
input의 name 속성 중 phone에 해당하는 입력 값과 name 속성이 phone이 아닌 경우를 나눠서 상태 업데이트를 해주었다.
결과 화면은 다음과 같다.
타이핑까지 하는 모습을 찍어서 보여줄 순 없지만 연속으로 1만 눌러도 저렇게 자동으로 하이픈(-)이 생긴다.
지금까지 위에서 작성한 코드를 정리하여 전체코드로 보이겠다.
전체 코드
Membership 컴포넌트
import React, { useState, useEffect, useCallback } from 'react';
import { useNavigate } from 'react-router-dom';
import styled, { css } from 'styled-components';

const MembershipBox = styled.div`
    width: 450px;
    height: 460px;
    font-size: 15px;
    background-color: rgba(255, 179, 128, 0.8);
    border-radius: 5px;
    margin: 0 auto;
`;

const H1 = styled.h1`
    text-align: center;
`;

const Form = styled.form`
    margin-top: 20px;
`;

const Label = styled.label<{ id?: string }>`
    font-size: 14px;
    margin-left: 60px;
    ${props =>
      props.id === "phoneLabel" &&
      css`
        margin-left: 35px;
    `}
`;

const Input = styled.input`
    display: block;
    width: 70%;
    height: 35px;
    background: #F5F5F5;
    border: 1px solid rgba(114, 143, 157, 0.93);
    border-radius: 5px;
    padding-left: 15px;
    margin: 0 auto;
    margin-top: 5px;
    margin-bottom: 10px;
    ${props =>
     props.name === 'username' &&
     css`
       width: 70%;
       margin-left: 56px;
    `}
    &:focus {
        outline: none;
        border: 1px solid orange;
        box-shadow: 0 0 4px orange;
    }
`;

const Conlumn = styled.div`
    display: inline-block;
    width: 100%;
    height: 70px;
    margin: 0 auto;
`;
const ColumnName = styled.div`
    display: inline-block;
    width: 38%;
`;
const ColumnPhone = styled.div`
    display: inline-block;
    width: 55%;
    margin-left: 2px;
`;

const Register = styled.button<{ checked: boolean }>`
    display: block;
    margin: 0 auto;
    width: 45%;
    height: 35px;
    border: none;
    border-radius: 5px;
    margin-top: 15px;
    margin-bottom: 5px;
    &:active {
        background-color: rgba(17, 48, 69, 0.25);
    }
    ${props =>
      props.checked === true &&
      css`
        background-color: #d8db31;
    `}
`;

const Back = styled.button`
    display: block;
    margin: 0 auto;
    background-color: mintcream;
    width: 15%;
    height: 20px;
    border: none;
    border-radius: 5px;
    color: purple;
    font-weight: bold;
    font-size: 13px;
    &:active {
        background-color: rgba(17, 48, 69, 0.25);
        color: black;
    }
`;

const Check = styled.div<{ checked: boolean }>`
    display: none;
    ${props =>
      props.checked === false &&
      css`
        display: block;
        color: #be0000;
        font-weight: bold;
        text-align: center;
        margin-top: 8px;
    `};
`;

interface FormState {
    id: string,
    password: string,
    password_confirm: string,
    username: string,
    phone: string,
};
interface ActiveState {
    confirmPassword: boolean,
    registerBtn: boolean
};

const Membership = () => {
    const navigate = useNavigate();
    const [ form, setForm ] = useState<FormState>({
        id: '',
        password: '',
        password_confirm: '',
        username: '',
        phone: ''
    });
    const { id, password, password_confirm, username, phone } = form;

    // 비밀번호 불일치 문구 & 회원가입 버튼 색상 => 활성화 상태 변수
    const [ isActive, setIsActive ] = useState<ActiveState>({
        confirmPassword: true, // 기본 설정값 (비밀번호 일치)
        registerBtn: false // 기본 버튼 비활성화 색상 설정
    });
    const { confirmPassword, registerBtn } = isActive;

    const handleInputChange = useCallback((e: React.ChangeEvent<HTMLInputElement>) => {
        const { name, value } = e.target;

        if (name === "phone") {
            // 휴대폰 번호 입력 시 자동으로 하이픈 추가
            const phoneNum = value.replace(/[^0-9]/g, '').replace(/^(\d{0,3})(\d{0,4})(\d{0,4})$/g, '$1-$2-$3')
                                  .replace(/(\-{1,2})$/g, '');
            setForm(prev => ({ ...prev, [name]: phoneNum }));
        } else {
            setForm(prev => ({ ...prev, [name]: value }));
        }
    }, []);

    useEffect(() => {
        setIsActive(prev => ({
            ...prev,
            // 같이 같으면 비밀번호 불일치 문구 숨기기
            confirmPassword: password_confirm === password,

            // id, password, password_confirm, username, phone 값이 모두 있으면 회원가입 버튼 색상 활성화
            registerBtn:
                id !== '' && password !== ''
                && password_confirm !== '' && username !== ''
                && confirmPassword === true // 비밀번호 불일치 문구까지 안 보여야 회원가입 버튼 색상 활성화
                && phone !== ''
        }));
    }, [id, password_confirm, password, username, confirmPassword, phone]);

    // // 상태 및 변수를 로깅
    // console.log('id:', id);
    // console.log('password = ', password);
    // console.log('rePassword = ', password_confirm);
    // console.log('confirmPassword = ', confirmPassword);
    // console.log('registerBtn = ', registerBtn);
    // console.log('username:', username);

    return (
        <>
            <MembershipBox>
                <H1>회원가입</H1>
                <Form
                    method="POST"
                    action="http://localhost/Album/src/Data/register.php"
                    onSubmit={(e) => registerBtn === false && e.preventDefault()}

                    <Label>아이디</Label>
                    <Input
                        type="text"
                        name="id"
                        onChange={handleInputChange}
                        required
                    />

                    <Label>비밀번호</Label>
                    <Input
                        type="password"
                        name="password"
                        onChange={handleInputChange}
                        required
                    />

                    <Label>비밀번호 확인</Label>
                    <Input
                        type="password"
                        name="password_confirm"
                        onChange={handleInputChange}
                        required
                    />

                    <Conlumn>
                        <ColumnName>
                            <Label>이름</Label>
                            <Input
                                type="text"
                                name="username"
                                onChange={handleInputChange}
                                required
                            />
                        </ColumnName>

                        <ColumnPhone>
                            <Label id="phoneLabel">휴대폰 번호</Label>
                            <Input
                                type="text"
                                name="phone"
                                maxLength={13}
                                value={form.phone}
                                onChange={handleInputChange}
                                required
                            />
                        </ColumnPhone>
                    </Conlumn>

                    <Register checked={registerBtn}>회원가입</Register>
                    <Back type="button" onClick={() => navigate('/')}>back</Back>
                    <Check checked={confirmPassword}>비밀번호가 일치하지 않습니다.</Check>
                </Form>
            </MembershipBox>
        </>
    );
}

export default Membership;
다음은 폼을 제출하면 데이터가 서버에 전달되어 DB에 저장되는 것을 구현해볼 것이다.