HTML / CSS / SCSS / SASS
*SASS / SCSS
SASS / SCSS 란?
sass란 css의 단점을 보완하기 위하여 css 확장 개념으로 나온 스트립트 언어를 의미
코드의 재활용성, 가독성을 높이며 개발 효율을 높이기 위하여 등장한 CSS전처리기 언어이다.Sass와 SCSS 차이점은?
Sass(Syntactically Awesome Style Sheets)의 3버전에서 새롭게 등장한 SCSS는 CSS 구문과 완전히 호환되도록 새로운 구문을 도입해 만든 Sass의 모든 기능을 지원하는 CSS의 상위집합(Superset) 이다.
즉, SCSS는 CSS와 거의 같은 문법으로 Sass 기능을 지원한다.
간단한 차이는 {}(중괄호)와 ;(세미콜론)의 유무
*VS code 확장프로그램 세팅
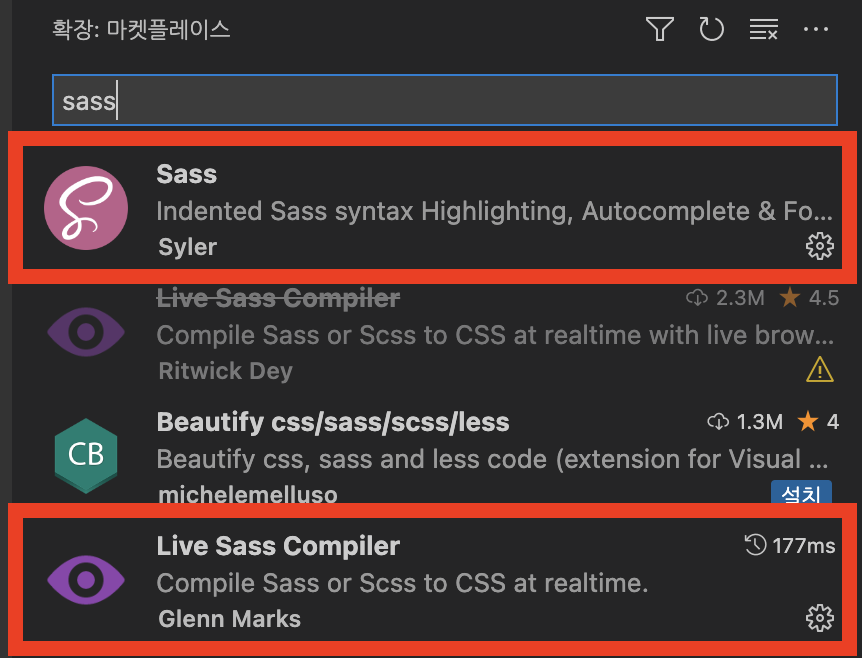
확장프로그램에서 Sass 와 Live Sass Compiler 를 설치한다.
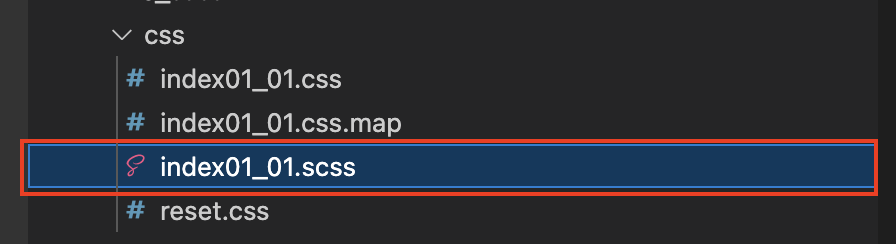
기존 CSS파일을 만들고 동일한 이름으로 확장자 .scss 로 하나 더 만든다.
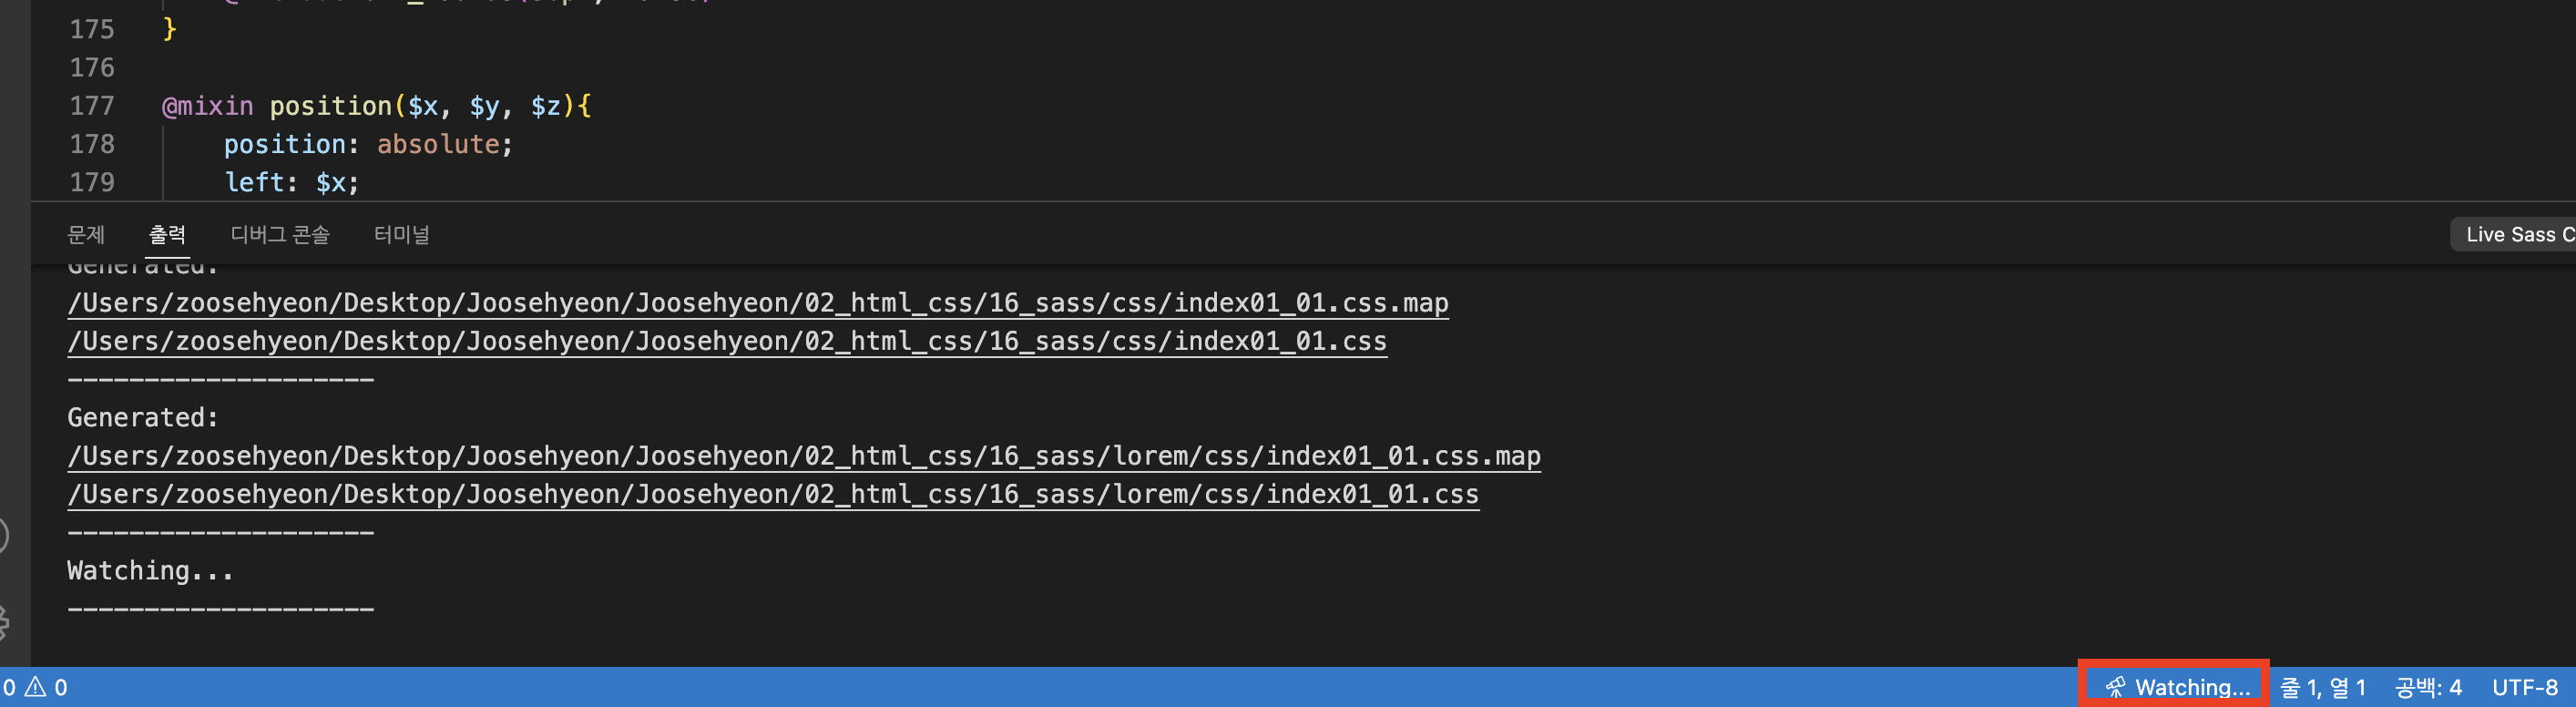
vs code 하단에 watching... 을 활성화 시킨다. (저장을 하면 브라우저에서 Live로 볼 수 있다.
ex) 변수
HTML
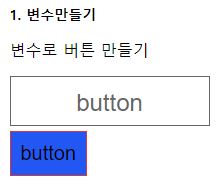
<h2>1. 변수만들기</h2>
        <p>변수로 버튼 만들기</p>
        <button class="btn1">button</button>
        <button class="btn2">button</button>
SCSS(변수 입력)
//1. 변수 선언
$gray: #666;
$_white: #fff;
$blue: rgb(35, 87, 243);
$red: rgb(220, 55, 55);
$fs24: 24px;
$fs20: 20px;

//CSS
.btn1{
    display: block;
    width: 200px;
    height: 50px;
    line-height: 50px;
    font-size: $fs24;
    color: $gray;
    background: $_white;
    border: 1px solid $gray;
    text-align: center;
    margin-bottom: 5px;
    &:hover{background: $gray; color: $_white;}
}
.btn2{
    padding: 10px;
    font-size: $fs20;
    border: 1px solid $red;
    background: $blue;
    &:hover{background: $red;}
}- 변수는 (영문, 영문+숫자, 영문+"-", "_"소문자)로 만든다.
- 선언한 변수는 color : $gray; 으로 불러온다.
ex)선택자(자식선택자, 종속선택자)
SASS/SCSS 에서의 자식선택, 종속선택
ex) ul > li > a 는
ul{ li{ a{ } } } 으로 쓴다.
결과

HTML
<h2>2. 선택자(자식선택자, 종속선택자)</h2>
        <div class="sass">
            <ul>
                <li><a href="#">test1</a></li>
                <li><a href="#" class="test2">test2</a></li>
                <li><a href="#">test3</a></li>
            </ul>
        </div>
SCSS
// 2. 선택자(자식선택자, 종속선택자)
.sass{
    color: $red;
    ul{border: 1px solid $red; padding: 5px 10px; list-style: none;
        li{background: pink; margin-bottom: 5px;
            a{text-decoration: none;
                &:hover{color: $red;}
                &.test2{font-size: 10px;}
            }
            .test2{text-decoration: underline;}
            &:last-child{border: 2px solid $blue;}
        }
    }
}
ex) mixin , include
HTML
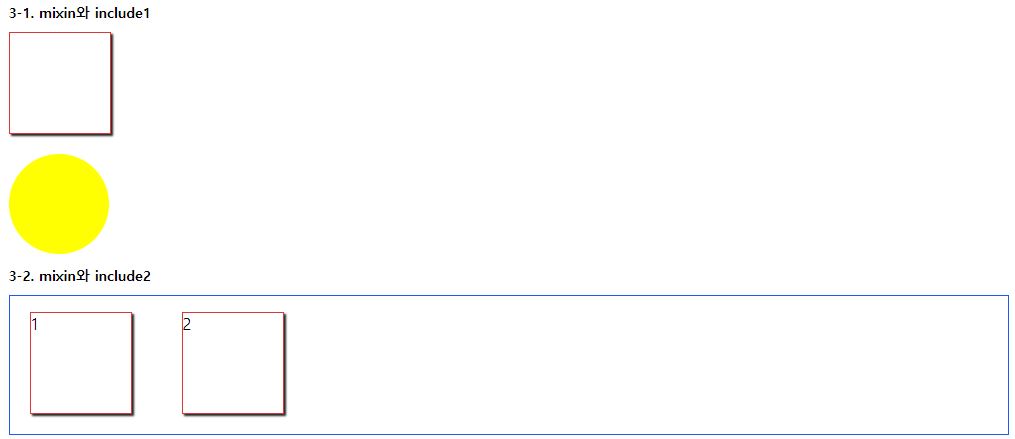
<h2>3-1. mixin와 include1</h2>
        <div class="test"></div>
        <div class="last"></div>
        <div class="first"></div>
        <h2>3-2. mixin와 include2</h2>
        <div class="clearfix">
            <p>1</p>
            <p>2</p>
        </div>
SCSS
@mixin test {
    width: 100px;
    height: 100px;
    border: 1px solid $red;
    box-shadow: 2px 2px 2px #222;
    margin-bottom: 20px;
}
@mixin first {
    width: 100px;
    height: 100px;
    border-radius: 50%;
    background: yellow;
}

.test{
    @include test();
}
.first{
    @include first();
}
@mixin clear{
    &:after{content: ""; display: block; clear: both;}
}

.clearfix{
    @include clear();
    border: 1px solid $blue;
    padding: 0 20px;
    p{float: left; margin-right: 50px; @include test();}
}- @mixin 으로 스타일을 만들어 둔다.
- 사용할 선택자에 @include 를 사용하여 불러올 준비를 한다.
ex) .test{@include test();}
ex)매개변수
결과
HTML
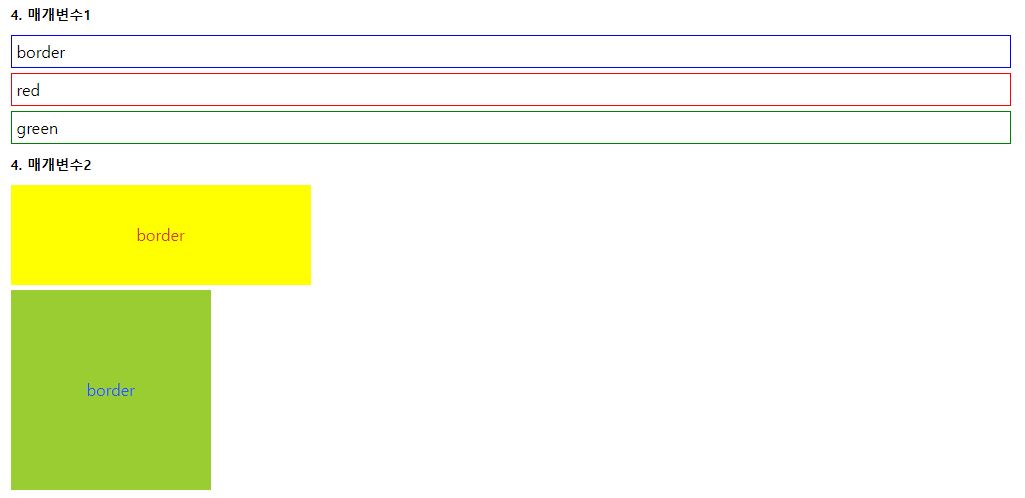
<h2>4. 매개변수1</h2>
        <div class="var">border</div>
        <div class="red">red</div>
        <div class="green">green</div>
        <h2>4. 매개변수2</h2>
        <div class="var2">border</div>
        <div class="var3">border</div>
SCSS
// 4. 매개변수
@mixin border($color){
    border: 1px solid $color;
    margin-bottom: 5px;
    padding: 5px;
}
.var{@include border(blue)}
.red{@include border(red)}
.green{@include border(green)}

@mixin box($w,$h) {
    width: $w;
    height: $h;
}
.var2{@include box(300px, 100px); background: yellow; line-height: 100px; text-align: center; color: $red; margin-bottom: 5px;}
.var3{@include box(200px, 200px); background: yellowgreen; line-height: 200px; text-align: center; color: $blue;}
- @mixin 을 선언하여 1px solid 까지는 동일하나 $color 를 변수로 사용하게 만든다.
- var , red, green 이라는 선택자에 @include로 @mixin을 불러오고 border(*blue) 컬러를 입력한다.
- @mixin box를 선언하여
box($w, $h)width와 height를 변수로 사용한다. - @mixin box를 ex) .var2{@include box(300px, 100px); 에 적용한다.
ex)문자보관
결과

HTML
<h2>5. 문자보관</h2>
        <div class="string1">ABC</div>
        <div class="string2">DEF</div>
        <div class="string3">GHI</div>
SCSS
// 5. 문자보관
$bx:string1;

div.#{$bx}{border:1px solid yellowgreen; padding: 10px; margin-bottom: 5px;}
@mixin bx1($position, $wid, $color1){
    border-#{$position} : $wid solid $color1
}
.string2{
    @include bx1(bottom, 2px, pink);
    margin-bottom: 4px;
    padding: 10px;
}
.string3{
    @include bx1(left, 2px, green);
    @include bx1(right, 2px, green);
    @include bx1(bottom, 2px, green);
    padding: 10px;
}
- string1 이라는 클래스의 문장을 보관한다. ex) $bx:string1;
div.#{$bx} = div.string1@mixinbx1(position, $wid, $color1) 을 만들고 border-#{position} : $wid solid $color1 를 만든다.- 해당 선택자를 선택하고
@includebx1 을 불러온 다음 $positin (top , bottom , left , right) 와 $wid(넓이값) $color1(컬러값) 을 넣어주면 border-(position){ 1px solid red); 가 완성된다.
ex)반복문
결과

HTML
<h2>6. for 반복문</h2>
        <ol class="list">
            <li class="ico1">text1</li>
            <li class="ico2">text2</li>
            <li class="ico3">text3</li>
            <li class="ico4">text4</li>
            <li class="ico5">text5</li>
        </ol>
SCSS
// 6. for 반복문
.list{margin-top: 10px;
    li{
        background: no-repeat 0 center/20px 20px; text-indent: 30px; line-height: 30px;
        &.ico1{background-image: url(../img/ico1.svg);}
        &.ico2{background-image: url(../img/ico2.svg);}
        &.ico3{background-image: url(../img/ico3.svg);}
        &.ico4{background-image: url(../img/ico4.svg);}
        &.ico5{background-image: url(../img/ico5.svg);}
        width: 150px;
        cursor: pointer;
    }
}
반복문을 사용하지 않을 경우에는 ico1~5 까지 background-image를 하나하나 입력하여야한다.
SCSS (반복문)
@for $i from 1 to 5{
    .list li.ico#{$i}{background-image: url(../img/ico#{$i}.svg);}
    .list li:nth-child(#{$i})::before{
        content:"내가#{$i}"
    }
    .list li:hover.ico#{$i}{background-image: url(../img/ico#{$i}_on.svg);}
    .list li:hover:nth-child(#{$i})::before{
        content:"scss #{$i}"
    }
}@for$i 를 정하고 from 1 to 5 를 선언한다. (클래스 ico1 ~ ico5 까지 있기 때문)- .list li.ico#{i}{background-image: url(../img/ico#{i}.svg);}
- .list li.ico#{$i} / 1~5 까지가 있다. 그러므로 '#{i}' 을 넣어준다.
- {background-image: url(../img/ico#{$i}.svg);} / 파일명도 숫자만 달라지게 이름을 바꿔서 #{i}를 넣어주고 마지막 파일 확장자명까지 적어준다.
ex)each문
결과

HTML
 <h2>7. each문</h2>
        <div class="each">
            <h1 class="ico_book">제목1</h1>
            <h2 class="ico_zoom">제목2</h2>
            <h3 class="ico_new">제목3</h3>
        </div>
SCSS
@each $var in book, zoom, new {
    .ico_#{$var}{
        background: url(../img/#{$var}.svg) no-repeat 0 center / 20px 20px;
        text-indent: 30px;
    }
}

$heading:(
    h1:13px,
    h2:14px,
    h3:15px
);
@each $ele, $fs in $heading{
    #{$ele}{
        font-size: $fs;
    }
}- html의 클래스를 ico_xxxx 로 만든다.
- SCSS에서
@each$var 변수에 book, zoom, new 를 넣는다.
ex) @each $var in book, zoom, new { } - background: url(../img/#{$var}.svg) no-repeat 0 center / 20px 20px;
text-indent: 30px;- 백그라운드 url의 파일명을 book, zoom, new로 저장된 이미지를 변수에 넣은 명과 같게 하고 변수를 넣는다.
ex)조건문(if)
결과

HTML
<h2>8. 조건문 (if)</h2>
        <a href="#" class="btn">버튼</a>
        <div class="if"></div>
SCSS
@mixin btn_radius($h, $radius:true) {
padding: 5px 20px;
height: $h;
line-height: $h;
text-align: center;
text-decoration: none;
background: #000;
color: #fff;
@if $radius{
border-radius: $h/2;
}@else{
border: 1px solid $red;
}
}
.btn{
@include btn_radius(30px, true)
}@mixinbtn_radius ($h, $radius:true) 를 넣는다.height,line-height,border-radius에$h를 넣어준 다음.btn에@include btn_radius(30px, true)을 입력한다. true 라고 한다면if문에 border-radius가 들어간 버튼이 만들어 지고,@include btn_radius(30px, false)라고 한다면else문에 있는 1px solid red 가 적용된다.
true

false