HTML 태그
- mark 태그
HTML5에서 새롭게 추가된 요소 하이라이트된 텍스트를 정의할 때 사용.
<mark>텍스트</mark>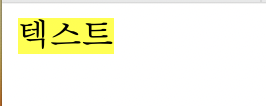
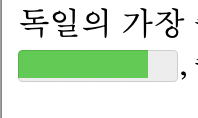
- meter 태그
HTML5에서 새롭게 추가된 요소 일정 범위 영역에서 얼마나 차지하는지 게이지 바로 표현.
(예: 하드공간 사용 비율, 후원 모금 진행 상태 등 표시.)
<meter value="현재값" min="영역최소값" max="영역최대값">meter 태그 의미</meter>
또는,
<meter value="백분율을 의미하는 소수값">meter 태그 의미</meter>

예제)
<meter value="0.81">81%</meter>
- progress 태그
어느 작업의 온료 정도를 나타내며, 주로 진행 표시 줄의 형태
<label>10초 남음</label>
			<progress value="40" max="100"></progress>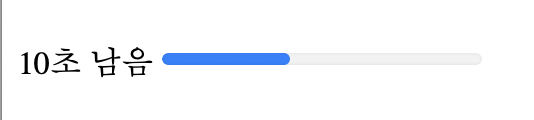
- ruby 태그
일본어의 히라가나와 같이 해당 문자의 발음이나 설명을 위 첨자로 표시할 수 있는 특징
<p><ruby>漢子<rt>한자</rt></ruby></p>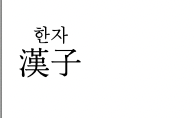
- details 태그 , summary 태그
접기/펼치기 목록을 설정합니다. 목록의 제목은 summary태그를 통해 설정합니다.
<details>
		<summary>
        details는 세부 항목이나 추가 정보를 숨겨
        놓았다가 펼쳐 보여줄수 있는 기능
        </summary>
		<ul>
			<li>summary요소는 세부 항목의 제목</li>
			<li>summary요소는 세부 항목의 요약 내용</li>
		</ul>
</details>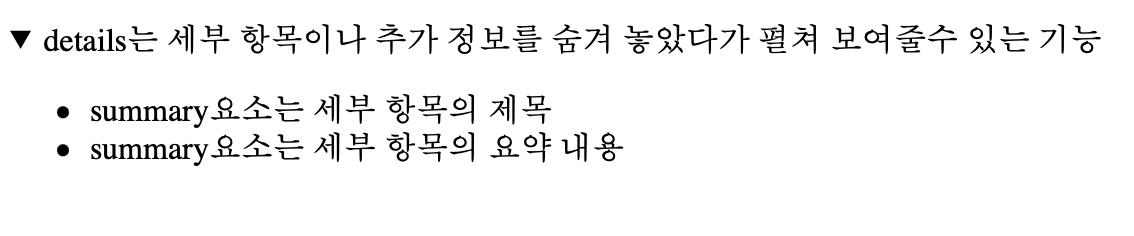
*혹시라도 긴목록을 가진 목록이라면 스크롤 미리 확보 해놓는 방법
body{margin-bottom: 200px;}- ul 태그(비정렬 목록 태그)
정렬되지 않은 목록(unordered list) 순서가 중요하지 않은 목록을 나타낼 때 사용 ul 요소 안에 들어갈 항목의 순서를 바꿧을 때 목록의 의미도 바뀌게 된다면 ul이 아닌 ol태그를 사용하는 것이 바람직합니다. ul과 ol의 직계 자식 요소로는 오직! li요소만 올 수 있습니다. ul과 ol요소는 최소 하나 이상의 li요소를 자식으로 가져야 한다.
<li>html5</li>
		<ul>
			<li>head</li>
			<ul>
				<li>meta</li>
				<li>title</li>
				<li>link</li>
				<li>script</li>
            </ul>
        </ul>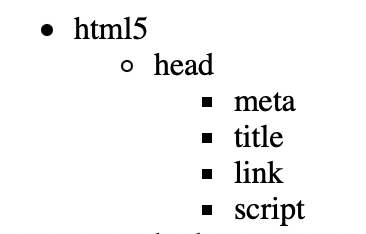
- ol 태그(정렬 목록 태그)
ol요소는 정렬된 목록(ordered list) 순서가 중요한 목록을 나타낼 때 사용 ul과 ol요소의 차이는 '순서의 중요성'에 있는 만큼 ul태그로 마크업 된 목록의 항목은 불릿으로 표시되는 반면 ol태그로 마크업 된 목록의 항목은 숫자로 표시된다.
<ol start="1">
		<li>인생은 아름다워</li>
		<li>공조2</li>
		<li>오펀: 천사의 탄생</li>
		<li>정직한 후보2</li>
		<li>대무가</li>
	</ol>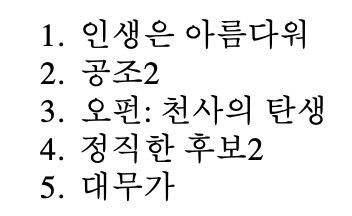
-
dl 태그(정의 목록 태그)
dl요소는 용어(dt)와 용어에 대한 정의 (dd) 그룹의 목록을 감싸는 정의 목록(description list)태그입니다. 주로 용어를 사전적으로 정의하거나 설명할때 사용합니다. dl의 자식요소로는 dt와 dd그리고 div만 올 수 있습니다. -
dt 태그(용어 태그)
dt요소는 정의 혹은 설명 목록의 정의하고자 하는 용어(description term)혹은 key값을 나타냅니다. 보통 dt요소 뒤에 용어를 정의하는 dd요소가 오지만, 여러개의 dt요소를 연속으로 배치하고 하나의 dd요소로 앞의 모든 dt요소를 서술할 수도 있습니다. -
dd 태그(용어 정의 태그)
dd요소는 앞선 용어 dt요소에 대한 정의나 설명(description details/dadta) 혹은 key값에 대한 value값을 제공합니다.
    <dl>
		<dt>적포도주</dt>
		<dd>포도를 껍질채 발효 시킨 것으로 스테이크와 같은 육류요리와
        함께 들면 고기 맛을 돋구면서 분위기를 새롭게 하여 준다.
        </dd>
		<dt>백포도주</dt>
		<dd>포도 껍질을 제거하고 포도즙만 발효시킨 것으로 반드시
        차게 해서 마신다. 생선요리나 조개류, 가금류 앙트레 등과 같이 하면
        더욱 좋다.
        </dd>
	</dl>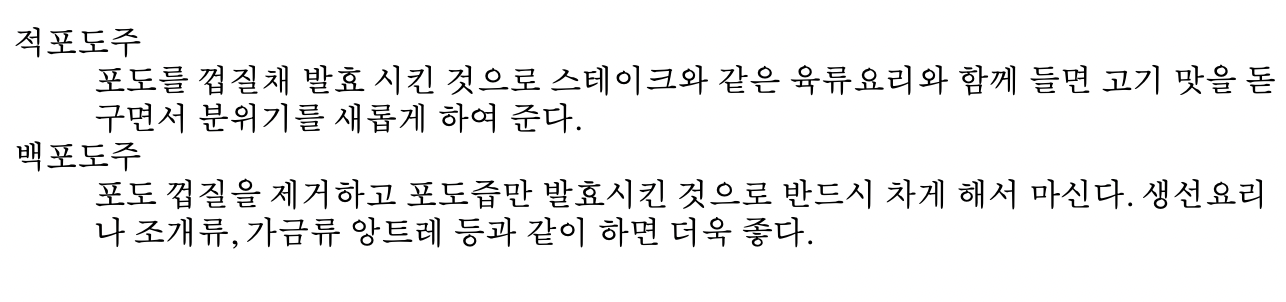
시맨틱 태그
-
시맨틱 태그(semantic tag)란?
semantic은 '의미의','의미론적인'이라는 뜻을 가진 형용사입니다. 따라서 시맨틱 태그란 의미가 있는 태그입니다. div나 span과 같이 의미가 없는 태그는 태그 이름만 보고는 어떤 내용인지 전혀 유추할 수가 없는 반면, form, table, article 등 의미가 있는 태그는 내용을 명확하게 정의합니다. -
시맨틱 태그 사용의 장점
1.검색엔진최적화(SEO) : 검색엔진은 태그를 기반으로 페이지 내 검색 키워드의 우선순위를 판단합니다. 따라서 제목은 h1, 중요한 단어는 strong또는 em을 사용하는 등 의미에 맞는 올바른 태그를 사용하는 것이 중요합니다.
2.시각장애가 있는 사용자가 스크린 리더를 사용하여 페이지를 탐색할 때 도움이 됩니다.
3.시맨틱 태그를 사용한 코드 블록을 찾는 것은 끝없는 div(div>div>div)를 탐색하는 것보다 훨씬 쉽습니다.
[출처 https://velog.io/@syoung125]
- 시맨틱 태그 종류와 용도 예시
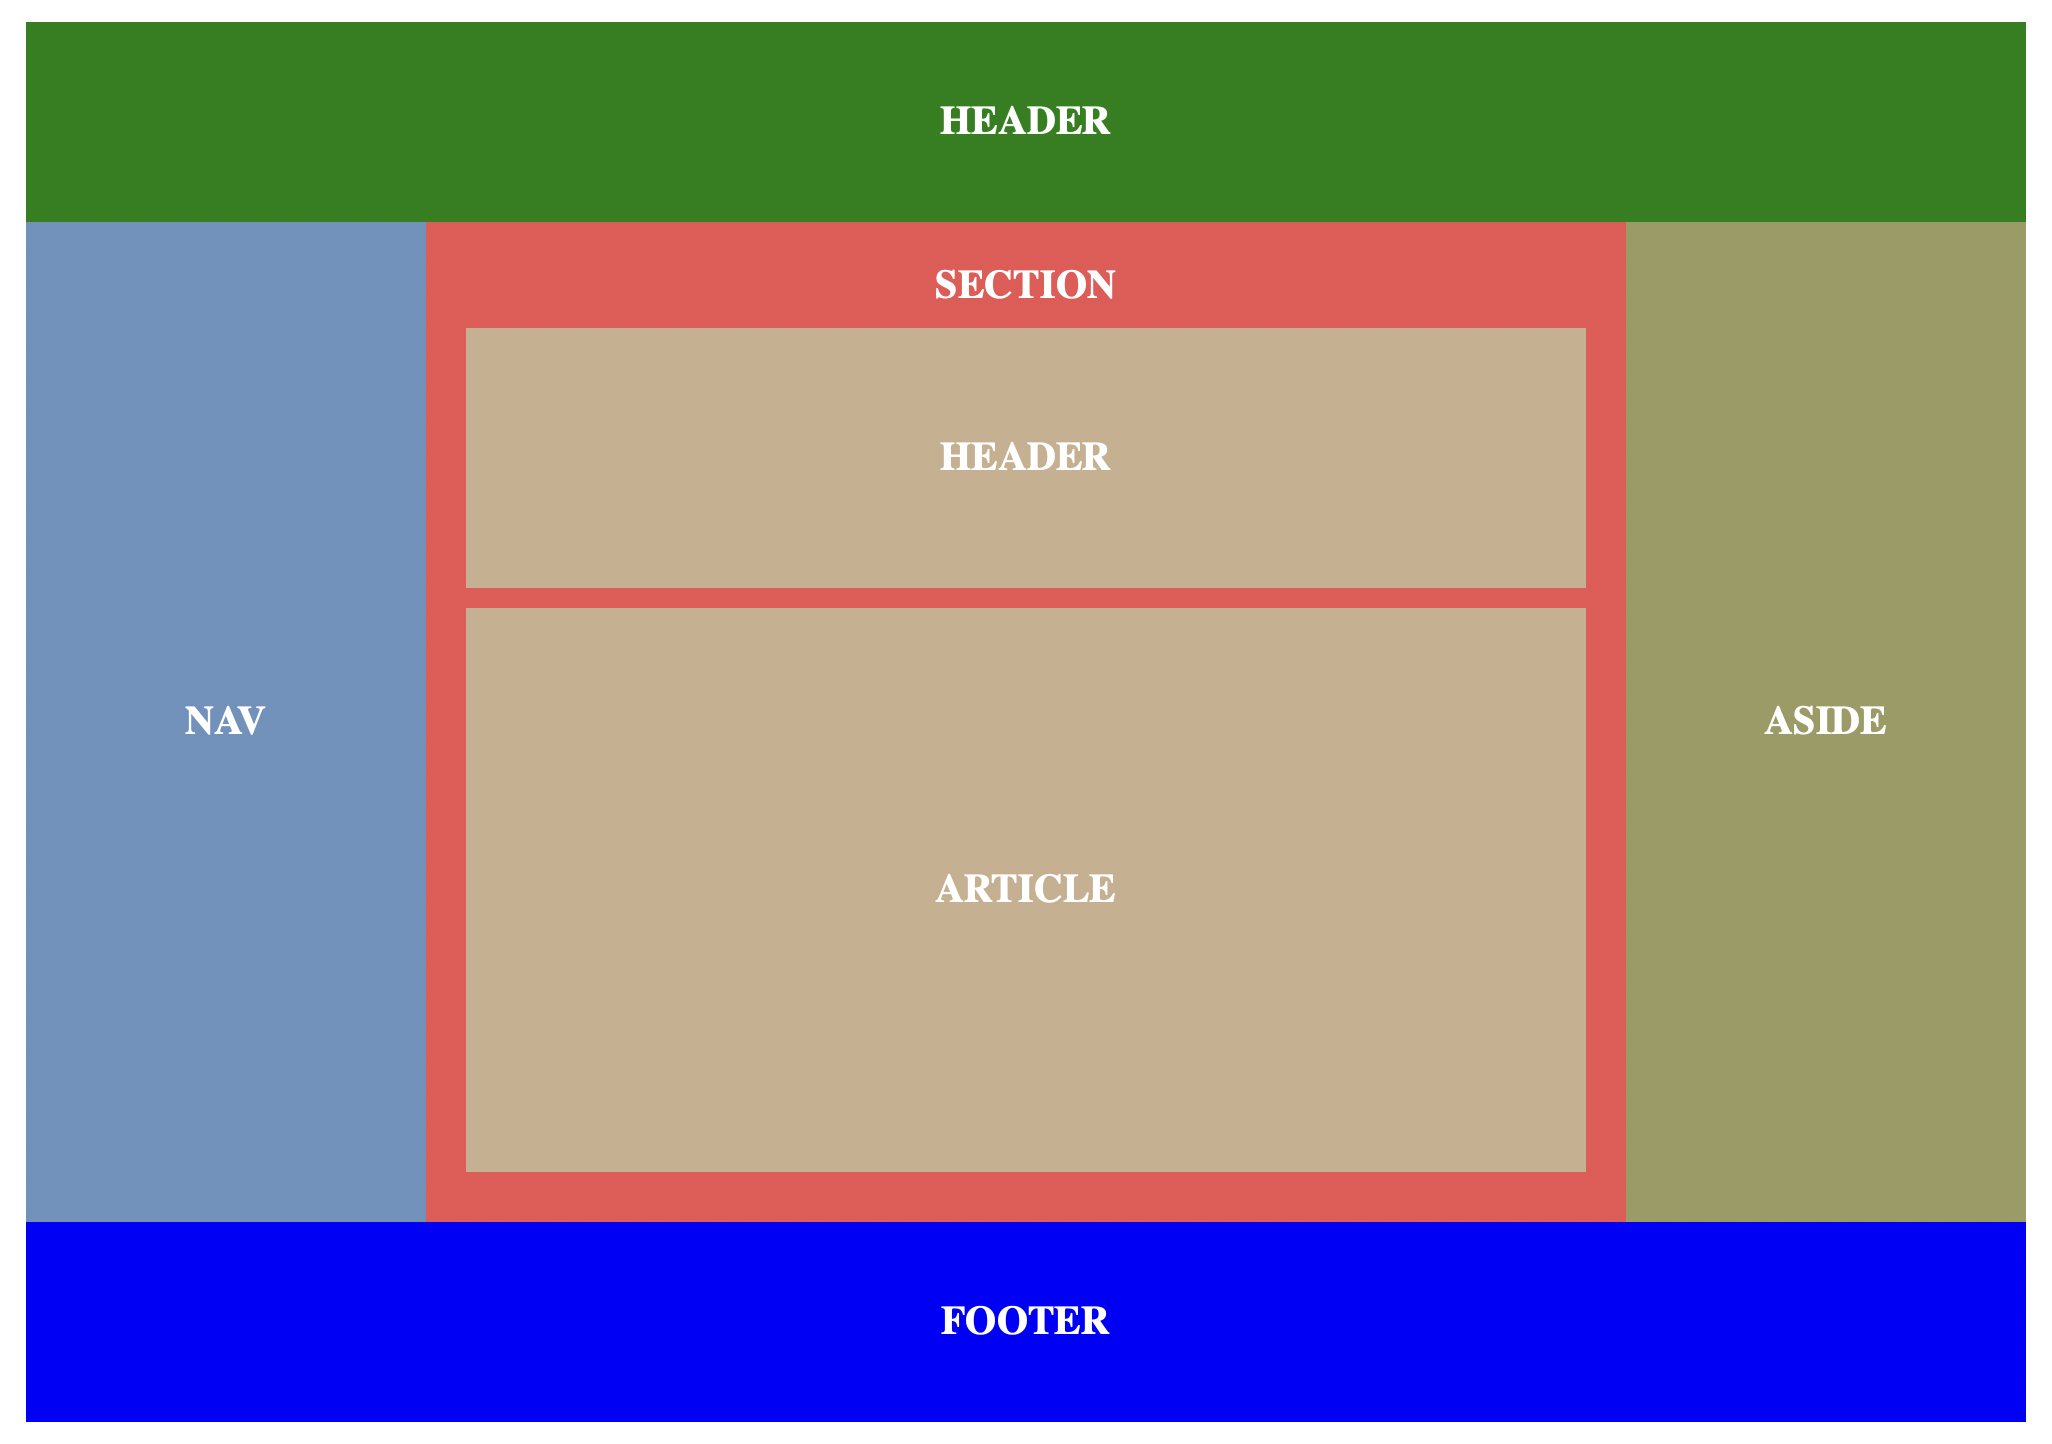
<!DOCTYPE HTML>
<html>
<head>
	<title> 시맨틱 요소를 이용한 마크업 </title>
	<meta charset="UTF-8" />
	<style>
		body{font-size: 20px; font-weight: bold;}
		#wrap{width: 1000px; height: 700px; background: red; margin: 50px; auto;}

		#header{width: 100%; height: 100px; background: green; text-align: center; color: #fff; line-height: 100px;}

		#main{width: 100%; height: 500px; background: yellow;}

			#main #nav{width: 200px; height: 100%; background: rgb(106, 146, 190); text-align: center; color: #fff; line-height: 500px; float: left;}

			#main #section{width: 600px; height: 100%; background: rgb(238, 82, 82); float: left; text-align: center; color: #fff; padding: 20px; box-sizing: border-box; color: #fff}

			#main #section #sectionHeader{width: 100%; height: 130px; background: rgb(201, 175, 142); margin-bottom: 10px; margin-top: 10px; line-height: 130px;}

			#main #section #article{width: 100%; height: 282px; background: rgb(201, 175, 142);line-height: 282px;}

			#main #aside{width: 200px; height: 100%; background: rgb(155, 155, 96); float: left; text-align: center; color:#fff; line-height: 500px;}

		#footer{width: 100%; height: 100px; background: blue; text-align: center; color: #fff; line-height: 100px;}
	</style>
</head>
<body>
	<div id="wrap">
		<header id="header">HEADER</header>
		<main id="main">
			<nav id="nav">NAV</nav>
			<section id="section">SECTION
				<header id="sectionHeader">HEADER</header>
				<article id="article">ARTICLE</article>
			</section>
			<aside id="aside">ASIDE</aside>
		</main>
		<footer id="footer">FOOTER</footer>
	</div>
</body>
</html>
<!DOCTYPE html>
<html lang="en">
<head>
	<meta charset="UTF-8">
	<meta http-equiv="X-UA-Compatible" content="IE=edge">
	<meta name="viewport" content="width=device-width, initial-scale=1.0">
	<title>시맨틱 태그 실습</title>
	<style>
		body{font-size: 18px; font-weight: bold; color: #fff;}
		#wrap{width: 700px; height: 700px; background: rgb(223, 9, 9); margin: auto;}

		#header{width: 100%; height: 100px; background: rgb(213, 236, 126); text-align: center; line-height: 100px; /* 높이만큼 해줘야됨 */}

		#nav{width: 100%; height: 100px; background: rgb(92, 182, 194); text-align: center; line-height: 100px;}

		#section{width: 100%; height: 400px; background: rgb(88, 103, 187);}
			section article{width: 500px; height: 100%;/* 부모가 감싸고 있으니 100% */float: left; padding: 20px; box-sizing: border-box;}
			section article div{width: 100%; height: 170px; background: rgb(79, 204, 162);text-align: center; line-height: ;}
			section article #box1{margin-bottom: 20px;}
			section aside{width: 200px; height: 100%; background: rgb(141, 31, 31); text-align: center; float: left; line-height: 400px;}

			#footer{width: 100%; height: 100px; background: rgb(163, 207, 157); text-align: center; line-height: 100px;}
	</style>
</head>
<body>
	<div id="wrap">
		<header id="header">머릿말부분</header>
		<nav id="nav">내비게이션부분</nav>
		<section id="section">
			<!-- 섹션에서 세부로 나눔 -->
			<article id="article"><!-- 글자x -->
				<div id="box1">본문내용</div>
				<div id="box2">중요한 내용</div>
			</article>
			<aside id="aside">부수적인내용(광고)</aside>
		</section>
		<footer id="footer">하단부분</foot>
	</div>
</body>
</html>
복습 시맨트 태그 기록
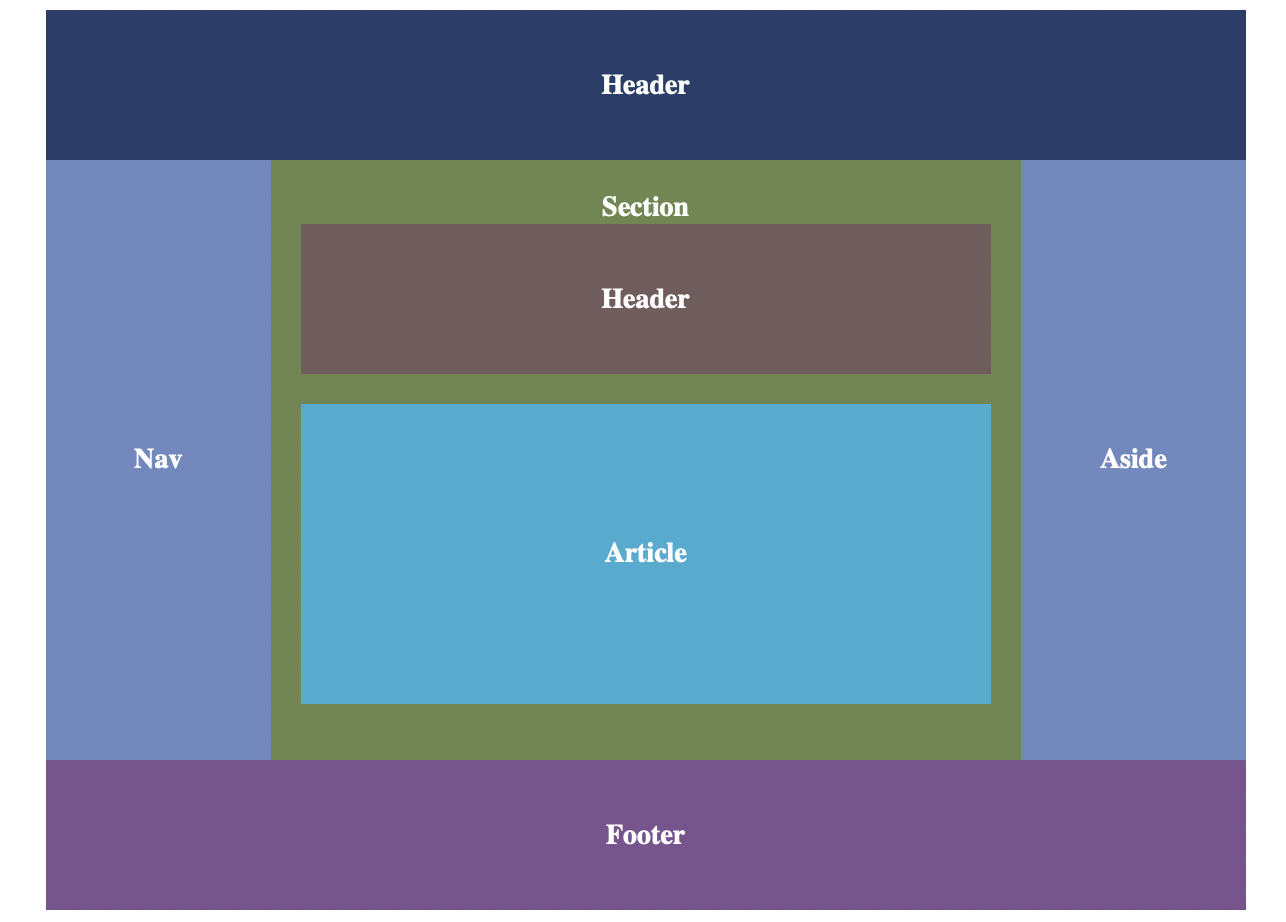
- 1st 시맨트 태그
<!DOCTYPE html>
<html lang="en">
<head>
	<meta charset="UTF-8">
	<meta http-equiv="X-UA-Compatible" content="IE=edge">
	<meta name="viewport" content="width=device-width, initial-scale=1.0">
	<title>시맨틱 태그 실습</title>
	<style>
        body{font-size: 18px; font-weight: bold; color: #fff;}

        #wrap{width: 800px; height: 600px; background: red; margin: auto;}

        #header{width: 100%; height: 100px; background: rgb(37, 62, 105); text-align: center; line-height: 100px;}

        #nav{width: 150px; height: 400px; background:rgb(109, 137, 192); text-align: center; line-height: 400px; float: left;}

        #section{width: 500px; height: 400px; background:rgb(109, 135, 79); text-align: center; float: left; box-sizing: border-box; padding: 20px;}

        #aside{width: 150px; height: 400px; background:rgb(109, 137, 192); text-align: center; line-height: 400px; float: left;}

        #header2{height: 100px; background: rgb(113, 92, 92); text-align: center; line-height: 100px;}

        #article{height: 200px; background: rgb(49, 173, 210); text-align: center; line-height: 200px; margin-top: 20px;}


        #footer{width: 100%; height: 100px; background:rgb(124, 82, 144);text-align: center; line-height: 100px; float: left;}
	</style>
</head>
<body>
	<div id="wrap">
        <header id="header">Header</header>
        <nav id="nav">Nav</nav>
        <section id="section">Section
            <header id="header2">Header</header>
            <article id="article">Article</article>
        </section>
        <aside id="aside">Aside</aside>
        <footer id="footer">Footer</footer><!-- 나중에 밀릴것..? -->
    </div>

</body>
</html>