
2주차
가상돔
html단위 하나하나를 객체로 생각하는 모델 >> 트리구조
DOM 트리 중 하나가 수정될 때마다 모든 DOM을 뒤지고, 수정할 걸 찾고, 싹 수정을 한다면?
→ 필요없는 연산이 너무 많이 일어난다!
→ 그래서 등장한 게 가상돔! >> 메모리 상에서 돌아가는 가짜 DOM
가상돔의 동작 방식: 기존 DOM과 어떤 행동 후 새로 그린 DOM(가상 돔에 올라갔다고 표현합니다)을 비교해서 정말 바뀐 부분만 갈아끼워준다.
라이프 사이클
컴포넌트의 생명주기: 컴포넌트가 렌더링을 준비하는 순간부터, 페이지에서 사라질 때까지의 과정
업데이트는 언제 되는가?
- props가 바뀔 때
- state가 바뀔 때
- 부모 컴포넌트가 업데이트 되었을 때(=리렌더링했을 때)
- 또는, 강제로 업데이트 했을 경우! (forceUpdate()를 통해 강제로 컴포넌트를 업데이트할 수 있습니다.)
라이프 사이클 함수는 클래스형 컴포넌트에서만 사용할 수 있지만 리액트 16.8버전부터 등장한 React Hooks으로 라이프 사이클 함수를 대체할 수 있음
Component
State
Component가 가지고 있는 데이터
Props
Component가 부모 Component로부터 받아온 데이터
Props로 받은 데이터는 수정할 수 없음.
함수형 컴포넌트
함수형 선언은 2가지가 있는데 화살표 형으로 해보자.
const BucketList = (props) => {

    return (
        <div>
            버킷 리스트
        </div>
    );
함수형과 클래스형을 비교해보자.
함수형 컴포넌트를 다른 파일에 분리해서 넣어준 다음 export&import해줬다.
bucketlist.js
import React from 'react';
const BucketList = (props) => {
    return (
        <div>
            버킷 리스트
        </div>
    );
}
export default BucketList;
app.js
import React from 'react';
import logo from './logo.svg';
import './App.css';
import BucketList from './BucketList';

function App() {

  return (
    <div className="App">
      <h1>내 버킷리스트</h1>
      <BucketList/>
    </div>
  );
}

export default App;
클래스형 컴포넌트
class App extends React.Component {

  constructor(props){
    super(props);
    // App 컴포넌트의 state를 정의해줍니다.
    this.state = {
      list: ['영화관 가기', '매일 책읽기', '수영 배우기'],
    };
  }

  // 랜더 함수 안에 리액트 엘리먼트를 넣어줍니다!
  render() {
      return (
      <div className="App">
        <h1>내 버킷리스트</h1>
        {/* 컴포넌트를 넣어줍니다. */}
        <BucketList/>
      </div>
    );
  }
}
dependencies: 다운받은 라이브러리 확인가능
styled-components 사용하기
styled-components에는 SCSS도 사용할 수 있다!
nesting 가능
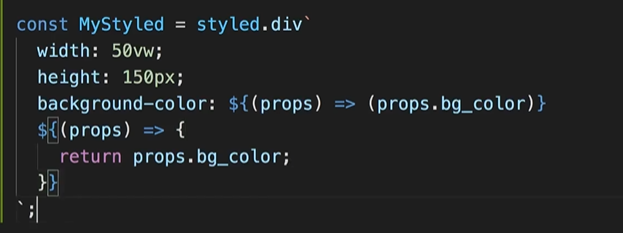
const MyStyled = styled.div`
  width: 50vw;
  height: 150px;
  background-color: ${(props) => (props.bg_color ? "red" : "purple")};
  p {
    color: blue;
  }
  &:hover{
    background-color: yellow;
  }
`;
scss에서 네스팅 기능을 쓰면 그냥 안에다가 쭉 써주면 됨.
Ref! 리액트에서 돔요소를 가져오려면?
어떤 인풋박스에서 텍스트를 가져오고 싶으면 어떻게 접근해야할까? 자바스크립트에서는 getElementById 이런식으로 가져왔는데 이렇게 하면 실제DOM에 접근하는 개념이다.
리액트에서는 가상DOM에서 리액트 요소를 가져온다. 이럴때 ref를 사용한다.
ref만들고 적용하기 - 클래스형
class App extends React.Component {
  constructor(props) {
    super(props);
    // App 컴포넌트의 state를 정의해줍니다.
    this.state = {
      list: ["영화관 가기", "매일 책읽기", "수영 배우기"],
    };
  this.text = React.createRef();

  }

  render() {
    return (
      <div className="App">
        <Container>
          <Title >내 버킷리스트</Title>
          <Line/>
          {/* 컴포넌트를 넣어줍니다. */}
          {/* <컴포넌트 명 [props 명]={넘겨줄 것(리스트, 문자열, 숫자, ...)}/> */}
          <BucketList list={this.state.list} />
        </Container>

        <div>
          <input type="text" ref={this.text}/>
        </div>


      </div>
    );
  }
}
ref훅 사용하기 - 함수형
useState와 useRef의 기능상의 공통점은 함수형 컴포넌트에서 동적으로 상태 관리를 할 수 있게 해준다는 점이다.
사용법 비교하기
useState
import React, {useState} from 'react';

const Test = () => {
  const [letter, setLetter] = useState('');
  const onClick = () => {
    setLetter('Humanscape!');
  };

  return (
    <div>
      <button onClick={onClick}>Humanscape?</button>
      <b>{letter}</b>
    </div>
  );
};
useRef (useState과 비교하기)
import React, {useRef} from 'react';

const Test2 = () => {
  const letter = useRef('');

  const onClick = () => {
    letter.current = 'Humanscape!';
    console.log(letter.current);
  };

  return (
    <div>
      <button onClick={onClick}>Humanscape?</button>
    </div>
  );
};
useRef를 사용한 구현에서 글씨를 화면에 띄우지 않은 것은 useState와는 다르게 useRef는 state를 변화시킨 후에 component를 re-render하지 않기 때문입니다.
결론적으로,
Rendering이 필요한 state의 경우 useState를 이용하는 것이 간편하게 상태관리를 할 수 있으며, rendering이 필요하지 않은 state의 경우 useRef를 쓰는 것이 간단하게 코드를 작성할 수 있다.
1초 있다가 실행해줘!
 window.setTimeout(() => { // 1초 뒤에는?!
    console.log(my_wrap);
  }, 1000);
State관리하기
단방향 데이터 흐름이란?
데이터는 위에서 아래로, 부모에서 자식으로 넘겨줘야 한다는 소리
부모 컴포넌트의 state가 업데이트 되면 자식 컴포넌트도 리렌더링이 일어난다.
왜 단방향으로 쓰는가?
하지만 자식 컴포넌트의 state가 바뀐 걸 부모 컴포넌트가 props로 받으면 안되기 때문에 단방향으로 작동됨 -> 양방향이 되어버리면 무한루프에 빠질 수 있음
클래스형 컴포넌트에서 state 관리 - setState()
import React from "react";

class App extends React.Component {
  constructor(props) {
    super(props);

    this.state = {
      count: 3, // 숫자넣기!
    };
  }

  componentDidMount() {}

  render() {
    // 배열을 만듭니다.
    // Array.from()은 배열을 만들고 초기화까지 해주는 내장 함수입니다.
    // Array.from()의 첫번째 파라미터로 {length: 원하는 길이} 객체를,
    // 두번째 파라미터로 원하는 값을 반환하는 콜백함수를 넘겨주면 끝!
    // array의 내장함수 대부분은 콜백 함수에서 (현재값, index넘버)를 인자로 씁니다.
    const nemo_count = Array.from({ length: this.state.count }, (v, i) => i);

    // 콘솔로 만들어진 배열을 확인해봅니다. 숫자가 0부터 순서대로 잘 들어갔나요?
    console.log(nemo_count);

    return (
      <div className="App">
        {nemo_count.map((num, idx) => {
          return (
            <div key={idx}
              style={{
                width: "150px",
                height: "150px",
                backgroundColor: "#ddd",
                margin: "10px",
              }}
            >
              nemo
            </div>
          );
        })}

        <div>
          <button>하나 추가</button>
          <button>하나 빼기</button>
        </div>
      </div>
    );
  }
}

export default App;
박스 생성/삭제하는 함수 만들기
	addNemo = () => {
    // this.setState로 count를 하나 더해줍니다!
    this.setState({ count: this.state.count + 1 });
  };

  removeNemo = () => {
    // 네모 갯수가 0보다 작을 순 없겠죠! if문으로 조건을 걸어줍시다.
    if (this.state.count > 0) {
      // this.setState로 count를 하나 빼줍니다!
      this.setState({ count: this.state.count - 1 });
    }else{
      window.alert('네모가 없어요!');
    }
  };
함수형 컴포넌트에서 state 관리 - setState()
- 새로운 컴포넌트 만들기
import React from "react";

const Nemo = (props) => {

    // 반환할 리액트 요소가 없을 때는 null을 넘겨주세요! 처음 껍데기 잡으실때도 null을 넘겨주면 굳!
    return null;
}

export default Nemo;- State 등록하기
	// count에는 state 값이, setCount는 count라는 state 값을 수정하는 함수가 될거예요.
  // useState(초기값): () 안에 초기값을 넣어줍니다.
const [count, setCount] = React.useState(3);- 뷰를 만들고(=반환할 리액트 요소를 만들고)
const nemo_count = Array.from({ length: count }, (v, i) => i);
  // 반환할 리액트 요소가 없을 때는 null을 넘겨주세요!
  return (
    <div className="App">
      {nemo_count.map((num, idx) => {
        return (
          <div
            key={idx}
            style={{
              width: "150px",
              height: "150px",
              backgroundColor: "#ddd",
              margin: "10px",
            }}
          >
            nemo
          </div>
        );
      })}

      <div>
        <button>하나 추가</button>
        <button>하나 빼기</button>
      </div>
    </div>
);- 함수만들기
  const addNemo = () => {
    // setCount를 통해 count에 저장된 값을 + 1 해줍니다.
    setCount(count + 1);
  };

  const removeNemo = () => {
    // setCount를 통해 count에 저장된 값을 - 1 해줍니다.
    // 이번엔 if문 대신 삼항 연산자로 해볼거예요!
    setCount(count > 0 ? count - 1 : 0);
};- 버튼에 연결
    <div>
      {/* 함수를 호출합니다. */}
      <button onClick={addNemo}>하나 추가</button>
      <button onClick={removeNemo}>하나 빼기</button>
    </div>
컴포넌트를 만들고→ state를 쓰는 순서! 뷰 먼저→ 그 다음은 state를 만들고(기본값도 잡아주고!)→ state를 조작하는 무언가를 만들어서→연결한다!
Event Listner
클래스형
사용자가 어떤 행동(=이벤트)을 하는 지 아닌 지 지켜보다가 알려주는 것. DOM 요소가 있어야 이벤트가 발생하는지 확인가능하므로 componentDidMount()에 넣어준다.
  hoverEvent = (e) => {
    // 콘솔로 이 이벤트가 누구에게서 일어났는 지 확인할 수 있습니다.
    console.log(e.target);
    // ref랑 같은 녀석인 지 확인해봐요!
    console.log(this.circle.current);

    this.circle.current.style.background = "yellow";
  }

  componentDidMount(){
    // 리액트 요소가 잘 잡혔나 확인해봅시다!
    console.log(this.circle);

    // 마우스를 올렸을 때, 이벤트가 일어나는 지 확인해봅시다.
    this.circle.current.addEventListener("mouseover", this.hoverEvent);
  }
이벤트리스너는 컴포넌트가 사라질때 지워줘야 한다.
  componentWillUnmount() {
    this.circle.current.removeEventListener("mouseover", this.hoverEvent);
  }
함수형
useEffect()는 리액트 훅이다.
라이프 사이클 함수 중 componentDidMount와 componentDidUpdate, componentWillUnmount를 합쳐둔 것!
첫 함수실행은 무조건 실행.
그 다음 리렌더링 될때는 dependency array에 들어있는 것만 실행한다. (비워두면 다시 실행안됨)
return으로 클린업한다.
  // 첫번째 인자는 익숙하죠! 화살표 함수! 넵, 렌더링 시 실행할 함수가 여기에 들어갑니다.
  // 두번째 인자의 []! 디펜던시 어레이라고 불러요. 여기 넣어준 값이 변하면 첫번째 인자인 콜백함수를 실행합니다.
  React.useEffect(() => {
    // 여기가 rendering 때 실행될 구문이 들어가는 부분입니다.
    // componentDidMount, componentDidUpdate일 때 동작하는 부분이 여기예요.
    // do something ...

    return () => {
        // 여기가 clean up 부분입니다.
        // componentWillUnmount 때 동작하는 부분이 여기예요.
      //do something ...
    };
  }, []);
3주차
라우팅
Single Page Application SPA
장점: 사용성 좋음
단점: 정적자원을 내려받다보니, 처음에 모든 컴포넌트를 받아온다 -> 첫 로딩 속도가 느리다.
react-router-dom 패키지 설치하기 (라이브러리 사용) @5.2.1
yarn add react-router-dom@5.2.1BrowserRouter
BrowserRouter(브라우저라우터)는 웹 브라우저가 가지고 있는 주소 관련 정보를 props로 넘겨준다.
index.js -> 사실상 루트
index.js
import React from 'react';
import ReactDOM from "react-dom";
import { BrowserRouter } from "react-router-dom";
import './index.css';
import App from './App';
import reportWebVitals from './reportWebVitals';

// 이부분이 index.html에 있는 div#root에 우리가 만든 컴포넌트를 실제로 랜더링하도록 연결해주는 부분입니다.
ReactDOM.render(
  <BrowserRouter>
    <App />
  </BrowserRouter>,
  document.getElementById("root")
);

// If you want to start measuring performance in your app, pass a function
// to log results (for example: reportWebVitals(console.log))
// or send to an analytics endpoint. Learn more: https://bit.ly/CRA-vitals
reportWebVitals();
app.js
import {Route} from "react-router-dom";
import Home from "./Home";
import Cat from "./Cat";
import Dog from "./Dog";

function App() {
  return (
    <div className="App">
      <Route path="/" exact>
        <Home/>
      </Route>
      <Route path="/cat">
        <Cat/>
      </Route>
      <Route path="/dog">
        <Dog/>
      </Route>


    </div>
  );
}

export default App;
URL 파라미터사용하기
→ 파라미터: /cat/nabi
→ 쿼리: /cat?name=nabi (key=value)
파라미터 불러와서 쓰기 (1)
useParams라고 하는 훅 사용하기
// 파라미터 주기
<Route path="/cat/:cat_name"/>
import { useParams } from "react-router-dom";
import (useParams)
const Cat = (props) => {
const cat_name = useParams();
console.log(cat_name);
return (
<div>고양이 화면이에요.</div>
)
}파라미터 불러와서 쓰기 (2)
component로 보내서 props로 받아와 쓰는법
// 파라미터 주기
<Route path="/cat/:cat_name" component={Cat}/>
//Cat.js
import React from "react";
const Cat = (props) => {
console.log(props.match);
return (
<div>고양이 화면이에요.</div>
)
}
export default Cat;링크와 히스토리 써서 페이지 이동하기
원시적인 방법: Link 임포트해서 갖다쓰기
<Link to="/">Home으로 가기 </Link>히스토리 쓰기
어렵게 하지말고 그냥 훅 갖다쓰자
useHistory훅
import React from "react";
import { useHistory } from "react-router-dom";

const Dog = (props) => {
    const history = useHistory();
    console.log(props);
    return (
        <div onClick={ () => {
            history.push("/cat");
        }}>강아지 화면이에요.</div>
    )
}

export default Dog;
라우팅, 조금 더 꼼꼼히 쓰려면?
NotFound.js 파일을 만들고 빈 컴포넌트를 만들어주고 잘못된 주소로 들어오면 알려주기
Switch를 불러와서 써준다. Switch는 전체 다 돌지않고 매칭되는 라우트를 찾으면 도는 걸 멈추고 그곳으로 바로 이동한다.
import { Route, Switch } from "react-router-dom";return (
<div className="App">
...
<Switch>
<Route
path="/"
exact
render={(props) => (
<BucketList
list={this.state.list}
history={this.props.history}
/>
)}
/>
<Route path="/detail" component={Detail} />
</Switch>
...
</div>
);NotFound 페이지에 메인으로 갈 수 있도록 버튼을 만들어주자.
import React from "react";
import { useHistory } from "react-router-dom";

const NotFound = (props) => {
    const history = useHistory();
  return(
    <>
        <h1>주소가 올바르지 않아요!</h1>
        <button onClick={()=>{
            history.push("/");
        }}>go back</button>
    </>
  )
};

export default NotFound;
리덕스(redux)
공식문서 굉장히 잘 되어있음
컴포넌트가 많아질때 전역상태(state)관리 해주는 시스템.
리덕스를 사용하는 이유:
자식 컴포넌트는 부모 컴포넌트의 state을 수정할 수 없다. 그러므로 유연한 컴포넌트 생성과 관리를 위해서 데이터를 하나의 저장소로 몰아넣어주고 모든 컴포넌트에서 그 저장소를 통해 데이터를 받도록 만드는 것.
-> 서로의 state에 간섭하지 않음, props drilling에 좋음
-> 데이터를 받아가는 것 = 구독한다.
-> 데이터에 바로 접근해서 수정하는 형식이 아니고, 데이터를 바꿀 수 있는 함수를 호출해서 수정한다. 그리고 다른 구독자들에게 수정사항을 알려줌 -> 재렌더링됨
스토어: 데이터 저장공간
리듀서: 액션이 왔을 때 수정하는 역할

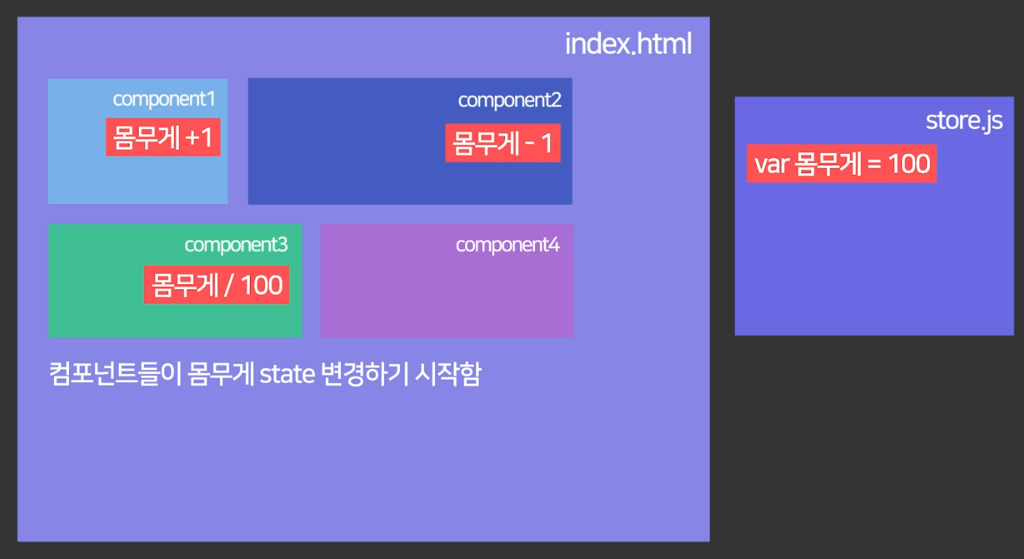
컴포넌트들이 그냥 맘대로 수정하게 냅둬버리면 오류나면 못찾음. 그래서 중앙제어장치에서 그냥 다 관리하는 것.

컴포넌트들은 수정해달라고 요청만 할 수 있음
store.js 내에서 모든 수정이 일어나고 그걸 api처럼 다 그냥 갖고 있음
dispatch로 가져와서 씀!
리덕스와 같은 기능 제공하는 라이브러리:
MobX, Overmind.js, Recoil
리덕스 설치하기
yarn add redux react-redux(1) State
리덕스에서는 저장하고 있는 상태값 (=="데이터")
딕셔너리 형태({[key]: value})형태로 보관한다.
(2) Action
상태에 변화가 필요할 때(=가지고 있는 데이터를 변경할 때) 발생
" 나 지금 수정할래"
type: 이 이름으로 바꿀래
data: 이 데이터로 바꿀거야
// 액션은 객체. type은 이름: 임의의 문자열을 넣는다.
{type: 'CHANGE_STATE', data: {...}}
(3) ActionCreator
액션 생성 함수
액션을 리턴. 그러니까 위에서 정해준 type이랑 data 끌고와서 return 값에다가 넣는거임
//이름 그대로 함수예요!
const changeState = (new_data) => {
// 액션을 리턴합니다! (액션 생성 함수니까요. 제가 너무 당연한 이야기를 했나요? :))
	return {
		type: 'CHANGE_STATE',
		data: new_data
	}
}
(4) Reducer
리덕스에 저장된 상태(=데이터)를 변경하는 함수
데이터를 실제로 바꾸는곳.
액션 dispatch되면 자동으로 reducer가 작동
// 기본 상태값을 임의로 정해줬어요.
const initialState = {
	name: 'mean0'
}

function reducer(state = initialState, action) {
	switch(action.type){

		// action의 타입마다 케이스문을 걸어주면,
		// 액션에 따라서 새로운 값을 돌려줍니다!
		case CHANGE_STATE:
			return {name: 'mean1'};

		default:
			return false;
	}
}
(5) Store
리듀서를 포함하는 개념
- 상태값도 가지고 있고 리듀서도 가지고있음
- dispatch등의 내장함수도 가지고 있음
- 딕셔너리 혹은 json처럼 생김
(6) dispatch
스토어의 내장함수 => 액션을 발생시키는 역할
리덕스의 특징 3가지
-
store는 하나만 사용
(리듀서는 여러개일 수 있음) -
store의 state (데이터)는 action으로만 변경이 가능
리액트에서도 state는 setState()나, useState() 훅을 써서만 변경 가능했다. 데이터가 마구잡이로 변하지 않도록 불변성을 유지해주기 위함
다시 말하자면, 리덕스에 저장된 상태는 읽기전용이며, 가지고 있던 값을 수정하지 않고, 새로운 값을 만들어서 상태를 갈아끼우는 개념임
- 리듀서는 순수한 함수만 사용
- 파라미터 외의 값에 의존 ㄴㄴ
- 파라미터가 같으면 항상 같은 값 반환
- 이전 상태는 수정하면 안됨 (복제해서 수정)
- 리듀서는 이전 상태와 액션을 파라미터로 받음
덕스(ducks) 구조
일반적 구조: 보통은 모양새대로 action, actionCreator, reducer를 분리해서 작성
덕스 구조: 기능끼리 묶어서 작성
ducks구조 이해하기
외부 서버에서 데이터 가져올때 비동기 통신 : 시간이 걸림. 그 사이에 어떤 요청이 들어올 수 있는데, 그때 중간다리를 놓음 (미들웨어)
(1) Action
어떤 액션인지 지정
// Action type 정해줌
const LOAD = "bucket/LOAD";
const CREATE = 'bucket/CREATE';
(2) initialState
// 초기값 지정해줌
const initialState = {
    list: ["영화관 가기", "매일 책읽기", "수영 배우기"];
}
(3) Action Creactor
자바스크립트에서는 딕셔너리 안에 key와 value가 같으면 한가지만 써도 됨{bucket : bucket} => {bucket}
// Action Creators
export const loadBucket = (bucket) => {
  return { type: LOAD, bucket };
};

export function cerateBucket (bucket) {
    return {type: CREATE, bucket : bucket};
}
(4) Reducer
load:
가지고 있던 기본값을 그대로 뿌려준다.
create:
새로 받아온 값을 가지고 있던 값에 더해서 리턴
리듀서에서는 case 마다 나눠서 어떻게 바꿔줄건지 선언함
// Reducer
export default function reducer(state = initialState, action = {}) {
    switch (action.type) {
         // do reducer stuff
        case "bucket/LOAD":
          return state;

        case "bucket/CREATE": {
            const new_bucket_list = [...state.list, action.bucket];
            return {list : [new_bucket_list]};
        }
      default:
        return state;
    }
  }
어떤 값을 돌려 보내 줄건지 정함
오류 방지 위해 기본값 지정: 파라미터에 값이 안들어온다면 그냥 빈 딕셔너리이다. 기본값이 있을때는 그냥 넣어주면 됨.
(5) Store
redux 폴더 하위에 configStore.js 파일을 만들고 스토어를 만들어보자
- combineReducers: 리듀서들을 엮어줌 -> 다 엮은 것이 rootReducer
리듀서들을 import한다.
루트 리듀서 선언
스토어 만들어줌
//configStore.js
import { createStore, combineReducers } from "redux";
import bucket from "./modules/bucket";

// root 리듀서를 만들어줍니다.
// 나중에 리듀서를 여러개 만들게 되면 여기에 하나씩 추가해주는 거예요!
const rootReducer = combineReducers({ bucket, reducer2,.... });

// 스토어를 만듭니다.
const store = createStore(rootReducer);

export default store;
리덕스와 컴포넌트 연결
import React from 'react';
import ReactDOM from 'react-dom';
import './index.css';
import App from './App';
import reportWebVitals from './reportWebVitals';
import {BrowserRouter} from "react-router-dom";

// 우리의 버킷리스트에 리덕스를 주입해줄 프로바이더를 불러옵니다!
import { Provider } from "react-redux";
// 연결할 스토어도 가지고 와요.
import store from "./redux/configStore";

ReactDOM.render(
  <Provider store={store}>
    <BrowserRouter>
      <App />
    </BrowserRouter>
  </Provider>,
  document.getElementById("root")
);

// If you want to start measuring performance in your app, pass a function
// to log results (for example: reportWebVitals(console.log))
// or send to an analytics endpoint. Learn more: https://bit.ly/CRA-vitals
reportWebVitals();
컴포넌트에서 리덕스 데이터 사용하기
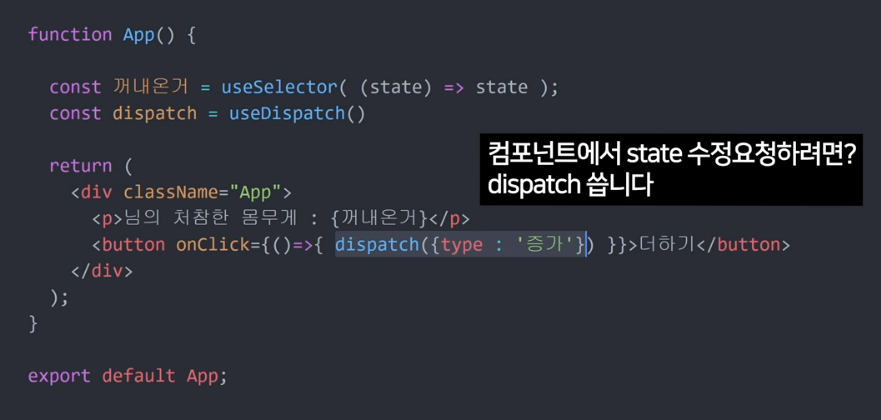
컴포넌트에서 리덕스 액션 사용하는 법
- 리덕스 훅
- 데이터를 가져오는 것 useSelector
- 상태를 업데이트할 수 있는 것 useDispatch
// useDispatch는 데이터를 업데이트할 때,
// useSelector는 데이터를 가져올 때 씁니다.
import {useDispatch, useSelector} from "react-redux";페이지에서 리덕스 데이터 가져오기
import { useSelector } from "react-redux";

const BucketList = (props) => {
  const history = useHistory();

  // const my_lists = props.list;
  const my_lists = useSelector((state) => state.bucket.list);
  console.log(my_lists);
useSelector((state) ⇒ state.bucket) 여기서 state는 리덕스 스토어가 가진 전체 데이터이다.
redux 데이터 추가하기
useDispatch 훅 쓰기
const dispatch = useDispatch();

const addBucketList = () => {
    // 스프레드 문법! 기억하고 계신가요? :)
    // 원본 배열 list에 새로운 요소를 추가해주었습니다.
    // 여긴 이제 주석처리!
    // setList([...list, text.current.value]);

    dispatch(createBucket(text.current.value));
  };
상세페이지에서 버킷리스트 내용을 띄워보기
몇번째 상세페이지인지 알기위해 url 파라미터 사용하자
파라미터를 사용해주려면 다음과 같은 절차를 꼭 기억하자:
1. route에서 파라미터 이름 지정
// App.js
<Route exact path="/detail/:index" component={Detail} />- 스위치 찾아서 onClick 하면 이동할 페이지 주소에 파라미터 입력
my_lists.map((list, index) => {
        return (
          <ItemStyle
            className="list_item"
            key={index}
            onClick={() => {
              history.push("/detail/"+index);
            }}
          >
            {list}
          </ItemStyle>
        );
})}- 목적지인 상세페이지로 가서 (여기선 detail 페이지) 파라미터 받아오기
import React from "react";
import { useHistory } from "react-router-dom";
import {useParams} from "react-router-dom";
import {useSelector} from "react-redux";

const Detail = (props) => {
    const params = useParams();
    const bucket_index = params.index;
    const bucket_list= useSelector((state) => state.bucket.list);

    console.log(bucket_list)
    console.log(params)
    console.log(bucket_list[bucket_index]);
    const history = useHistory();
    return (

        <div onClick={()=>{
            history.push("/");
        }}>디테일 화면이에요</div>
    )
}

export default Detail;
버킷 리스트 데이터 삭제하기
- 조건에 맞춰 배열 항목을 필터링 해주는 array의 내장함수 filter를 사용: url 파라미터가 배열의 index이니, 그 것만 빼고 나머지를 새로운 배열에 넣어준다.
- 액션, 액션 생성 함수, 리듀서에 삭제 기능을 추가
s
<button
        onClick={() => {
          //   dispatch(); <- 괄호안에는 액션 생성 함수가 들어가야겠죠?
          // 예를 들면 이렇게요.
          console.log("삭제하기 버튼을 눌렀어!");
            dispatch(deleteBucket(bucket_index));
            history.goBack();
        }}
      >
        삭제하기
      </button>
// 액션 타입을 정해줍니다.
const CREATE = "bucket/CREATE";
const DELETE = "bucket/DELETE";
// 초기 상태값을 만들어줍니다.
const initialState = {
list: ["영화관 가기", "매일 책읽기", "수영 배우기"],
};
// 액션 생성 함수예요.
// 액션을 만들어줄 함수죠!
export function createBucket(bucket){
console.log("액션을 생성할거야!");
return {type: CREATE, bucket: bucket};
}
export function deleteBucket(bucket_index){
console.log("지울 버킷 인덱스", bucket_index);
return {type: DELETE, bucket_index};
}
// 리듀서예요.
// 실질적으로 store에 들어가 있는 데이터를 변경하는 곳이죠!
export default function reducer(state = initialState, action = {}) {
switch (action.type) {
case "bucket/CREATE": {
console.log("이제 값을 바꿀거야!");
const new_bucket_list = [...state.list, action.bucket];
return {list : new_bucket_list};
}
case "bucket/DELETE": {
const new_bucket_list = state.list.filter((l, idx) => {
return parseInt(action.bucket_index) !== idx;
});
return {list: new_bucket_list};
}
default:
return state;
}
}3주차 마지막 과제: 퀴즈 앱 만들기!
4주차
keyframes (ft. css)
transition
비교적 단순 (만약 박스 크기를 크게 만든다고 하면 일정 속도로만 설정가능)
animation
복잡하게 구현 가능 (박스 크기를 퍼센테지로 나눠서 다양한 속도로 설정 가능)
animation에서 쓰는 속성이 => keyframes
react 이니셜 페이지 예:
@media (prefers-reduced-motion: no-preference) {
  .App-logo {
    animation: App-logo-spin infinite 20s linear;
  }
}


@keyframes App-logo-spin {
  from {
    transform: rotate(0deg);
  }
  to {
    transform: rotate(360deg);
  }
}
from/to를 퍼센테지로도 셋팅이 가능
@keyframes App-logo-spin {
  0% {
    transform: rotate(0deg);
  }
  50% {
    transform: rotate(100deg);
  }
  100% {
    transform: rotate(360deg);
  }
}
styled-components사용하기
import styled, {keyframes} from "styled-components";

function App() {

  return (
    <div className="App">
      <Box></Box>
    </div>
  );
}


const boxAnimation = keyframes`
0% {
  border-radius: 0%;
}
30% {
  border-radius: 25%;
  top: 200px;
}
50% {
  border-radius: 50%;
  top: 400px;
}
100% {
  border-radius: 0%;

}
`
const Box = styled.div`
  width: 100px;
  height: 100px;
  background-color: green;
  border-radius: 0%;
  margin: 5px;


  position: absolute;
  top: 20px;
  left: 20px;

  animation: ${boxAnimation} 2s 1s infinite linear
`;


export default App;
버킷리스트에 프로그래스바 달기
- (1) 뷰를 먼저 만들어요! (버튼 먼저 만들기)
- (2) 액션 타입 먼저 만들기
- (3) 액션 생성 함수 만들고,
- (4) 리듀서까지 만든다.
- (5) 이제 버튼을 누르면 액션을 호출하게 해볼까요?

- 먼저 기존에 list에서 나열하던 버킷 리스트를 딕셔너리 형태로 만들어서 완료여부 정보가 들어갈수 있도록 state를 손봐줄거다.
list: [
    { text: "영화관 가기", completed: false },
    { text: "매일 책읽기", completed: false },
    { text: "수영 배우기", completed: false },
    { text: "코딩하기", completed: false },
  ],
그 다음 update 액션을 만들어 준다.
Action 타입, Action Creators
// Action 타입 정해줌
//const LOAD   = 'my-app/widgets/LOAD';
const UPDATE = 'bucket/UPDATE';

// Action Creators 액션 개체

export function updateBucket (bucket_index) {
  return {type: UPDATE, bucket_index};
}
Reducer
// Reducer 순서대로 배치하면 보기좋음
export default function reducer(state = initialState, action = {}) {
    switch (action.type) {
       // do reducer stuff

       case "bucket/UPDATE": {
          const updated_list = state.list.map((l,idx) => {

            if (parseInt(action.bucket_index) === idx) {
               return {...l, completed: true};
            } else{
              return l;
            }
          })
          console.log({list : updated_list})
          return {list : updated_list};

        }


      default:
        return state;
    }
  }
완료하기 버튼 누르면 bucket_index가 action으로 넘어가서 action.bucket_index로 해당 위치에 있는 l을 찾은 다음 complete:true로 바꿔서 표시한다.
<button onClick={()=>{
                dispatch(updateBucket(bucket_index))
                history.goBack();
            }}> 완료하기 </button>
완료하면 색 바꿔주기
styled-components로 변수받아오기 (props 구멍뚫기)
const ItemStyle = styled.div`
  padding: 16px;
  margin: 8px;
  background-color: ${(props) => (props.completed ? "orange" : "aliceblue")};
`;
ItemStyle에게 props를 내려보내줄거다.
list.completed를 "completed"(임의로 정한 props의 이름)라는 props로 내려보내주고, props.completed가 true면 orane, 아니면 aliceblue색으로 정의한다.
<ItemStyle completed={list.completed} className="list_item" key={index} onClick={() => {
            history.push("/detail/"+index);
          }}>
            {list.text}
          </ItemStyle>
프로그레스 바를 만들어 주고 완료된 숫자를 count해서 전체에서 몇%인지 찾은 다음 박스width를 정해준다.
Progress.js
import React from "react";
import styled from "styled-components";
import { useSelector } from "react-redux";

const Progress = (props) => {
  const bucket_list = useSelector((state) => state.bucket.list);
  console.log(bucket_list);

  let count = 0;
  bucket_list.map((b, idx) => {
    if (b.completed) {
      count++;
    }
  });

  console.log(count);
  return (
    <ProgressBar>
      <HighLight width={(count / bucket_list.length) * 100 + "%"} />
    </ProgressBar>
  );
};

const ProgressBar = styled.div`
  background: #eee;
  width: 100%;
  height: 40px;
`;

const HighLight = styled.div`
  background: orange;
  transition: 1s;
  width: ${(props) => props.width};
  height: 40px;
`;

export default Progress;
그리고
++흐름에서 벗어나지만 나중에 어차피 만져줘야 하는 부분
딕셔너리 형태로 바꿔줬기 때문에 input에 입력했을때 딕셔너리로 createBucket되도록 수정해줘야 한다:
const dispatch = useDispatch();
const addBucketList = () => {
dispatch(createBucket({text: text.current.value, completed: false}));
};

...

<button onClick={addBucketList}>추가하기</button>
위로가기 만들기
scrollTo를 이용해서 원하는 좌표로 이동하게 만든다.
<button onClick={()=>{
  window.scrollTo(0,0);
}}>위로가기</button>
조금 자연스러운 액션을 원한다면 이렇게:
<button onClick={()=>{
  window.scrollTo({top:0, left:0, behavior:"smooth"});
}}>위로가기</button>
높이 고정해주고 스크롤 만들기
overflow-y를 auto로 주면 컨텐츠가 전체높이보다 짧으면 스크롤이 안보이고 넘치면 스크롤이 생긴다.
const ListStyle = styled.div`
display: flex;
flex-direction: column;
height: 50vh;
overflow-x: hidden;
overflow-y: auto;
max-height: 50vh;

`;
progress bar에 버튼 달아주기
  return (

    <ProgressBar>
      <HighLight width={(count/bucket_list.length)*100+ '%'}></HighLight>
      <Roundbutton></Roundbutton>
    </ProgressBar>
  )
}

const ProgressBar = styled.div`
  background-color: #eee;
  width: 100%;
  height: 20px;
  display: flex;
  align-items: center;
  border-radius:10px;
`
const HighLight = styled.div`
  background-color: orange;
  transition: 1s;
  width: ${(props) => props.width};
  height: 20px;
  border-radius:10px;

`
const Roundbutton = styled.div`
  width: 30px;
  height: 30px;
  border-radius: 50%;
  border: 2px solid orange;
  background-color: white;
  transition: 1s;
  margin: 0px 0px 0px -15px;

`
FireStore - 서버리스 웹 만들어보기
Async & Await 이해하기
한쌍으로 쓰이는데, 보통 서버에서 데이터를 받아올때, 비동기로 진행되며 언제 받아올지 모른다. 그래서 아래있는 getDocs요청을 콘솔에 찍어보면 'promise' 라고 뜨는데, 이건 '언젠간 주겠다' 라는 약속같은 것. 이 케이스에서 async & await를 쓰면 기다린다.
React.useEffect(() => {async() => {
  const query = await getDocs(collection(db, "bucket"));
  console.log(query);
}, []);
}
React.useEffect(async() => {
  const query = await getDocs(collection(db, "bucket"));
  query.forEach((doc) => {
    console.log(doc.id, doc.data());
  });
}, []);
데이터 추가하기
콜렉션을 찾고 → addDoc()!
대시보드에서 잘 추가되었는 지 확인
React.useEffect(async() => {

    addDoc(collection(db, "bucket"), {text: "new", completed:false});

}, []);
데이터 수정하기
콜렉션을 찾고 → 도큐먼트 id로 updateDoc()
React.useEffect(async() => {
    const docRef = doc(db, "bucket", "2XI8lJkqKlOMt4388dK2")
    updateDoc(docRef, {completed:true})


}, []);
데이터 삭제하기
콜렉션을 찾고 → 도큐먼트 id로 deleteDoc()
React.useEffect(async() => {
    const docRef = doc(db, "bucket", "2XI8lJkqKlOMt4388dK2");
    await deleteDoc(docRef);

}, []);
콜렉션 이름을 바꿔서 추가하면 어떻게 될까?
자동으로 새로운 컬렉션이 생김!
리덕스에서 FireStore 데이터 가져다쓰기
firestore 데이터를 리덕스 스토어에 넣으려면? => 미들웨어 설치!
edux-thunk는 객체 대신 함수를 생성하는 액션 생성함수를 작성할 수 있게 해준다. 리덕스는 기본적으로는 액션 객체를 디스패치한다! → 즉, 함수를 생성하면 특정 액션이 발생하기 전에 조건을 주거나, 어떤 행동을 사전에 처리하는 것.
redux-thunk는 객체 대신 함수를 생성하는 액션 생성함수를 작성할 수 있게 해줌.
yarn add redux-thunkstore
//configStore.js
import { createStore, combineReducers, applyMiddleware, compose } from "redux";
import bucket from "./modules/bucket";
import thunk from "redux-thunk";


const middlewares = [thunk];
const enhancer = applyMiddleware(...middlewares);
// root 리듀서를 만들어줍니다.
// 나중에 리듀서를 여러개 만들게 되면 여기에 하나씩 추가해주는 거예요!
const rootReducer = combineReducers({ bucket });

// 스토어를 만듭니다.
const store = createStore(rootReducer, enhancer);

export default store;
리덕스 공식문서에 쓰는법이 잘 나와있음!
Create / Read / Update / Delete
READ (LOAD)
load할 때 데이터를 가지고 와보자
- 액션생성 -> 파이어베이스랑 통신하는 함수 만듬 -> 리듀서 고쳐 -> 액션 갖다써
const LOAD = "bucket/LOAD";

export const loadBucket = (bucket) => {
  return { type: LOAD, bucket_list };
};
app.js
React.useEffect(async() => {
  dispatch(loadBucketFB());

}, []);
// bucket.js
import {db} from "../../firebase"
import { collection, getDoc, getDocs, addDoc, updateDoc, doc, deleteDoc } from "firebase/firestore";

// 액션 타입
const LOAD = "bucket/LOAD";

// 액션 생성 함수
export const loadBucket = (bucket_list) => {
  return { type: LOAD, bucket_list };
};

//파이어베이스랑 통신하는 함수
export const loadBucketFB = () => {
  return async function (dispatch) {
    const bucket_data = await getDocs(collection(db, "bucket"));
    console.log(bucket_data);

    let bucket_list = [];

    bucket_data.forEach((doc) => {
      console.log(doc.data());
      bucket_list.push({...doc.data()});
    });
    console.log(bucket_list);
    dispatch(loadBucket(bucket_list));
  }
}

// 리듀서를 고쳐요
export default function reducer(state = initialState, action = {}) {
    switch (action.type) {
       // do reducer stuff
        case "bucket/LOAD": {
          return {list: action.bucket_list};
        }

      default:
        return state;
    }
  }
CREATE
const addBucketList = () => {

  dispatch(addBucketFB({text: text.current.value, completed: false}));
// dispatch(createBucket({text: text.current.value, completed: false}));
};
//파이어베이스랑 통신하는 함수
export const addBucketFB = (bucket) => {
return async function (dispatch) {
const docRef = await addDoc(collection(db, "bucket"), bucket);
const _bucket = await getDoc(docRef);
const bucket_data = {id: _bucket.id, ..._bucket.data()};
// = const bucket_data = {id: docRef.id, ...bucket};
console.log(bucket_data);
dispatch(createBucket(bucket_data));
}
}UPDATE
<button onClick={()=>{
                // dispatch(updateBucket(bucket_index));
                dispatch(updateBucketFB(bucket_list[bucket_index].id));
                history.goBack();
            }}> 완료하기 </button>
어떤걸 업데이트할건지 잡아주기 -> docRef
딱 하나만 가져와서 바꿔줄거야 -> doc
updateDoc 끝난 다음 리덕스 수정해줘야 하기 때문에 updateDoc에 async/await 달아준다.
export const updateBucketFB = (bucket_id) => {
  return async function (dispatch, getState) {
    const docRef = doc(db,"bucket",bucket_id);
    await updateDoc(docRef, {completed: true});

    console.log(getState().bucket);
    const _bucket_list = getState().bucket.list;
    const bucket_index = _bucket_list.findIndex((c)=>{
      return c.id === bucket_id;
    })
    dispatch(updateBucket(bucket_index));
  }
}
DELETE
<button onClick={()=>{
                // dispatch(deleteBucket(bucket_index));
                dispatch(deleteBucketFB(bucket_list[bucket_index].id));
                history.goBack();
            }}> 삭제하기 </button>
export const deleteBucketFB = (bucket_id) => {
  return async function (dispatch, getState) {
    if(!bucket_id){
      window.alert("아이디가 없네요!");
      return;
    }
    const docRef = doc(db,"bucket",bucket_id);
    await deleteDoc(docRef)

    const _bucket_list = getState().bucket.list;
    const bucket_index = _bucket_list.findIndex((c)=>{
      return c.id === bucket_id;
  })
  dispatch(deleteBucket(bucket_index));
};
}
머테리얼 UI
머테리얼 ui는 우리가 styled-components를 쓰던 것처럼 사용할 수 있다.
공식 문서에서 어떻게 생겼는 지 보고 사용 해보자!
계속 업데이트되기 때문에 공식문서에서 매번 확인하고 써야함
페이지 의도적으로 가리기
로딩 스피너 만들어서 흰 화면 대신 넣어준다.
로딩이 되기 전에 보여줘야 하기 때문에,
initial state를 false로 두고 load action으로 가서 완료될때 is_loaded가 true가 되도록 state에 같이 설정해준다.
const initialState = {
  is_loaded: false,
  list: [

  ],
};
case "bucket/LOAD":{
return {list: action.bucket_list, is_loaded:true};
}useSelector로 is_loaded를 가져온다.
const is_loaded = useSelector(state => state.bucket.is_loaded);로딩이 된 상태가 아니라면 spinner를 띄우라는거
{!is_loaded && <Spinner/>}추가하기 버튼을 누를때, 완료전까지 스피너가 나오게 하려면 =>
<button onClick={addBucketList}>추가하기</button>버튼클릭하면 뭐가 나오는지를 따라가보자.
const addBucketList = () => {

  dispatch(addBucketFB({text: text.current.value, completed: false}));
// dispatch(createBucket({text: text.current.value, completed: false}));
};
또 가보면 결국 이게 나옴.
export const addBucketFB = (bucket) => {
  return async function (dispatch) {
    dispatch(isLoaded(false));
    const docRef = await addDoc(collection(db, "bucket"), bucket);
    // const _bucket = await getDoc(docRef);
    const bucket_data = {id: docRef.id, ...bucket};
    console.log(bucket_data);

    dispatch(createBucket(bucket_data));
  }
}
여기서 isLoaded를 dispatch해서 false로 바꿔줄거다.
이제 리듀서에서 다른 action들 받아올때 is_loaded도 바꿔준다.
 case "bucket/CREATE": {
            const new_bucket_list = [...state.list, action.bucket];
            return {...state, list : new_bucket_list, is_loaded:true};
        }