목표 : 윈도우 VM(우분투)에 nginx + tomcat인스턴스 2개 띄워서 무중단 롤링 배포 해보기.
특이사항 : 배포한 프로젝트가 아니고 tomcat을 다운받아 실습만 해볼거라 jsp임...
- 윈도우에 ubuntu 설치
$ sudo apt update
$ sudo apt install nginx
$ sudo systemctl start nginx //nginx실행
$ sudo systemctl disable nginx // 서버시작시 nginx 자동실행 off- tomcat 인스턴스 설치(2개)
개인적으로 apt install tomcat9로는 아무리 해봐도 잘 모르겠어서, 그냥 tomcat.tar로 진행함. 근데 둘이 구조가 다르니 tar로 진행하는걸 추천함.
$ sudo apt-get install openjdk-8-jdk //톰캣 설치 전에 자바부터

// 포스팅 기준 9.0.80 버전이 최신임
$ wget http://apache.mirror.cdnetworks.com/tomcat/tomcat-9/v9.0.80/bin/apache-tomcat-9.0.80.tar.gz
$ tar -xzf apache-tomcat-9.0.80.tar.gz // 압축 풀기
$ mv apache-tomcat-9.0.53 /opt/tomcat1 // 압축 푼 것 옮기기
//압축은 한번 풀고 복사해서 사용해도 되지만 그냥 반복한 것임.
$ tar -xzf apache-tomcat-9.0.80.tar.gz // 압축 풀기
$ mv apache-tomcat-9.0.53 /opt/tomcat2 // 압축 푼 것 옮기기

//tomcat1과 tomcat2를 실행하려면 port가 달라야함. tomcat2의 포트변경.
$ sudo vi /opt/tomcat2/conf/server.xml
<Server port="8105" shutdown="SHUTDOWN">
<Connector port="8180" protocol="HTTP/1.1"

// 톰캣 실행
$ /opt/tomcat1/bin/start.sh
$ /opt/tomcat2/bin/start.sh
. nginx로 tomcat1, tomcat2 porxy해서 로드벨런싱 해보기
tomcat1, tomcat2 구분을 위하여 /opt/tomcatX/webapps/ROOT/index.jsp파일에 구분 할 수 있을 만한 것을 마음것 추가.
//ubuntu는 아래 위치 파일을 nginx.conf에서 include 해서 사용함.
$ sudo vi /etc/nginx/sites-available/default
// 아래 스크립트 작성
upstream test_proyx{ // Round Robin방식
	server 127.0.0.1:8080 //tomcat1
    server 127.0.0.1:8180 //tomcat2
}
// location 부분 proxy_xxx추가
server{
	...
	location / {
    	...
    	proxy_pass http://test_proxy;
        proxy_set_header X-Real-IP $remote_addr;
        proxy_set_header X-Forwarded-For $proxy_add_x_forwarded_for;
        proxy_set_header Host $http_host;
    }
}

// nginx 재실행
sudo systemctl reload nginx
reload 후 localhost:80을 계속 새로고침하면 tomcat1, tomcat2가 한번씩 접속 되는 걸 확인 할 수 있음.
- 아무 조건 없는 순수 롤링배포 해보기
- 먼저 bash작성 할 때 tomcat1, tomcat2를 구분할 수 있는게 필요하다.
각각 opt/tomcatX/webapps/test/index.jsp파일을 만들고 index.jsp에는 tomcatX와 같이 tomcat번호만 적어준다. - 3번 과정에서 사용한 스크립트 변경
$ sudo vi /etc/nginx/sites-available/default
// 아래 스크립트 주성 or 삭제
upstream test_proyx{ // Round Robin방식
	server 127.0.0.1:8080 //tomcat1
    server 127.0.0.1:8180 //tomcat2
}

server{
	...
    include /etc/nginx/conf.d/service-url.inc;//$service_url 변수 담아 둘 파일.
	location / {
    	...
    	proxy_pass http://$service_url; //동적으로 할당 받아야하니 변수로 변경
        proxy_set_header X-Real-IP $remote_addr;
        proxy_set_header X-Forwarded-For $proxy_add_x_forwarded_for;
        proxy_set_header Host $http_host;
    }

    // bash에서 tomcat1, tomcat2 구분하기위해 추가
    	location /test {
    	...
    	proxy_pass http://$service_url/test;
        proxy_set_header X-Real-IP $remote_addr;
        proxy_set_header X-Forwarded-For $proxy_add_x_forwarded_for;
        proxy_set_header Host $http_host;
    }
}- bash 스크립트 작성
/etc/nginx/test/switch.sh 경로에 파일 만들어서 작성했음.

//아래부터 switch.sh작성

#!/bin/bash //#!은 주석이 아님 셔뱅(shebang)라고하니 반드시 적어야함.
echo ">현재 작동 중인 tomcat 확인"
CURRENT_PROFILE=$(curl -s http://127.0.0.1/test/)
echo "> 사용중인 tomcat : $CURRENT_PROFILE"
TOMCAT1="tomcat1"
TOMCAT2="tomcat2"

# 사용중인 톰캣 찾기 tomcat1 활성 중이면 tomcat2 port인 8180을 할당
if [ "$CURRENT_PROFILE" = "$TOMCAT1" ];
then
        echo "> tomcat1 사용 중이니 tomcat2 실행"
        echo "set \$service_url 127.0.0.1:8180;" | sudo tee /etc/nginx/conf.d/service-url.inc
        /opt/tomcat2/bin/startup.sh //꺼져있는 톰캣 시작.
        IDEL_PORT=8180
elif [ "$CURRENT_PROFILE" = "$TOMCAT2" ];
then
        echo "> tomcat2 사용 중이니 tomcat1 실행"
        echo "set \$service_url 127.0.0.1:8080;" | sudo tee /etc/nginx/conf.d/service-url.inc
        /opt/tomcat1/bin/startup.sh
        IDEL_PROT=8080
else
        echo ">일치하는 톰캣이 없음.사용 중인 톰캣 : $CURRENT_PROFILE"
        echo ">1번 톰캣을 할당함."
        echo "set \$service_url 127.0.0.1:8080;" | sudo tee /etc/nginx/conf.d/service-url.inc
        /opt/tomcat1/bin/startup.sh
        IDEL_PROT=8080
fi

echo "> $IDEL_PROT로 Port 전환"

PROXY_PROT=$(curl -s http://127.0.0.1/test/)
echo "> Nginx Current Proyx tomcat : $PROXY_PROT"

echo "> Nginx Reload"
sudo systemctl reload nginx

// 사용 중이던 톰캣은 종료
sleep 2s
echo "> $CURRENT_PROFILE shutdown"
sudo /opt/$CURRENT_PROFILE/bin/shutdown.sh
여기서 if문 조건이 상당히 악랄하다. [v 조건 v] 반드시 띄어쓰기가 있어야한다... chatGPT한테 검수받고 겨우 찾았다.
- switch.sh 파일 실행권한 부여
$ chmod +x /etc/nginx/test/switch.sh- 실행
/etc/nginx/test/switch.sh위 스크립트를 실행하면 tomcat1, tomcat2가 전환 될 것이다.
우아한 무중단 배포 해보기
목적 : 무중단 배포를 할 때 계속해서 요청이 들어와도 에러가 없이 배포가 완료 되도록 해보는 것.
우아한 무중단 배포를 위해 앞에서 한 tomcat은 사용하지 않고 spring boot 프로젝트를 사용해서 다시 했다.
Graceful shutdown 이란?
Graceful shutdown은 애플리케이션 서버 종료시 새로운 요청은 받지 않고 기존 요청을 완전히 처리한 이후 서버를 종료하는 것이며 스프링 부트 2.3버전 부터 지원함.
server.shutdown=graceful
spring.lifecycle.timeout-per-shutdown-phase=20s
배포 시작
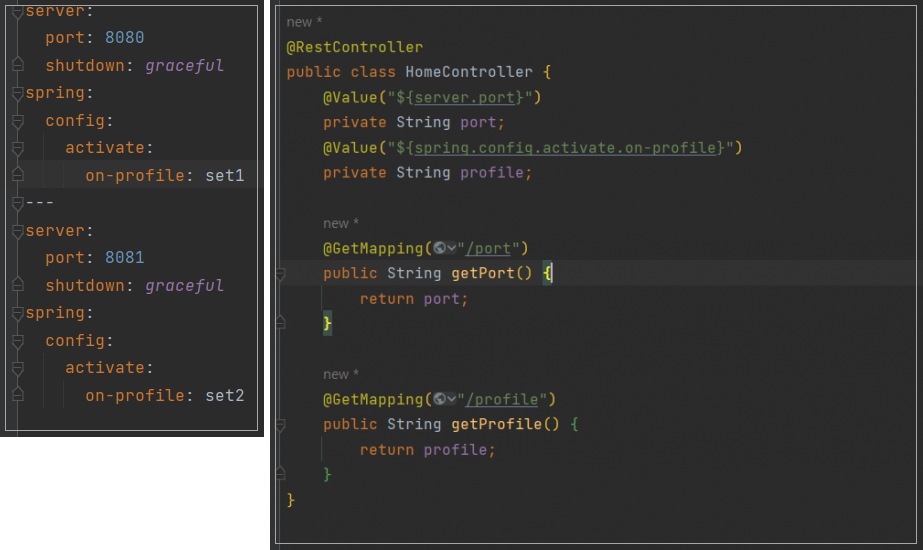 무중단 배포에 사용할 예제다.
1. spring boot를 jar파일로 만들고 wsl로 옮기기
/opt/boot/ 경로에 jar파일을 옮겨 사용.
2. jar실행 파일 daemon으로 실행 할 수 있도록 만들기
//파일 이름은 달라도 경로는 반드시 같아야함
$ sudo vi /etc/systemd/system/set1-test-0.0.1-SNAPSHOT.service
// 파일 내용
[Unit]
Description=TEST JAR파일 실행용.

[Service]
User=root
ExecStart=java -jar /opt/boot/test-0.0.1-SNAPSHOT.jar --spring.profiles.active=set1

SuccessExitStatus=143
TimeoutStop=10
Restart=on-failure
RestartSec=5
ExecStart의 set1 -> set2로 바꿔서 set2-test-0.0.1-SNAPSHOT.service 파일도 만들어 주자.
// 파일 실행 권한 부여
$ chmod 644 set1-test-0.0.1-SNAPSHOT.service
$ chmod 644 set2-test-0.0.1-SNAPSHOT.service

// 데몬 리로드
$ sudo systemctl daemon-reload
3. nginx proxy
$ sudo vi /etc/nginx/sites-available/default

// 내용 추가
server{
	...
    include /etc/nginx/conf.d/service-url.inc;//$service_url 변수 담아 둘 파일.
	location / {
    	...
    	proxy_pass http://$service_url; //동적으로 할당 받아야하니 변수로 변경
        proxy_set_header X-Real-IP $remote_addr;
        proxy_set_header X-Forwarded-For $proxy_add_x_forwarded_for;
        proxy_set_header Host $http_host;
    }

    // bash에서 tomcat1, tomcat2 구분하기위해 추가
    	location /profile {
    	...
    	proxy_pass http://$service_url/profile;
        proxy_set_header X-Real-IP $remote_addr;
        proxy_set_header X-Forwarded-For $proxy_add_x_forwarded_for;
        proxy_set_header Host $http_host;
    }
}
4.무중단 배포 쉘 스크립트 작성
$ sudo vi /etc/nginx/test/switch.sh

// 파일 본문

#!/bin/bash #!은 주석이 아님 셔뱅(shebang)라고하니 반드시 적어야함.
echo ">현재 작동 중인 profile 확인"
CURRENT_PROFILE=$(curl -s http://127.0.0.1/profile)
echo "> 사용중인 port : $CURRENT_PROFILE"

# 사용중인 서버의 PID 찾기(죽이기 위해)
PID_FOR_KILL=$(pgrep -f test-0.0.1-SNAPSHOT.jar)
SET1=set1
SET2=set2


# 쉬는 profile 찾기 set1이 실행 중이면 set2를 실행
if [ "$CURRENT_PROFILE" = "$SET1" ];
then
        echo "> set1 사용 중이니 set2 실행."
        echo "set \$service_url 127.0.0.1:8081;" | sudo tee /etc/nginx/conf.d/service-url.inc
        IDLE_PROFILE=set2
        IDLE_PORT=8081
elif [ "$CURRENT_PROFILE" = "$SET2" ];
then
        echo "> set2 사용 중이니 set1 실행."
        echo "set \$service_url 127.0.0.1:8080;" | sudo tee /etc/nginx/conf.d/service-url.inc
        IDLE_PROFILE=set1
        IDLE_PROT=8080
else
        echo ">일치하는 Profile이 없음. Profile : $CURRENT_PROFILE"
        echo ">set1을 실행함."
        echo "set \$service_url 127.0.0.1:8080;" | sudo tee /etc/nginx/conf.d/service-url.inc
        IDLE_PROFILE=set1
        IDLE_PROT=8080
fi

#데몬으로 실행
sudo systemctl start ${IDLE_PROFILE}-test-0.0.1-SNAPSHOT.service
sleep 10s #실행시간을 충분히 주려는 목적

echo "> $IDEL_PROT로 Port 전환"

echo "> Nginx Reload"
sudo systemctl reload nginx

# 실행 되고 있는 서버가 없다면 죽일 PID도 없음
if [ -n  $PID_FOR_KILL ];
then
        echo "> $CURRENT_PROFILE shutdown"
        kill $PID_FOR_KILL
fi- 실행 해보기
Jmter로 요청을 보내는 도중 서버를 바꿔도 문제없이 돌아가는지 확인.

한 줄평 : 윈도우만 사용해봐서 뭐가뭔지 아무것도 몰라서 많이 힘들었다.. 특히 if문 오류는 너무 악랄한 것 같다.