Node.js의
http 모듈은 서버와 클라이언트 간의 HTTP 통신을 처리할 수 있도록 도와주는 핵심 모듈 중 하나입니다. 이를 사용하여 HTTP 서버를 생성하고, 요청(request) 및 응답(response)을 관리할 수 있습니다.
HTTP server
HTTP server를 생성하는데 http 모듈을 사용합니다.
http.createServer(requestListner) 는 http.Server의 새 인스턴스를 반환합니다.
requestListner는 request 이벤트가 발생할 때 호출되는 콜백함수 입니다.
Server 인스턴스는 listen 메소드를 호출하여 접속 대기를 시작합니다.
기본 HTTP Server 생성
// ./server.js

// 'http' 모듈을 가져옵니다. 이 모듈을 사용하여 서버를 생성하고 요청/응답을 처리할 수 있습니다.
const http = require("http");

// http 모듈의 createServer 메서드를 사용하여 서버를 생성합니다.
// createServer는 요청(req)과 응답(res) 객체를 매개변수로 가지는 콜백 함수를 받습니다.
http.createServer((req, res) => {
  // 응답 헤더를 설정합니다.
  // '200'은 성공적인 응답을 의미하는 HTTP 상태 코드입니다.
  // 'Content-Type': 'text/html; charset=utf-8' 설정으로 클라이언트(브라우저)에게 전송하는 콘텐츠가 HTML이고, UTF-8로 인코딩된다는 것을 알립니다.
  res.writeHead(200, { 'Content-Type': 'text/html; charset=utf-8' });

  // 응답 본문을 작성합니다.
  // 첫 번째 줄에 `<h1>hello Nodejs</h1>`를 전송합니다.
  res.write('<h1>hello Nodejs</h1>');

  // 응답 본문을 추가로 작성합니다.
  // 두 번째 줄에 `<p>hello</p>`를 전송합니다.
  res.write('<p>hello</p>');

  // 응답을 종료합니다. 응답 데이터를 모두 전송하고 클라이언트와의 연결을 닫습니다.
  res.end();

// 서버를 8080 포트에서 실행합니다.
// listen 메서드가 호출되면 서버가 요청을 대기합니다.
// 콜백 함수는 서버가 성공적으로 실행되었을 때 실행되며, 콘솔에 "8080 PORT is listening" 메시지를 출력합니다.
}).listen(8080, () => {
  console.log("8080 PORT is listening");
});
위 코드 작성후 터미널창에 node server.js를 입력하면 서버가 실행되고 http:localhost:8080에 접속하면 아래와 같은 화면이 나타나게 됩니다.
node server.js
주요 메서드와 속성
- http.createServer :
createServer는 HTTP 서버를 생성하는 메소드입니다. 인자로 전달되는 requestListener는 서버가 요청을 받을 때마다 호출되는 함수입니다. 여기서는req와res객체를 사용하여 요청과 응답을 처리합니다. - req (Request 객체) : 클라이언트가 서버로 보낸 HTTP 요청 정보를 담고 있습니다. 이 객체는 요청 메소드, URL, 헤더 등의 정보를 포함하고 있으며, 본문을 읽는 데도 사용됩니다.
req.method: 클라이언트가 요청을 보낼 때 사용한 HTTP 메서드를 나타냅니다. 일반적인 메서드로는GET,POST,PUT,DELETE등이 있습니다.req.url: 클라이언트가 요청한 URL 경로를 나타냅니다. 이를 통해 특정 경로에 따라 다른 처리를 할 수 있습니다.req.headers: 요청 헤더 정보를 포함하는 객체입니다. 헤더는 요청에 대한 부가 정보를 담고 있으며, 인증 정보, 사용자 에이전트, 콘텐츠 타입 등의 정보를 확인할 수 있습니다.req.query: URL에 포함된 쿼리 문자열을 파싱한 정보를 담고 있습니다. 기본http모듈에서는 이 값을 바로 제공하지 않으며, URL을 수동으로 파싱해야 합니다. Express와 같은 프레임워크에서는 이 기능이 자동으로 지원됩니다.req.body:POST,PUT등의 요청 본문 데이터를 담고 있습니다. 기본http모듈에서는 이 값을 자동으로 파싱하지 않으며, 직접 처리해야 합니다. 예를 들어, 데이터를 스트리밍 방식으로 받아야 합니다.req.on(event, callback): 요청에서 특정 이벤트가 발생할 때 실행할 콜백 함수를 설정합니다. 주로 데이터를 스트리밍 방식으로 처리할 때 유용합니다.data: 요청에서 데이터가 들어올 때마다 발생하는 이벤트입니다.end: 요청 데이터 수신이 끝났을 때 발생하는 이벤트입니다.error: 요청 처리 중 에러가 발생하면 호출됩니다.
- res (Response 객체) : 서버가 클라이언트로 보낼 응답을 다루는 객체입니다. 응답 상태, 헤더, 본문 등을 설정할 수 있습니다.
res.statusCode: 응답의 상태 코드를 설정합니다. 상태 코드는 요청에 대한 결과를 나타내며, 예를 들어200(성공),404(페이지를 찾을 수 없음),500(서버 에러) 등이 있습니다.res.setHeader(name, value): 응답 헤더를 설정합니다.Content-Type,Content-Length등의 헤더를 설정하여 클라이언트가 응답을 어떻게 처리해야 할지 지시할 수 있습니다.res.writeHead(statusCode, [headers]): 응답 헤더에 대한 정보를 기록하는 메서드입니다. 상태 코드는 HTTP 상태코드를 말하는데 200, 404, 500 등 이며, 'text/html' 은 응답의 콘텐츠 형식이 HTML 이라는 의미이고, 'utf-8' 은 한글 표시를 하라는 의미입니다.res.getHeader(name): 설정된 특정 응답 헤더의 값을 가져옵니다.res.removeHeader(name): 응답 헤더에서 특정 헤더를 제거합니다.res.write(data): 응답 본문을 작성합니다. 한 번에 모든 데이터를 전송하지 않고, 여러 번에 걸쳐 데이터를 스트리밍할 수도 있습니다.res.end([data]): 응답을 종료하고 데이터를 클라이언트에 전송합니다. 이 메서드는 더 이상 응답에 추가할 데이터가 없을 때 호출해야 합니다. 매개변수로 데이터를 전달하면 응답의 마지막 데이터를 전송하고 바로 연결을 종료합니다.- 상태코드, 헤더정보에 대한 자세한 설명은 https://developer.mozilla.org/ko/docs/Web/HTTP를 참고해주세요.
- .listen('port', () => { ... }): 서버가 설정한 포트에서 클라이언트 요청을 기다리도록 설정합니다. 이 메소드는 비동기로 동작하며, 서버가 정상적으로 실행되면 콜백 함수가 호출됩니다.
fs 모듈로 html 파일 제공하기
fs 모듈을 이용하여 별도로 분리한 html파일을 가져와 제공할 수 있습니다.
<!-- ./view/index.html -->

<!DOCTYPE html>
<html lang="ko-KR">
  <head>
    <meta charset="UTF-8" />
    <meta http-equiv="X-UA-Compatible" content="IE=edge" />
    <meta name="viewport" content="width=device-width, initial-scale=1.0" />
    <title>Nodejs</title>
  </head>
  <body>
    <h1>Hello Nodejs</h1>
    <p>hello</p>
  </body>
</html>./server.js
const http = require("http");
const fs = require("fs").promises;
http.createServer(async (req, res)=> {
// html 파일 로드중 에러 처리를 위한 try/catch문 사용
try {
res.writeHead(200, { 'Content-Type': 'text/html; charset=utf-8' });
// fs모듈을 이용하여 html 파일을 불러옵니다.
const html = await fs.readFile("./view/index.html);
res.end(html);
} catch(error) {
console.error(error);
res.writeHead(500, { 'Content-Type': 'text/plain; charset=utf-8' });
res.end(error.message);
}
}).listen(8080, ()=>{
console.log("8080 PORT is listening")
})경로 생성하기
경로 생성하여 사용자가 서버에 요청하는 URL에 따라 서로 다른 파일이나 데이터를 제공할 수 있습니다. 예를 들어, /about 경로로 요청이 들어왔을 때는 "소개 페이지"를, /contact 경로로 요청이 들어왔을 때는 "연락처 페이지"를 보여줄 수 있습니다.
HTML 파일 생성
<!-- ./view/index.html -->
<!DOCTYPE html>
<html lang="ko-KR">
  <head>
    <meta charset="UTF-8" />
    <meta http-equiv="X-UA-Compatible" content="IE=edge" />
    <meta name="viewport" content="width=device-width, initial-scale=1.0" />
    <title>메인 페이지</title>
  </head>
  <body>
    <h1>메인 페이지</h1>
    <p>여기는 메인 페이지입니다.</p>
  </body>
</html>
<!-- ./view/about.html -->
<!DOCTYPE html>
<html lang="ko-KR">
  <head>
    <meta charset="UTF-8" />
    <meta http-equiv="X-UA-Compatible" content="IE=edge" />
    <meta name="viewport" content="width=device-width, initial-scale=1.0" />
    <title>소개 페이지</title>
  </head>
  <body>
    <h1>소개 페이지</h1>
    <p>여기는 소개 페이지입니다.</p>
  </body>
</html>
<!-- ./view/contact.html -->
<!DOCTYPE html>
<html lang="ko-KR">
  <head>
    <meta charset="UTF-8" />
    <meta http-equiv="X-UA-Compatible" content="IE=edge" />
    <meta name="viewport" content="width=device-width, initial-scale=1.0" />
    <title>연락처 페이지</title>
  </head>
  <body>
    <h1>연락처 페이지</h1>
    <p>여기는 연락처 페이지입니다.</p>
  </body>
</html>
Server 코드 생성
const http = require("http");
const fs = require("fs").promises;

http.createServer(async (req, res) => {
  try {
    // 경로에 따라 분기 처리
    if (req.url === "/") {
      const html = await fs.readFile("./view/index.html");
      res.writeHead(200, { "Content-Type": "text/html; charset=utf-8" });
      res.end(html);
    } else if (req.url === "/about") {
      const html = await fs.readFile("./view/about.html");
      res.writeHead(200, { "Content-Type": "text/html; charset=utf-8" });
      res.end(html);
    } else if (req.url === "/contact") {
      const html = await fs.readFile("./view/contact.html");
      res.writeHead(200, { "Content-Type": "text/html; charset=utf-8" });
      res.end(html);
    } else {
      // 존재하지 않는 경로에 대한 처리
      res.writeHead(404, { "Content-Type": "text/html; charset=utf-8" });
      res.end("<h1>404 페이지를 찾을 수 없습니다.</h1>");
    }
  } catch (error) {
    console.error(error);
    res.writeHead(500, { "Content-Type": "text/plain; charset=utf-8" });
    res.end(error.message);
  }
}).listen(8080, () => {
  console.log("8080 PORT is listening");
});
- 경로 처리:
req.url값을 통해 클라이언트의 요청 경로를 확인합니다. 예를 들어, 사용자가http://localhost:8080/about에 접속하면req.url은"/about"이 됩니다. - 파일 읽기:
fs.readFile()메소드를 사용해 요청된 경로에 맞는 HTML 파일을 비동기적으로 읽어옵니다. 각 경로별로 다른 HTML 파일을 불러오도록 설정되어 있습니다. - 404 처리: 지정된 경로 외의 경로로 요청이 들어올 경우, 404 상태 코드를 반환하고 "페이지를 찾을 수 없습니다"라는 메시지를 응답합니다.
- 에러 처리: 파일 읽기 중 오류가 발생하면 500 상태 코드를 반환하며 서버 내부 오류 메시지를 출력합니다.
REST API 서버 만들기
REST API는 Representational State Transfer (REST) 아키텍처를 기반으로 하는 API로 서버의 자원을 정의하고, 자원에 대한 주소를 지정하는 방법입니다. REST API는 HTTP 요청을 통해 리소스를 생성(Create), 조회(Read), 수정(Update), 삭제(Delete)하는 작업을 수행할 수 있게 해줍니다. 이를 흔히 CRUD(Create, Read, Update, Delete) 작업이라고 부릅니다.
Node.js에서는 http 모듈을 사용해 RESTful API 서버를 구축할 수 있습니다.
HTTP 요청 메서드
- GET : 서버에 자원을 조회하는 API
- POST : 서버에 자원을 새로 생성하는 API
- PUT : 서버의 자원을 요청에 들어있는 자원으로 완전히 바꾸고자 할 때 사용하는 API
- PATCH : 서버 자원의 일부만 수정하고자 할 때 사용하는 API
- DELETE : 서버 자원을 삭제하는 API
Server 코드
const http = require("http");

let data = [
  { id: 1, name: "Apple", price: 100 },
  { id: 2, name: "Banana", price: 200 },
];

const server = http.createServer((req, res) => {
  if (req.method === "GET" && req.url === "/products") {
    // GET 요청: 모든 제품 데이터 조회
    res.writeHead(200, { "Content-Type": "application/json" });
    res.end(JSON.stringify(data));
  } else if (req.method === "POST" && req.url === "/products") {
    // POST 요청: 새 제품 추가
    let body = "";
    req.on("data", (chunk) => {
      body += chunk;
    });
    req.on("end", () => {
      const newProduct = JSON.parse(body);
      data.push({ id: data.length + 1, ...newProduct });
      res.writeHead(201, { "Content-Type": "application/json" });
      res.end(JSON.stringify({ message: "Product added", data }));
    });
  } else if (req.method === "PUT" && req.url.startsWith("/products/")) {
    // PUT 요청: 특정 ID의 제품 전체 업데이트
    const id = parseInt(req.url.split("/")[2]);
    let body = "";
    req.on("data", (chunk) => {
      body += chunk;
    });
    req.on("end", () => {
      const updatedProduct = JSON.parse(body);
      // id에 해당하는 제품을 완전히 새로운 데이터로 대체
      data = data.map((product) =>
        product.id === id ? { id, ...updatedProduct } : product
      );
      res.writeHead(200, { "Content-Type": "application/json" });
      res.end(JSON.stringify({ message: "Product fully updated", data }));
    });
  } else if (req.method === "PATCH" && req.url.startsWith("/products/")) {
    // PATCH 요청: 특정 ID의 제품 일부 업데이트
    const id = parseInt(req.url.split("/")[2]);
    let body = "";
    req.on("data", (chunk) => {
      body += chunk;
    });
    req.on("end", () => {
      const updates = JSON.parse(body);
      // 기존 데이터 중 수정할 부분만 업데이트
      data = data.map((product) =>
        product.id === id ? { ...product, ...updates } : product
      );
      res.writeHead(200, { "Content-Type": "application/json" });
      res.end(JSON.stringify({ message: "Product partially updated", data }));
    });
  } else if (req.method === "DELETE" && req.url.startsWith("/products/")) {
    // DELETE 요청: 특정 ID의 제품 삭제
    const id = parseInt(req.url.split("/")[2]);
    data = data.filter((product) => product.id !== id);
    res.writeHead(200, { "Content-Type": "application/json" });
    res.end(JSON.stringify({ message: "Product deleted", data }));
  } else {
    // 경로에 맞지 않는 요청 처리
    res.writeHead(404, { "Content-Type": "application/json" });
    res.end(JSON.stringify({ message: "Not Found" }));
  }
});

server.listen(8080, () => {
  console.log("8080 PORT is listening");
});
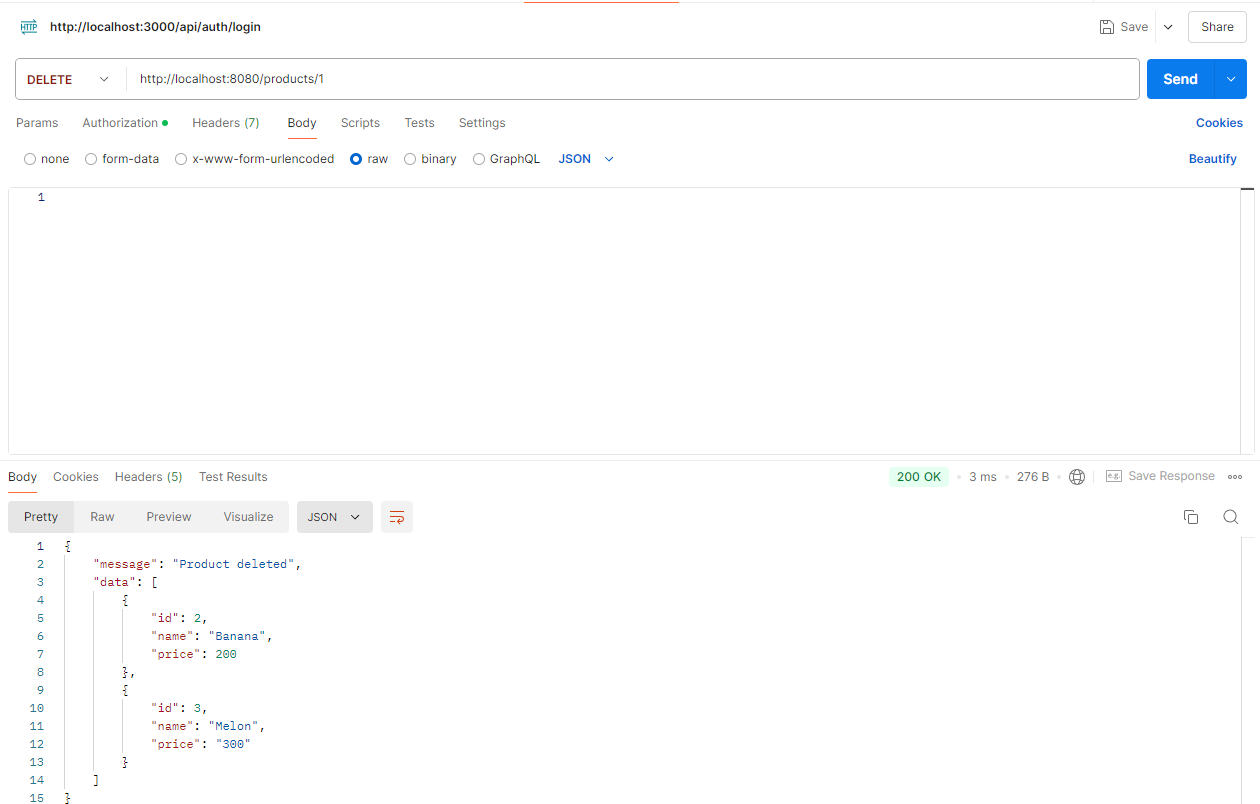
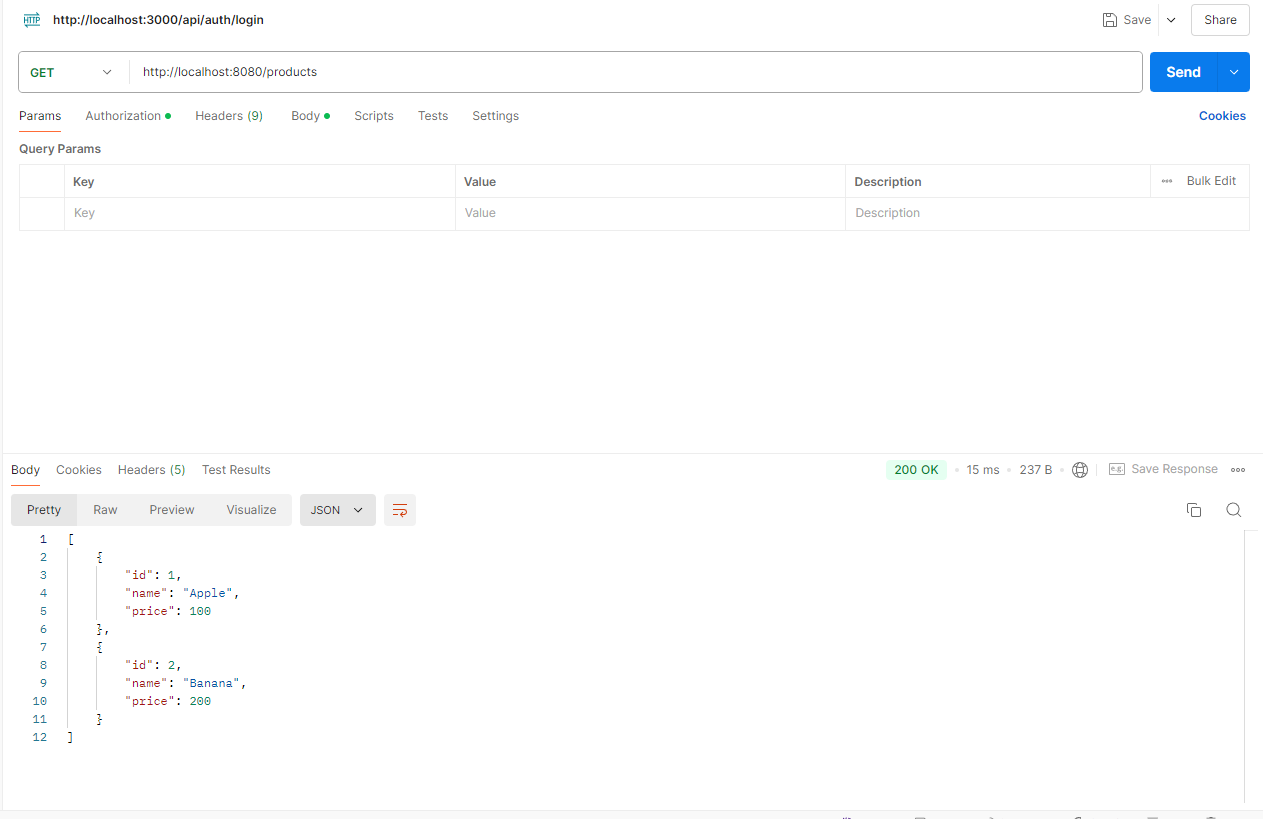
Postman으로 API 테스트
위에서 만든 REST FULL API를 Postman를 이용하여 테스트 해보겠습니다.
http://localhost:8080/products URL로 Method별 요청을 보냅니다.
결과
1 ) GET
2 ) POST

3 ) PUT

4 ) PATCH

5 ) DELETE