Flux Pattern?
Flux 패턴은 Facebook(현 Meta)에서 개발한 아키텍처 패턴으로, 데이터 흐름을 쉽게 관리하기 위한 패턴입니다. Flux 패턴은단방향 데이터 흐름을 강제하여 복잡한 상태 관리 문제를 해결하는 데 도움을 줍니다. Flux는 MVC(Model-View-Controller) 패턴의 대안으로 개발되었으며, 더 명확하고 예측 가능한 애플리케이션 상태 관리를 목표로 합니다.
Flux 패턴의 구성요소
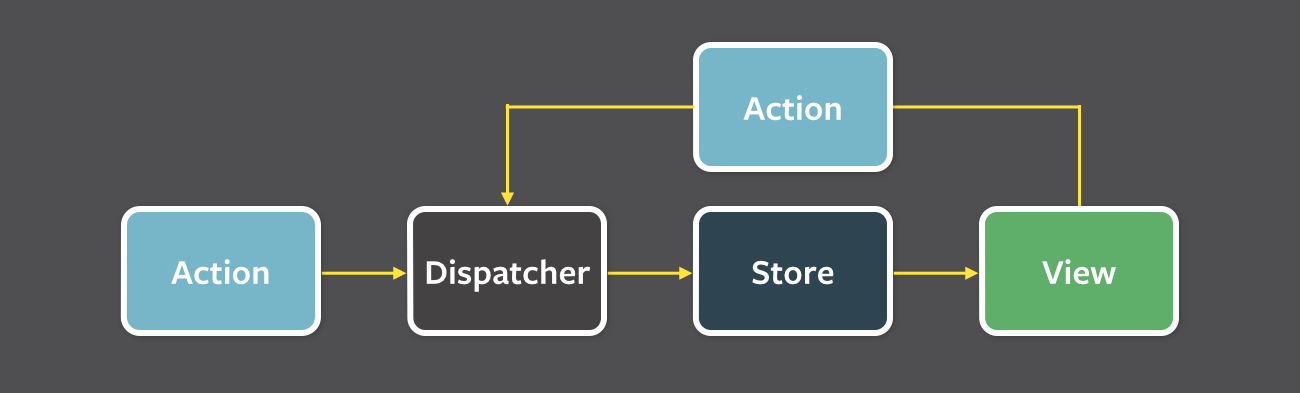
Flux 패턴은 데이터를 단방향으로 처리하며, 데이터의 변경을 Action과 Dispatcher를 통해 나누어 처리합니다.
-
Action : 애플리케이션에서 일어나는 모든 이벤트를 설명하는 객체입니다.
View에서 발생한 이벤트는Action계층으로 전달되며Action계층은 발생한 이벤트에 맞게Action객체를 생성하여Dispatcher객체로 전달합니다. -
Dispatcher : 액션을 받아서 스토어로 전달하는 역할을 합니다.
Action객체를 받아 필요한 비즈니스 로직을 처리하고 해당 상태를Store에 저장합니다. -
Store : 애플리케이션의 상태와 비즈니스 로직을 관리합니다.
Dispatcher로부터 전달된Action을 받아 상태를 변경하고, 상태 변경이 발생하면View에 알려줍니다. -
View : 사용자 인터페이스를 담당하며,
Store에서 데이터를 가져와서 화면에 렌더링합니다. 또한 사용자 입력을 받아Action을 생성하고, 이를Dispatcher에 전달합니다.
Flux의 데이터 흐름
Flux 패턴에서 데이터는 단방향 흐름으로 아래과 같은 순환 구조로 흐릅니다
-
Action 생성 : 사용자의 입력이나 기타 이벤트로 인해 Action이 생성됩니다. 예를 들어, 사용자가 새로운 할 일을 추가하면 ADD_TODO라는 Action이 생성됩니다.
-
Dispatcher로 Action 전달 : 생성된 Action은 Dispatcher로 전달됩니다. Dispatcher는 애플리케이션 내의 모든 Store에 이 Action을 전달합니다.
-
Store에서 상태 변경 : 각 Store는 전달받은 Action을 처리하여 자신의 상태를 업데이트합니다. 이 과정에서 비즈니스 로직이 적용될 수 있습니다.
-
View 업데이트 : Store가 상태를 변경하면, View가 이 변경 사항을 반영하여 화면을 업데이트합니다. 이는 Store가 변경되었음을 View에 알리기 때문에 자동으로 이루어집니다.
Flux 패턴의 장점
-
단방향 데이터 흐름 : Flux의 가장 큰 장점은 단방향 데이터 흐름입니다. 이는 데이터가 항상 한 방향으로만 흐르기 때문에 상태 관리와 디버깅이 훨씬 쉬워집니다.
-
모듈화 : Flux는 애플리케이션의 각 부분을 모듈화하고, 명확한 역할을 부여합니다. Action, Dispatcher, Store, View는 각각 고유한 책임을 가지며, 이로 인해 코드 유지보수가 쉬워집니다.
-
예측 가능성 : Flux의 구조 덕분에 상태 변화가 예측 가능하고, 버그를 추적하기 쉽습니다. 모든 상태 변경은 Action을 통해서만 이루어지며, 이는 애플리케이션의 상태 흐름을 추적하고 이해하는 데 도움을 줍니다.
Flux 패턴의 단점
-
복잡성 : 작은 애플리케이션에서는 다소 과하게 느껴질 수 있습니다. 특히 단순한 상태 관리만 필요한 경우에도 모든 Action, Dispatcher, Store를 설정해야 하기 때문입니다.
-
보일러플레이트 코드 : Flux를 사용하면 많은 양의 설정 코드와 반복 코드가 필요할 수 있습니다. 이를 줄이기 위해 Redux와 같은 라이브러리가 등장하게 되었습니다.
Flux Pattern으로 TodoList 구현하기
Action.ts
action 타입 생성
export enum ActionType {
  "ADD_TODO" = "ADD_TODO",
  "REMOVE_TODO" = "REMOVE_TODO",
  "TOGGLE_TODO" = "TOGGLE_TODO",
}

export interface Action {
  type: ActionType;
  payload?: any;
}
Dispatcher.ts
모든 Action을 받아서 등록된 리스너들에게 전달합니다.
import { Action } from "./Action";
// Dispatcher 클래스: 액션을 받아서 등록된 모든 리스너에게 전달하는 역할
export class Dispatcher {
  // 액션을 처리할 리스너(콜백 함수)들을 저장하는 배열
  private listeners: Array<(action: Action) => void> = [];

  // Store의 액션 처리 함수를 리스너로 등록하는 메서드
  // 각 Store는 이 메서드를 통해 자신의 액션 처리 함수를 Dispatcher에 등록
  register(listener: (action: Action) => void) {
    this.listeners.push(listener);
  }

  // 등록된 모든 리스너에게 액션을 전달하여 실행시키는 메서드
  dispatch(action: Action) {
    this.listeners.forEach((listener) => listener(action));
  }
}

// Dispatcher의 단일 인스턴스를 생성
const todoDispatcher = new Dispatcher();
export default todoDispatcher;
Store.ts
애플리케이션 상태와 그 상태를 업데이트하는 메서드를 포함하며, Dispatcher로부터 Action을 받아 처리합니다.
import { Action, ActionType } from "./Action";
import todoDispatcher from "./Dispatcher";

// Todo 항목의 데이터 구조 정의
type Todo = {
  id: string;    // 할 일의 고유 ID
  task: string;  // 할 일의 내용
  isDone: boolean; // 할 일이 완료되었는지 여부
};

// Store 클래스: 애플리케이션 상태(할 일 목록)를 관리
export class Store {
  private todoList: Todo[] = []; // 할 일 목록을 저장하는 배열
  private listeners: (() => void)[] = []; // 상태 변화 시 실행될 리스너(콜백) 함수 배열

  // 생성자: Store가 생성될 때 Dispatcher에 액션 처리 함수를 등록
  constructor() {
    todoDispatcher.register(this.handleActions.bind(this));
  }

  // Dispatcher로부터 전달된 액션을 처리하는 메서드
  private handleActions(action: Action) {
    switch (action.type) {
      case ActionType.ADD_TODO:  // 할 일을 추가하는 액션
        this.addTodo(action.payload);
        console.log("ADD");
        break;
      case ActionType.REMOVE_TODO: // 할 일을 삭제하는 액션
        this.removeTodo(action.payload);
        break;
      case ActionType.TOGGLE_TODO: // 할 일의 완료 상태를 토글하는 액션
        this.toggleDone(action.payload);
        break;
      default:
        throw new Error("지원하지 않는 액션 타입입니다."); // 지원하지 않는 액션 타입에 대한 예외 처리
    }

    this.emitChange(); // 상태 변화 후 리스너들에게 알림
  }

  // 새로운 할 일을 추가하는 메서드
  private addTodo(task: string) {
    const newTodo: Todo = {
      id: new Date().getTime().toString(), // 현재 시간을 기반으로 고유 ID 생성
      task,
      isDone: false, // 기본적으로 완료되지 않은 상태로 초기화
    };
    this.todoList.push(newTodo); // 할 일 목록에 추가
  }

  // 특정 ID를 가진 할 일을 삭제하는 메서드
  private removeTodo(id: string) {
    this.todoList = this.todoList.filter((todo) => todo.id !== id);
  }

  // 특정 ID를 가진 할 일의 완료 상태를 토글하는 메서드
  private toggleDone(id: string) {
    this.todoList.find((todo) => {
      if (todo.id === id) {
        todo.isDone = !todo.isDone; // 완료 상태를 반전
      }
    });
  }

  // 상태 변화 시 실행될 리스너를 추가하는 메서드
  addChangeListener(listener: () => void) {
    this.listeners.push(listener);
  }

  // 등록된 모든 리스너들에게 상태 변화를 알리는 메서드
  private emitChange() {
    this.listeners.forEach((listener) => listener());
  }

  // 현재 할 일 목록을 반환하는 메서드
  getTodoList() {
    return this.todoList;
  }
}

// 단일 Store 인스턴스를 생성하여 외부에서 사용할 수 있도록 내보내기
const todoStore = new Store();
export default todoStore;
View.ts
Store의 상태를 구독하고, Dispatcher를 통해 Action을 생성하여 상태를 업데이트하며, 사용자에게 UI를 제공합니다.
import { Action, ActionType } from "./Action";
import todoDispatcher from "./Dispatcher";
import todoStore from "./Store";

// View 클래스: UI를 관리하고, 사용자 입력을 처리하여 Action을 생성
export class View {
  rootEl: HTMLDivElement;
  containerEl: HTMLDivElement;
  titleEl: HTMLHeadingElement;
  todoListEl: HTMLUListElement;
  formEl: HTMLFormElement;
  inputEl: HTMLInputElement;
  submitBtnEl: HTMLButtonElement;

  constructor() {
    // Store에서 상태가 변경되면 render 메서드를 호출하도록 리스너 등록
    todoStore.addChangeListener(this.render.bind(this));

    // DOM 요소들을 초기화
    this.rootEl = document.getElementById("app") as HTMLDivElement;
    this.containerEl = this.createEl("div", "container") as HTMLDivElement;
    this.titleEl = this.createEl("h1", "title") as HTMLHeadingElement;
    this.todoListEl = this.createEl("ul", "todo-list") as HTMLUListElement;
    this.formEl = this.createEl("form", "todo-form") as HTMLFormElement;
    this.inputEl = this.createEl("input", "todo-input") as HTMLInputElement;
    this.submitBtnEl = this.createEl(
      "button",
      "submit-btn",
    ) as HTMLButtonElement;

    // 초기 화면에 표시될 텍스트 설정
    this.titleEl.textContent = "TodoList";
    this.inputEl.placeholder = "할 일을 입력해주세요.";
    this.inputEl.type = "text";
    this.submitBtnEl.textContent = "추가";

    // 요소들을 조립하여 화면에 추가
    this.formEl.append(this.inputEl);
    this.formEl.append(this.submitBtnEl);
    this.containerEl.append(this.titleEl, this.formEl, this.todoListEl);
    this.rootEl.append(this.containerEl);

    // 이벤트 바인딩
    this.bindEvents();
  }

  private createEl(tag: string, id?: string) {
    const newEl = document.createElement(tag) as HTMLElement;
    if (id) {
      newEl.id = id;
    }

    return newEl;
  }

  // 이벤트 바인딩
  private bindEvents() {
    this.formEl.addEventListener("submit", (e) => {
      e.preventDefault();
      const value = this.inputEl.value;

      if (value.trim()) {
        this.addTodo(value);
        this.inputEl.value = "";
      }
    });

    this.todoListEl.addEventListener("click", (e) => {
      if ((e.target as HTMLButtonElement).id === "todo-delbtn") {
        const todoId = (e.target as HTMLButtonElement).closest("li")!.id;
        this.removeTodo(todoId); // 할 일 삭제
      }
    });

    this.todoListEl.addEventListener("click", (e) => {
      if ((e.target as HTMLInputElement).id === "todo-checkbox") {
        const todoId = (e.target as HTMLButtonElement).closest("li")!.id;
        this.toggleTodo(todoId); // 할 일 완료 상태 토글
      }
    });
  }

  // 새로운 할 일을 추가하는 Action을 생성하여 Dispatcher에 전달
  private addTodo(task: string) {
    const action: Action = {
      type: ActionType.ADD_TODO,
      payload: task,
    };
    todoDispatcher.dispatch(action);
  }

  // 할 일을 삭제하는 Action을 생성하여 Dispatcher에 전달
  private removeTodo(id: string) {
    const action: Action = {
      type: ActionType.REMOVE_TODO,
      payload: id,
    };
    todoDispatcher.dispatch(action);
  }

  // 할 일의 완료 상태를 토글하는 Action을 생성하여 Dispatcher에 전달
  private toggleTodo(id: string) {
    const action: Action = {
      type: ActionType.TOGGLE_TODO,
      payload: id,
    };
    todoDispatcher.dispatch(action);
  }

  // UI를 현재 상태에 맞게 업데이트하는 메서드
  render() {
    const todoList = todoStore.getTodoList(); // Store에서 현재 할 일 목록 가져오기

    this.todoListEl.innerHTML = ""; // 기존 목록 초기화
    document.getElementById("empty-msg")?.remove(); // '할 일이 없습니다' 메시지 제거

    if (todoList.length !== 0) {
      // 할 일이 있을 경우, 각각의 할 일을 화면에 표시
      todoList.forEach((todo) => {
        const li = this.createEl("li", todo.id);
        const checkbox = this.createEl(
          "input",
          "todo-checkbox",
        ) as HTMLInputElement;
        const p = this.createEl("p");
        const button = this.createEl("button", "todo-delbtn");

        checkbox.type = "checkbox";
        checkbox.checked = todo.isDone;

        p.textContent = todo.task;
        p.setAttribute(
          "style",
          `${todo.isDone && "text-decoration:line-through;opacity:0.5;"}`,
        );

        button.textContent = "remove";

        li.append(checkbox, p, button);

        this.todoListEl.append(li);
      });
    } else {
      // 할 일이 없을 경우, '할 일을 추가해주세요' 메시지 표시
      const p = this.createEl("p", "empty-msg");
      p.textContent = "✍ 할 일을 추가해주세요.";

      this.containerEl.append(p);
    }
  }
}
index.ts
import { View } from "./View";
import "../styles.css";

// view 생성
new View();
index.html
<!doctype html>
<html lang="ko-KR">
  <head>
    <meta charset="UTF-8" />
    <meta http-equiv="X-UA-Compatible" content="IE=edge" />
    <meta name="viewport" content="width=device-width, initial-scale=1.0" />
    <title>Flux TodoList</title>
  </head>
  <body>
    <div id="app"></div>
  </body>
</html>
정리
Flux 패턴은 명확하고 예측 가능한 애플리케이션 구조를 제공하며, 특히 대규모 애플리케이션에서 그 강점을 발휘합니다. 하지만 규모가 작은 애플리케이션에서는 복잡성과 보일러플레이트 코드 때문에 다소 부담스러울 수 있습니다. 이 경우, Redux와 같은 대안도 고려할 수 있습니다.