1. Xcode Project 에 Package 설치하기
1-1. Push Notification 을 위한 FirebaseMessaging 설치
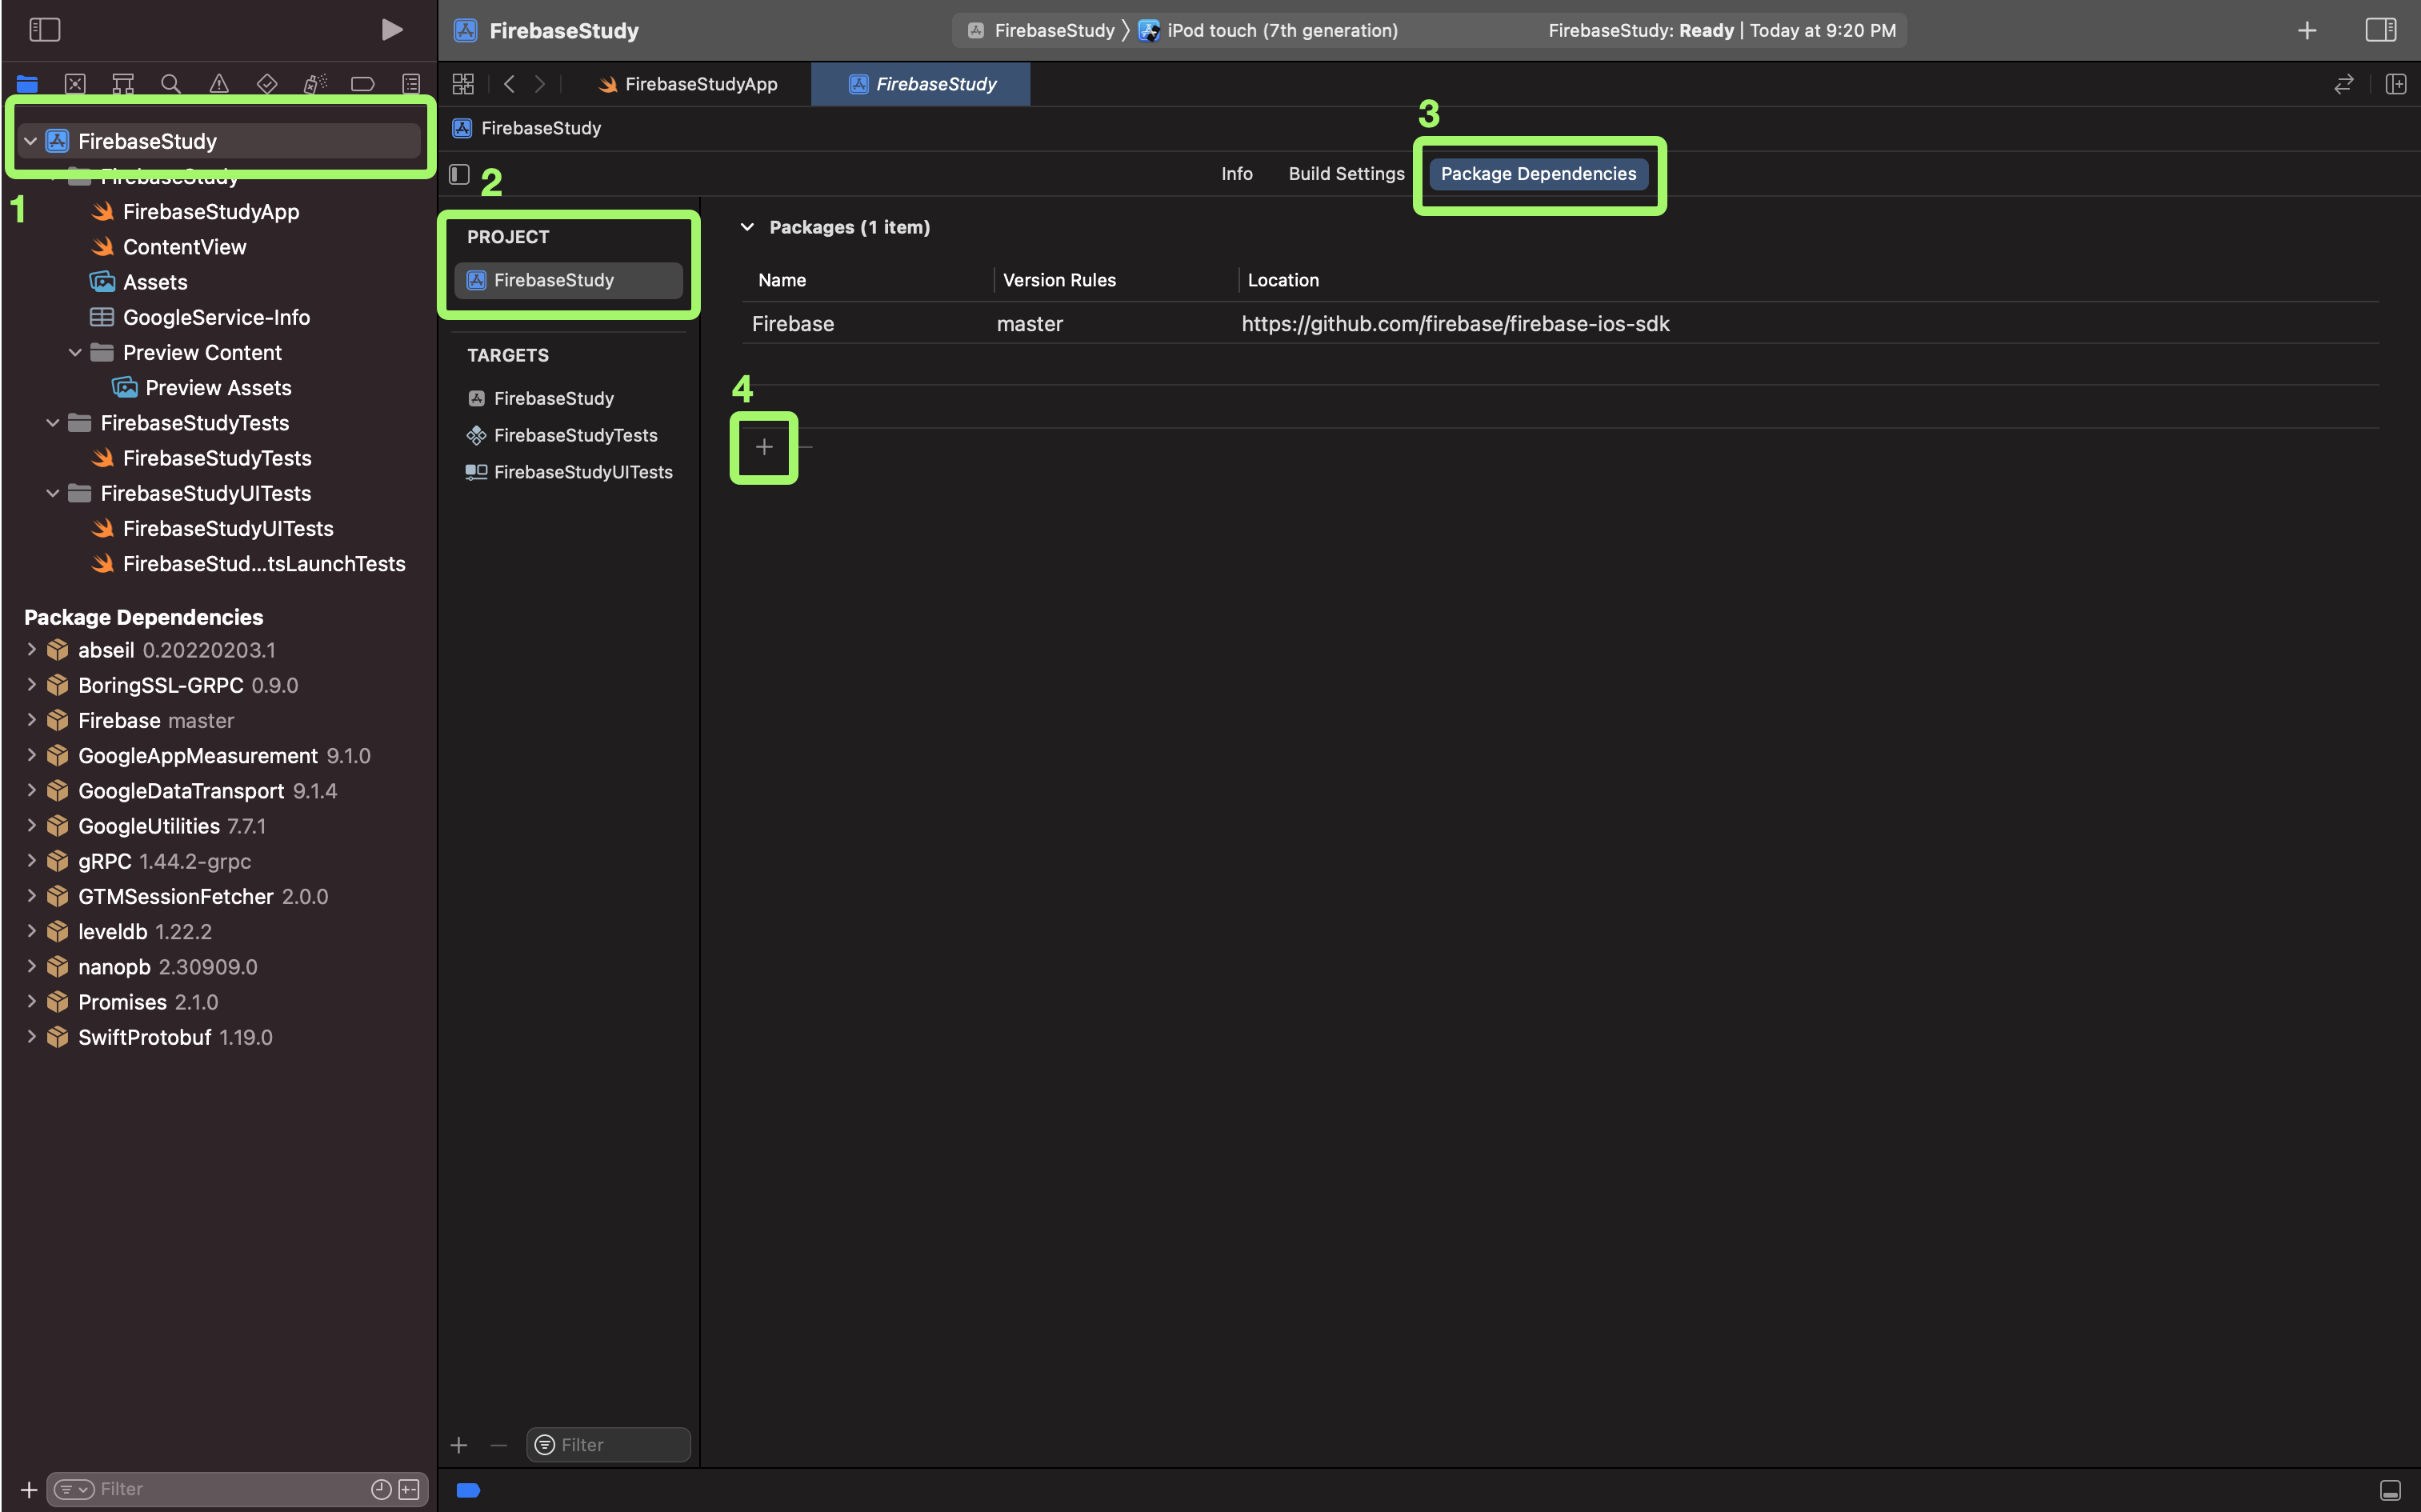
- 해당 Project 파일로 들어가 이미지에 적혀있는 순서대로 진행합니다.
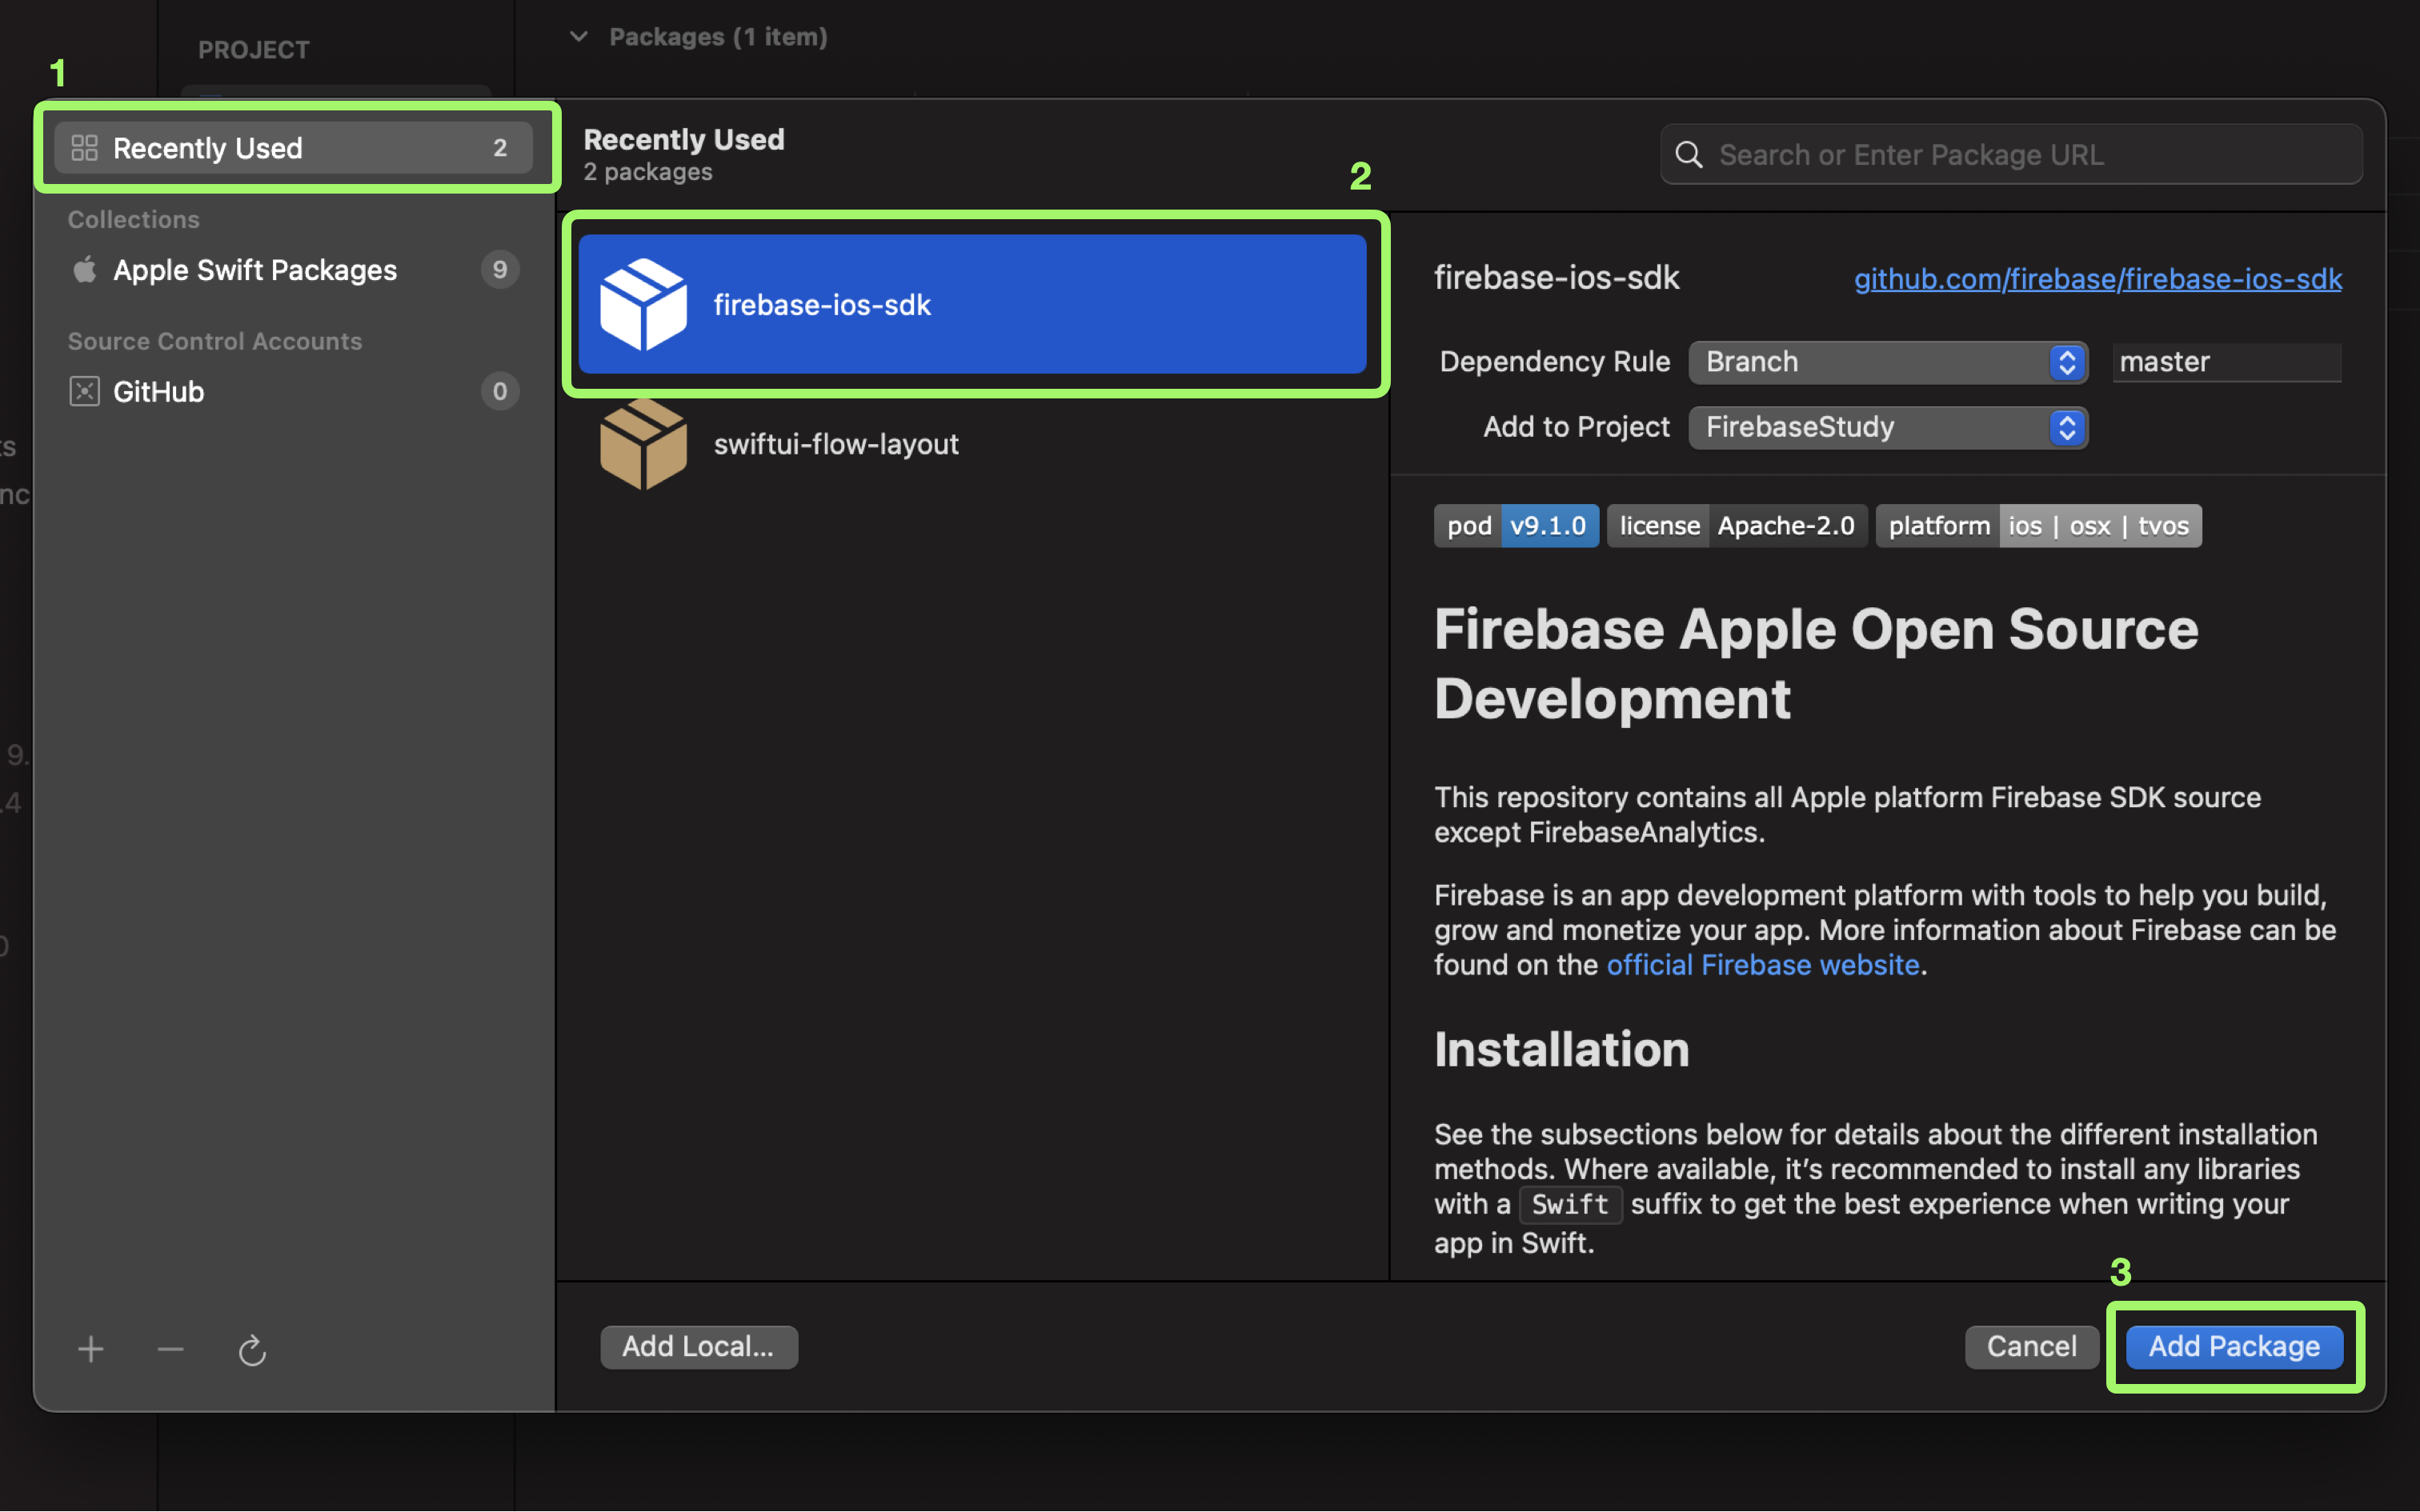
- + 버튼 을 누르게 되면 위의 이미지와 같은 창이 나타나게 되고
- 우측 이미지에 적혀있는 순서대로 진행합니다. ( SPM 를 이용해 firebase Package 다운 )
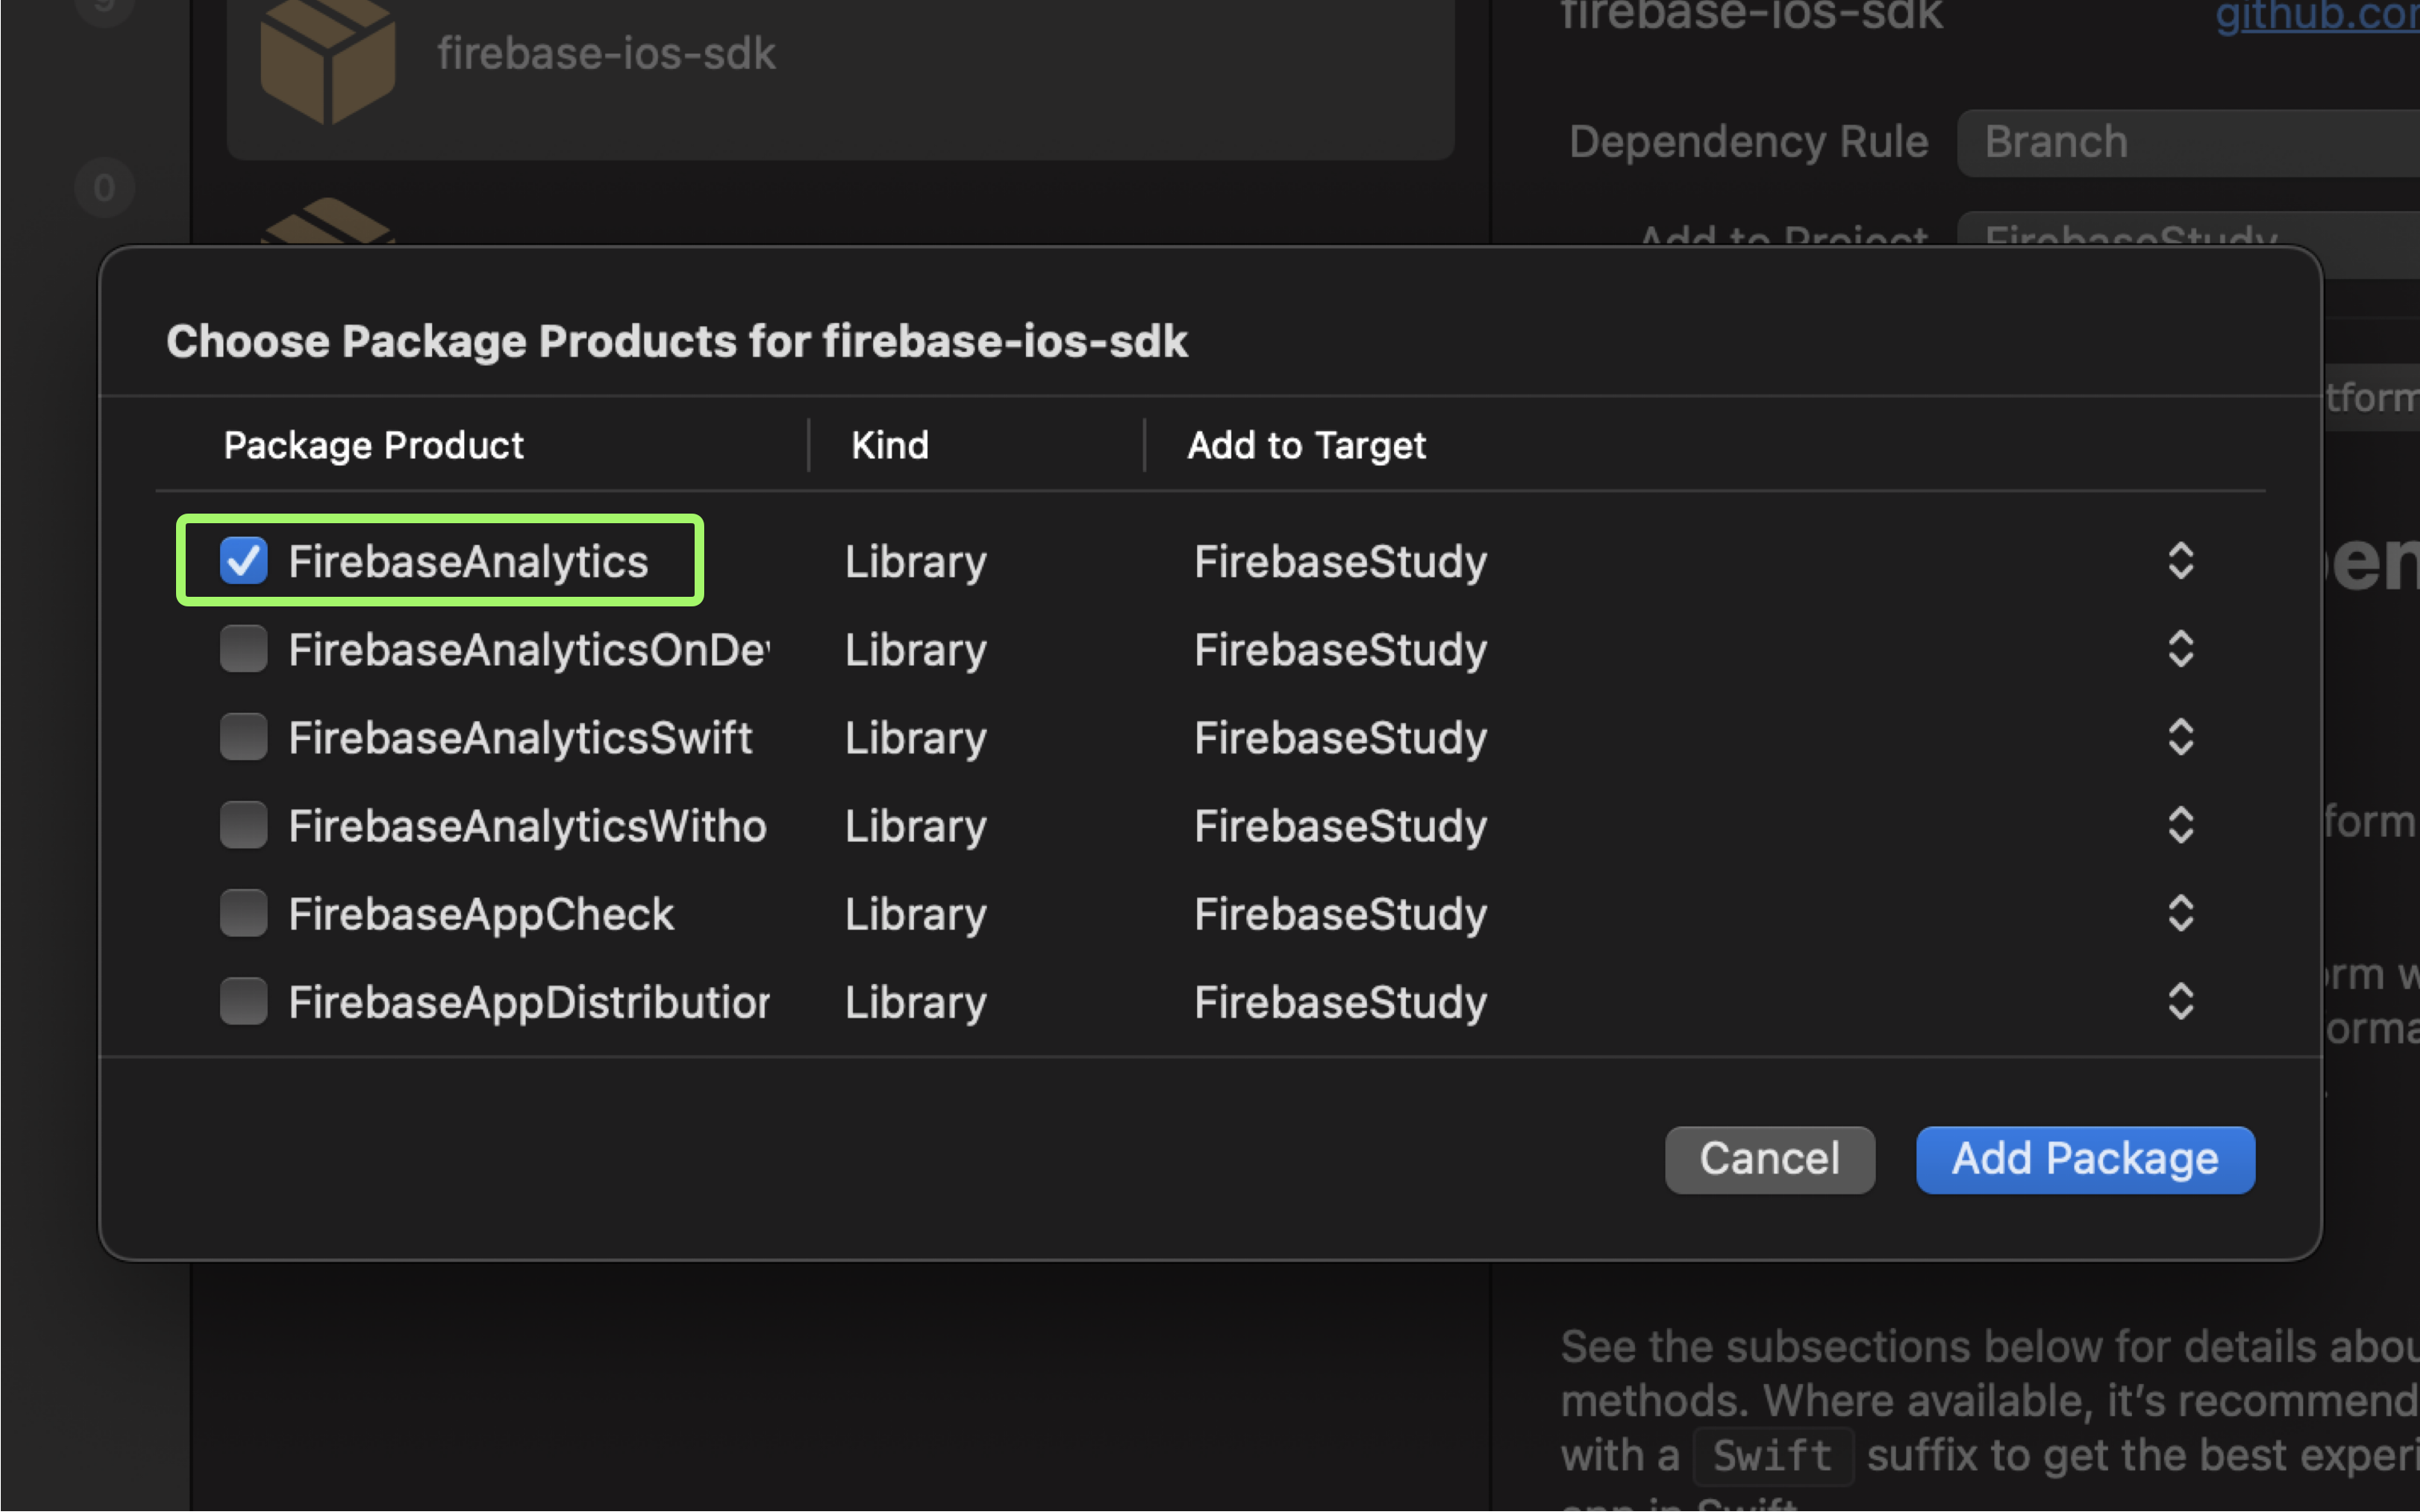
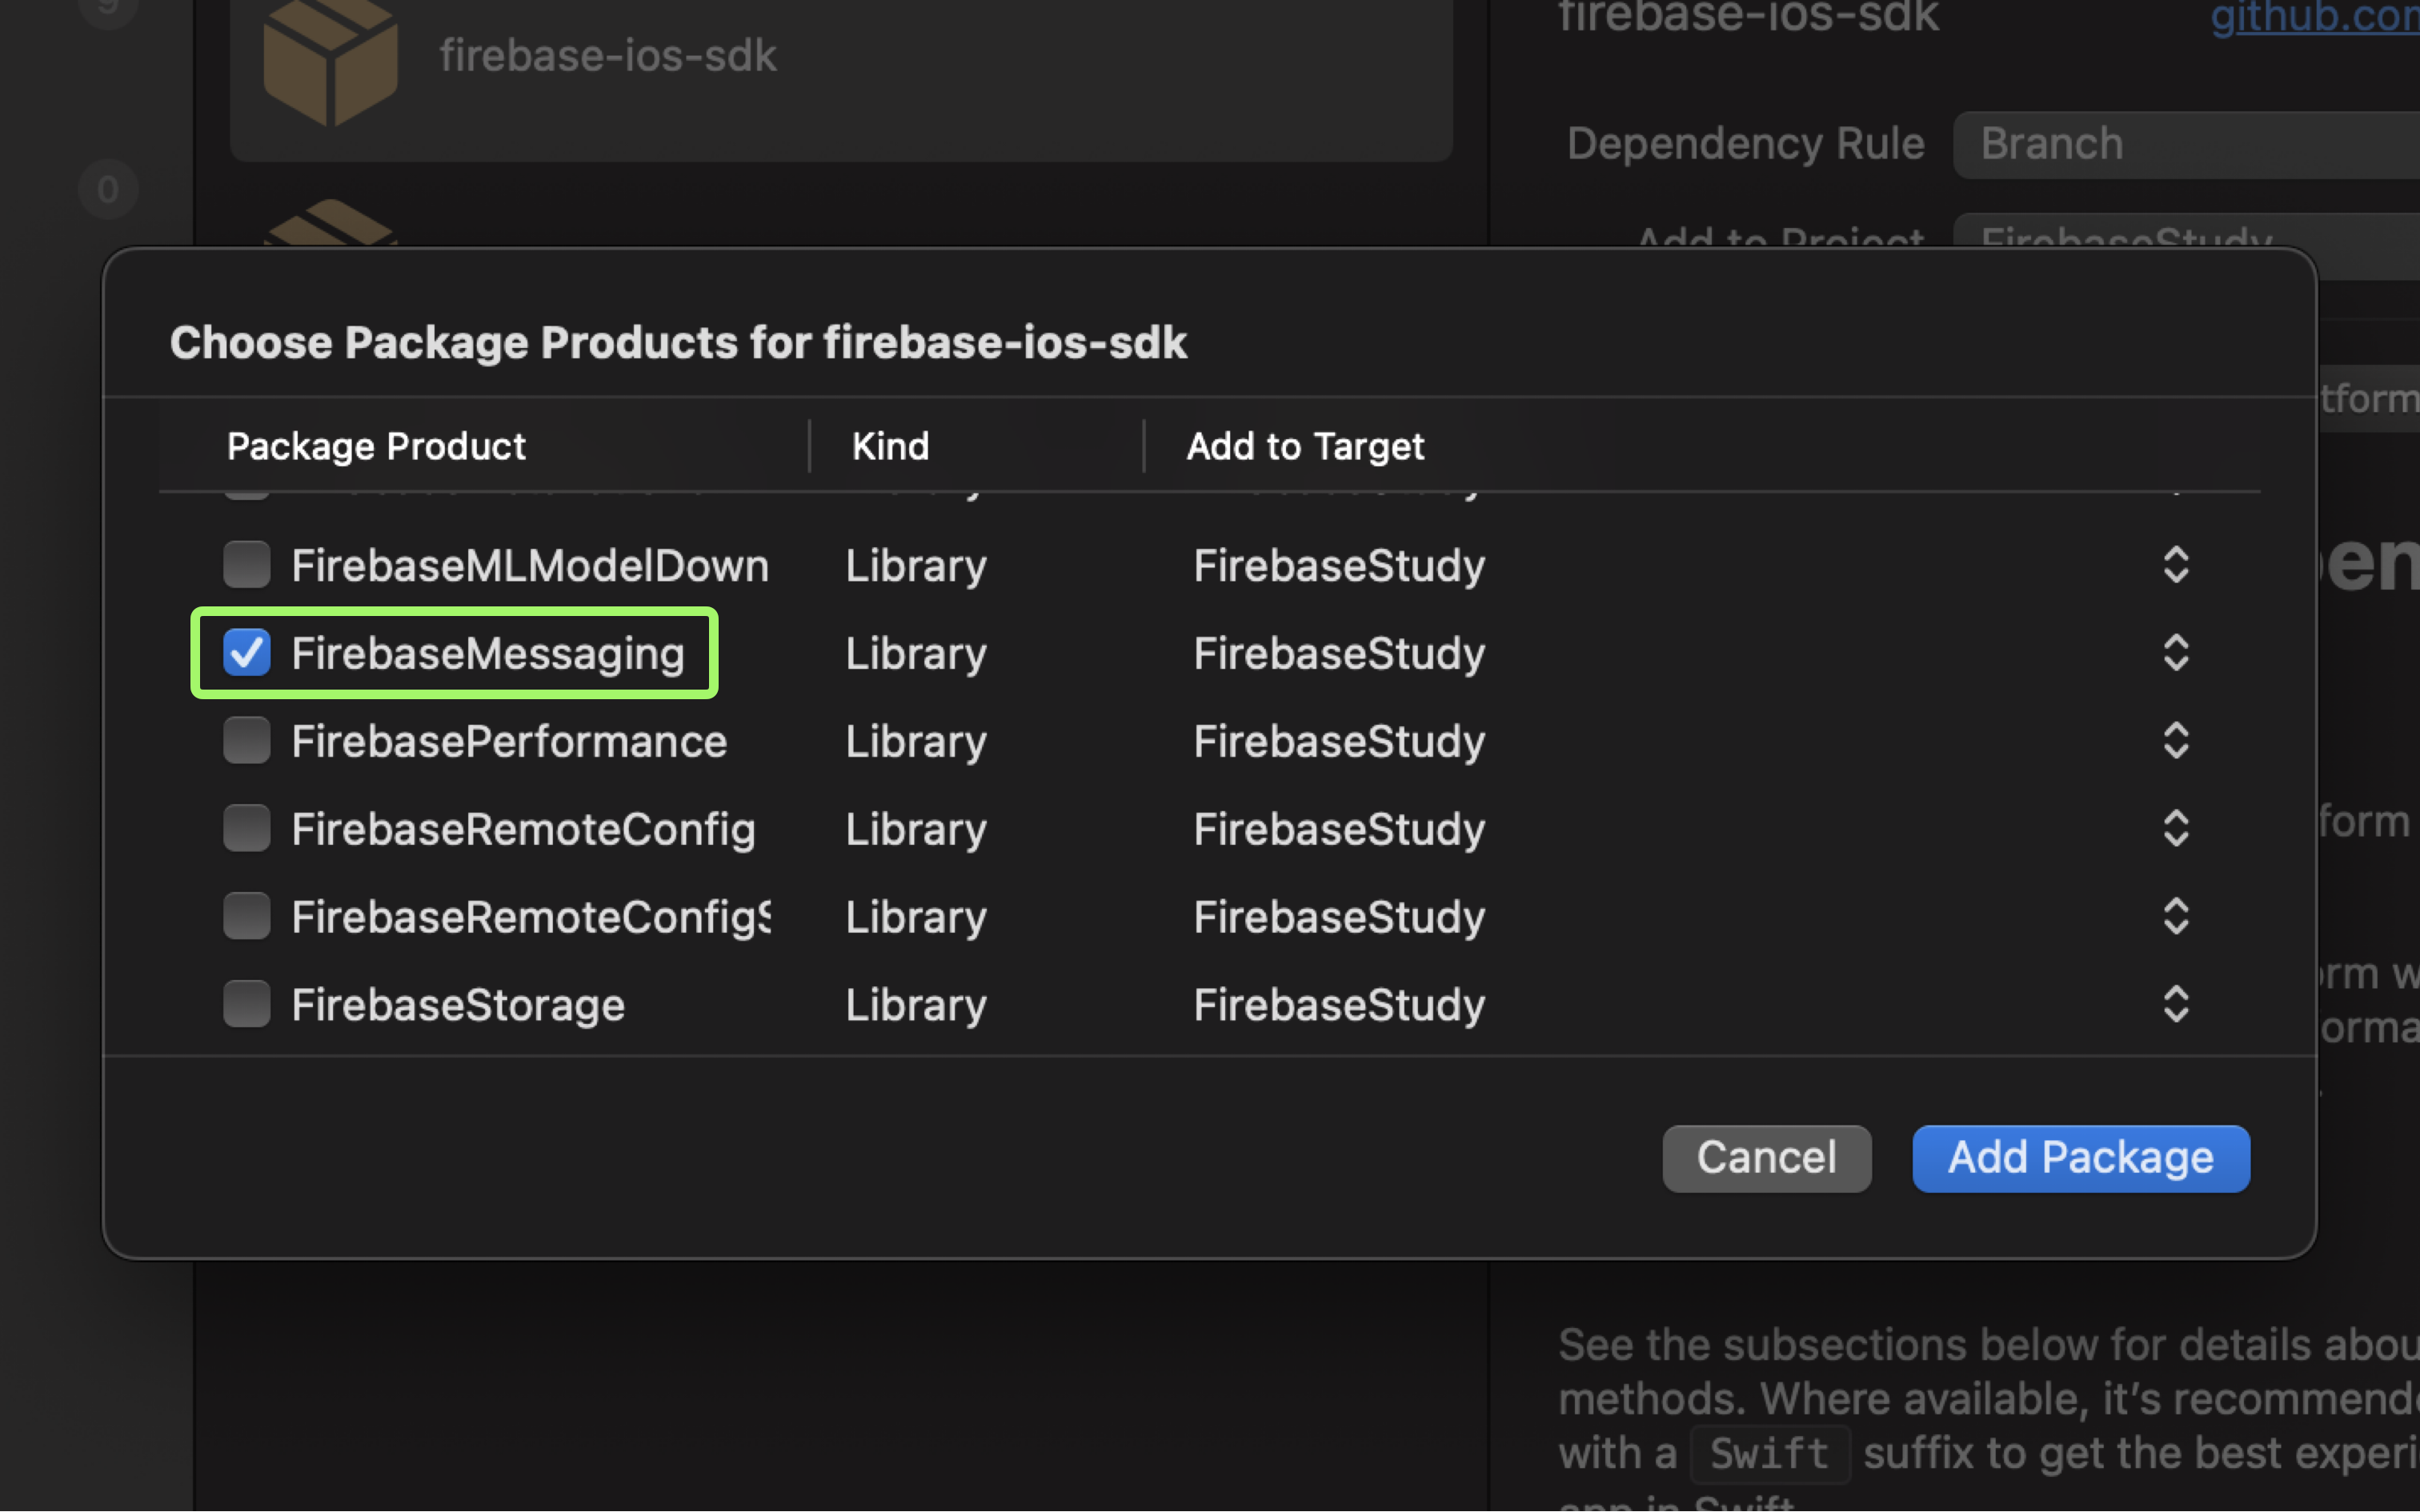
- Project 에 추가할 FirebaseAnalytics 와 FirebaseMessaging Package 를 선택 후 Add Package 를 누르세요.
- 추가가 됐다면 Apple Developer 에 접속해 개발자 계정으로 로그인 하세요.
2. 개발자 계정에 Key 생성, Firebase 에 Key 업로드
2-1. Push Notifications 을 위한 Key 생성
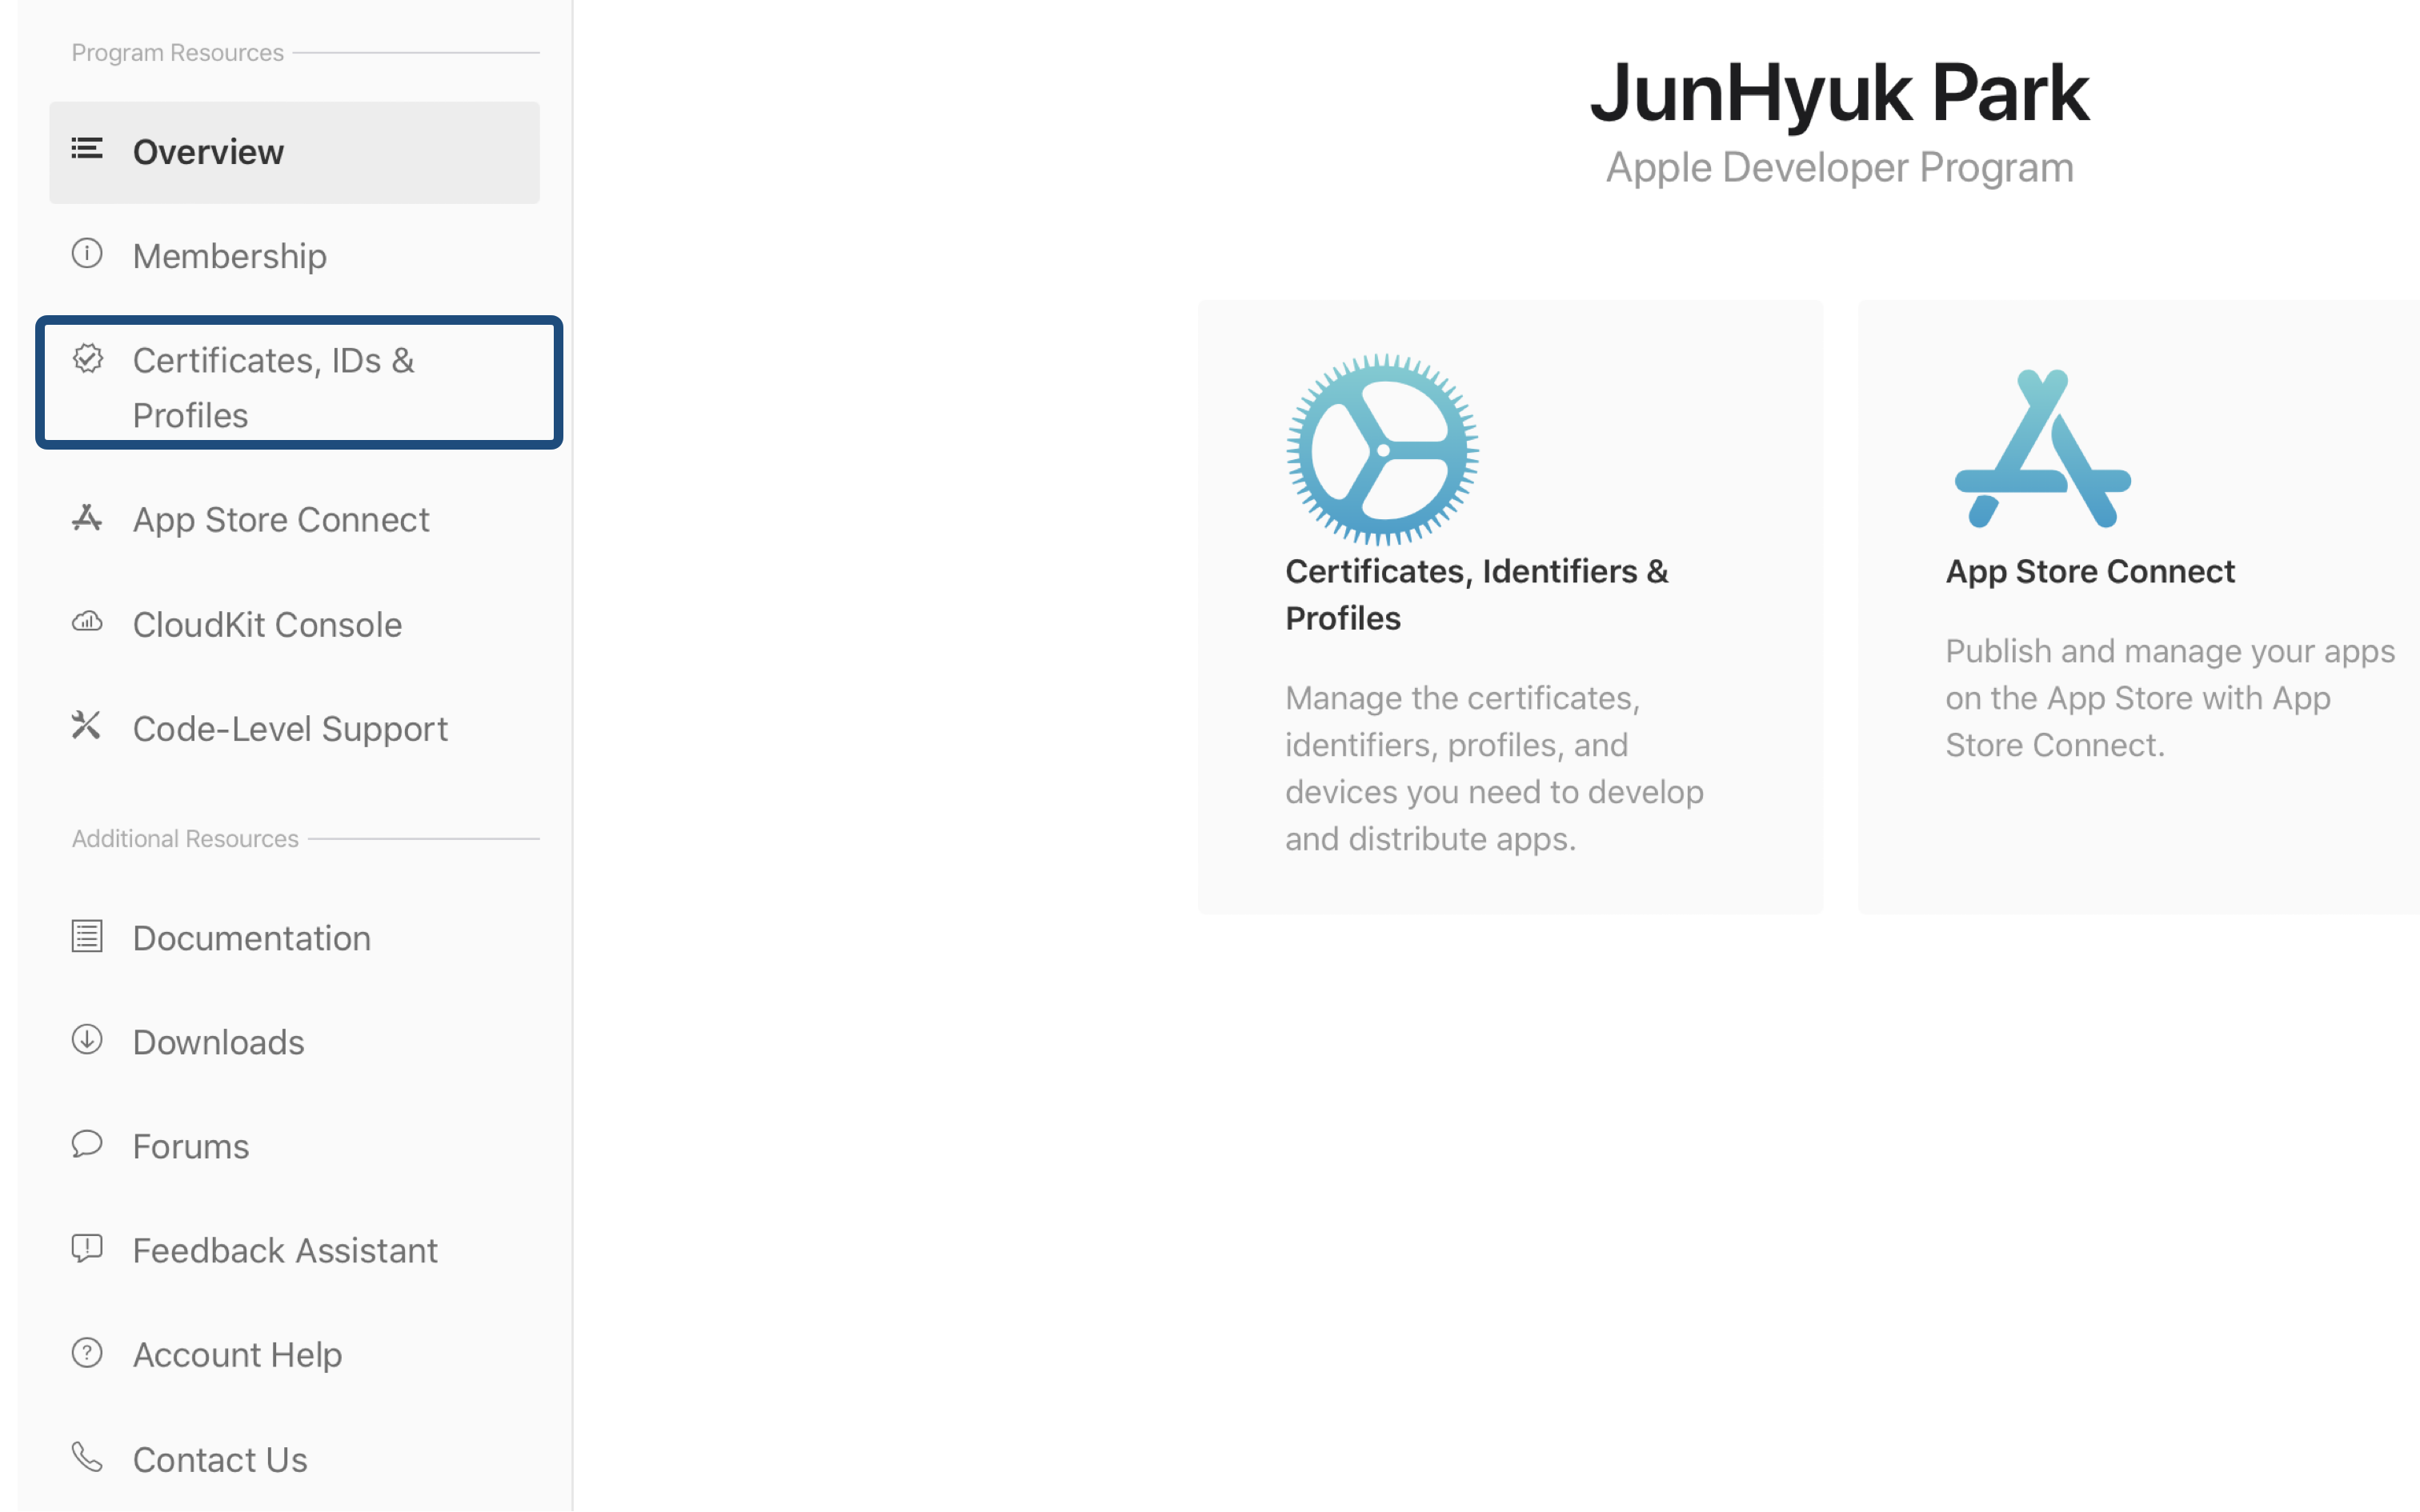
- 개발자 계정을 구입한 분들은 Certificate, IDs & Profiles 메뉴로 들어가세요.
❗️Apple Developer 계정을 구입한 분들만 Push Notification 을 사용할 수 있습니다.
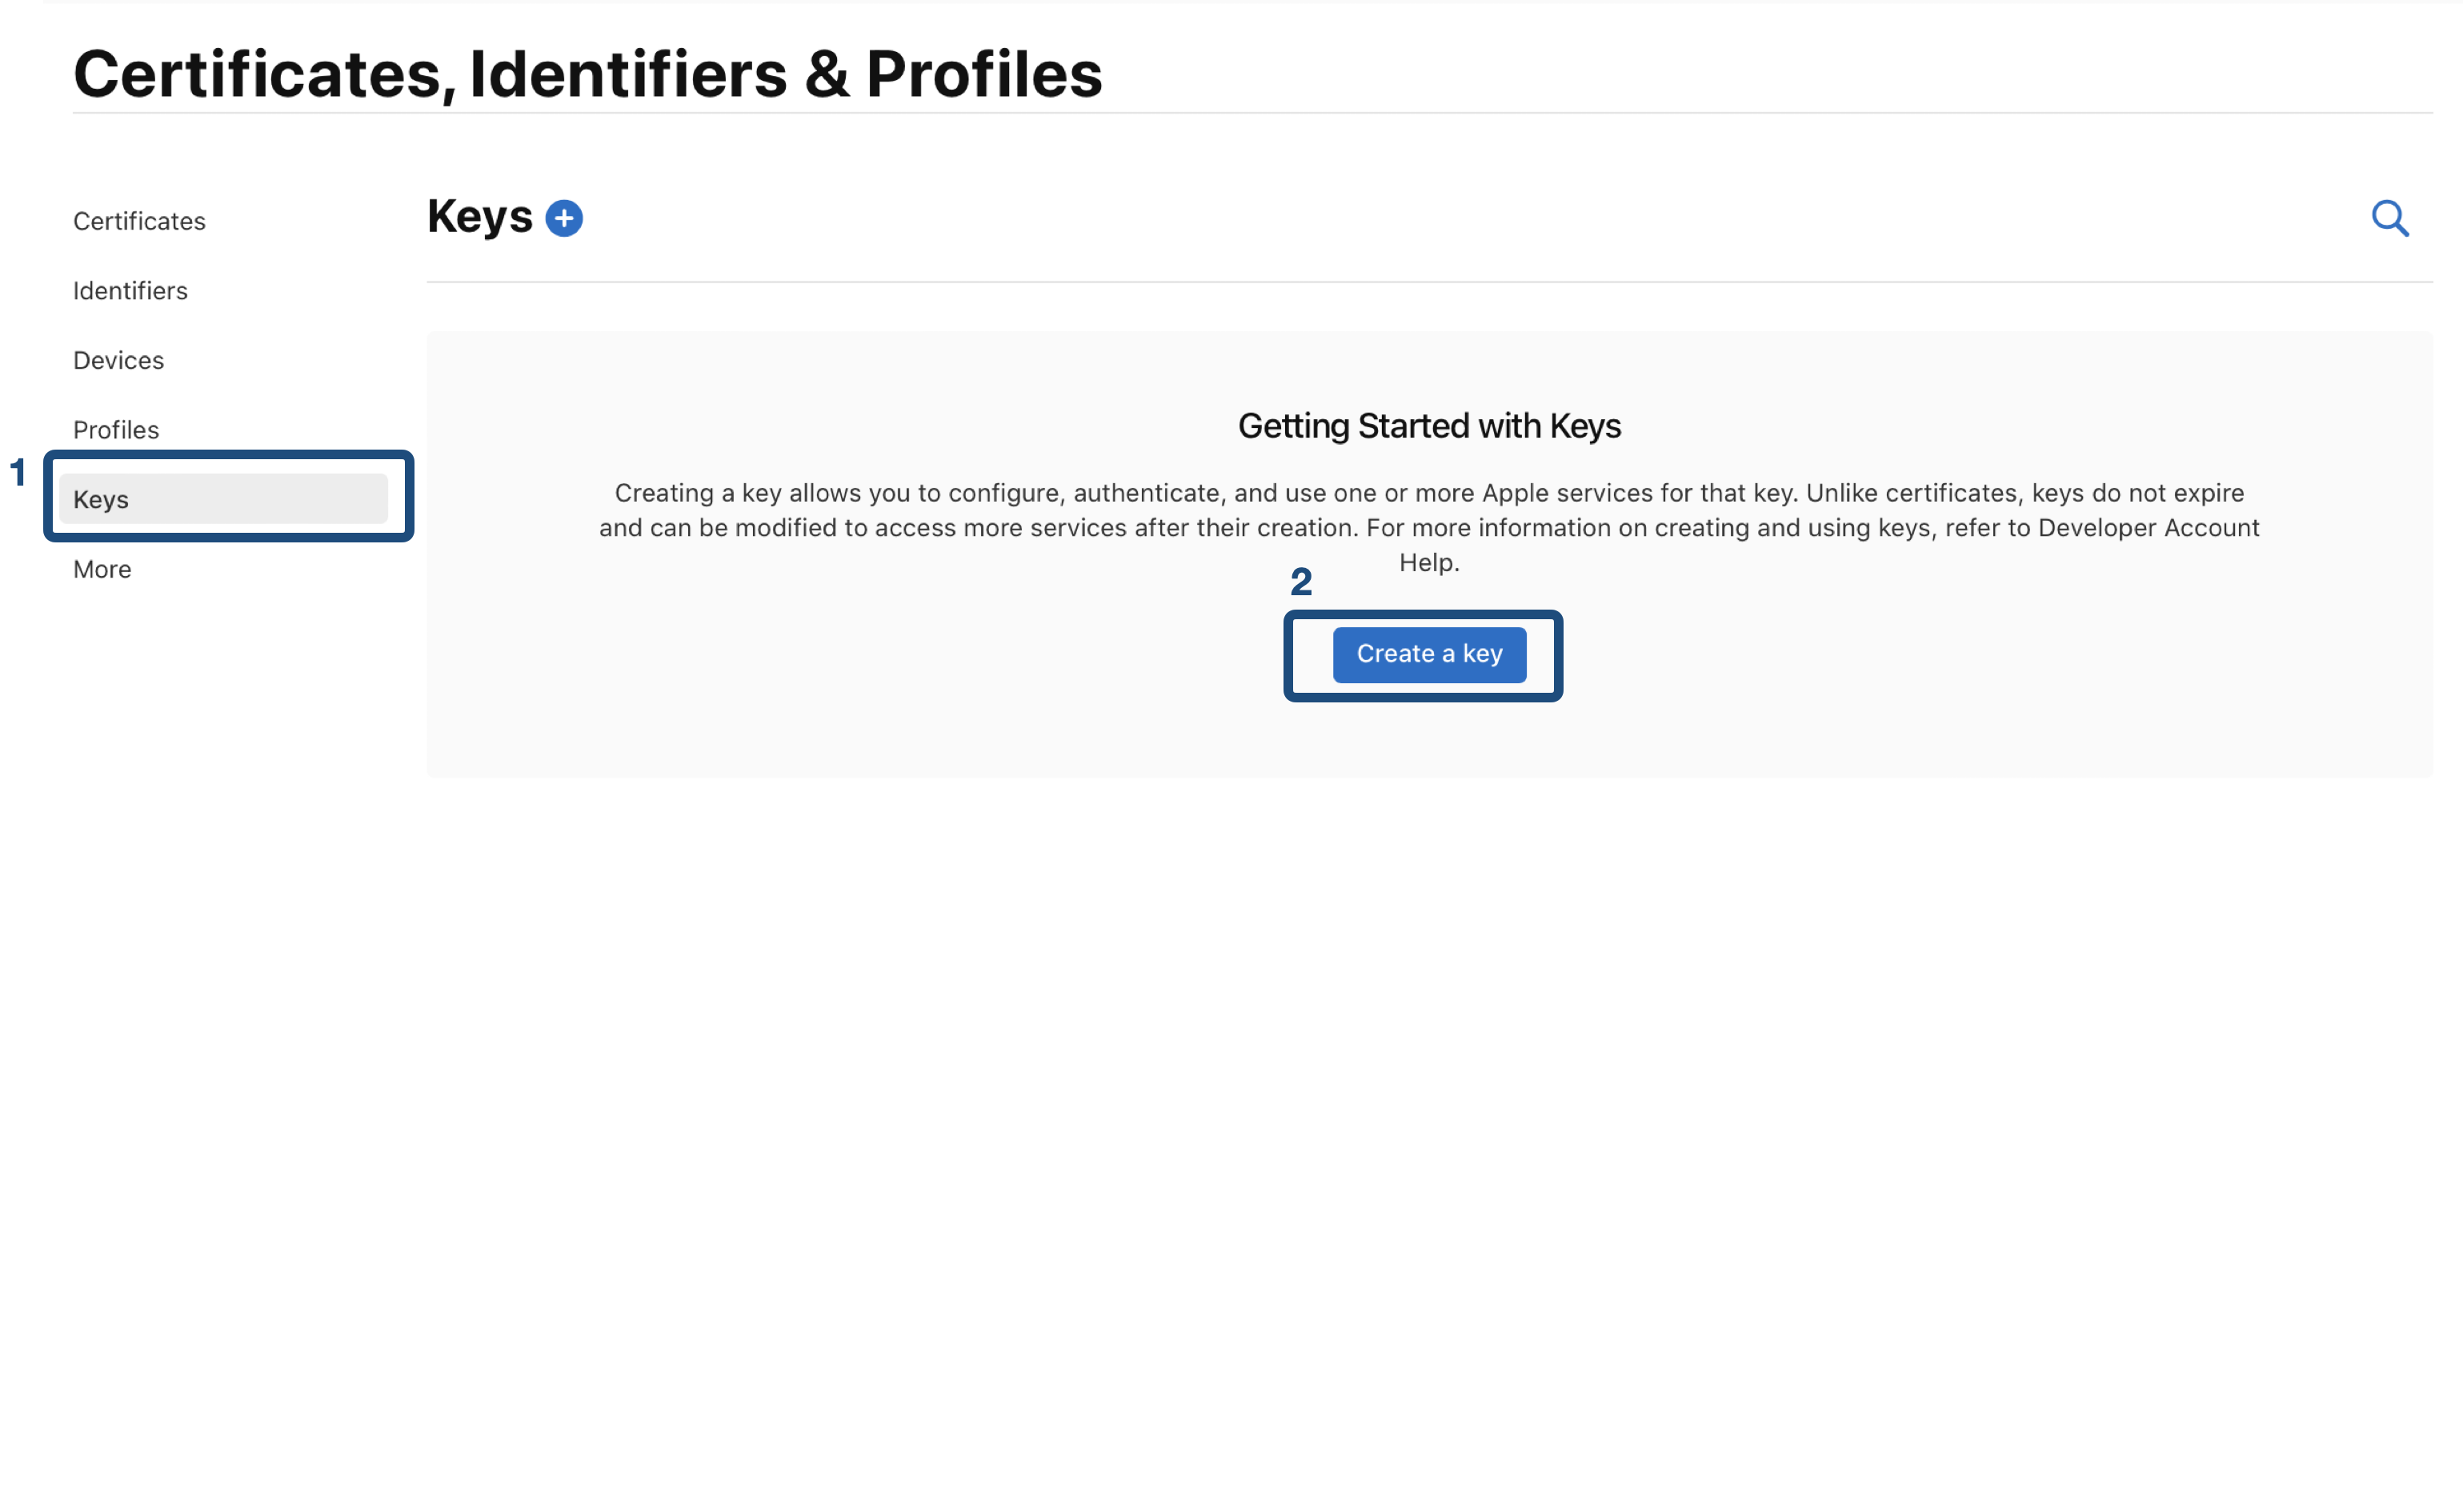
- Key 를 생성하기 위해 위의 이미지에 적힌 순서대로 진행하세요.
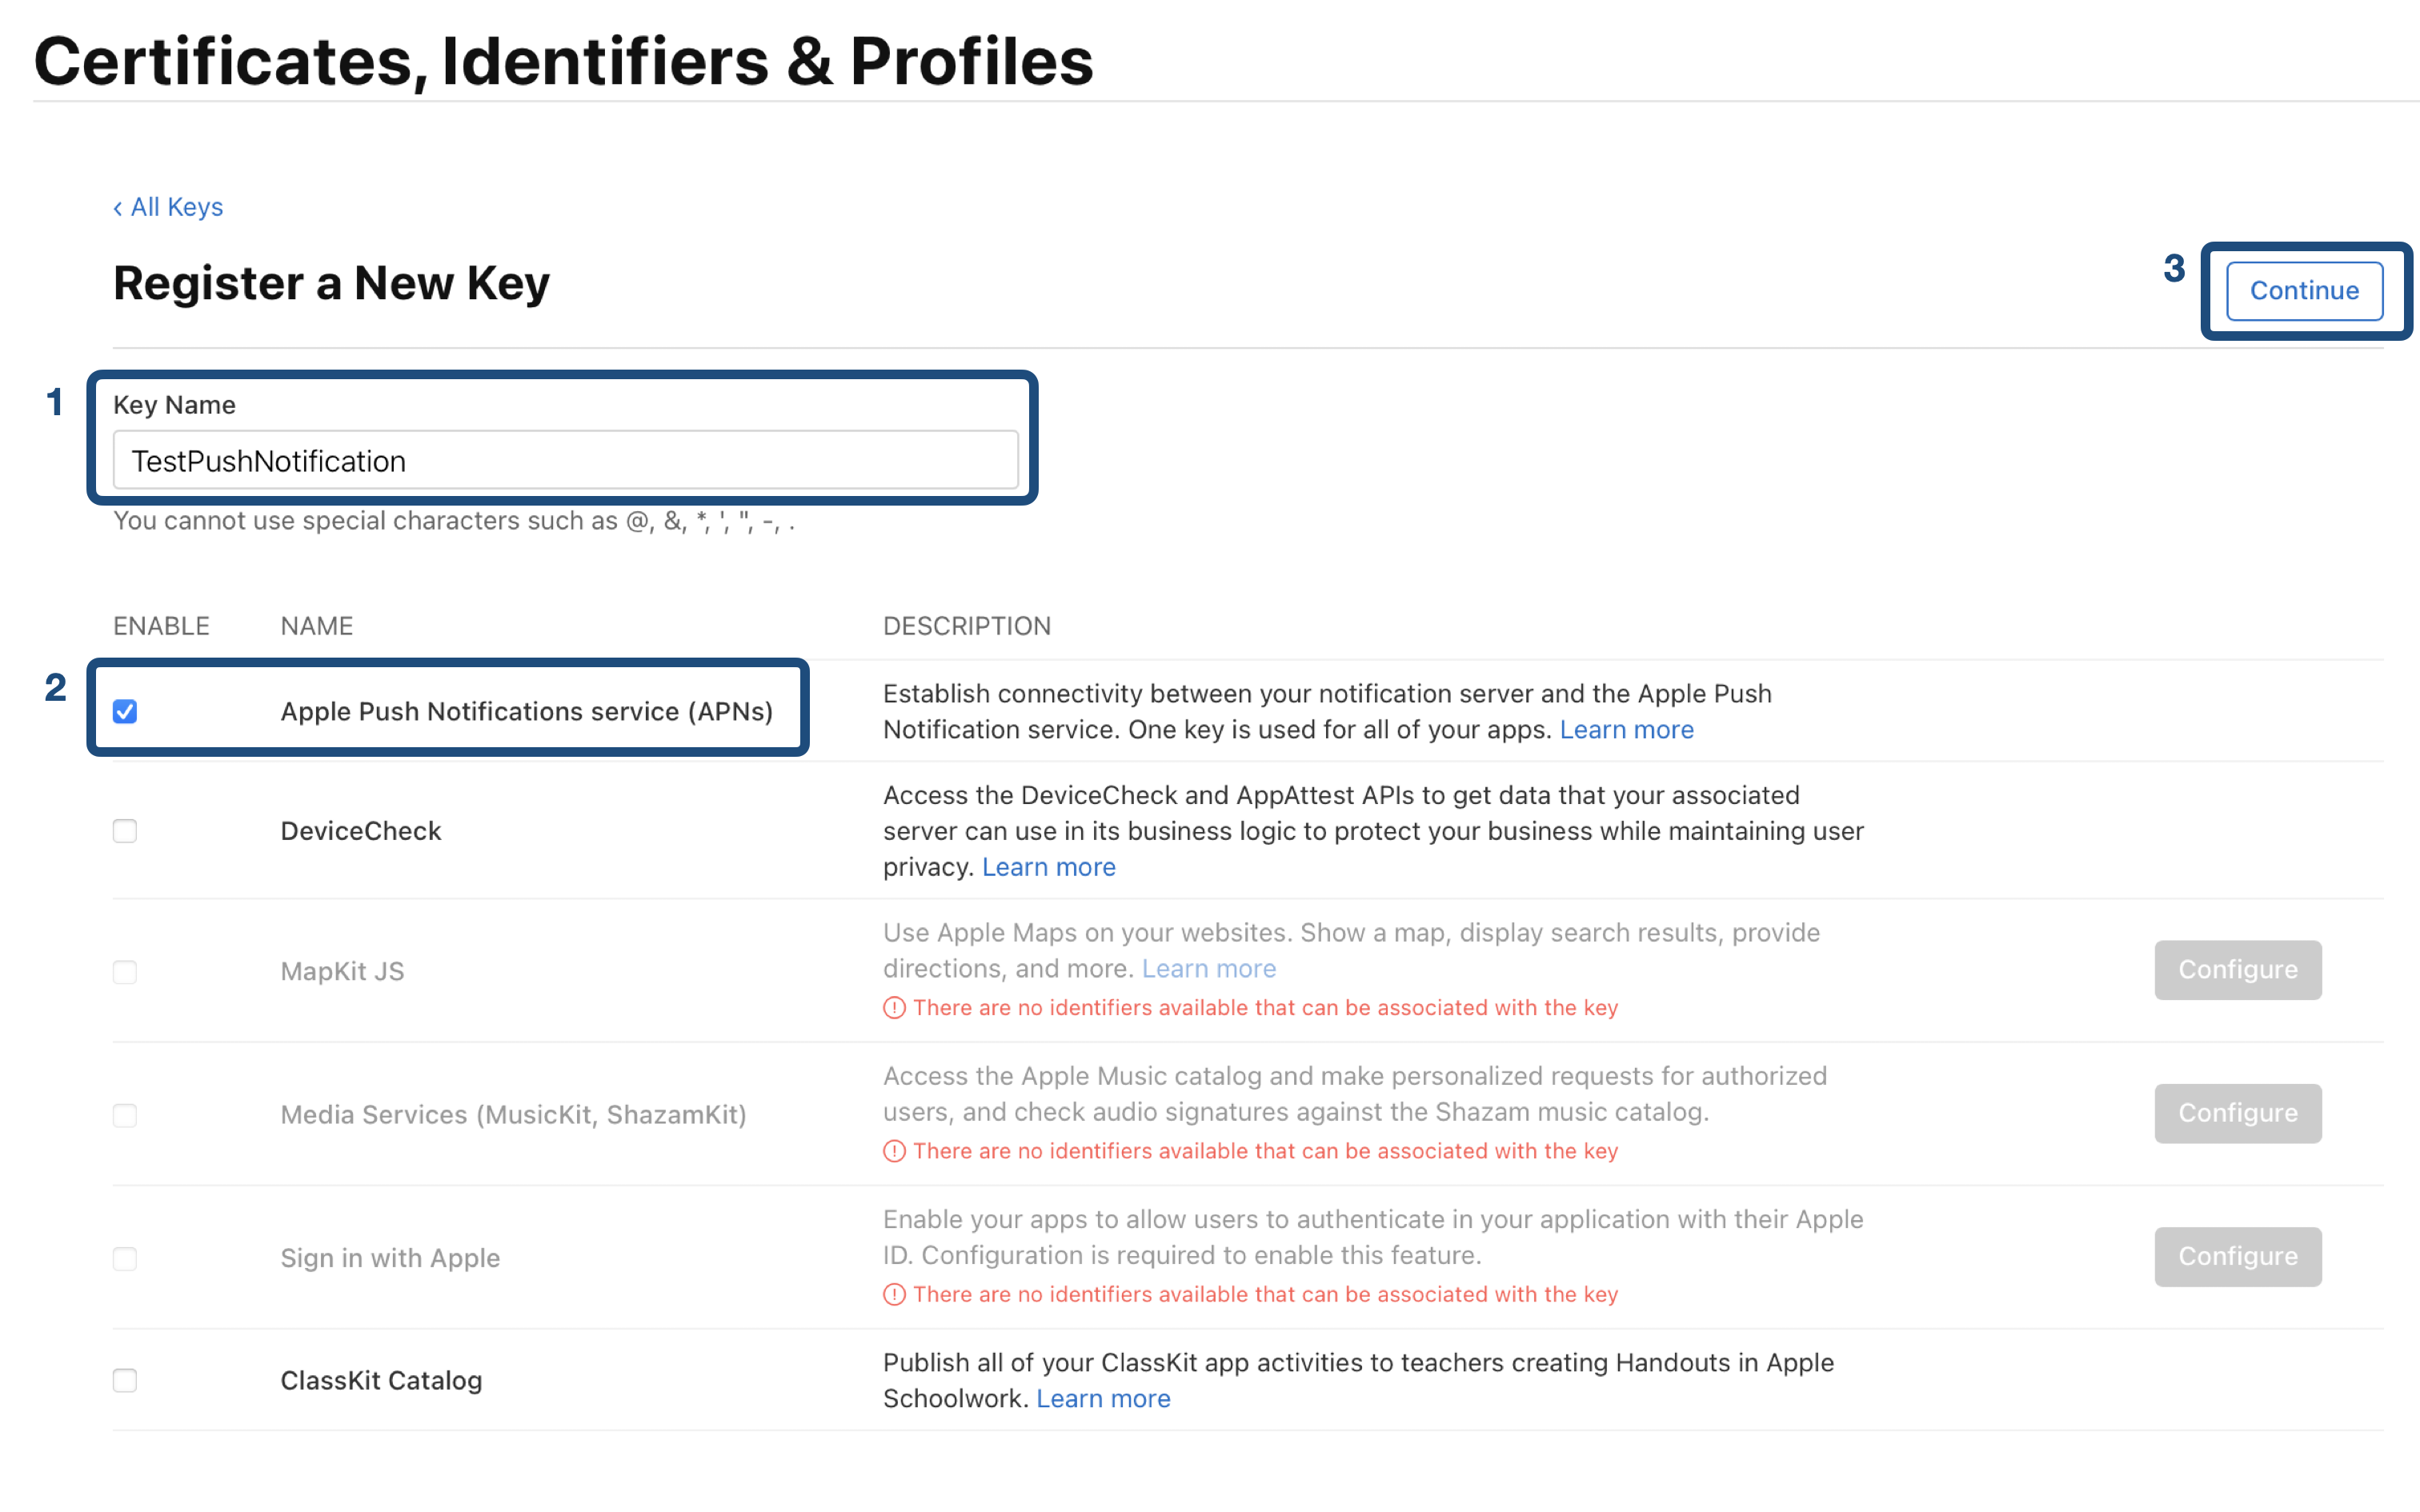
- 새로운 Key 를 만들기 위해 Key name 을 만들고
- Push Nntifications service 를 사용해야하기 때문에 체크 후 Continue 를 클릭합니다.
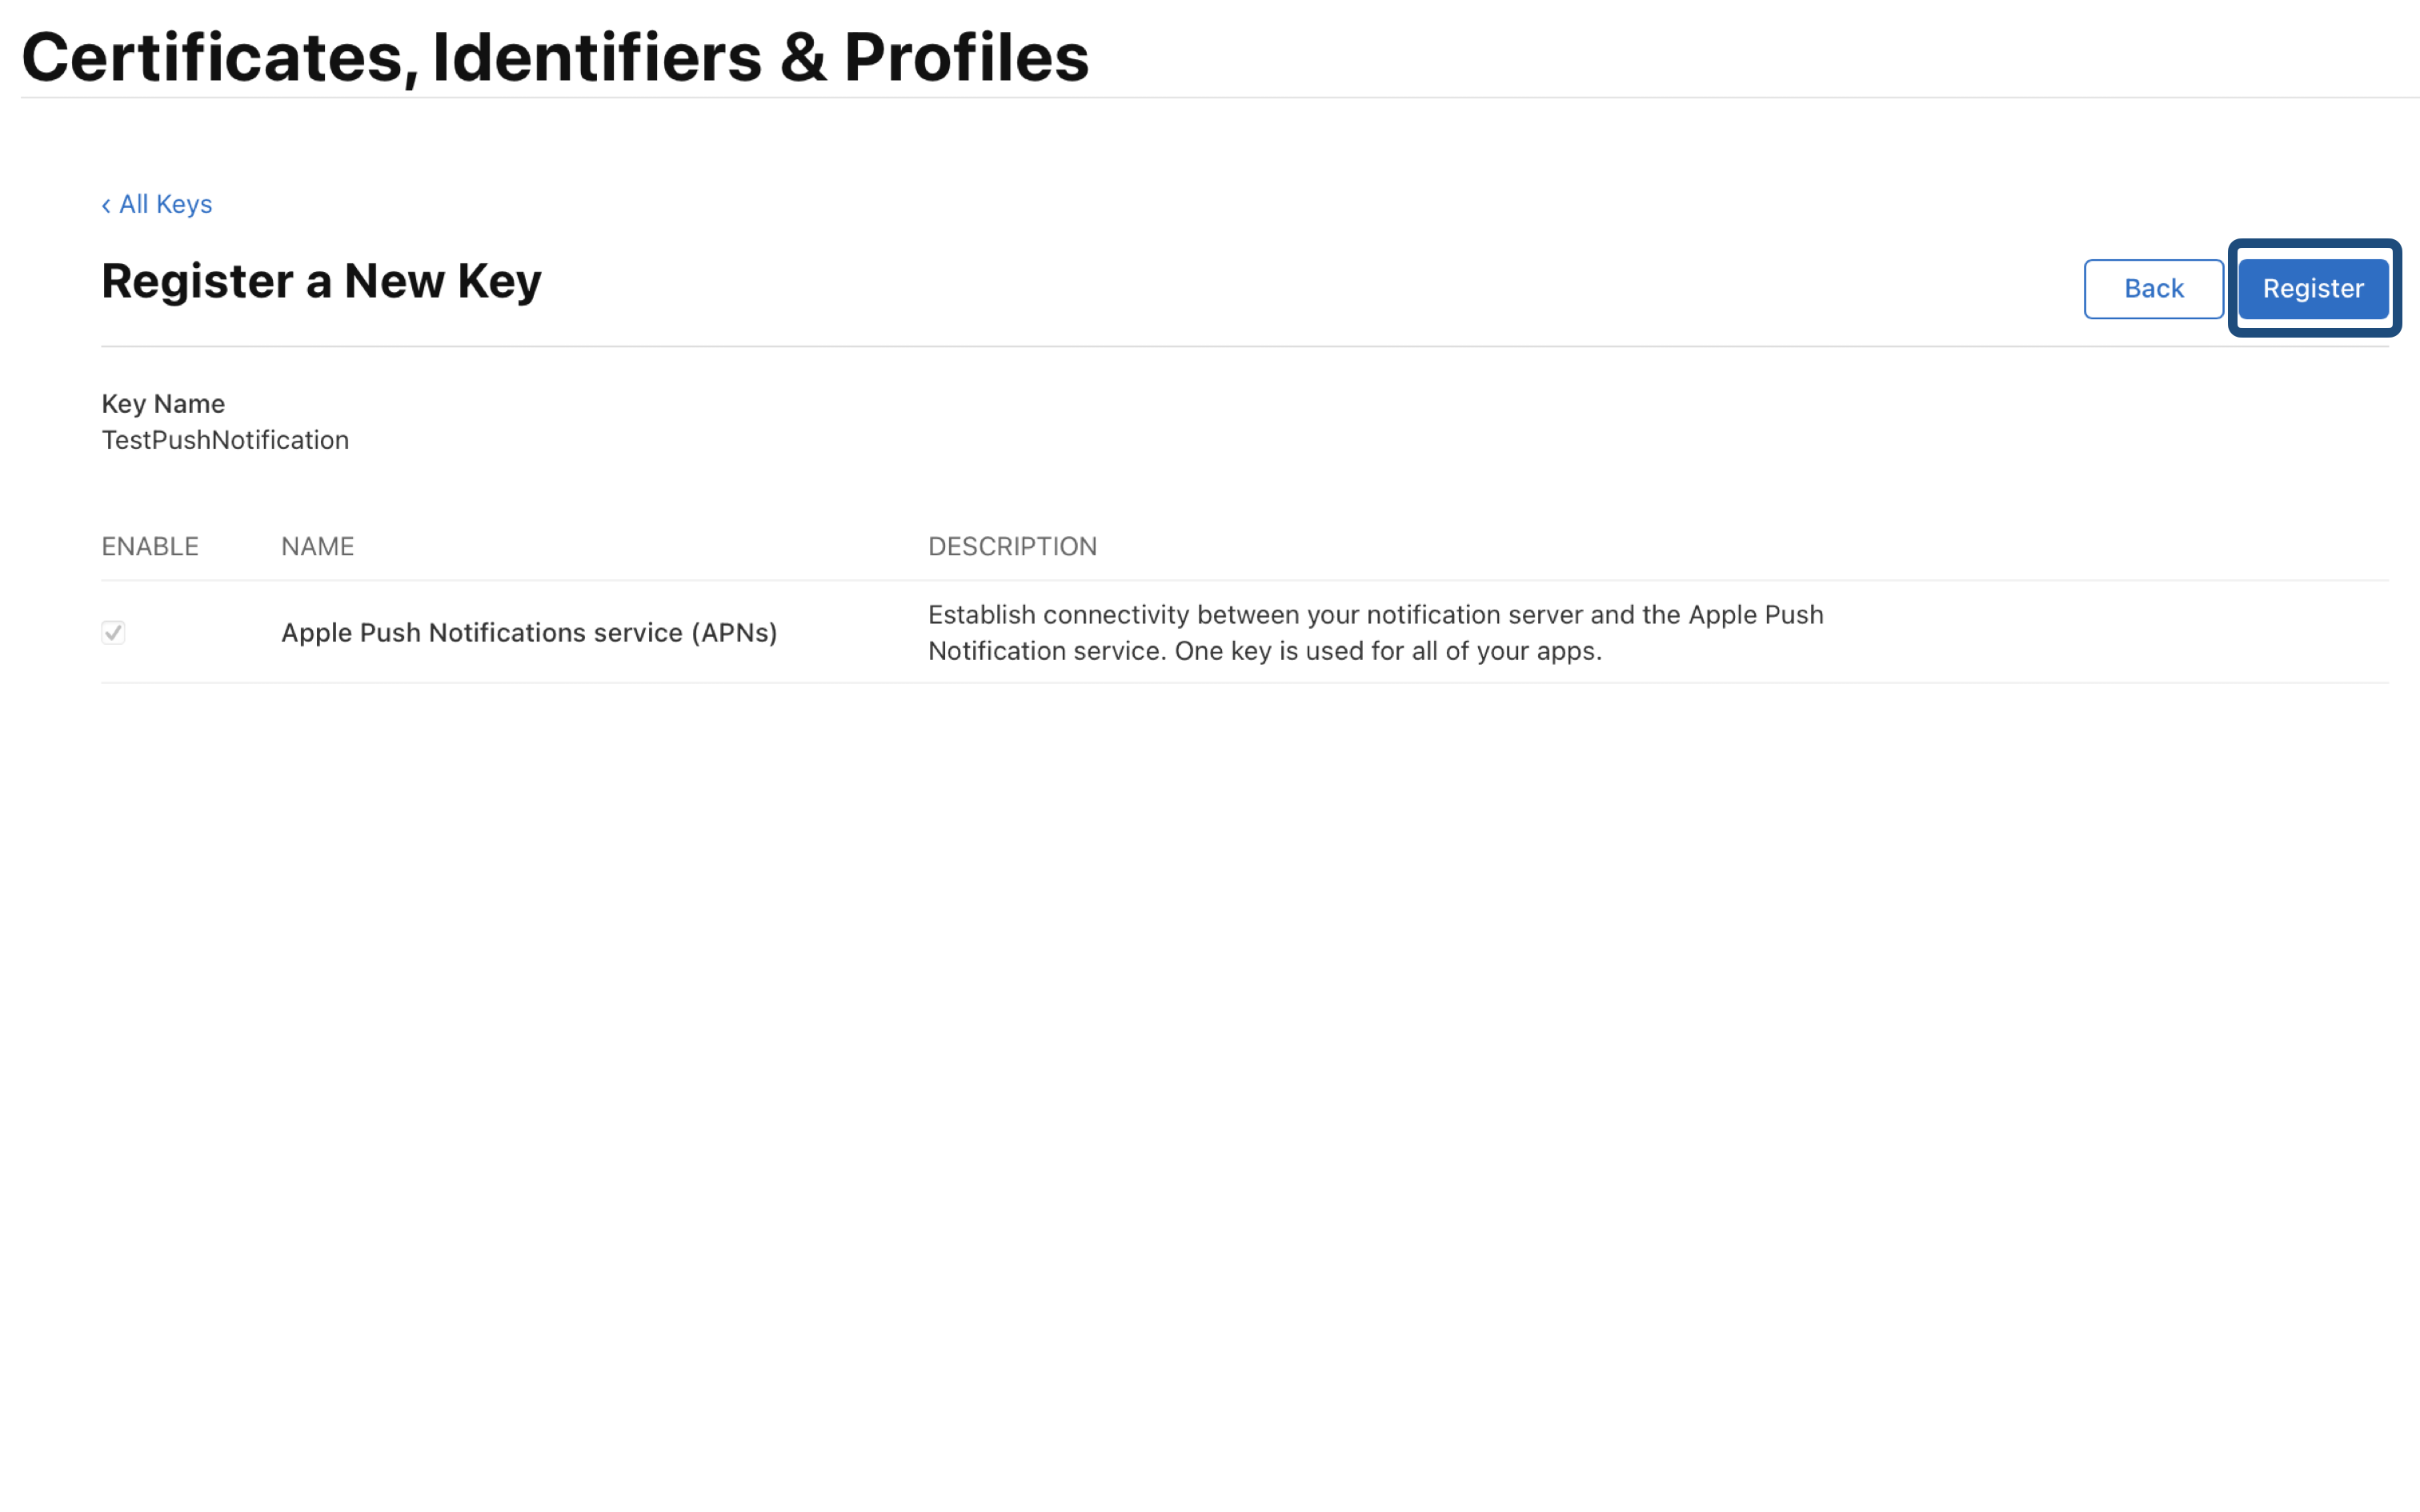
- 제대로 골랐는지 다시 알려주는 페이지가 뜨고 Register 를 클릭합니다.
- Key 가 생성되고 Name, Key ID, Services 에 대한 내용이 나오게 되는데 Key 의 고유 값이므로 절대 발설해서는 안됩니다! ( Key ID 는 꼭 기억해야합니다! )
- 우측 상단에 download 버튼이 생기게 되는데 Firebase console 에서 APN 인증 Key 를 업로드 해야하므로 파일을 다운로드 합니다. ( 확장자는 .p8 , 이것도 유출돼선 안됩니다! )
2-2. Firebase console 에 Key 업로드 하기
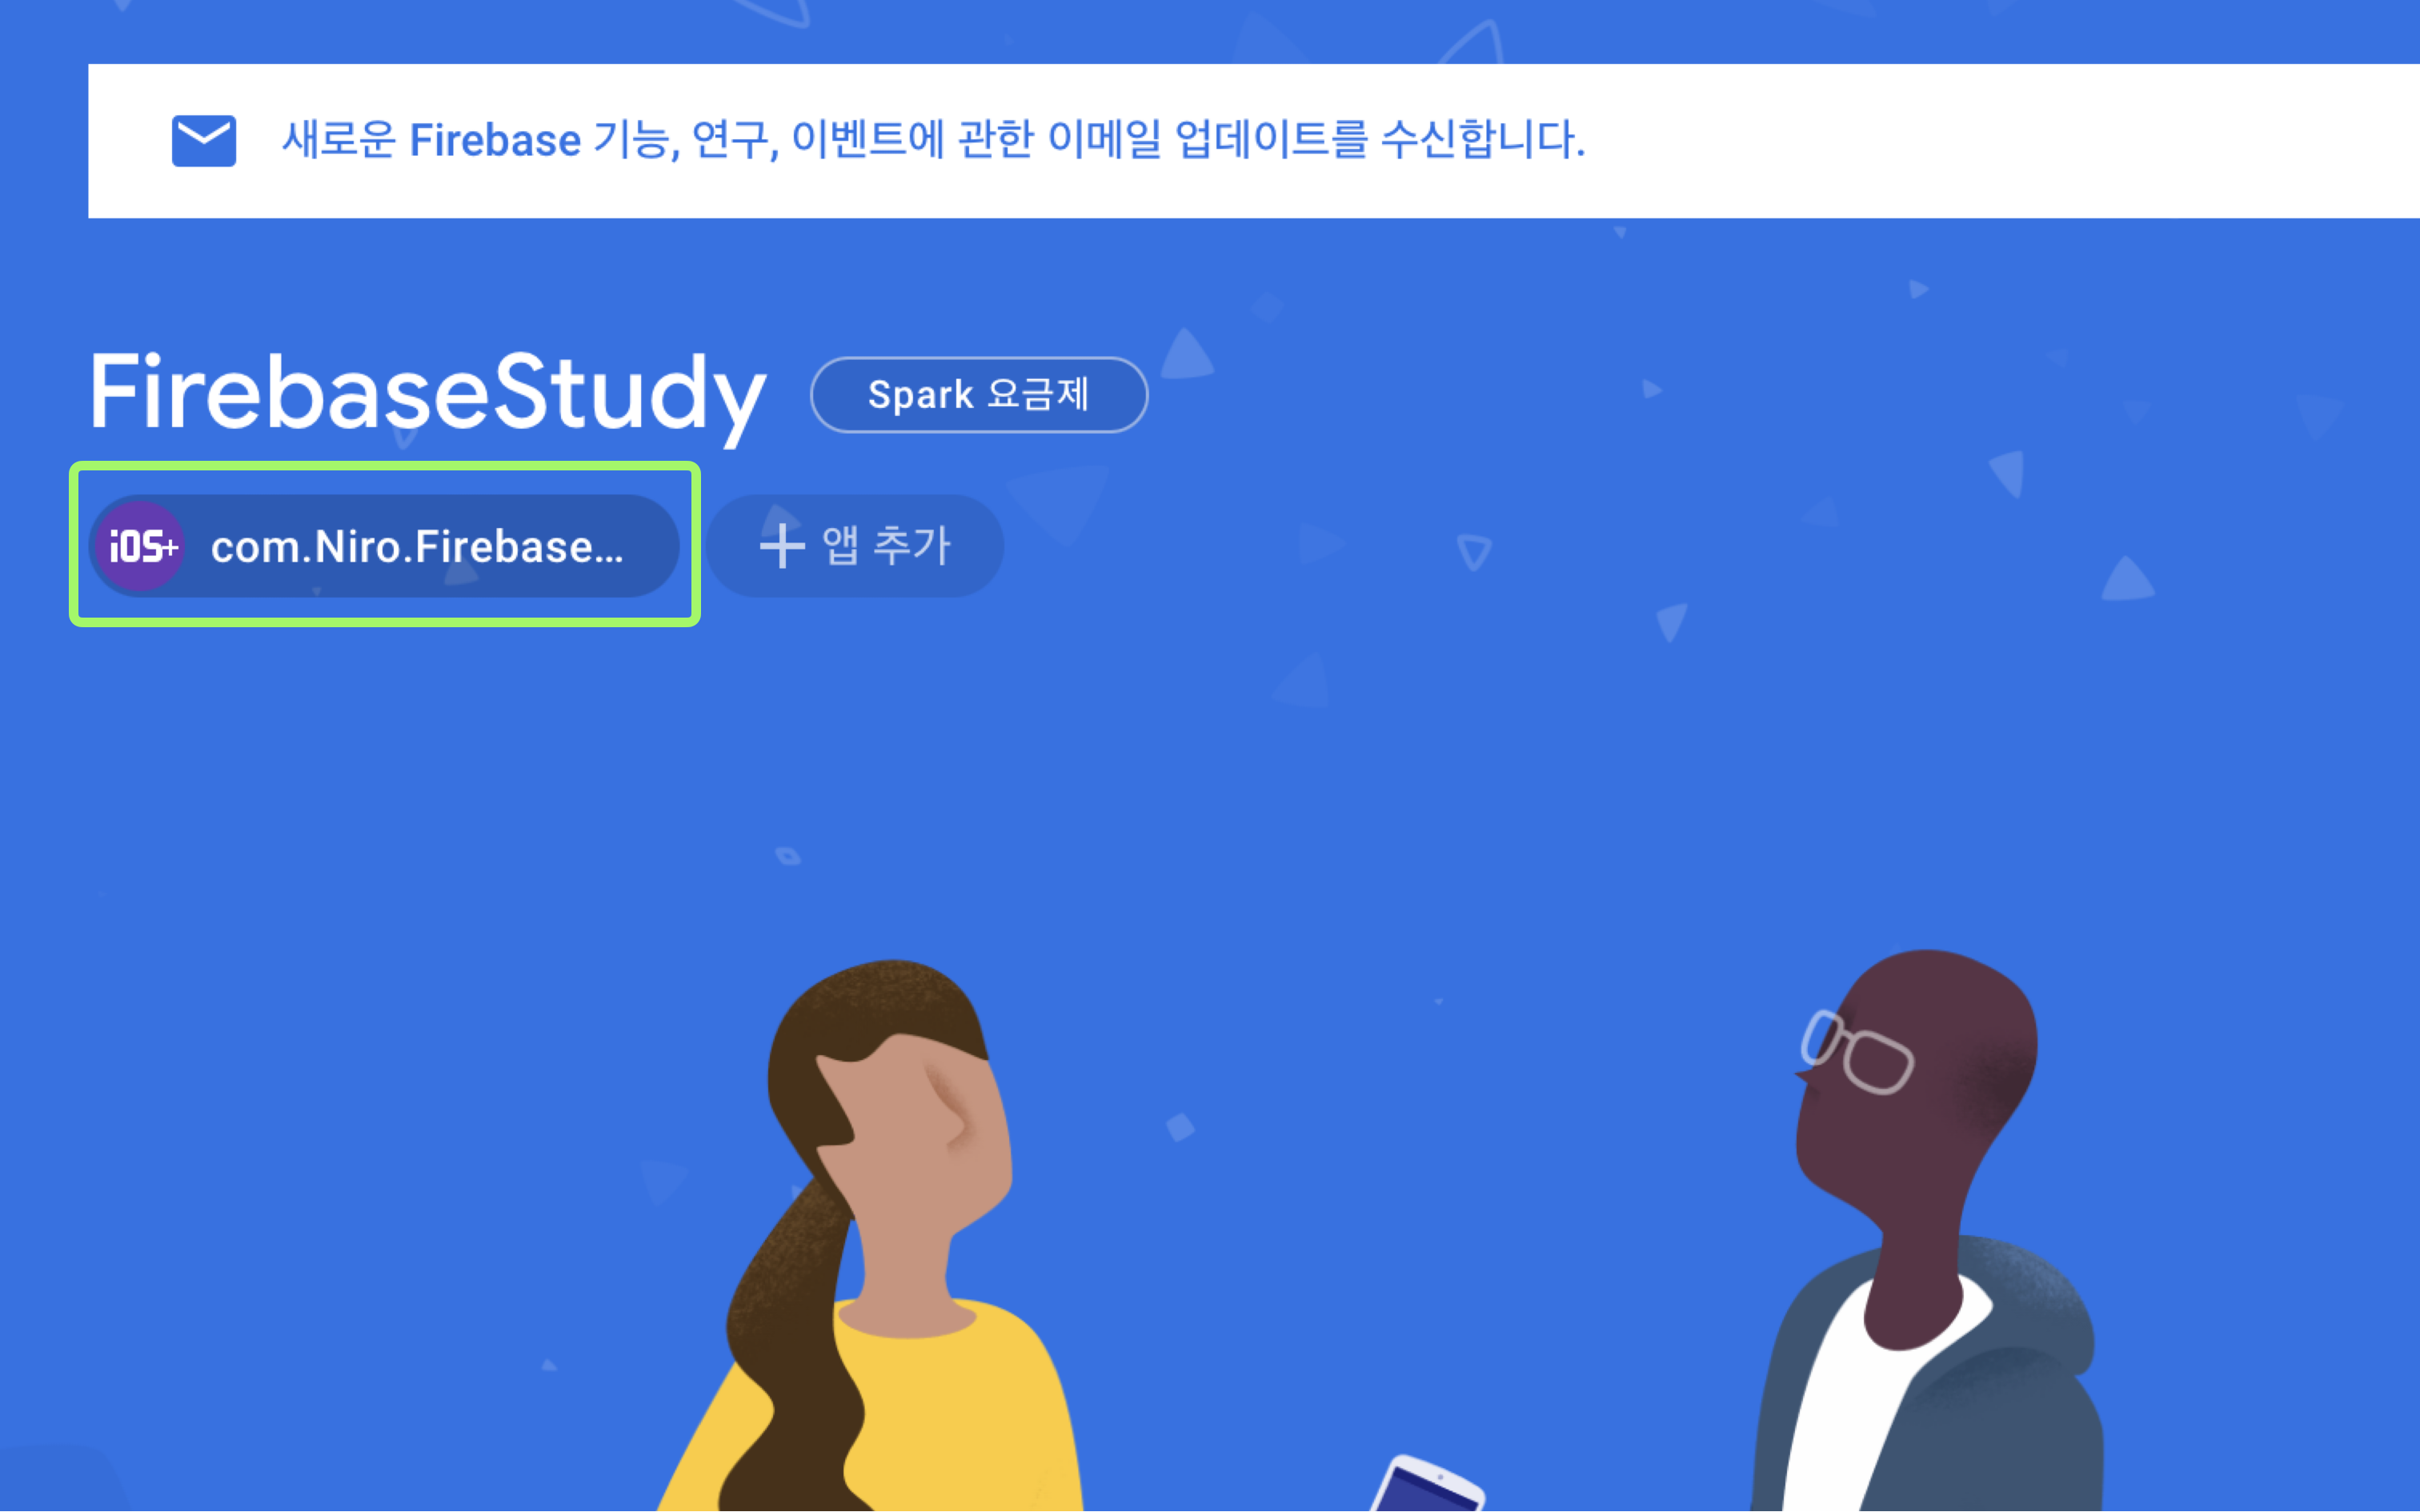
- 해당 Project Console 에 들어가면 다음과 같은 화면이 존재하고

- 박스에 커서를 올리게 되면 설정화면으로 이동할 수 있게 바뀝니다. ( 설정 아이콘 클릭 )
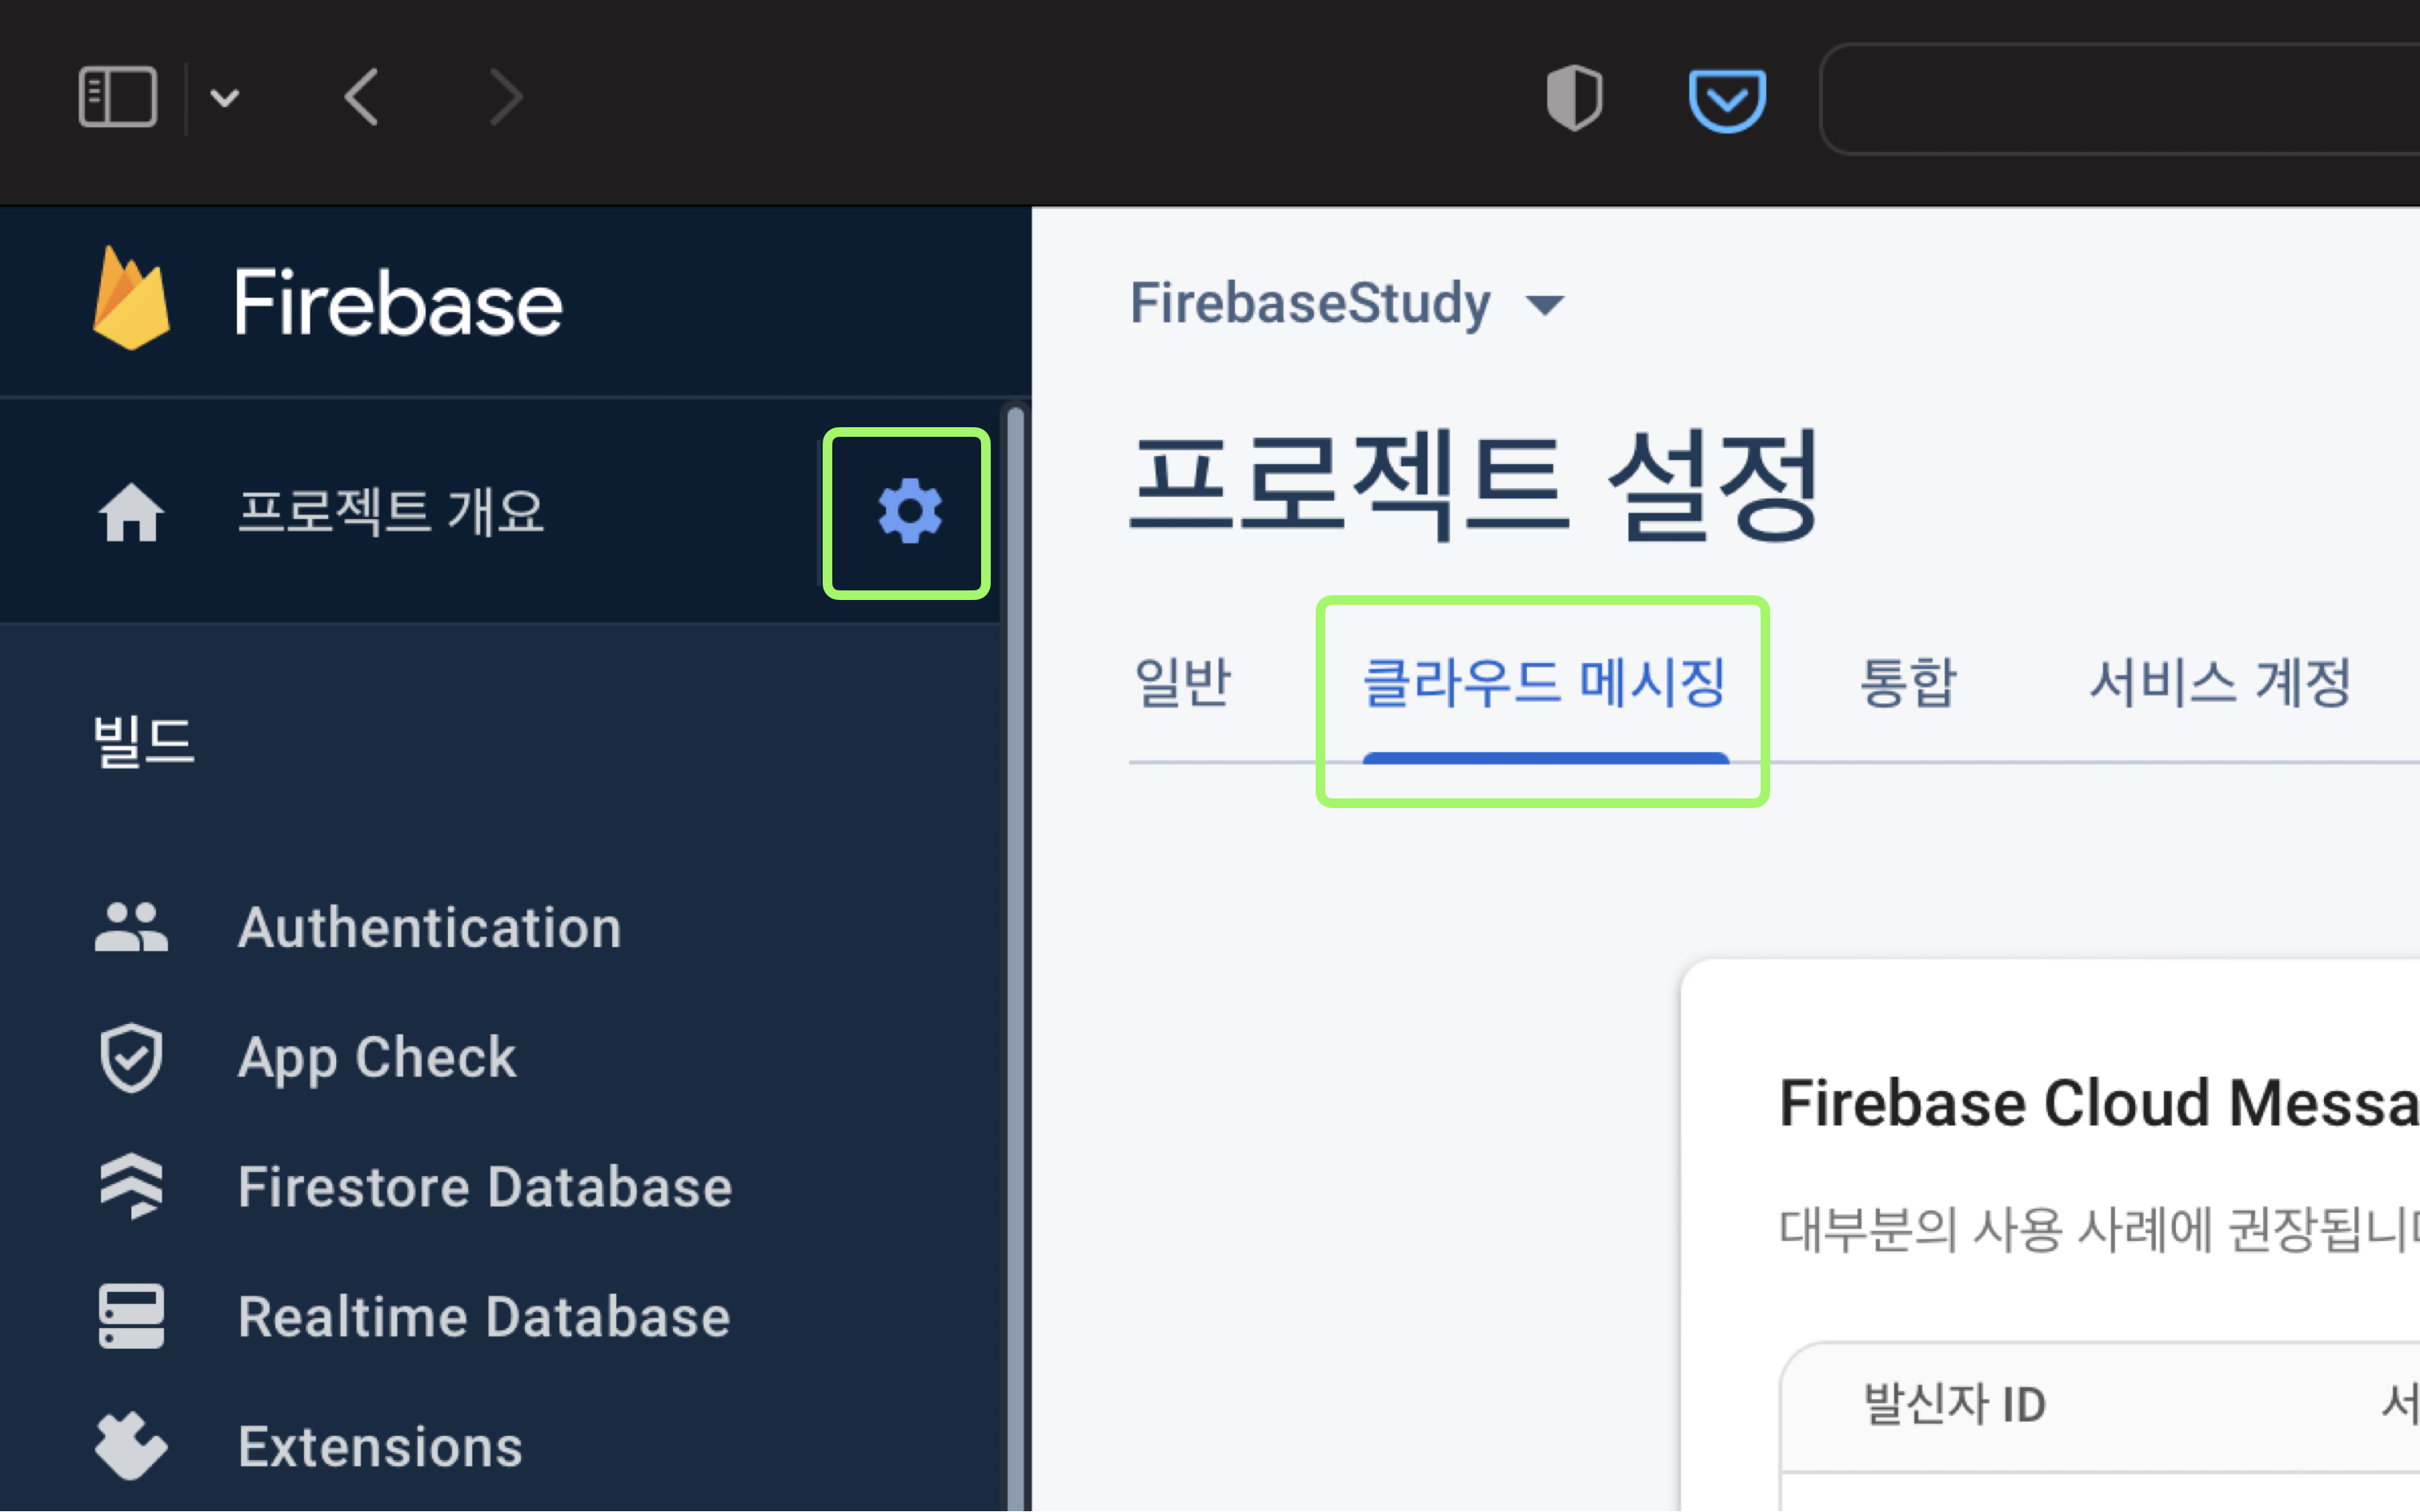
- 혹은 좌측 메뉴에 있는 설정을 누르고 프로젝트 설정으로 넘어가 클라우드 메시징 메뉴를 클릭 합니다.
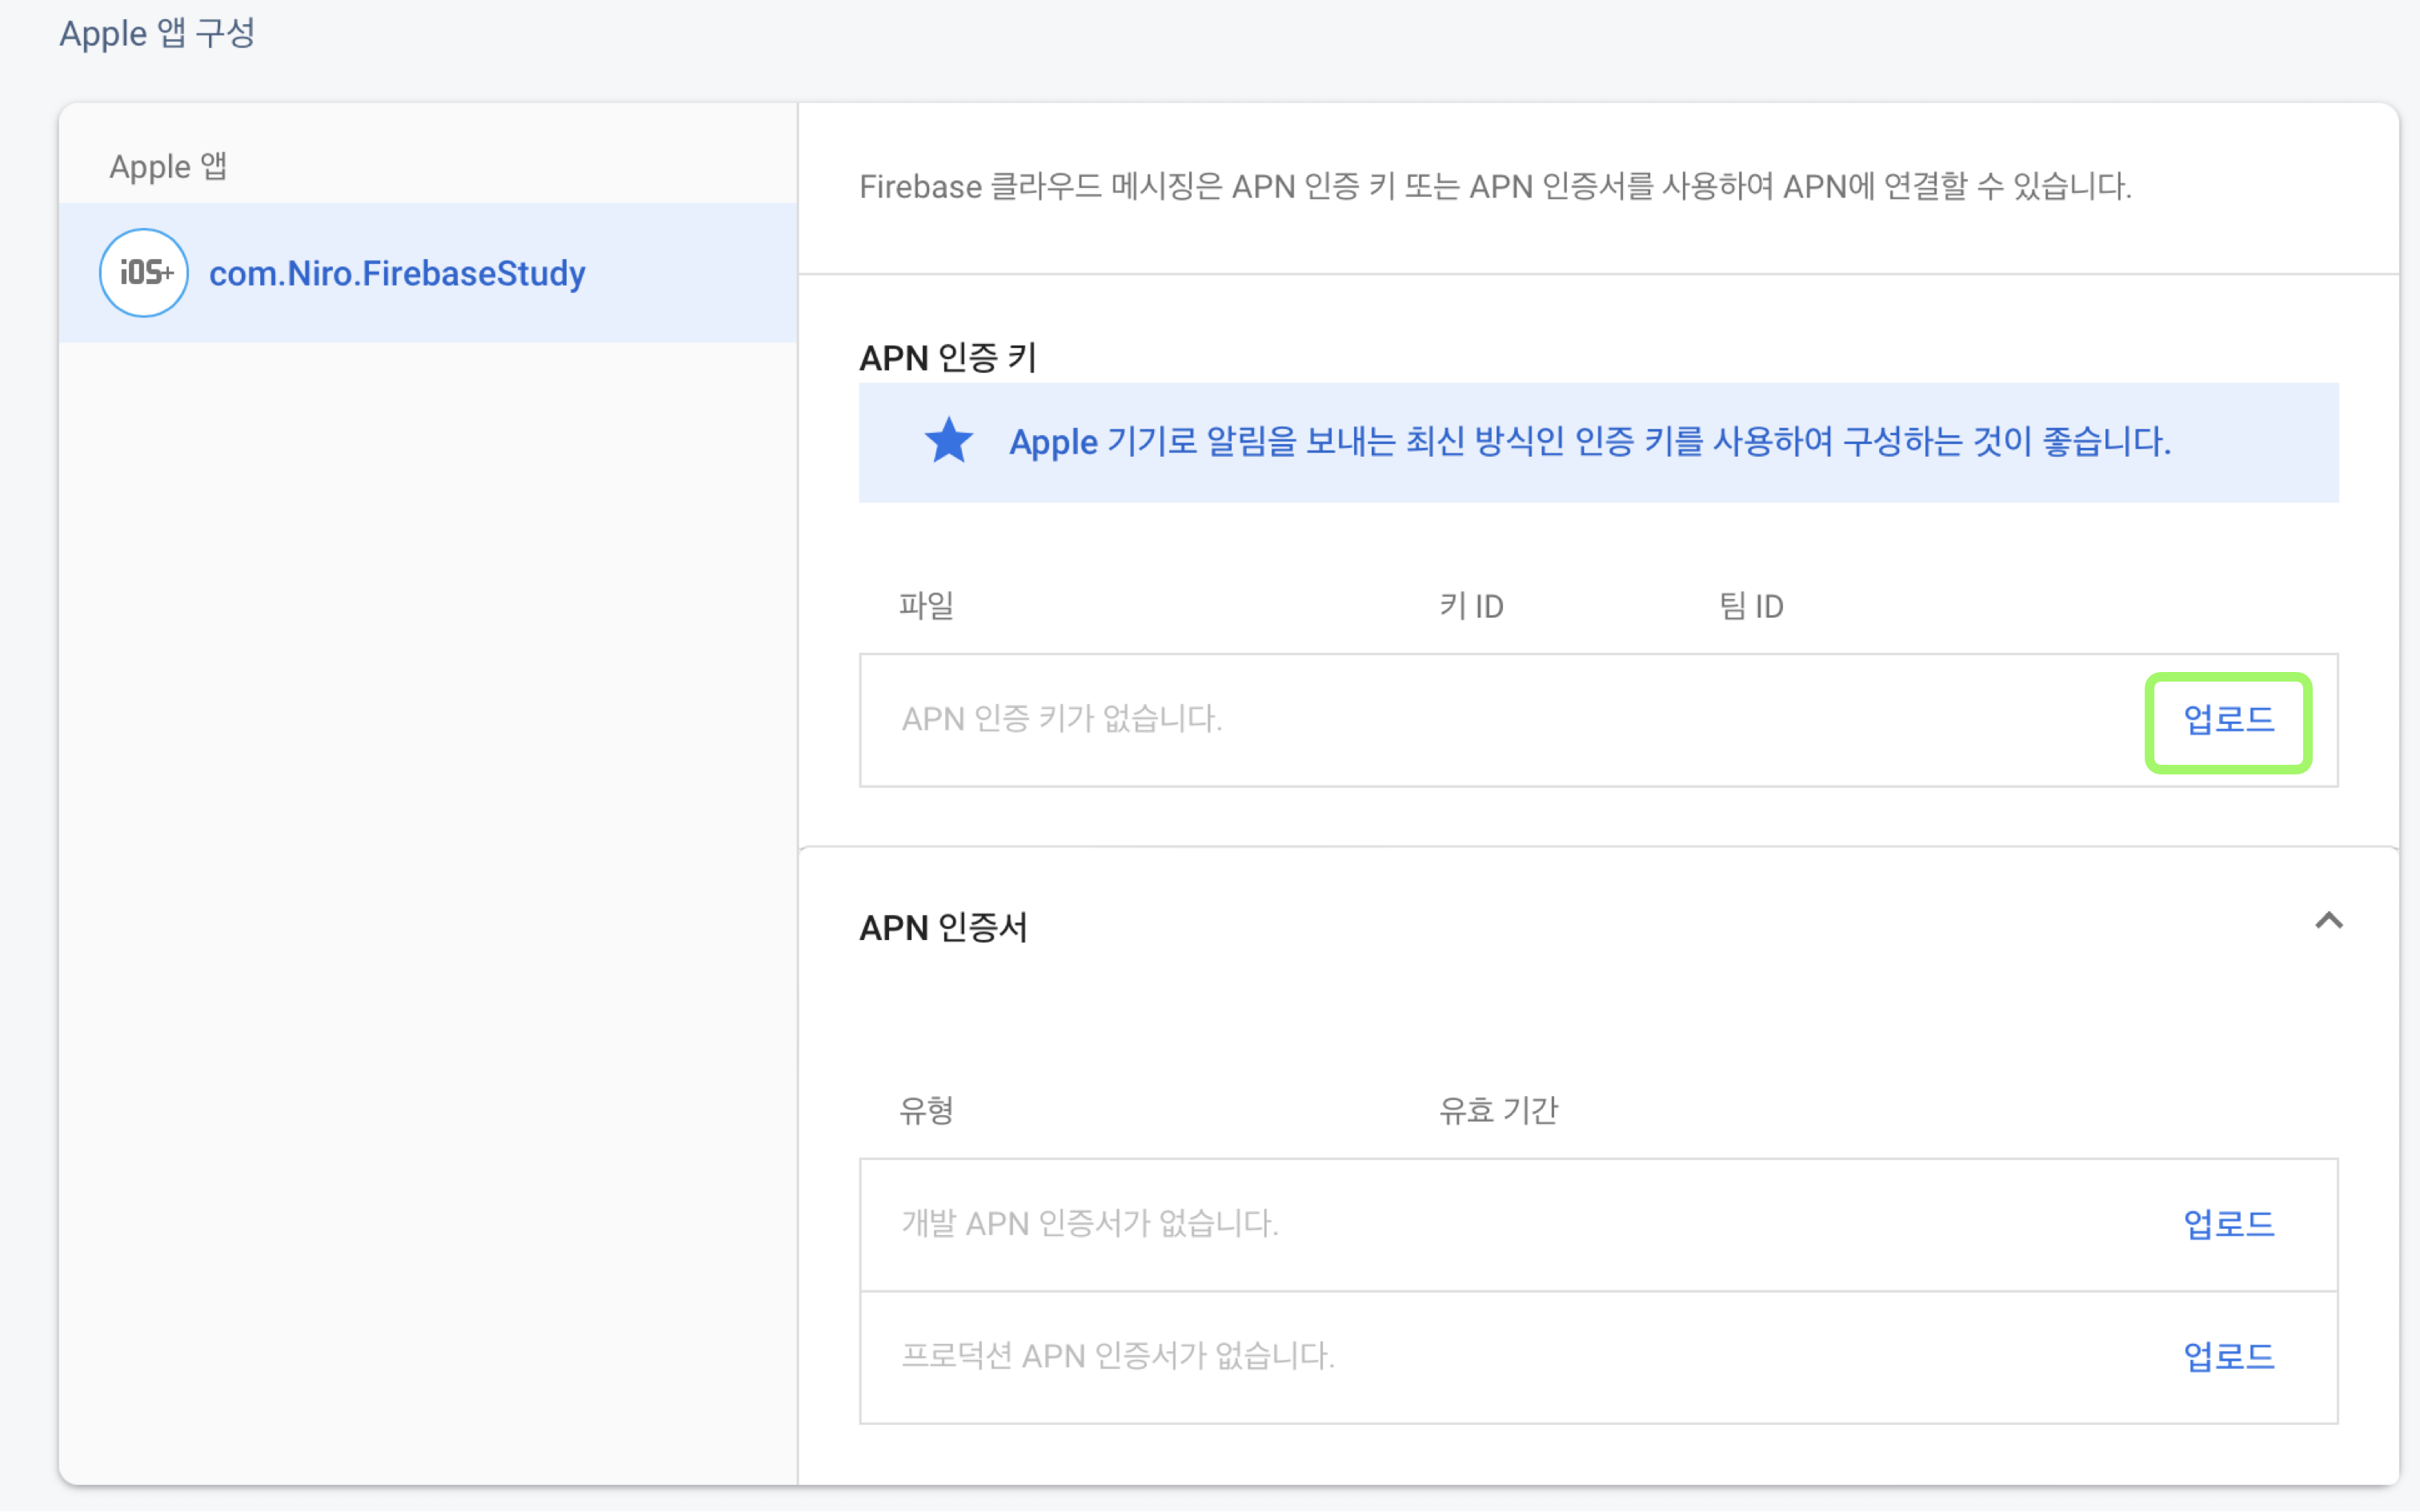
- 클라우드 메시징 페이지로 넘어간 후 아래로 스크롤 하면 우측 이미지와 같이 APN 인증 키 업로드 창 이 나옵니다.
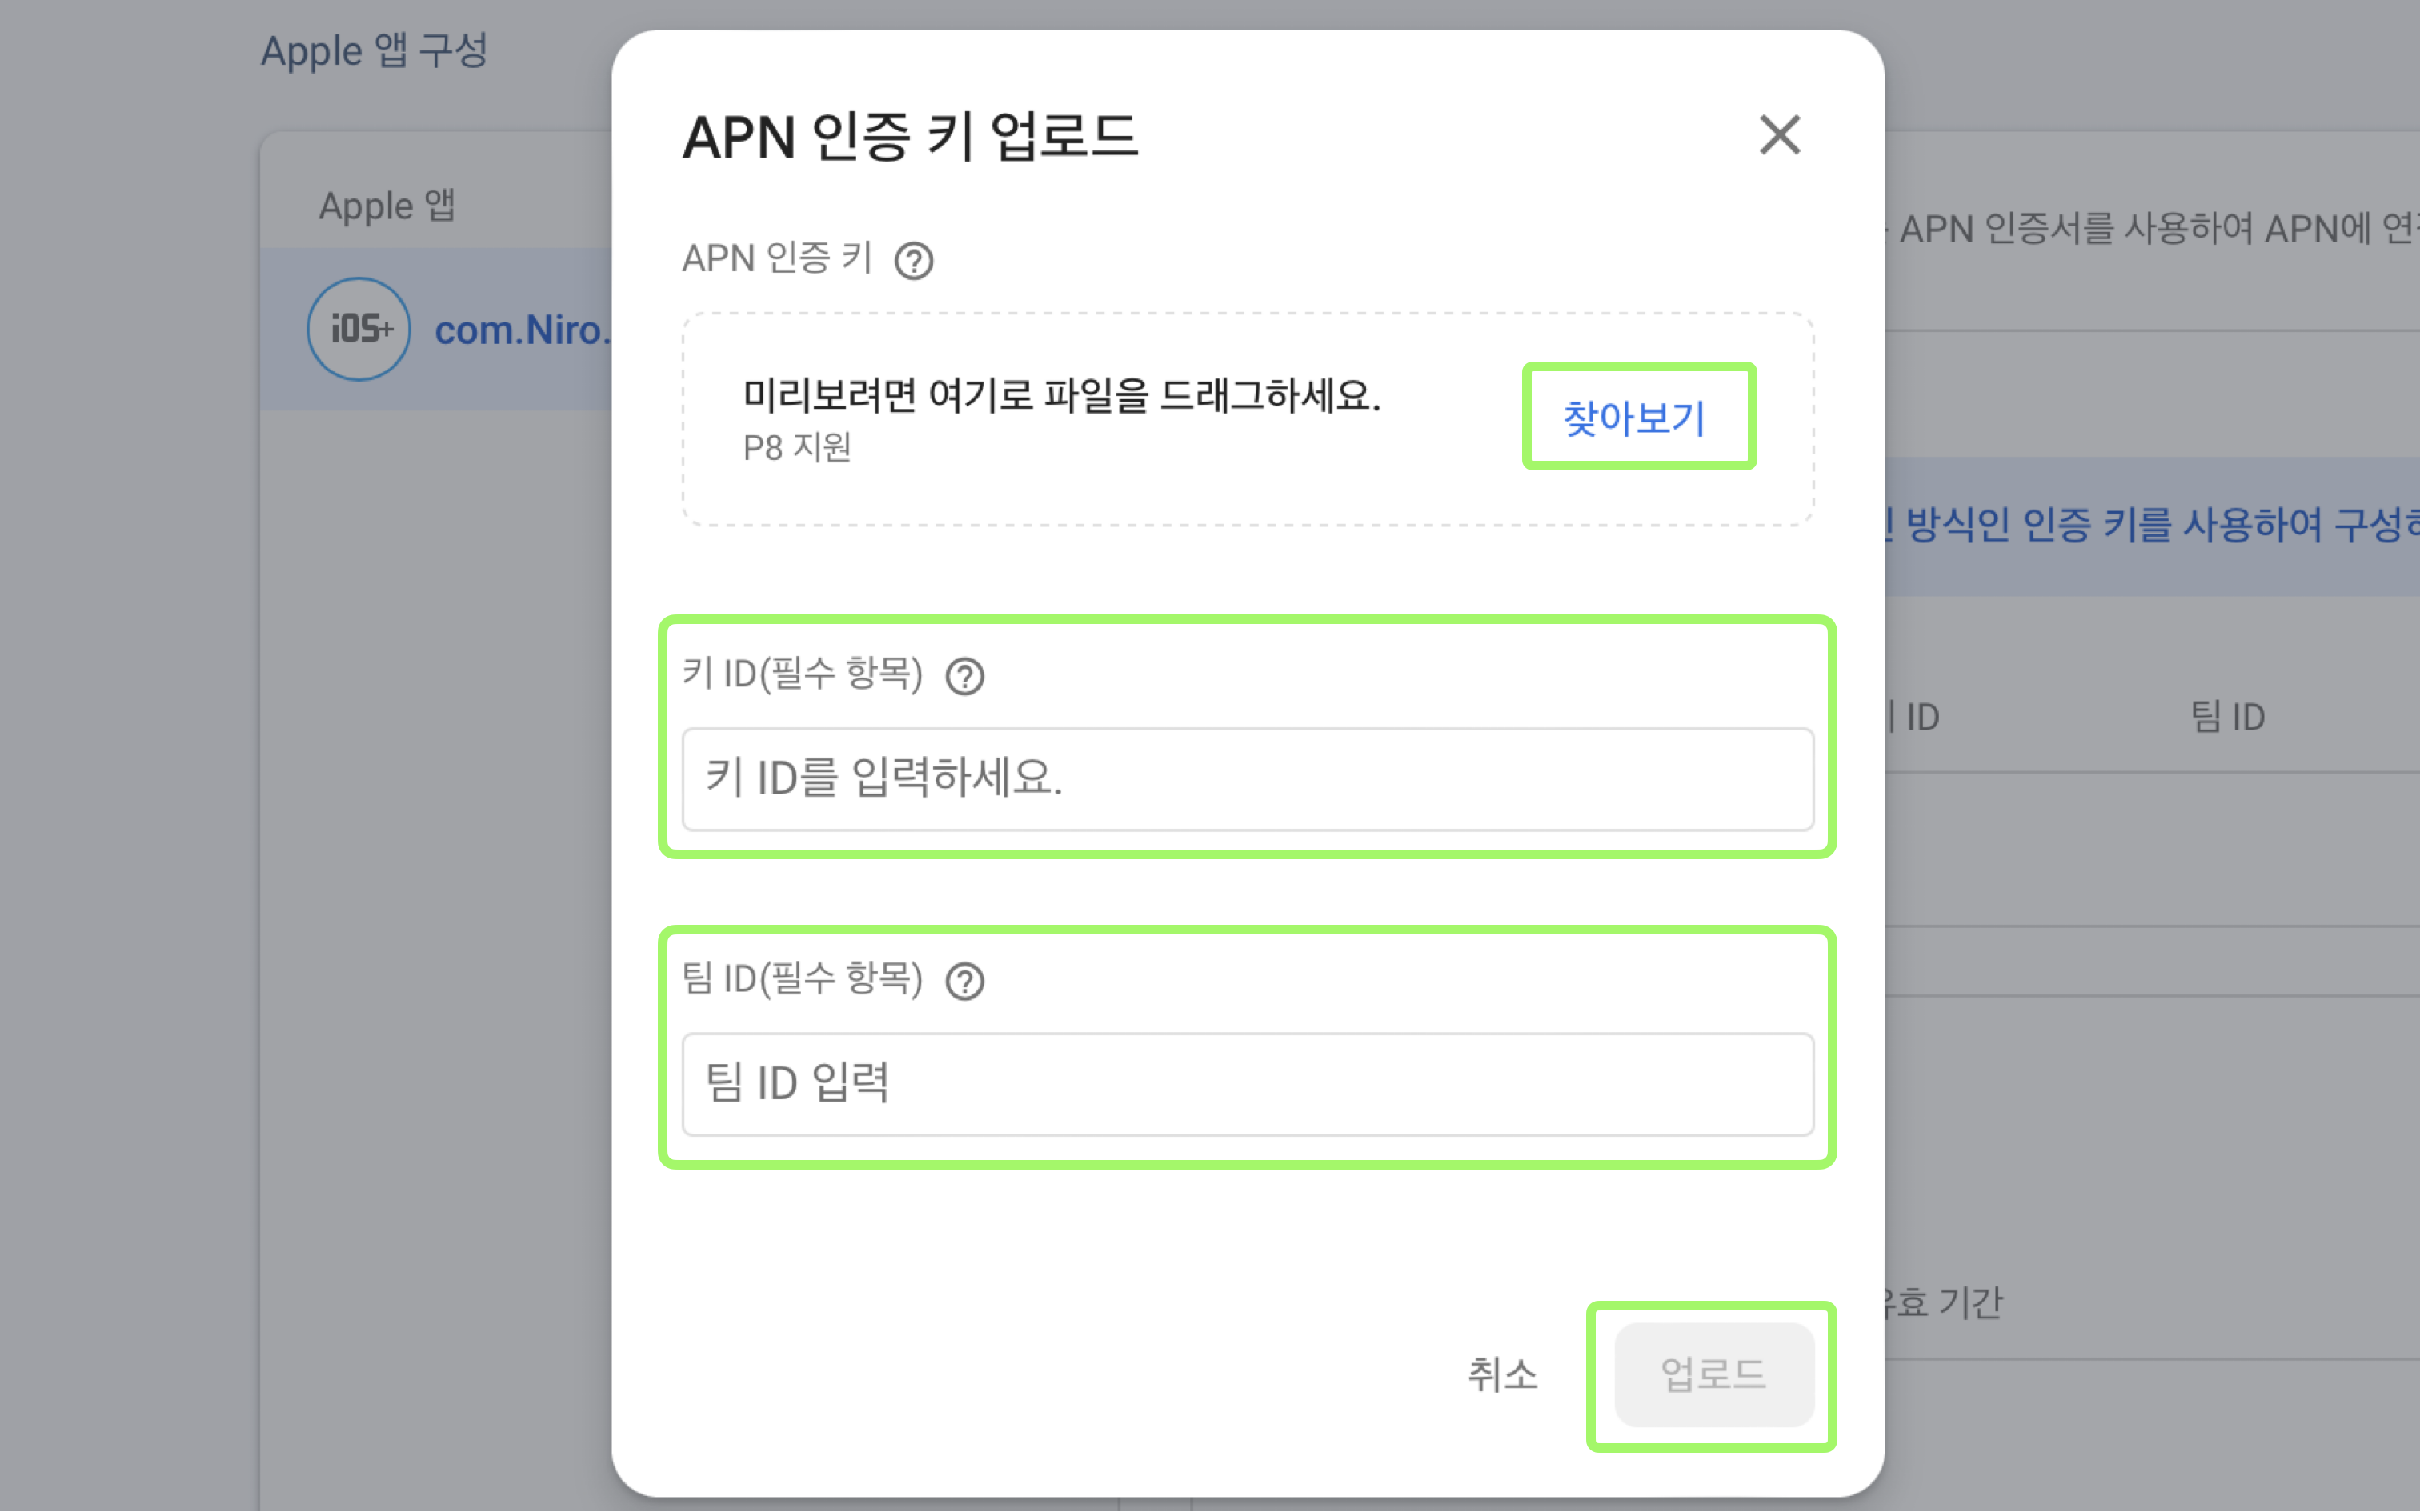
- 확장자명이 .p8 인 파일, APN 인증 Key 를 업로드 합니다.
- 인증 Key 를 만들 때 제공 받았던 Key ID 입력하기 하고 ( Key 를 만들었던 곳으로 가면 다시 확인 가능 )
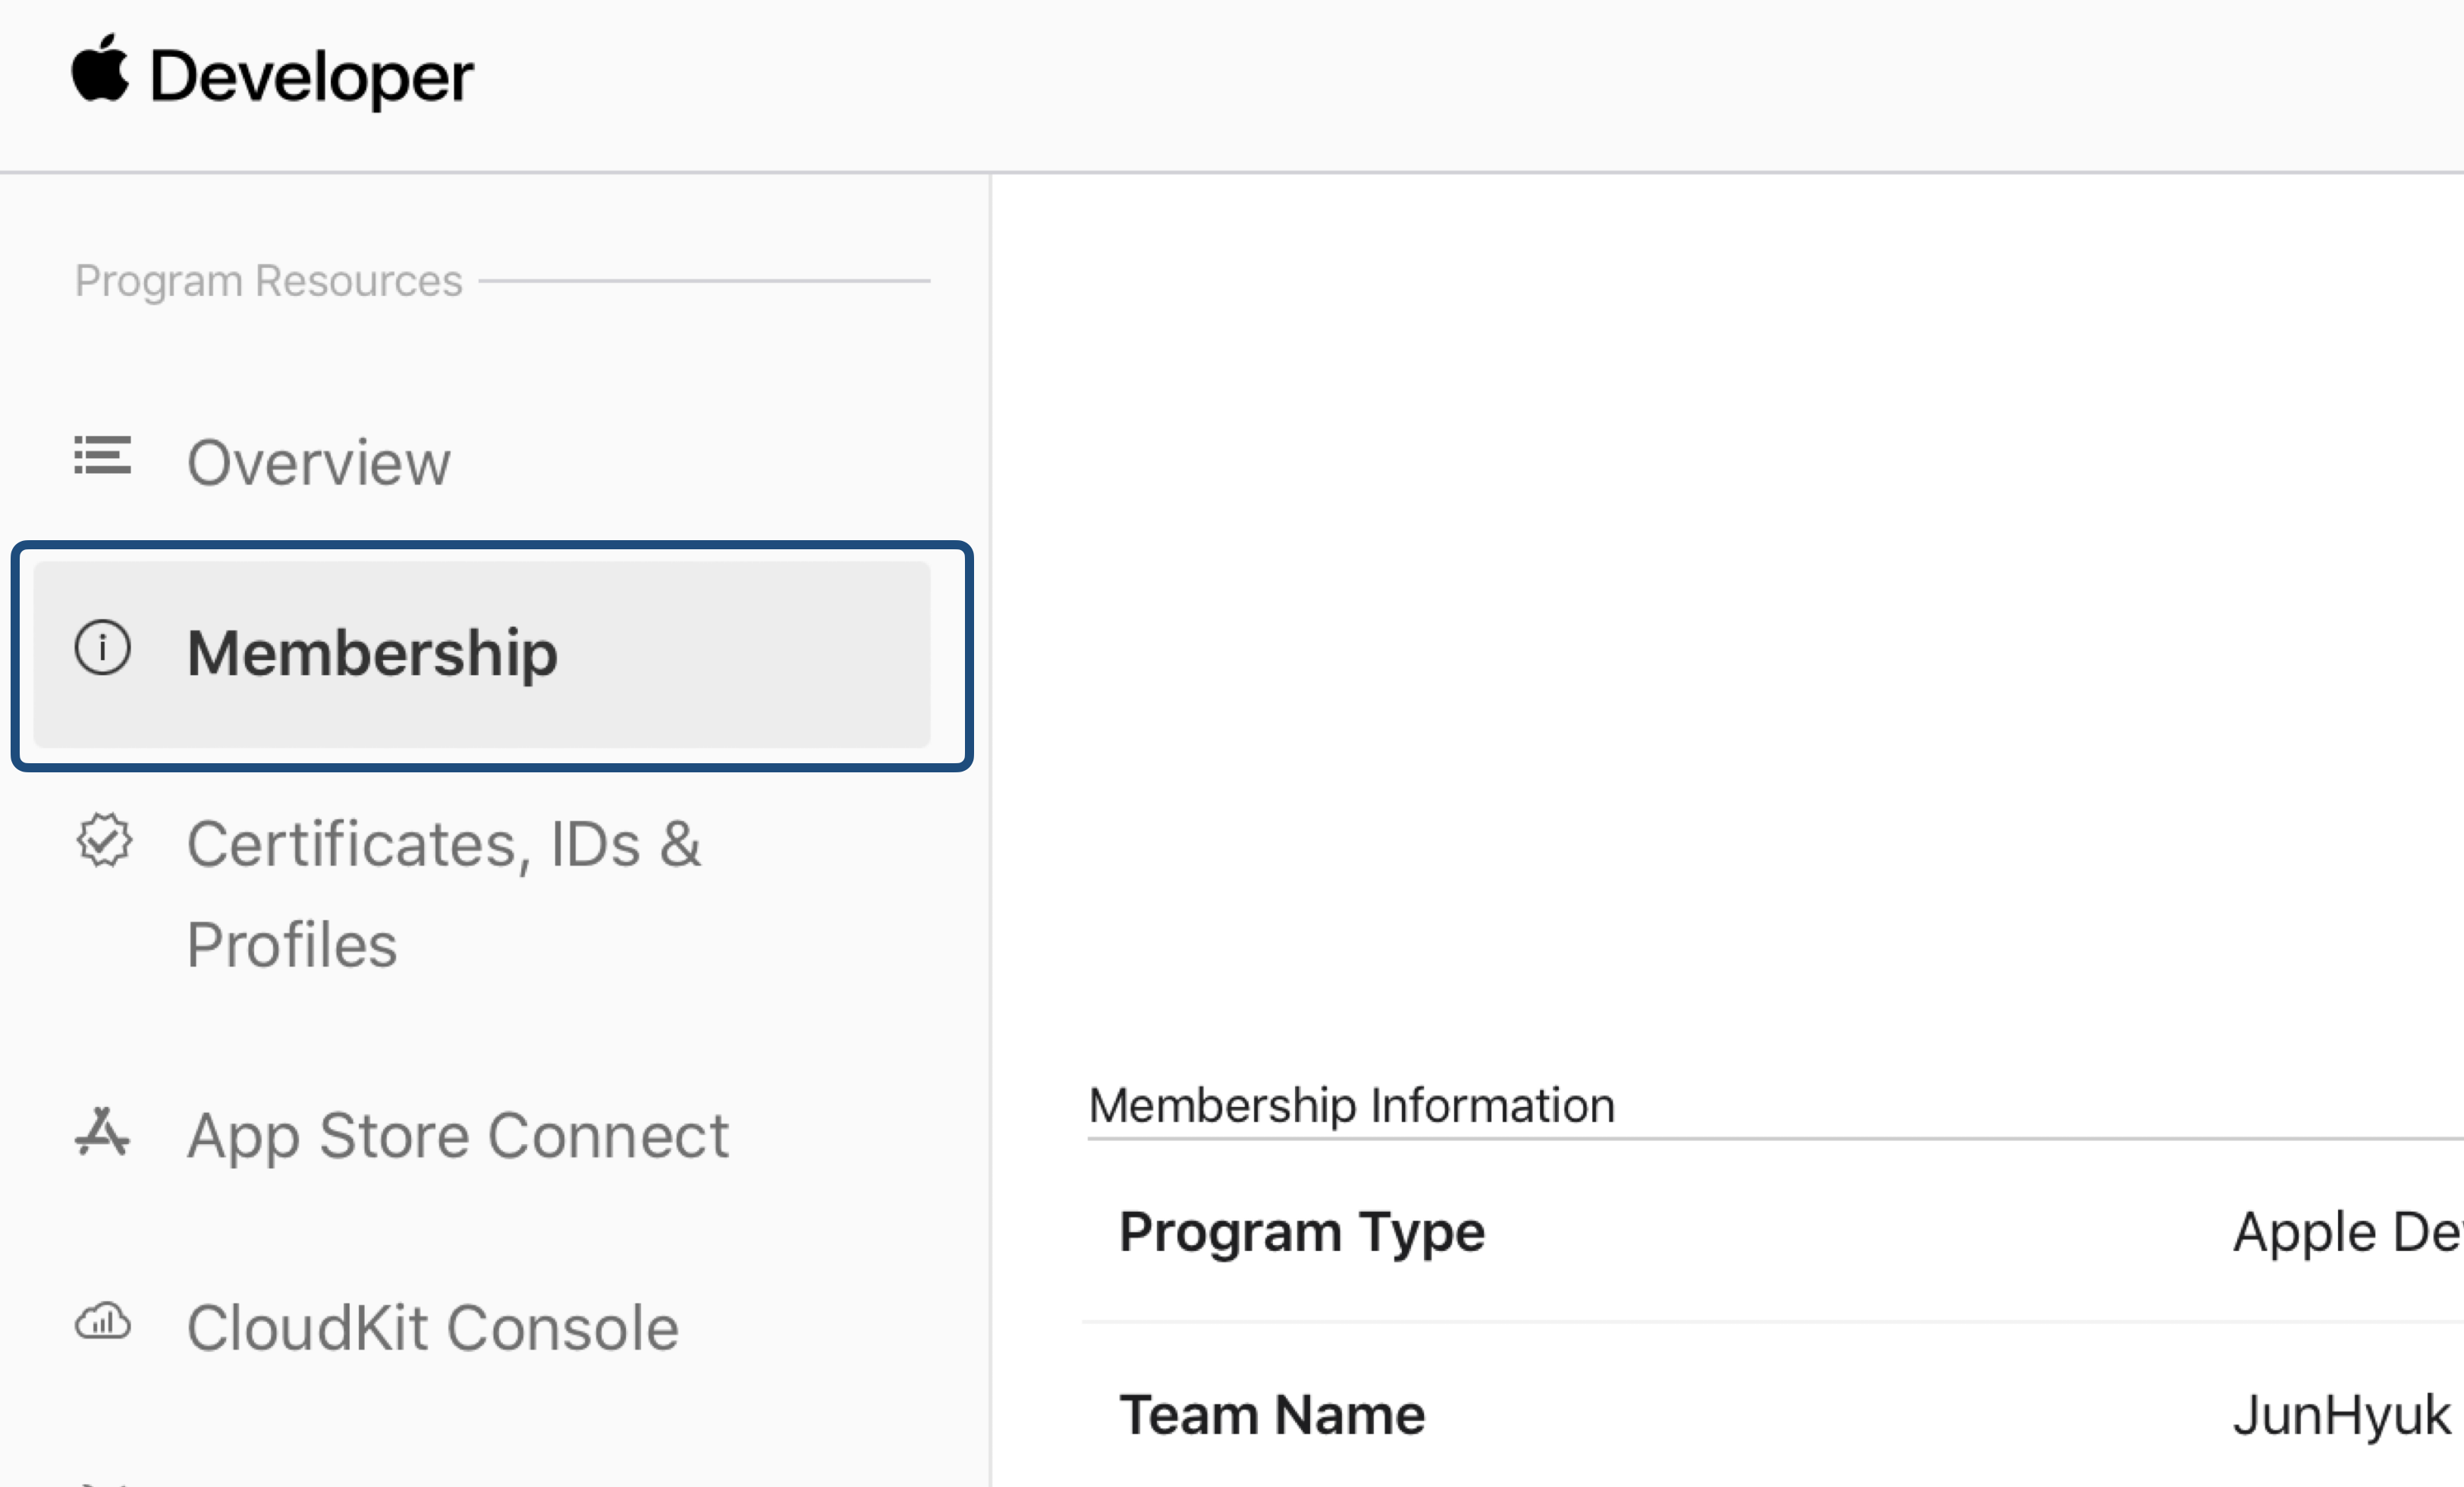
- 팀 ID 는 Apple Developer 에서 Membership 메뉴 로 들어가면 확인해서 적으세요.
- 파일과 키, 팀 ID 를 다 입력하면 업로드 진행하고 완료 되면 해당 인증 Key 를 확인할 수 있습니다.
2-3. Xcode Project 에 기능 추가
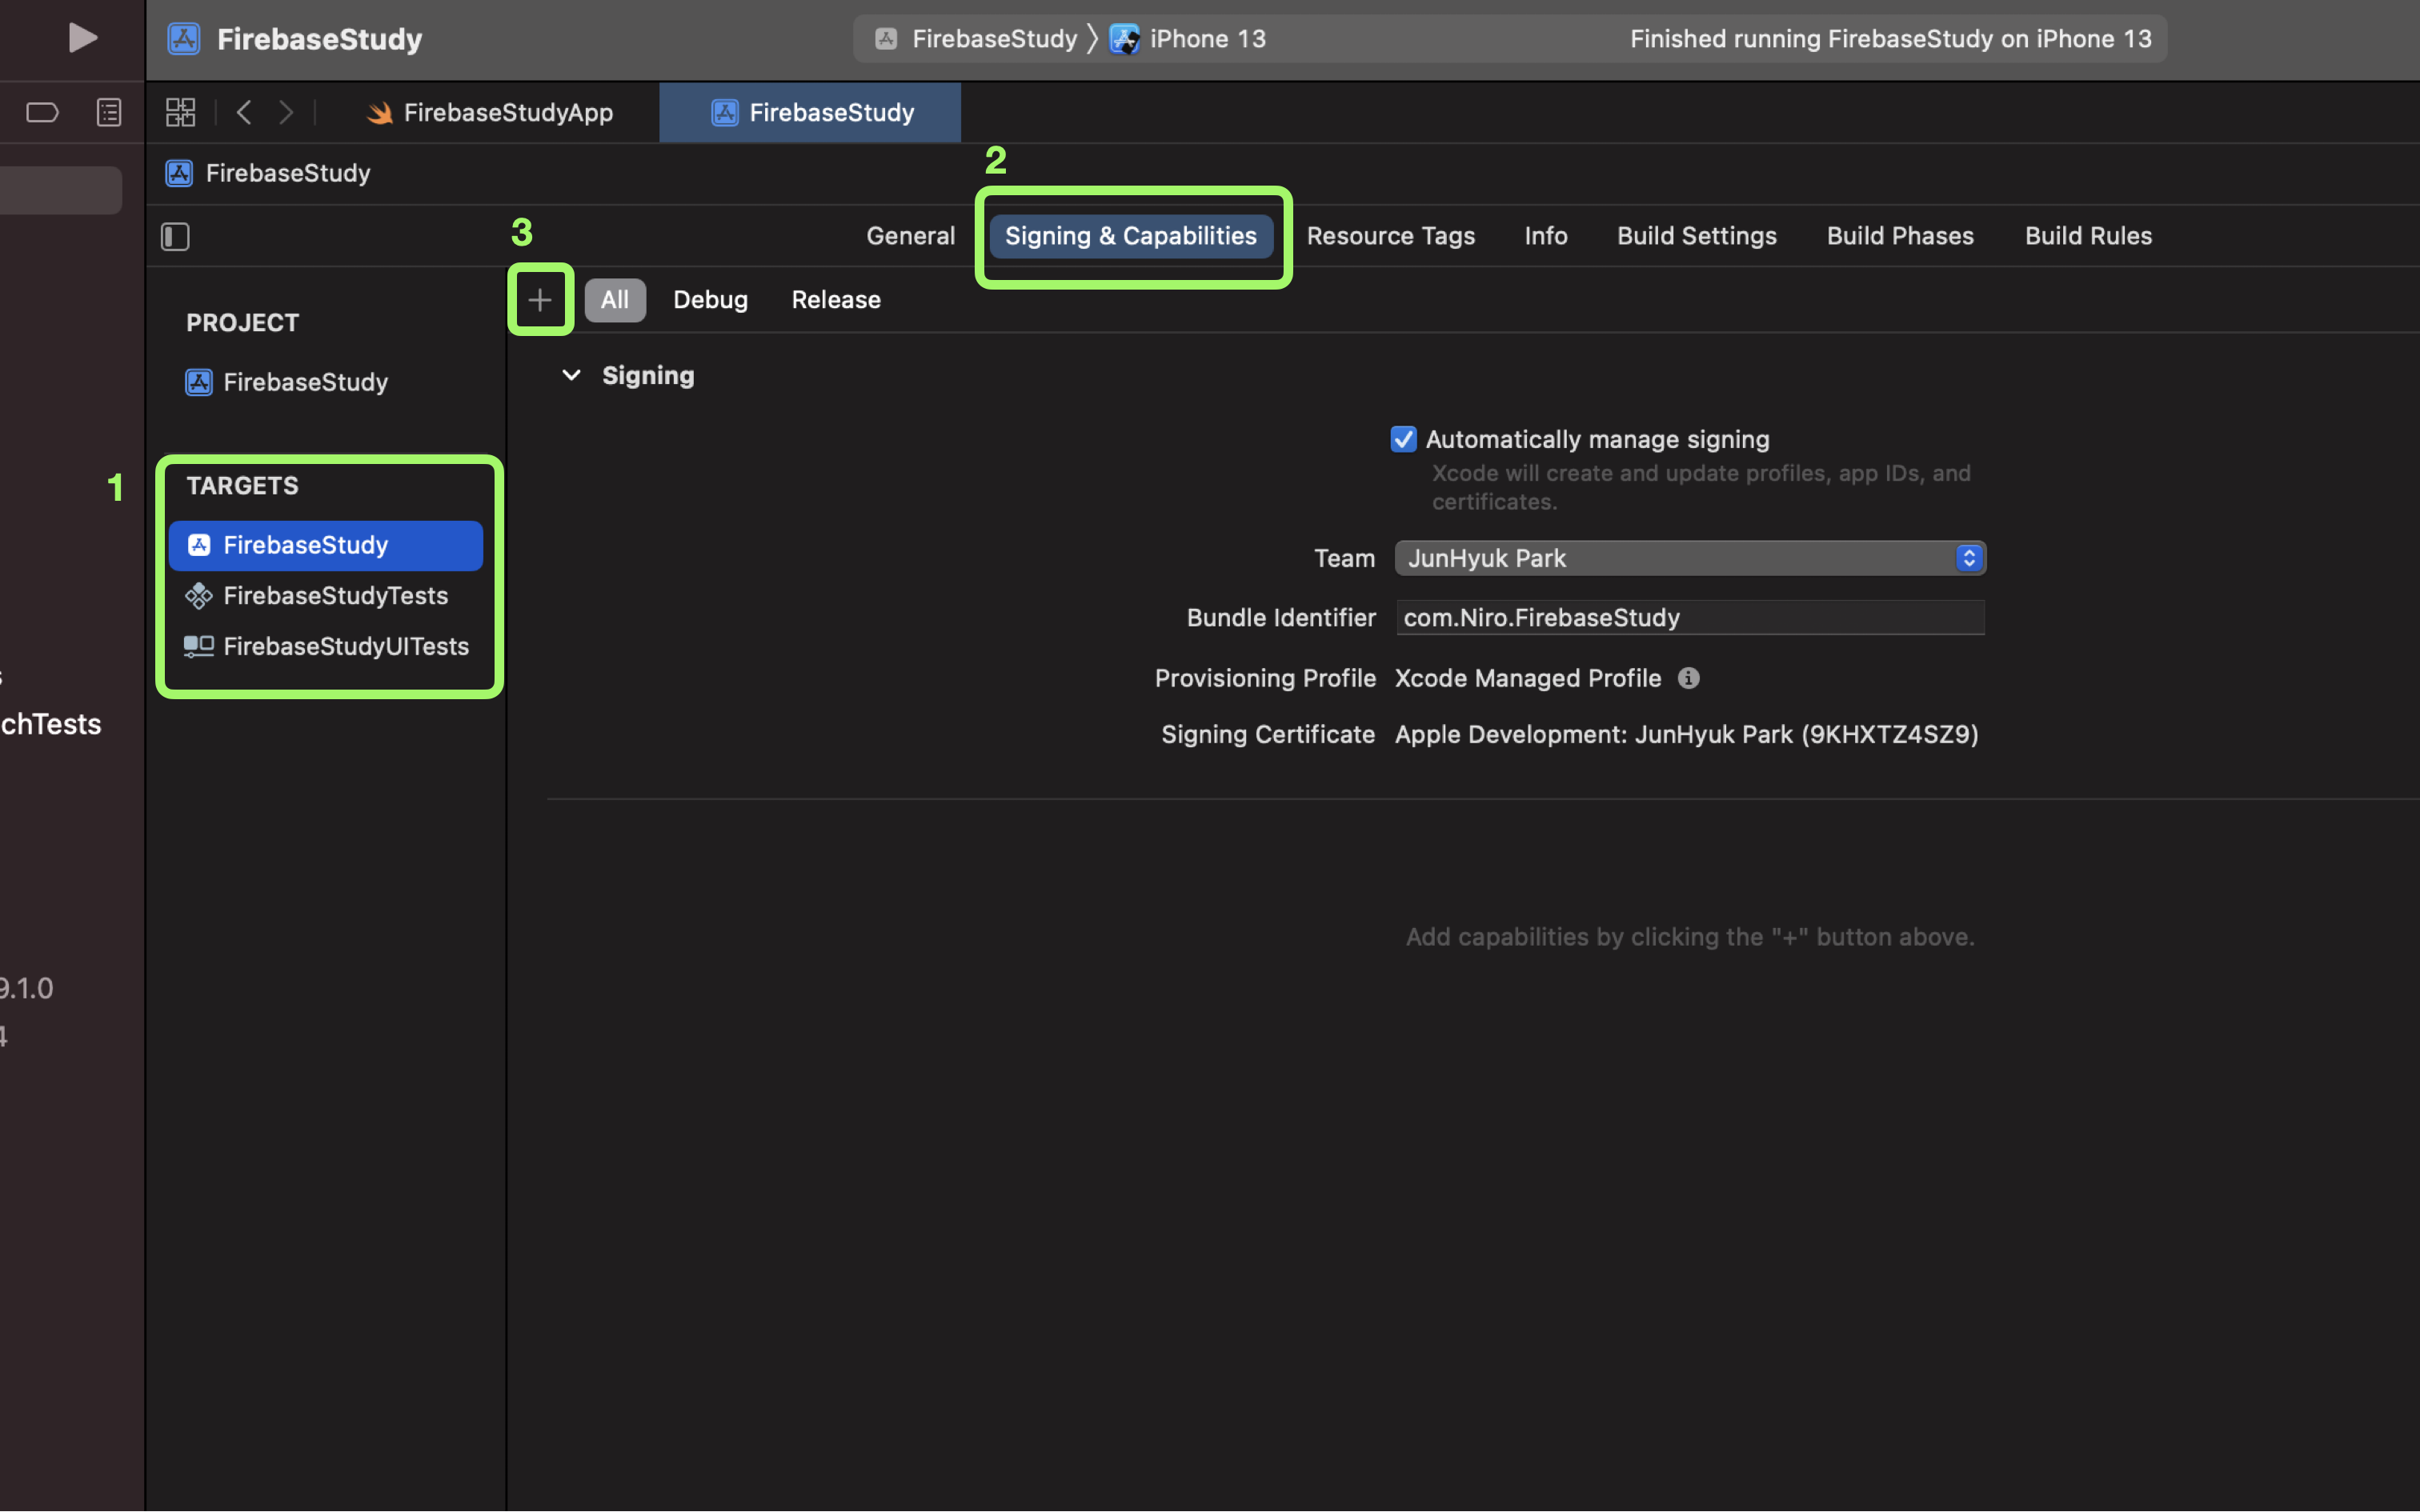
- Xcode Project 파일에 들어가 TARGETS 에서 Project 이름을 선택 후 목차에서 Signing & Capabilities 선택합니다.
- 중간의 Plus 버튼 을 눌러 기능 추가해줍니다.
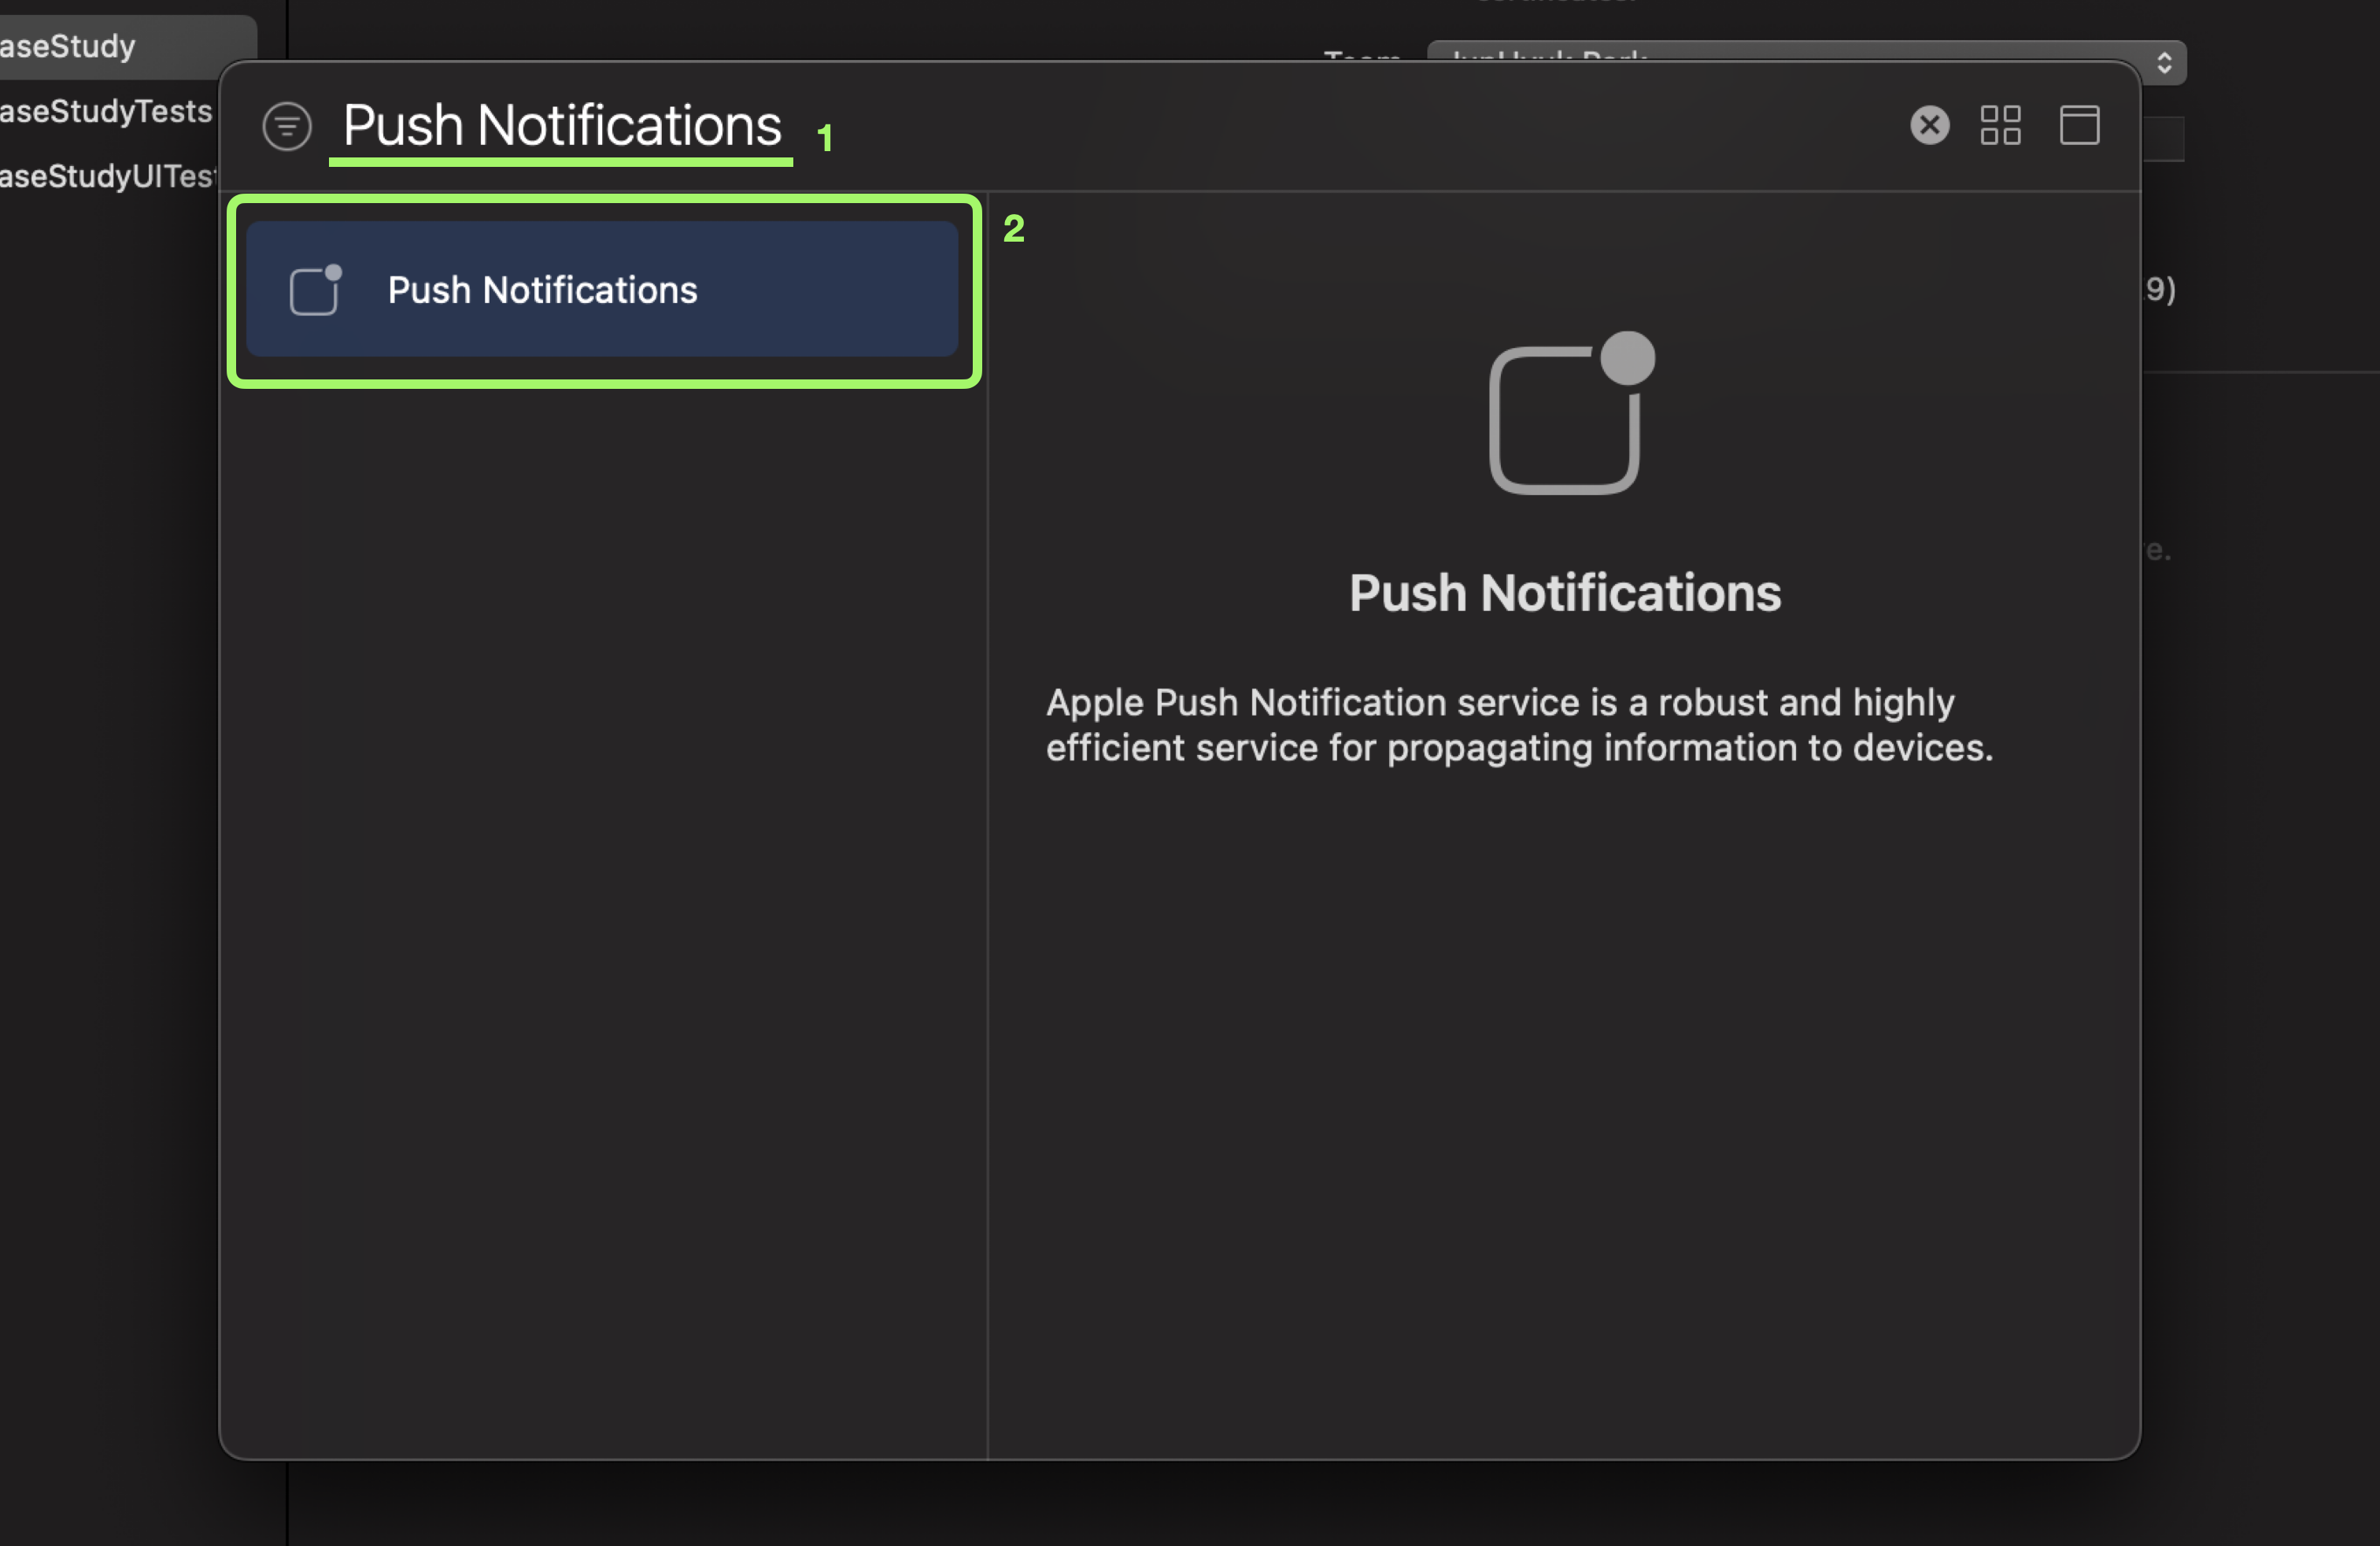
- 다음과 같이 Push Notifications 을 검색하고 설치하고
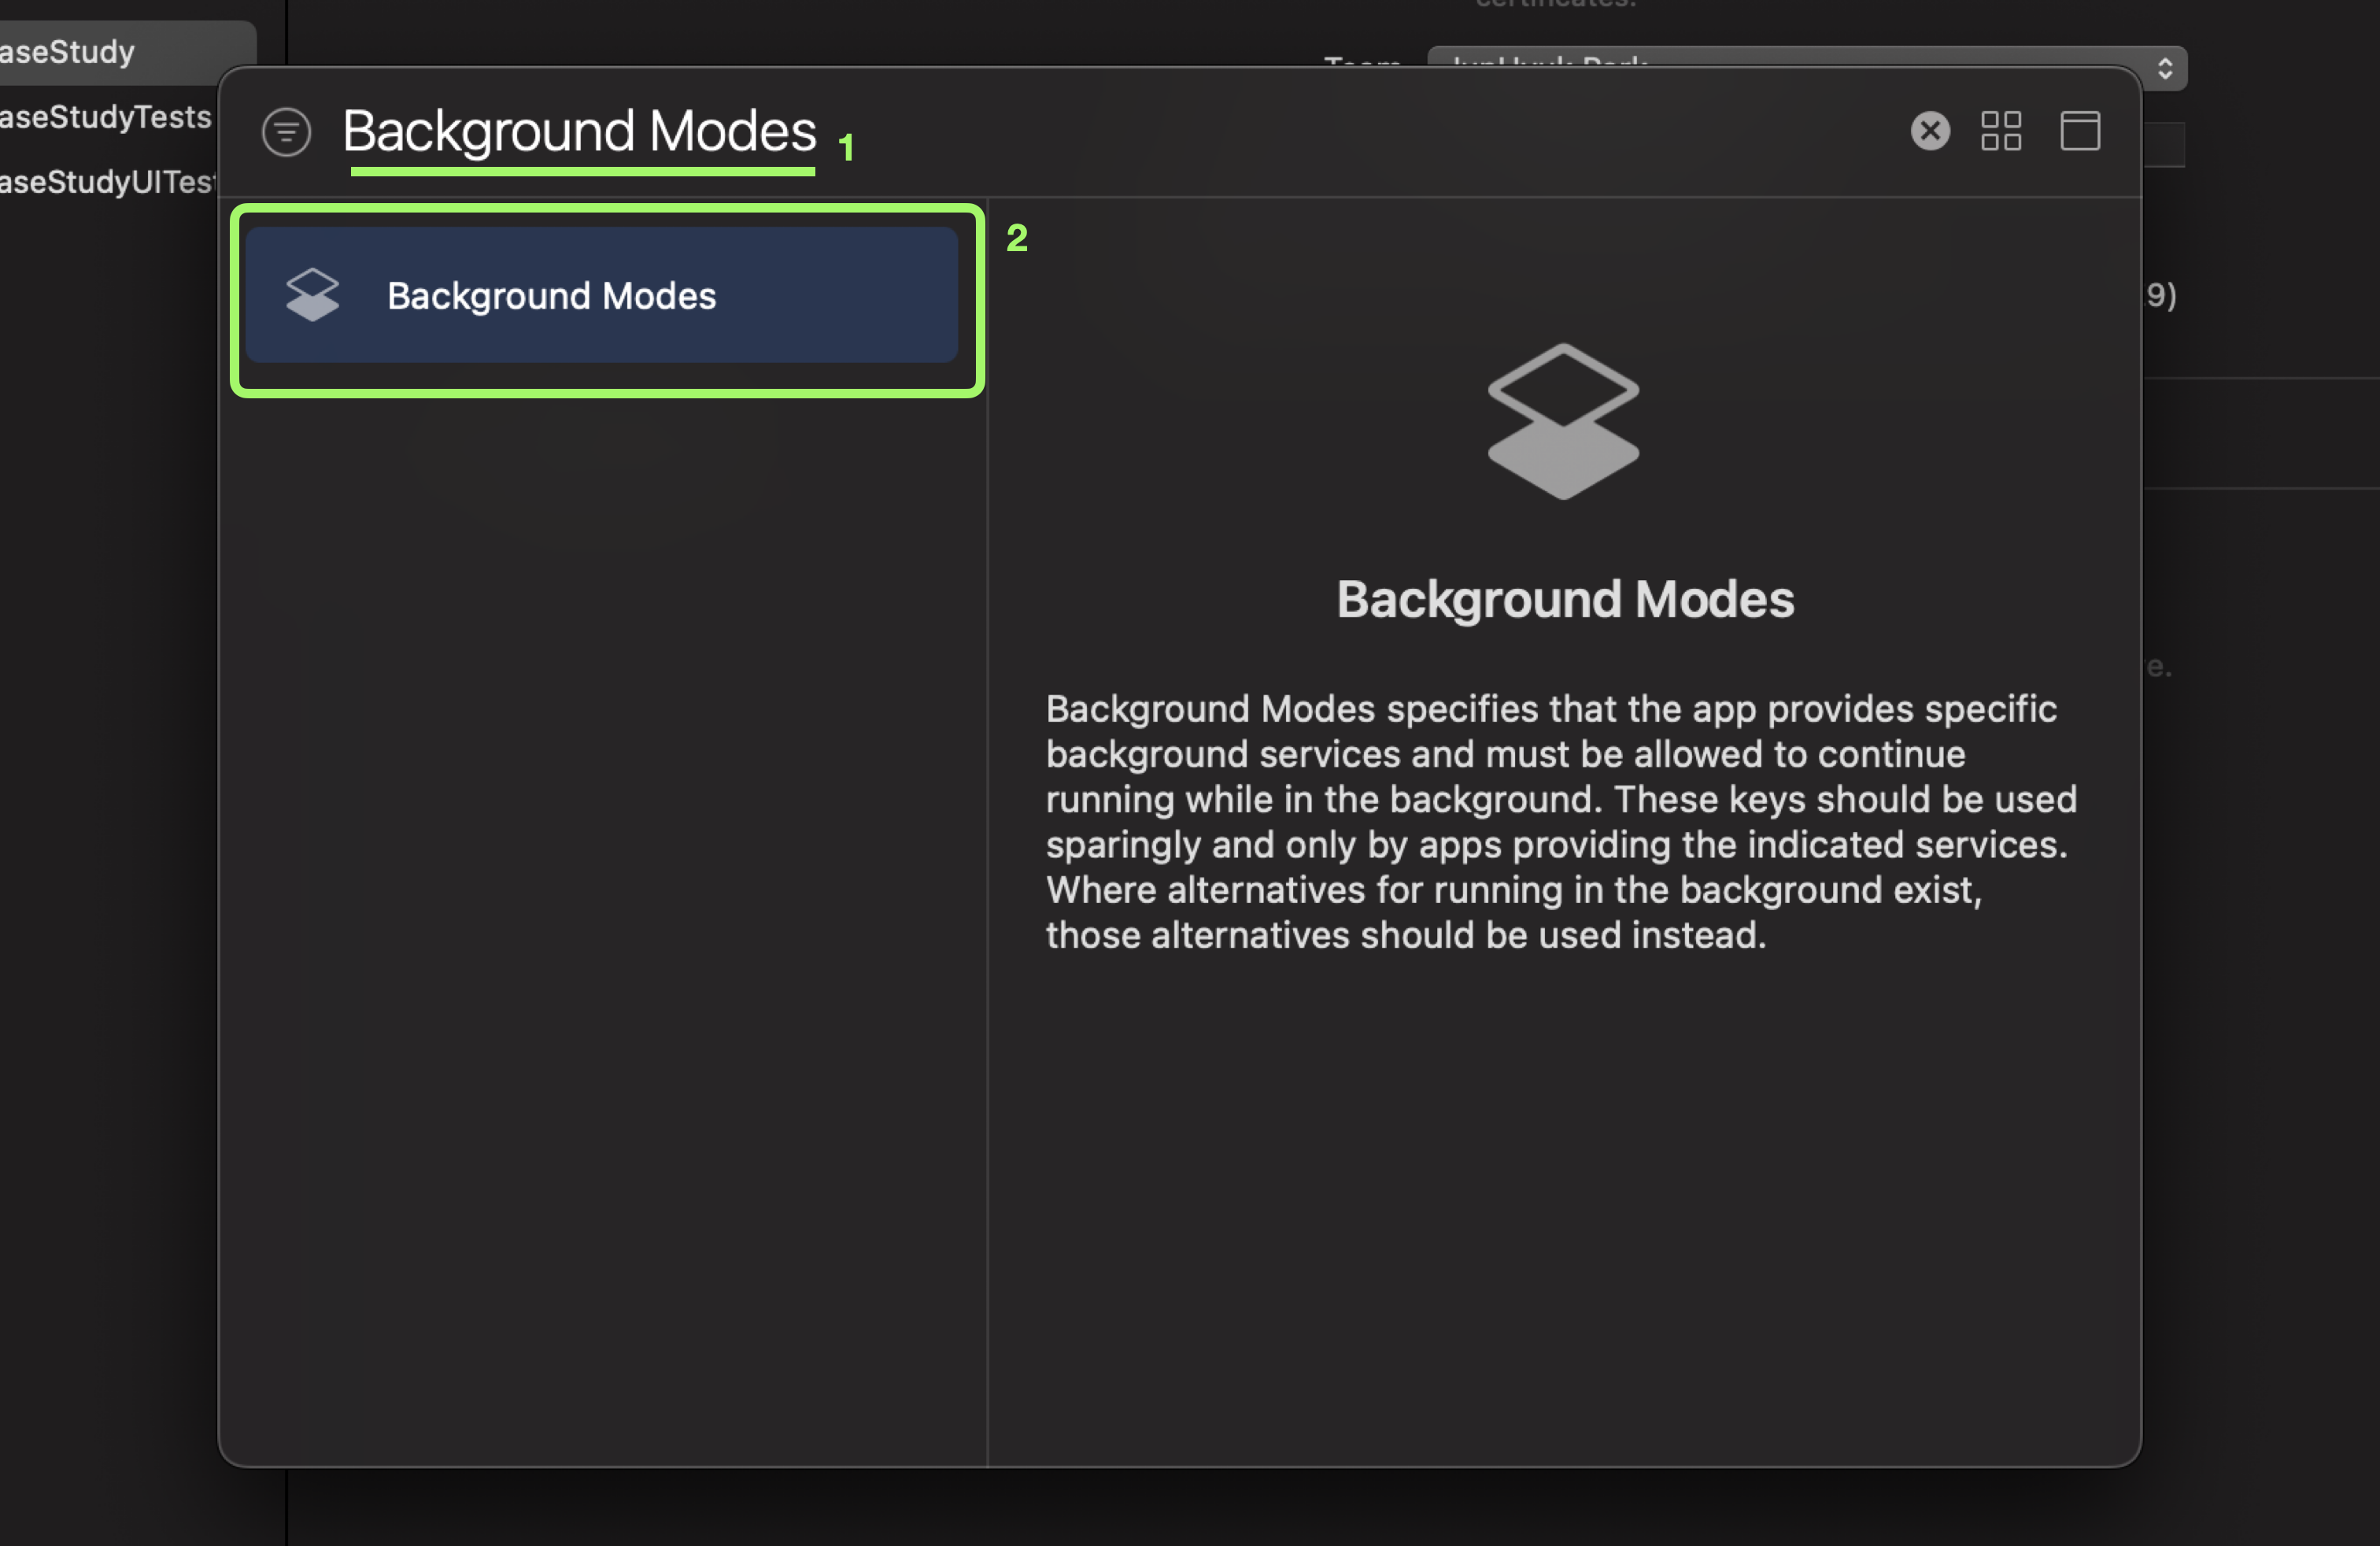
- Background Modes 도 검색하고 설치하세요.
3. FCM 토큰을 받기 위한 코드 추가
3-1. 프로젝트명App 파일에 코드 추가
import SwiftUI
import Firebase
import FirebaseMessaging

@main
struct SOCprojectUIApp: App {
    @UIApplicationDelegateAdaptor(AppDelegate.self) var appDelegate

    var body: some Scene {
        WindowGroup {
            ContentView()
        }
    }
}

// Configuring Firebase Push Notification...
// See my Full Push Notification Video...
// Link in Description...

class AppDelegate: NSObject, UIApplicationDelegate{

    let gcmMessageIDKey = "gcm.message_id"

    // 앱이 켜졌을 때
    func application(_ application: UIApplication, didFinishLaunchingWithOptions launchOptions: [UIApplication.LaunchOptionsKey : Any]? = nil) -> Bool {

        // 파이어베이스 설정
        FirebaseApp.configure()

        // Setting Up Notifications...
        // 원격 알림 등록
        if #available(iOS 10.0, *) {
            // For iOS 10 display notification (sent via APNS)
            UNUserNotificationCenter.current().delegate = self

            let authOption: UNAuthorizationOptions = [.alert, .badge, .sound]
            UNUserNotificationCenter.current().requestAuthorization(
                options: authOption,
                completionHandler: {_, _ in })
        } else {
            let settings: UIUserNotificationSettings =
            UIUserNotificationSettings(types: [.alert, .badge, .sound], categories: nil)
            application.registerUserNotificationSettings(settings)
        }

        application.registerForRemoteNotifications()


        // Setting Up Cloud Messaging...
        // 메세징 델리겟
        Messaging.messaging().delegate = self

        UNUserNotificationCenter.current().delegate = self
        return true
    }

    // fcm 토큰이 등록 되었을 때
    func application(_ application: UIApplication, didRegisterForRemoteNotificationsWithDeviceToken deviceToken: Data) {
        Messaging.messaging().apnsToken = deviceToken
    }

}

// Cloud Messaging...
extension AppDelegate: MessagingDelegate{

    // fcm 등록 토큰을 받았을 때
    func messaging(_ messaging: Messaging, didReceiveRegistrationToken fcmToken: String?) {

        print("토큰을 받았다")
        // Store this token to firebase and retrieve when to send message to someone...
        let dataDict: [String: String] = ["token": fcmToken ?? ""]

        // Store token in Firestore For Sending Notifications From Server in Future...

        print(dataDict)

    }
}

// User Notifications...[AKA InApp Notification...]

@available(iOS 10, *)
extension AppDelegate: UNUserNotificationCenterDelegate {

    // 푸시 메세지가 앱이 켜져있을 때 나올떄
  func userNotificationCenter(_ center: UNUserNotificationCenter,
                              willPresent notification: UNNotification,
                              withCompletionHandler completionHandler: @escaping (UNNotificationPresentationOptions)
                                -> Void) {

    let userInfo = notification.request.content.userInfo


    // Do Something With MSG Data...
    if let messageID = userInfo[gcmMessageIDKey] {
        print("Message ID: \(messageID)")
    }


    print(userInfo)

    completionHandler([[.banner, .badge, .sound]])
  }

    // 푸시메세지를 받았을 떄
  func userNotificationCenter(_ center: UNUserNotificationCenter,
                              didReceive response: UNNotificationResponse,
                              withCompletionHandler completionHandler: @escaping () -> Void) {
    let userInfo = response.notification.request.content.userInfo

    // Do Something With MSG Data...
    if let messageID = userInfo[gcmMessageIDKey] {
        print("Message ID: \(messageID)")
    }

    print(userInfo)

    completionHandler()
  }
}- 다양한 방법의 코드들이 있는 것으로 알고 있습니다.
- 해당 코드는 예전에 사용했던 코드로 프로젝트명App file 에 추가하세요.
출처 : https://designcode.io/swiftui-advanced-handbook-push-notifications-part-2
3-2. 스마트폰에 직접 앱 설치 후 log 에 토큰 값 확인
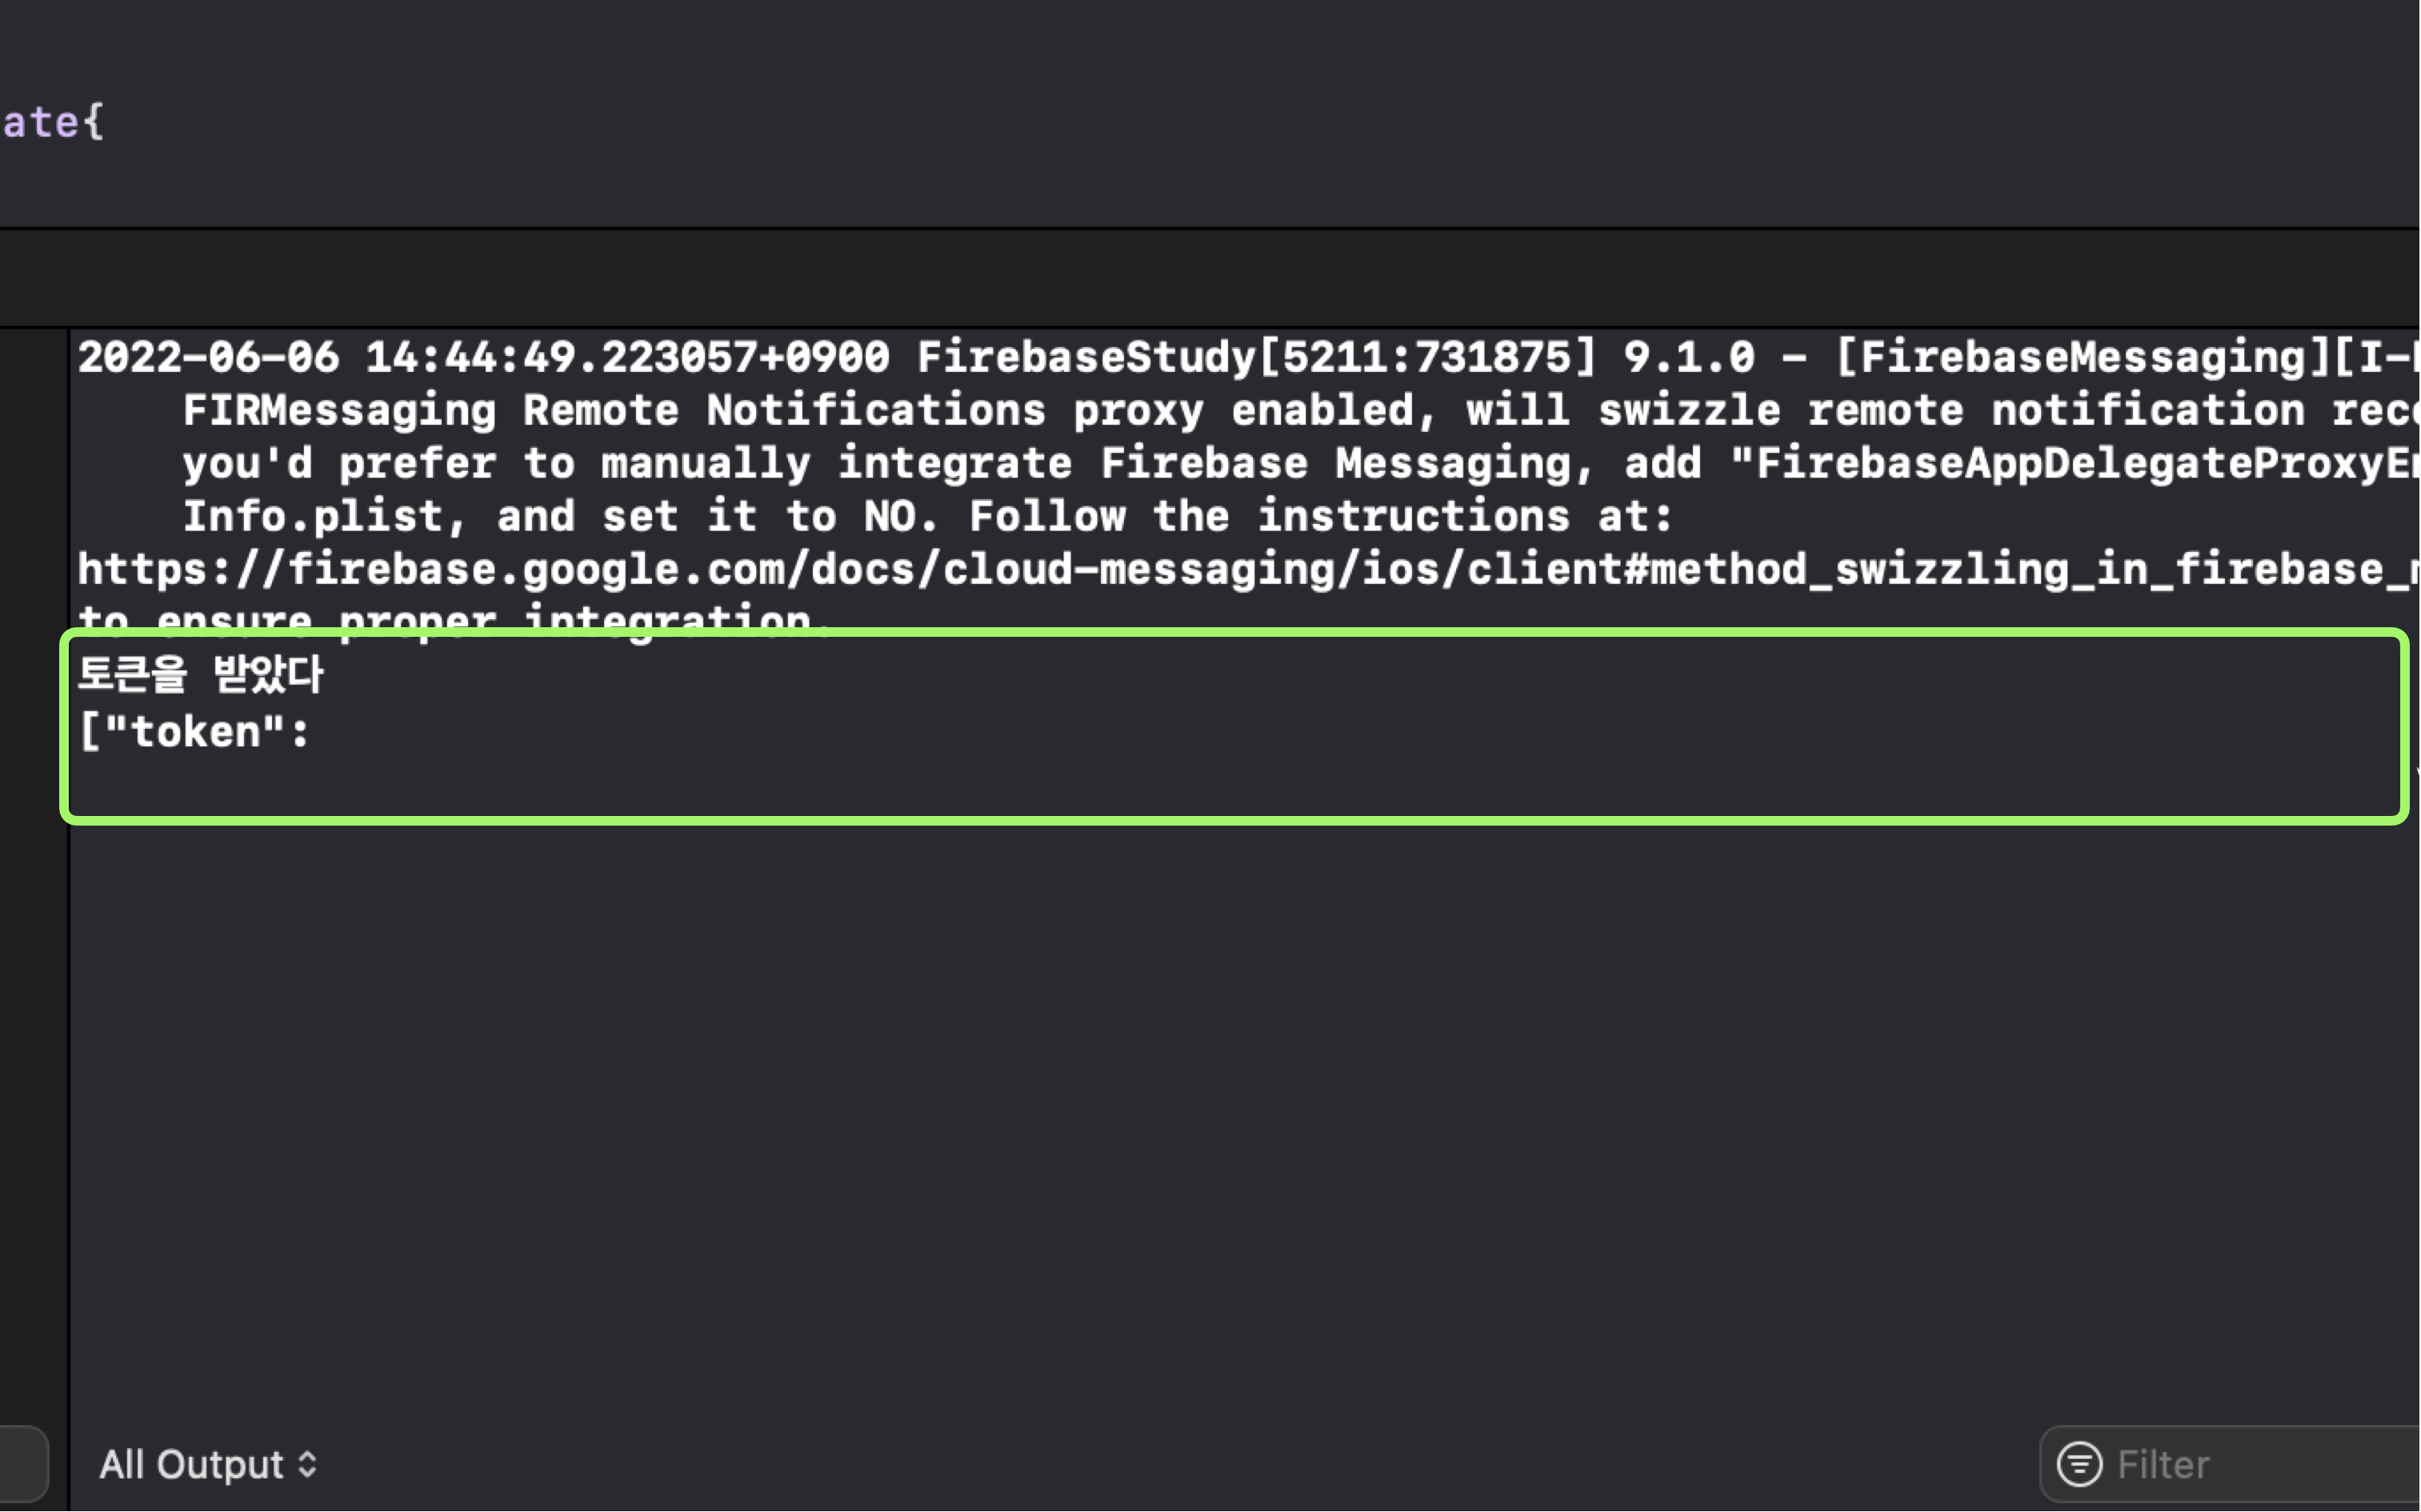
- 스마트폰을 직접 MAC 에 연결하고 아이폰으로 실행을 시키면 앱이 설치 됩니다.
- 그 후 해당 이미지 처럼 토큰을 받았다는 Log 창이 켜지게 되고 ( token 값도 보안사항이기 때문에 가려 놓은 상태 )
- 해당 토큰 값을 복사해주세요!
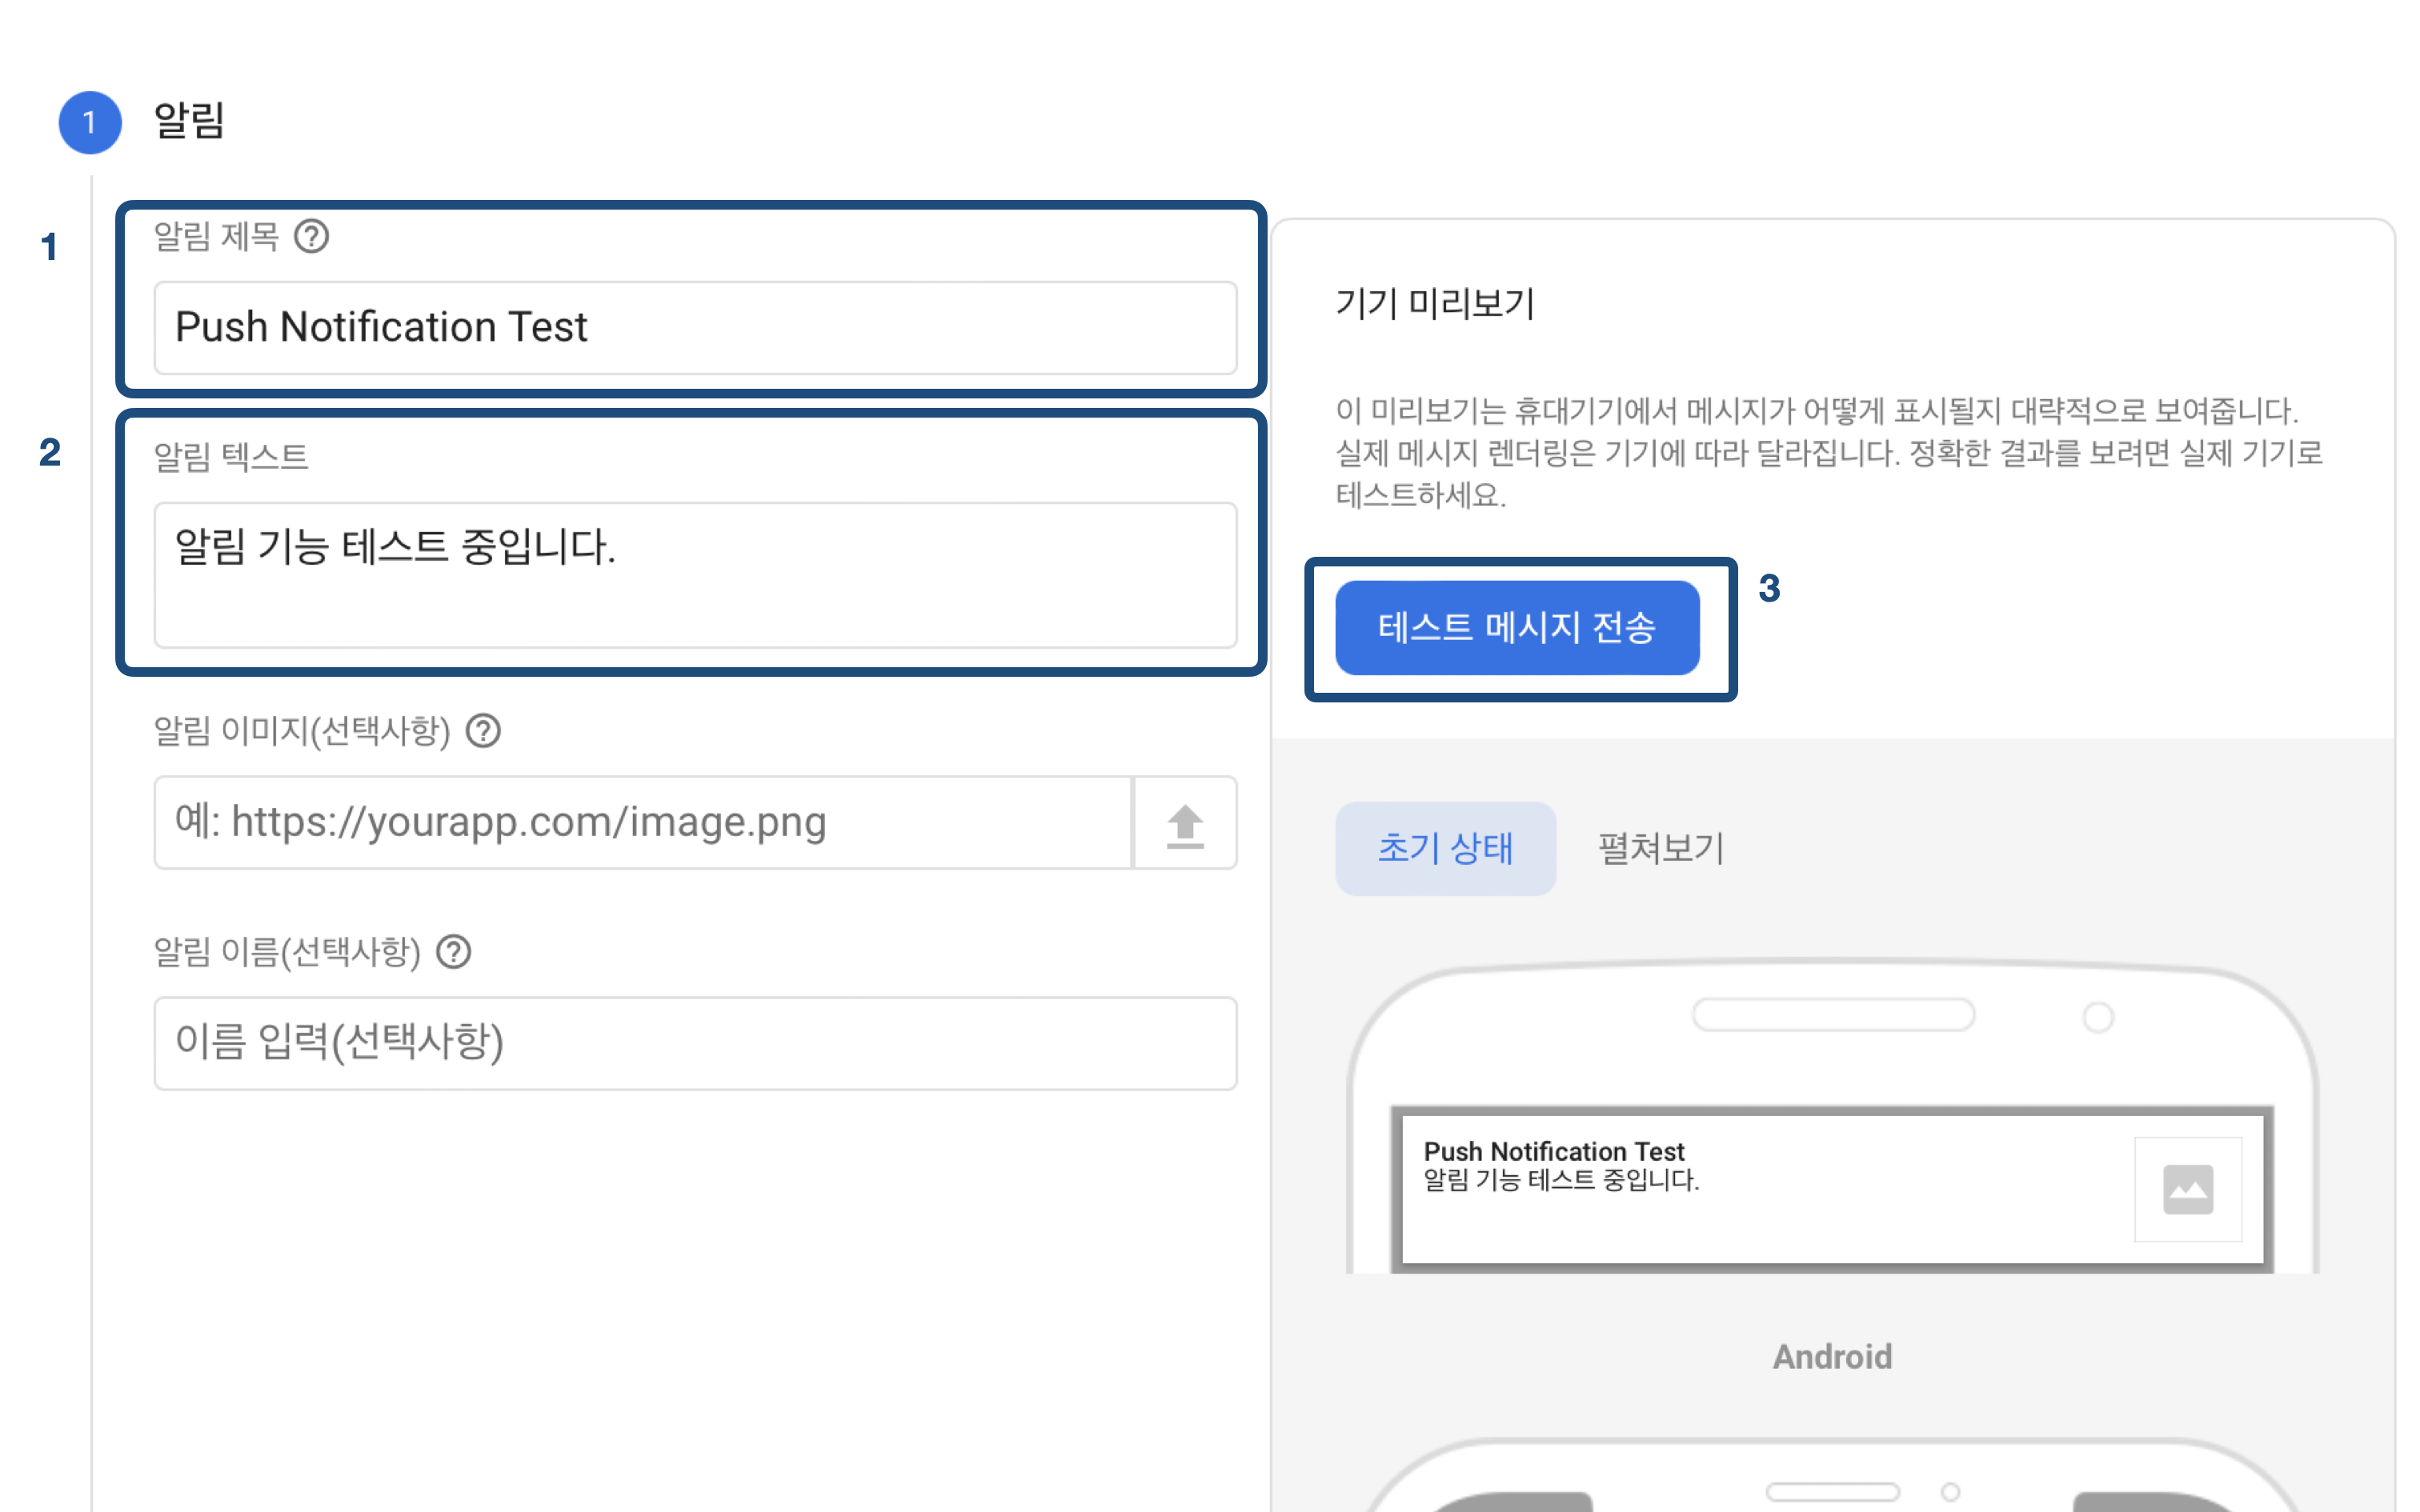
- Firebase 홈페이지 옆 메뉴 하단에 있는 Cloud Messaging 를 클릭하세요.
- 위의 이미지와 같이 알림 제목과 텍스트를 적고 테스트 메세지 전송 버튼 누르세요.
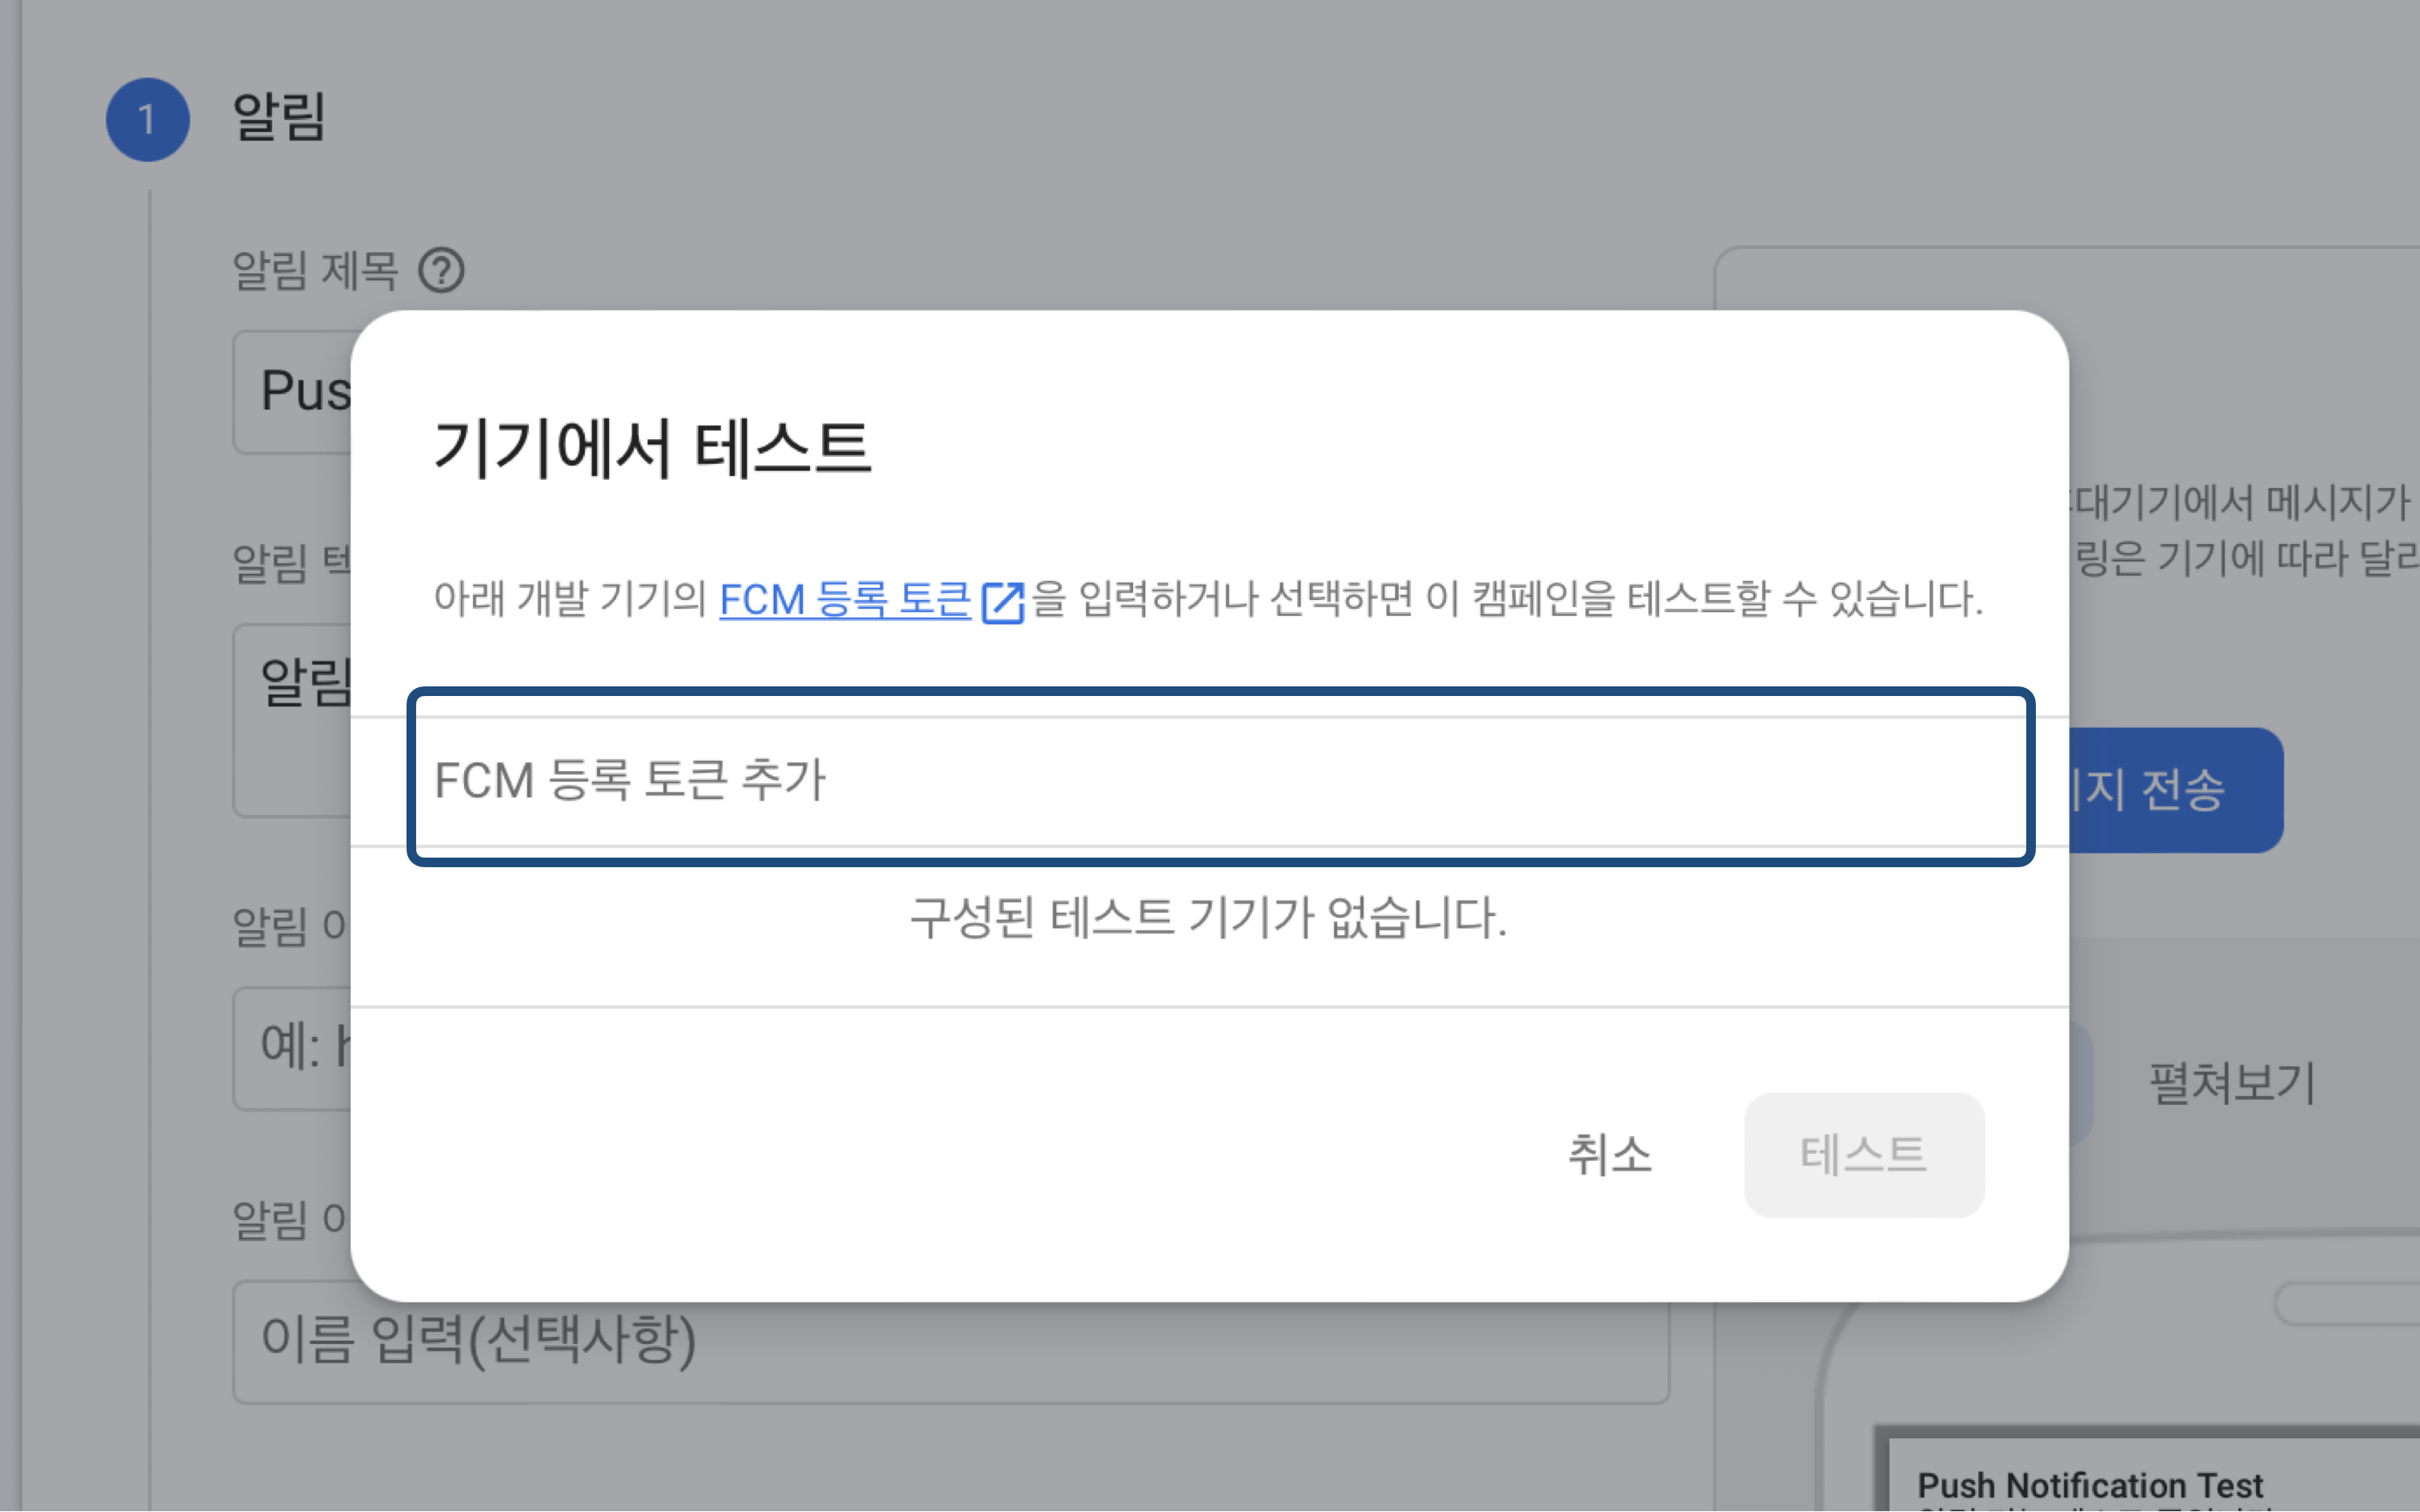
- 위의 이미지와 같은 알림창이 뜨게 되고 위에서 복사한 토큰 값을 입력 하고, + 버튼 누르게 되면 토큰이 추가 됩니다.
- 해당 토큰을 체크하고 테스트 버튼을 누르면 몇초 뒤에 알림이 전송 됩니다.
3-3. Push Notification 결과
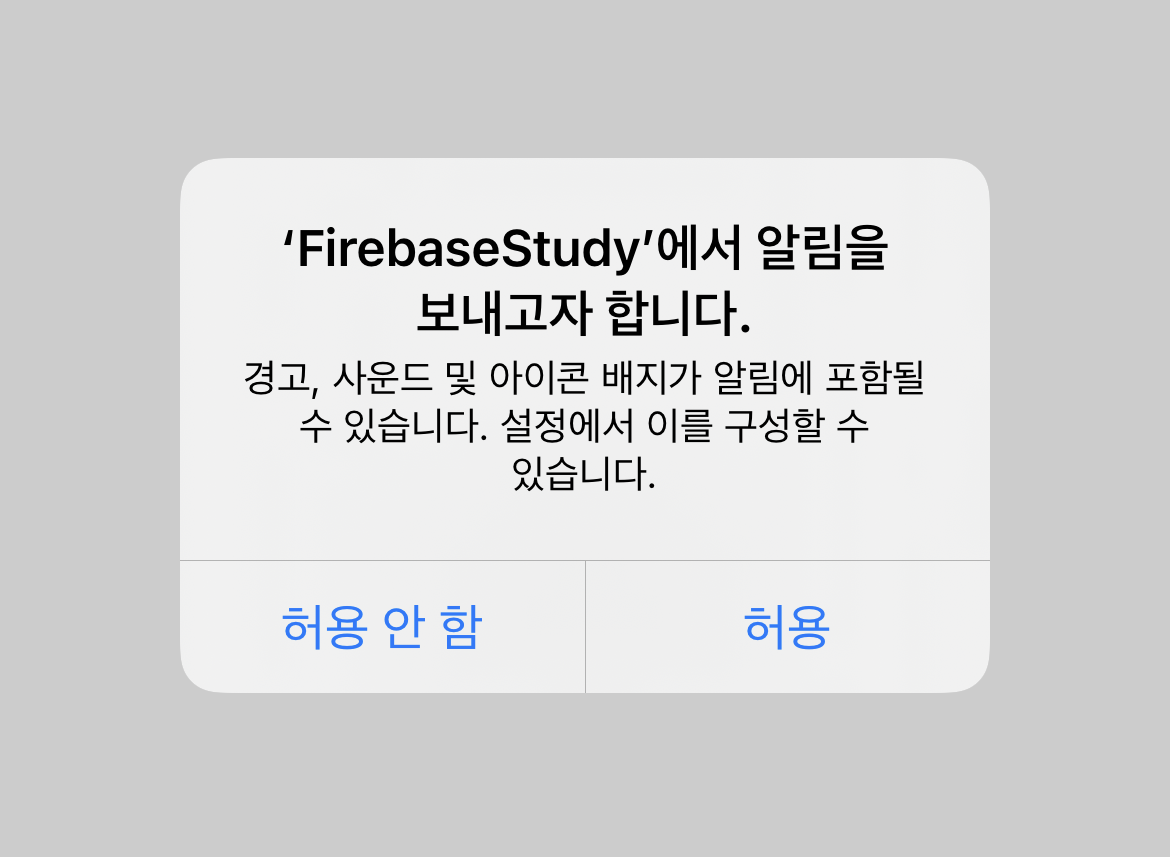
처음 App 을 실행하면 알림에 관한 사용자 권한 허용 경고창이 뜨게되고 허용을 눌러주세요.
3-3-1. App 실행 도중 알림이 오는 상황
3-3-2. 잠금화면 상태에서 알림이 오는 상황

📱iOS Developer, 🍎 Apple Developer Academy @ POSTECH 1st, 💻 DO SOPT 33th iOS Part
너무 유익하고 그림 설명이 깔끔하고 좋아요 !