HTTP 요청은 기본적으로 요청이 가고 응답이 돌아오는 형태다. 하지만, 때로는 바로 원하는 응답을 해줄 수 없는 상황일 때가 있는데 이런 경우 polling 기법을 사용해 응답을 기다릴 수 있다.
Long Polling
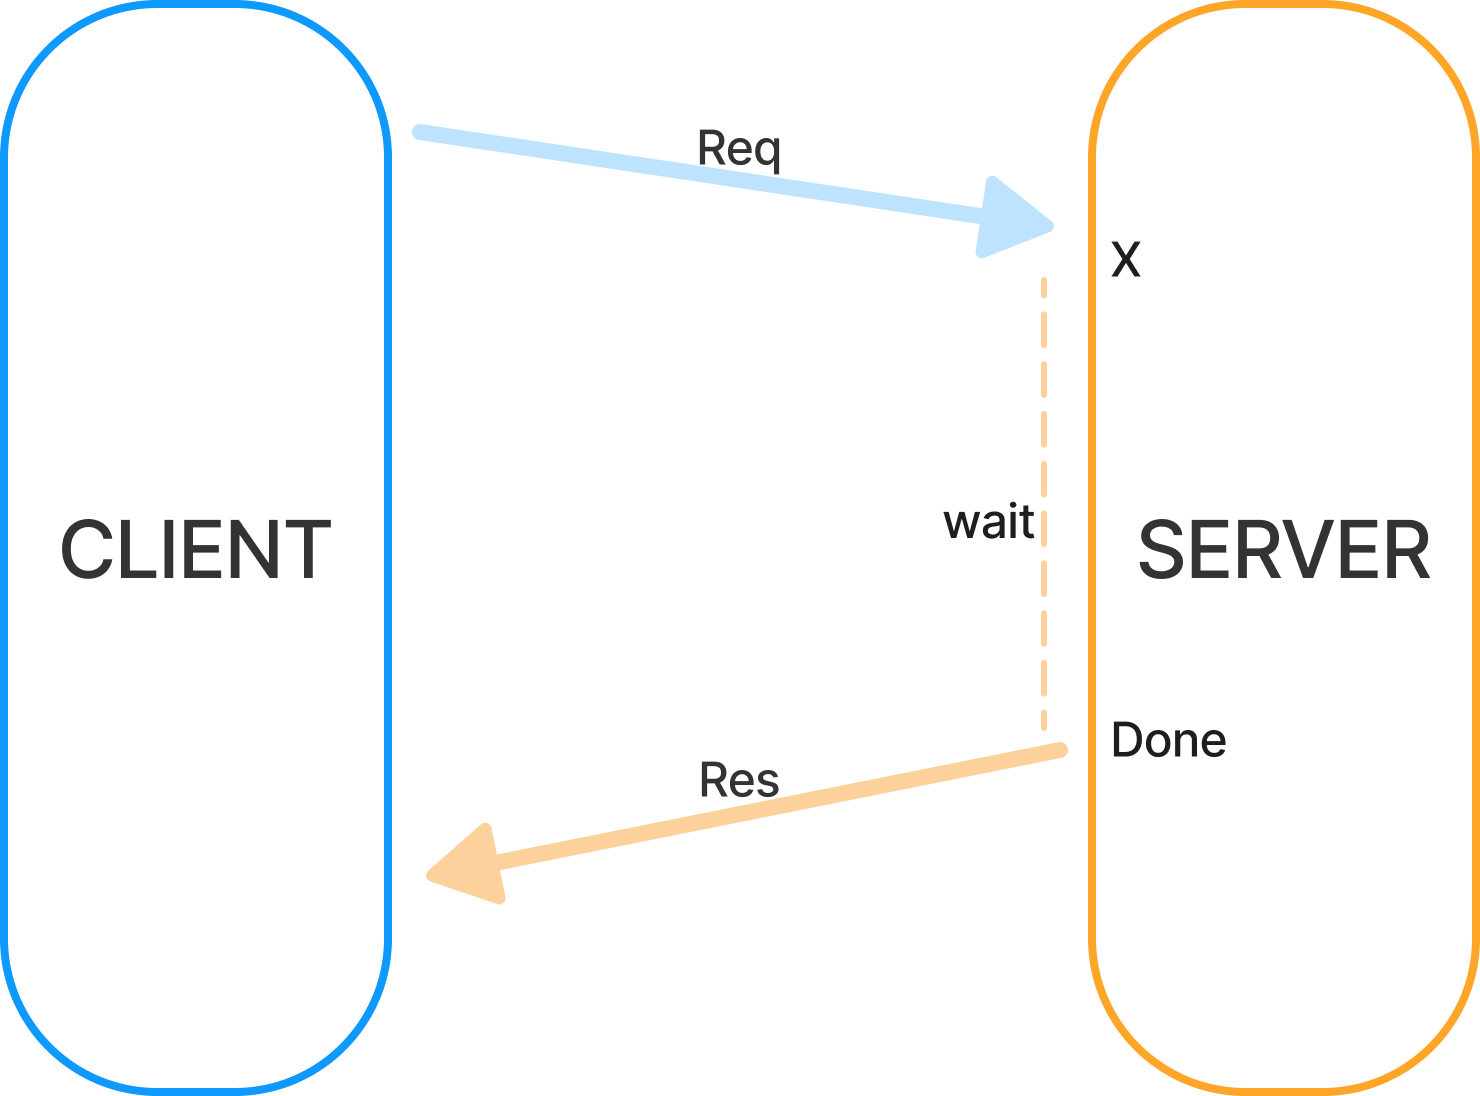
먼저, long polling은 요청을 보낸 후 서버가 응답 준비가 될 때까지 기다렸다가 응답을 보내는 것이다. 예를들어, 큐에 작업을 등록하는 API가 있다. 이때, 작업을 등록한 이후 작업이 완료되기를 기다리는 API 요청은 long polling으로 구현할 수 있다.
// [Client] api/task.ts
async function waitQueue(
  queueId: string,
  timeout: number=30000
): Promise<Task> {
  try {
    const url = `/api/queue?id=${queueId}&ttl=${timeout}`;
    const response = await fetch(url, { method: 'GET' });
    if (response.status === 408) {
      throw new Error('polling timeout');
    }
    return response.json();
  } catch (error) {
    return null;
  }
}
// [Server] task.controller.ts
@Get('/queue')
async pollImage(
  @Query('id') queueId: string,
  @Query('ttl') ttl: number,
  @Req() req: Request,
  @Res() res: Response,
) {
  const isValidQueue = await this.queueService.validateQueueId(queueId);
  if (!isValidQueue) {
    throw new BadRequestException('Invalid queueId');
  }

  const start = Date.now();
  const timeout = Number(ttl || 30000);
  await waitResult();

  async function waitResult() {
    const result = await this.queueService.isCompleted(queueId);
    if (result) {
      res.status(200).json(result);
    } else if (start + timeout > Date.now()) {
      setTimeout(waitResult, 1000);
    } else {
      res.status(408).end();
      throw new RequestTimeoutException('polling timeout');
    }
  };
}
이처럼 long polling에서 클라이언트는 일반적인 요청을 보내고 응답을 기다리기만 하고, 작업의 결과를 기다리는 핵심 로직은 서버단에서 처리가 된다.
Short Polling
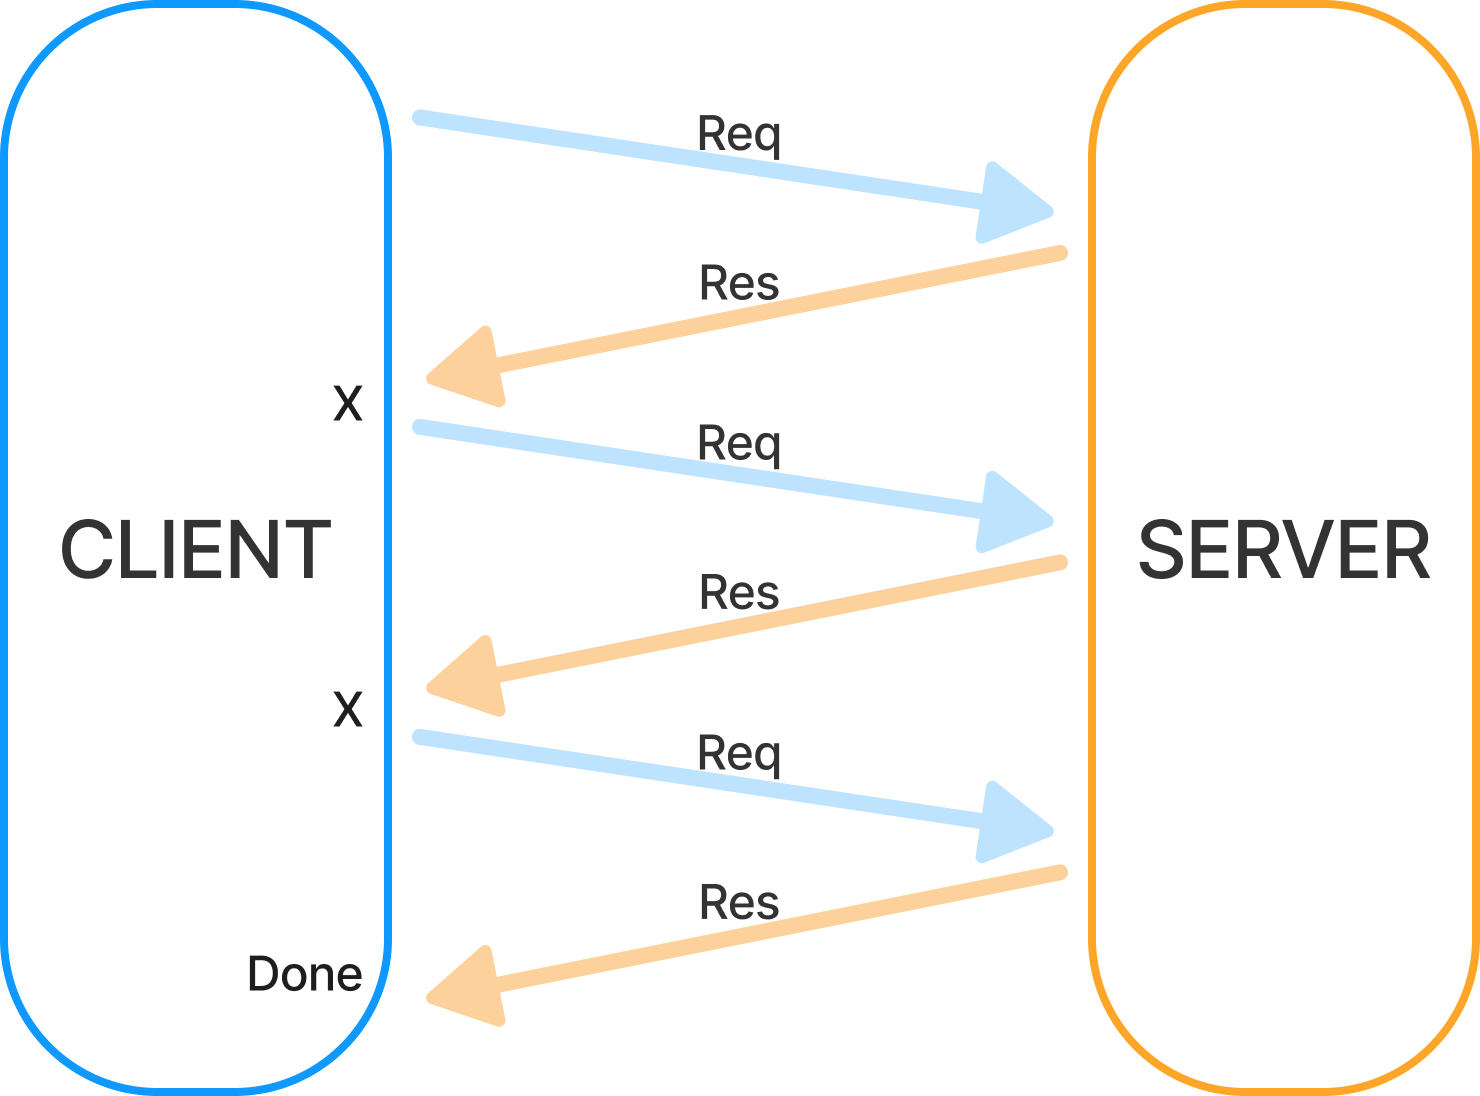
반면에 short polling에서 서버는 단순 응답만을 수행하고, 작업이 끝났는지 판단은 클라이언트에서 한다. 따라서 작업이 끝났음을 확인하기 전까지 클라이언트는 반복적으로 요청을 보낸다.
// [Client] api/task.ts
async function waitQueue (
  queueId: string,
  timeout: number=120000,
  pollingInterval: number=5000,
): Promise<Task> {
  try {
    const url = `/api/queue?id=${queueId}`;
    const maxAttempts = Math.ceil(timeout / pollingInterval);

    for (let attempts = 0; attempts < maxAttempts; attempts++) {
      const response = await fetch(url, { method: 'GET' });

      if (response.status === 204) {
        await new Promise((resolve) => setTimeout(resolve, pollingInterval));
      } else if (response.status === 200) {
        return response.json();
      } else if (response.status === 400) {
        throw new Error('invalid queueId');
      } else {
        throw new Error('unexpected error');
      }
    }

    throw new Error('pollImage polling timeout');
  } catch (error) {
    return null;
  }
}
// [Server] task.controller.ts
@Get('/queue')
async waitQueue(
@Query('id') queueId: string,
@Req() req: Request,
@Res() res: Response,
) {
const result = await this.queueService.retrieve(queueId);
if (result === null) {
throw new BadRequestException(`Invalid queueId: ${queueId}`);
}
if (result.s3Key === null) {
res.status(204).end();
// res.status(202).send(result.waitingCount);
return;
}
res.status(200).json(result);
}short polling은 복수의 응답을 보내기 때문에 이때 작업의 진행 경과 등을 클라이언트에게 전달할 수도 있다. 하지만, 일반적으로 여러번에 걸친 요청과 응답을 처리해야하기 때문에, 만약 작업의 경과처럼 어떤 정보를 주기적으로 그리고 실시간으로 받아오는 것이 중요하다면 sse를 사용하는 것이 더 효율적일 수가 있다.
Server Side Event(SSE)
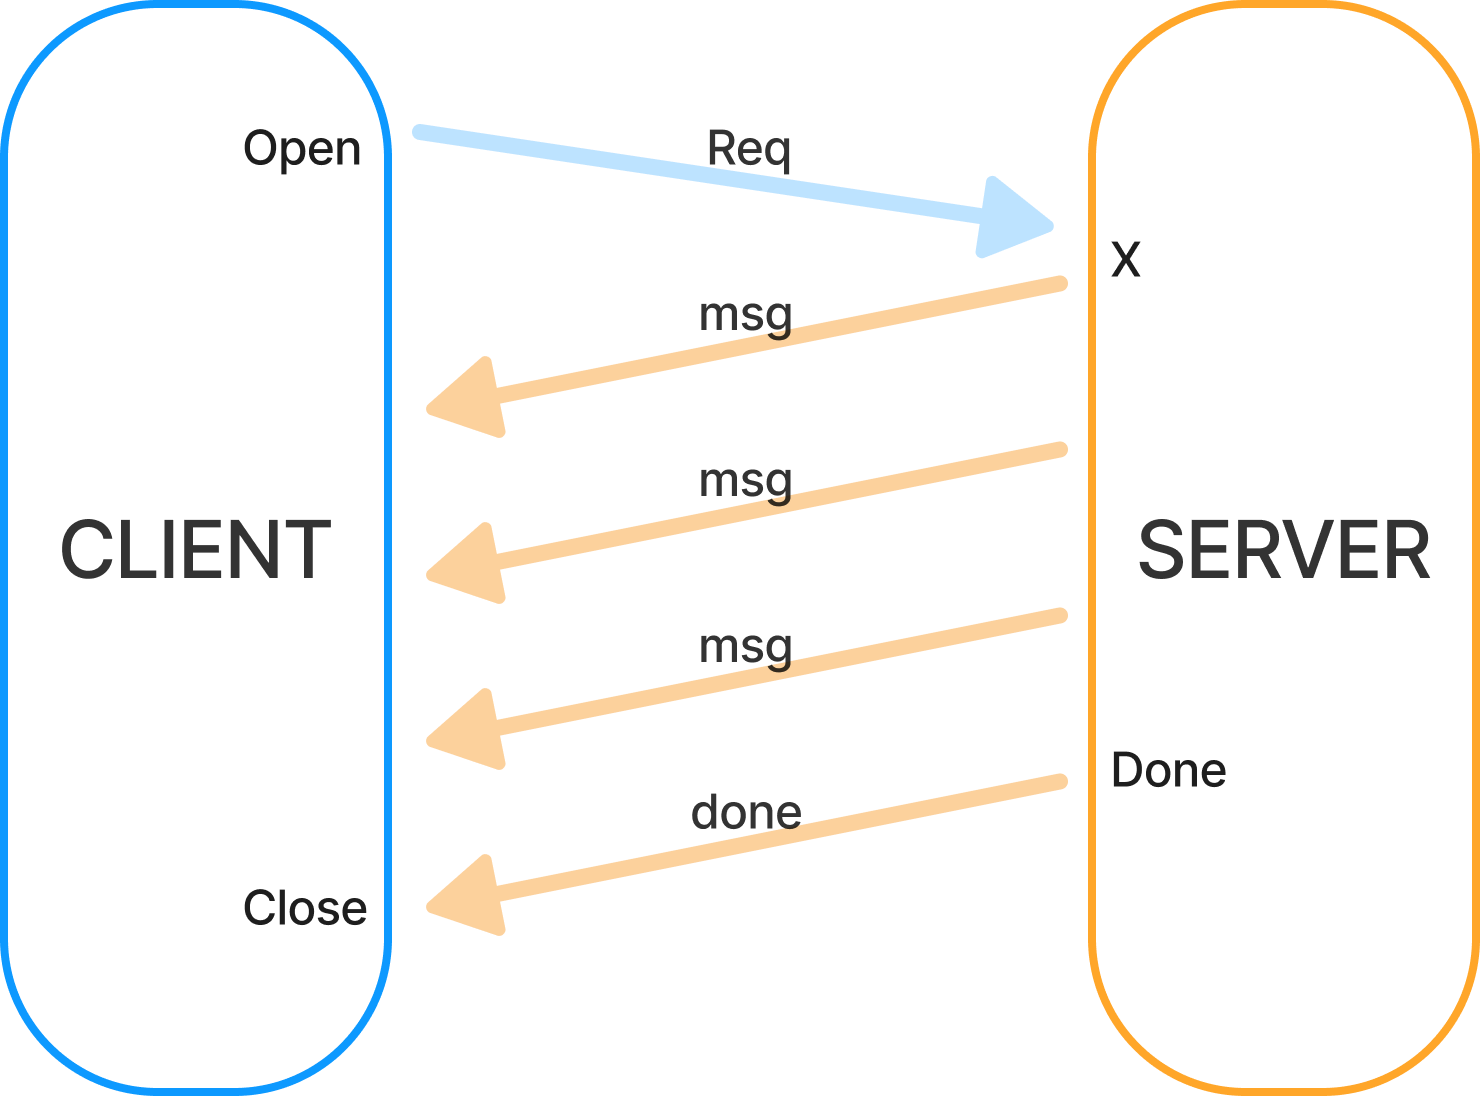
server side event(sse)는 실시간 통신을 지원하기 위한 프로토콜로서 종종 웹소캣과 비교된다. 하지만, 양방향 통신이 자유롭게 가능한 웹소캣과는 다르게 sse는 최초 클라이언트의 요청 이후 오직 서버에서 클라이언트로의 단방향 통신만 가능하다. 또한, 별개의 서버를 갖춰야하는 웹소캣과 다르게 sse는 기존 서버 안에서 간단하게 사용할 수 있기 때문에 데이터의 스트리밍이나 기타 단방향의 실시간 통신에서 웹소캣보다 적은 리소스를 사용할 수 있다.
sse는 EventSource API를 통해 보낼 수 있으며, Nestjs에서는 Rxjs와 혼합한 사용환경을 제공한다.
// [Client] api/task.ts
function waitQueue(queueId: string, waitHandler: any): Promise<Task> {
  return new Promise((resolve, reject) => {
    const sse = new EventSource(`/api/queue?id=${queueId}`);

    sse.addEventListener('wait', ({ data }) => waitHandler(data as string));
    sse.addEventListener('done', ({ data }) => {
      resolve(data as Task);
      sse.close();
    });
    sse.addEventListener('error', (event) => {
      reject();
      sse.close();
    });
  });
}
// [Server] task.controller.ts
@Sse('/queue')
waitQueue(
@Req() req: Request,
@Res() res: Response,
): Observable<MessageEvent> {
let count = 0;
const isDone = new Subject<void>();
return interval(1000).pipe(
takeUntil(isDone),
map((value, index) => {
count += 1;
if (count > 10) {
isDone.next();
isDone.complete();
}
return {
data: String(count),
type: count < 10 ? 'wait' : 'done',
};
})
);
}Nestjs에서는 Rxjs와 혼합이 되어서 사용되며 Observable객체를 반환하도록 되어있으며, interval과 map operator를 사용하여 일정 주기마다 반복적인 응답을 보낼 수 있다.
단, interval을 쓰게되면 설령 클라이언트 쪽에서 EventSource를 닫더라도 서버에서는 응답이 계속 보내진다. 따라서, pipe에 takeUntil operator를, 혹은 다른 방식으로라도 서버에서 언제 interval를 중단할지를 정할 수 있어야한다. (이때, Nestjs의 특수한 환경 탓인지, 일반적인 Express 환경에서 사용할 때처럼 Request객체를 통해 close 이벤트를 들을 수가 없었다.)
export interface MessageEvent {
  data: string | object;
  id?: string;
  type?: string;
  retry?: number;
}
또, Nestjs는 응답을 MessageEvent라는 객체의 형태로 응답을 보내게하는데, 여기서 type를 조작하여 클라이언트 측에서 message가 아닌 다른 이름의 이벤트로 응답을 수신할 수 있다.
마지막으로, 만일 map operator 안에서 비동기 작업이 필요할 경우에 MessageEvent가 아닌 처리되지 않은 Promise 객체가 반환되면서 클라이언트에서 정상적으로 데이터 수신이 되지 않는다. 이 경우 mergeMap이라는 operator를 사용하면 정상적으로 비동기 작업을 처리하고 응답을 보낼 수 있다.
