과거 졸업작품 발표 시 제작한 CNN 다중 클래스 이미지 분류 모델을 언젠가 한 번 제대로 각 잡고 수정해야겠다는 생각이 있었다.
미루고 미루다가 드디어! 수정 작업을 시작하였다. 기능에는 큰 문제가 없었으나 클린 코드와 지나치게 동떨어진 느낌이 있어 이를 수정하고, 과거 google colab 환경에서 모델을 제작하였는데 이번에는 jupyter notebook에서 진행하였다.
우선 CNN을 활용한 이미지 분류 과정이다.
0. 필요한 라이브러리 호출하기
# 필요한 라이브러리 정리하기

import os.path
import cv2
import glob
import numpy as np
import pandas as pd
import matplotlib.pyplot as plt
from tqdm import tqdm
from time import perf_counter

import tensorflow as tf
from tensorflow.keras import layers
from tensorflow.keras import models

import keras_preprocessing
from keras_preprocessing import image
from keras_preprocessing.image import ImageDataGenerator
from sklearn.model_selection import train_test_split
1. 이미지가 저장되어 있는 경로 탐색
# 이미지가 저장되어 있는 디렉토리 검색하고, 데이터프레임으로 저장하기

filepaths = glob.glob("./finger_image/fimg/finger/*/*") # 이미지 저장 경로

def proc_img(filepath):

    labels = [str(filepath[i]).split("\\")[-2] for i in range(len(filepath))]

    filepath = pd.Series(filepath, name='Filepath').astype(str)
    labels = pd.Series(labels, name='Label')

    df = pd.concat([filepath, labels], axis=1)

    # index 재설정
    df = df.sample(frac=1,random_state=0).reset_index(drop = True)

    return df

df = proc_img(filepaths)
df.head()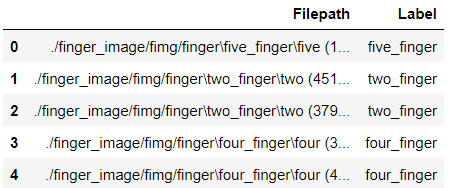
2. 이미지 데이터셋 총 개수 및 label 종류 수 확인
# 이미지 개수 및 클래스 개수(종류 수) 확인하기

labels = df['Label'].values.tolist()

label_list=[]
for i in labels:
    if i not in label_list:
        label_list.append(i)

print('The number of pictures:', df.shape[0])
print('The number of labels:', len(label_list))
print('Labels:', label_list)
The number of pictures: 2500
The number of labels: 5
Labels: ['five_finger', 'two_finger', 'four_finger', 'three_finger', 'one_finger']3. 이미지 데이터 확인하기
# 데이터 확인
fig, axes = plt.subplots(nrows=5, ncols=5, figsize=(15, 7),
                        subplot_kw={'xticks': [], 'yticks': []})

for i, ax in enumerate(axes.flat):
    ax.imshow(plt.imread(df.Filepath[i]))
    ax.set_title(df.Label[i], fontsize = 12)
plt.tight_layout(pad=0.5)
plt.show()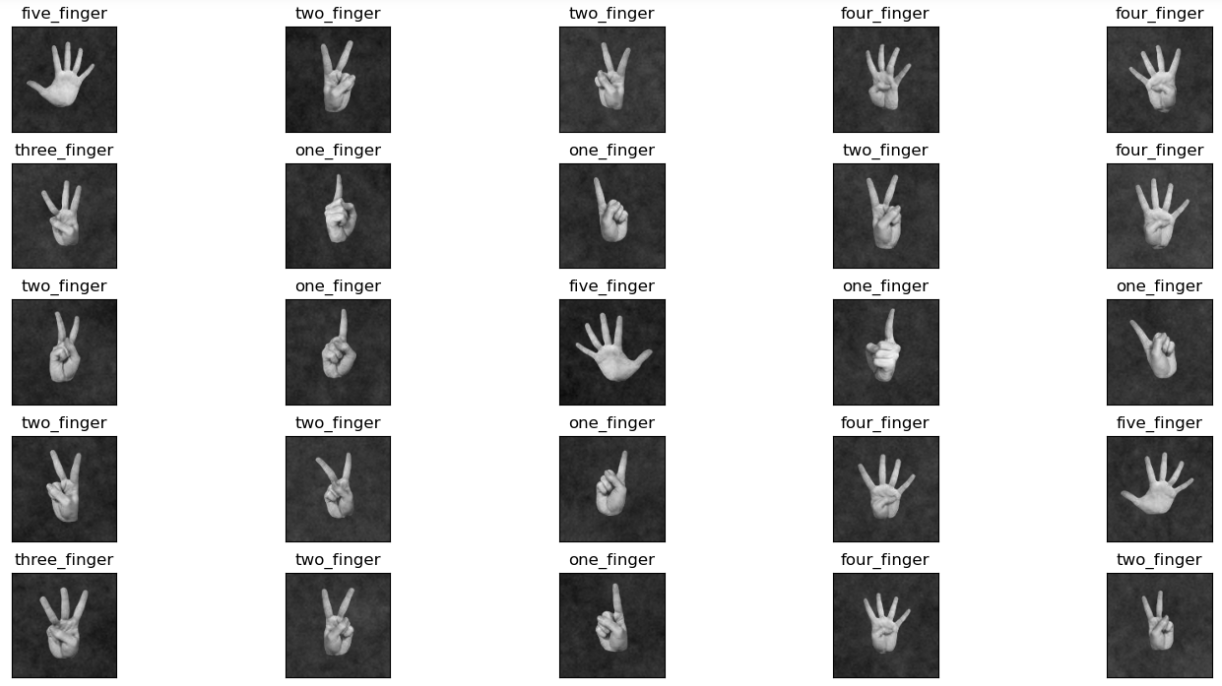
4. train,valid,test 데이터셋으로 각각 split
# train, test set으로 split(9대 1)

train_df,test_df = train_test_split(df, test_size=0.1,random_state=0)
train_df.shape,test_df.shape
((2250, 2), (250, 2))# train_df를 9대 1로 split(train과 valid로)
train_df, valid_df = train_test_split(train_df, test_size=0.1, random_state=0)
train_df.shape, valid_df.shape((2025, 2), (225, 2))5. 이미지 증강
Dataset을 더 효율적으로 활용하여 모델의 정확도를 높이기 위한 과정
# ImageDataGenerator 적용 과정(이미지 증강 과정)

train_datagen = ImageDataGenerator(rescale = 1./255,
                                   rotation_range=30, # 회전제한 각도 30도
                                   zoom_range=0.15, # 확대 축소 15%
                                   width_shift_range=0.2, # 좌우이동 20%
                                   height_shift_range=0.2, # 상하이동 20%
                                   shear_range=0.15, # 반시계방햐의 각도
                                   horizontal_flip=True, # 좌우 반전 True
                                   fill_mode="nearest")

valid_datagen = ImageDataGenerator(rescale = 1./255)

train_generator = train_datagen.flow_from_dataframe(train_df,
                                                    x_col='Filepath',
                                                    y_col='Label',
                                                    target_size=(128, 128),
                                                    batch_size=75,
                                                    class_mode='categorical'
                                                    )

validation_generator = valid_datagen.flow_from_dataframe(valid_df,
                                                     x_col='Filepath',
                                                     y_col='Label',
                                                     target_size=(128, 128),
                                                     batch_size=75,
                                                     class_mode='categorical'
                                                     )
Found 2025 validated image filenames belonging to 5 classes.
Found 225 validated image filenames belonging to 5 classes.batch data의 크기와 label의 크기를 확인하면 모델 제작 전 모든 작업이 완성된다.
for data_batch, labels_batch in train_generator:
    print('배치 데이터 크기:', data_batch.shape)
    print('배치 레이블 크기:', labels_batch.shape)
    break
배치 데이터 크기: (75, 75, 75, 3)
배치 레이블 크기: (75, 5)※ 모델 학습 전 유의사항
- Training size : 2025
- batch size : 75
- step_per_epoch : Training size/batch size이므로 27로 설정
- validation_step은 test_df의 사이즈가 225이므로 이를 75로 나눈 3으로 설정한다
6. 모델 제작하기
마지막 softmax 설정 과정에서 레이블의 개수에 맞게 설정해야 한다.
# Convolutional Layer를 쌓아서 CNN 모델을 제작한다.
model = models.Sequential()
model.add(layers.Conv2D(32, (3, 3), activation = 'relu', input_shape = (128, 128, 3)))
model.add(layers.MaxPooling2D((2, 2)))
model.add(layers.Conv2D(64, (3, 3), activation = 'relu'))
model.add(layers.MaxPooling2D((2, 2)))
model.add(layers.Conv2D(128, (3, 3), activation = 'relu'))
model.add(layers.MaxPooling2D((2, 2)))
model.add(layers.Conv2D(256, (3, 3), activation = 'relu'))
model.add(layers.MaxPooling2D((2, 2)))

model.add(layers.Flatten())
model.add(layers.Dense(512, activation = 'relu'))
model.add(layers.Dense(5, activation = 'softmax'))

model.compile(loss = 'categorical_crossentropy',
              optimizer = 'adam',
              metrics = ['accuracy'])
7. 모델 학습
%%time

history = model.fit(train_generator,
                       steps_per_epoch = train_df.shape[0]//75,
                       epochs = 15,
                       validation_data = validation_generator,
                       validation_steps = test_df.shape[0]//75)
Epoch 1/15
27/27 [============] - 48s 2s/step - loss: 1.5448 - accuracy: 0.2790 - val_loss: 1.1302 - val_accuracy: 0.5822
Epoch 2/15
27/27 [============] - 46s 2s/step - loss: 1.0042 - accuracy: 0.5649 - val_loss: 0.2792 - val_accuracy: 0.9422
Epoch 3/15
27/27 [============] - 47s 2s/step - loss: 0.4989 - accuracy: 0.8094 - val_loss: 0.2244 - val_accuracy: 0.9333
.
.
.
.
Epoch 15/15
27/27 [============] - 48s 2s/step - loss: 0.0731 - accuracy: 0.9728 - val_loss: 0.0644 - val_accuracy: 0.9956
CPU times: total: 41min 19s
Wall time: 13min 3s8. 결과 확인하기
15번의 epoch를 거친 후 training set과 validation set 각각의 loss와 accuracy를 그래프를 통해 시각화하였다.
# 손실함수, 정확도 그래프 그리기

acc = history.history['accuracy']
val_acc = history.history['val_accuracy']
loss = history.history['loss']
val_loss = history.history['val_loss']

epochs = range(len(acc))

def plot_loss_acc(history, epoch):

    loss, val_loss = history.history['loss'], history.history['val_loss']
    acc, val_acc = history.history['accuracy'], history.history['val_accuracy']

    fig, axes = plt.subplots(1, 2, figsize=(12, 4))

    axes[0].plot(range(1, epoch + 1), loss,'b', label='Training')
    axes[0].plot(range(1, epoch + 1), val_loss,'r', label='Validation')
    axes[0].legend(loc='best')
    axes[0].set_title('Loss')

    axes[1].plot(range(1, epoch + 1), acc,'b', label='Training')
    axes[1].plot(range(1, epoch + 1), val_acc,'r', label='Validation')
    axes[1].legend(loc='best')
    axes[1].set_title('Accuracy')

    plt.show()

plot_loss_acc(history, 15)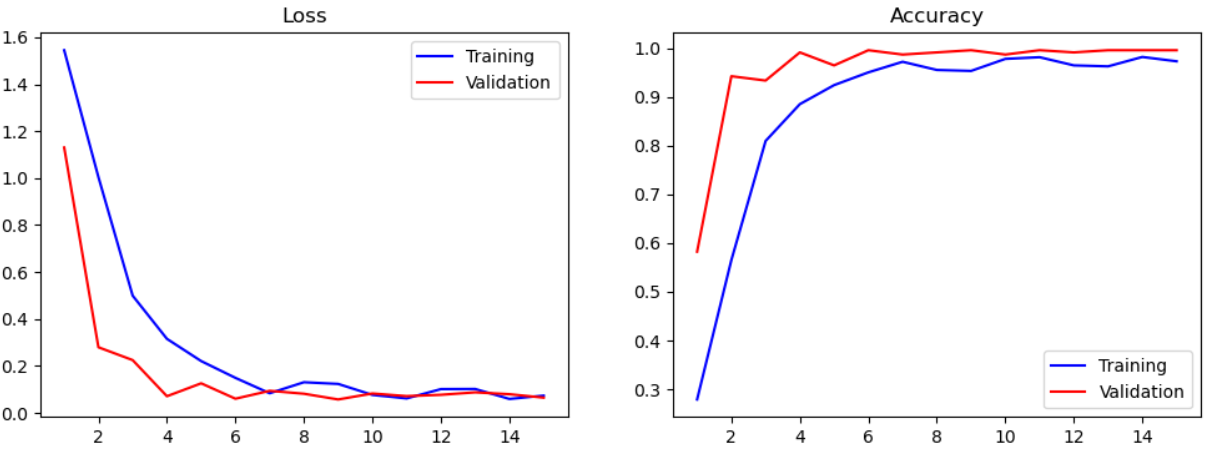
마지막으로 준비해둔 test dataset을 활용한 성능 검증작업을 거친 후 모델을 저장하면 모델 학습이 모두 완료된다.
# Test 데이터셋으로 성능 확인하기

test_datagen = ImageDataGenerator(rescale = 1./255)

test_generator = test_datagen.flow_from_dataframe(test_df,
                                                  x_col='Filepath',
                                                  y_col='Label',
                                                  target_size=(128, 128),
                                                  batch_size=75)

loss, accuracy = model.evaluate(test_generator)

print('Loss = {:.5f}'.format(loss))
print('Accuracy = {:.5f}'.format(accuracy))
Found 250 validated image filenames belonging to 5 classes.
4/4 [============] - 2s 350ms/step - loss: 0.0011 - accuracy: 1.0000
Loss = 0.00111
Accuracy = 1.00000모델 저장까지 모두 완료! 👍
model.save('cnn_test.h5')다음 포스팅에는 ResNet를 활용한 이미지 데이터셋 분류에 대하여 알아보자😊
github 주소 : https://github.com/Kihoon-Kwon/multiclass_ImageClassification.git

꾸준하게 😊