github actions란?
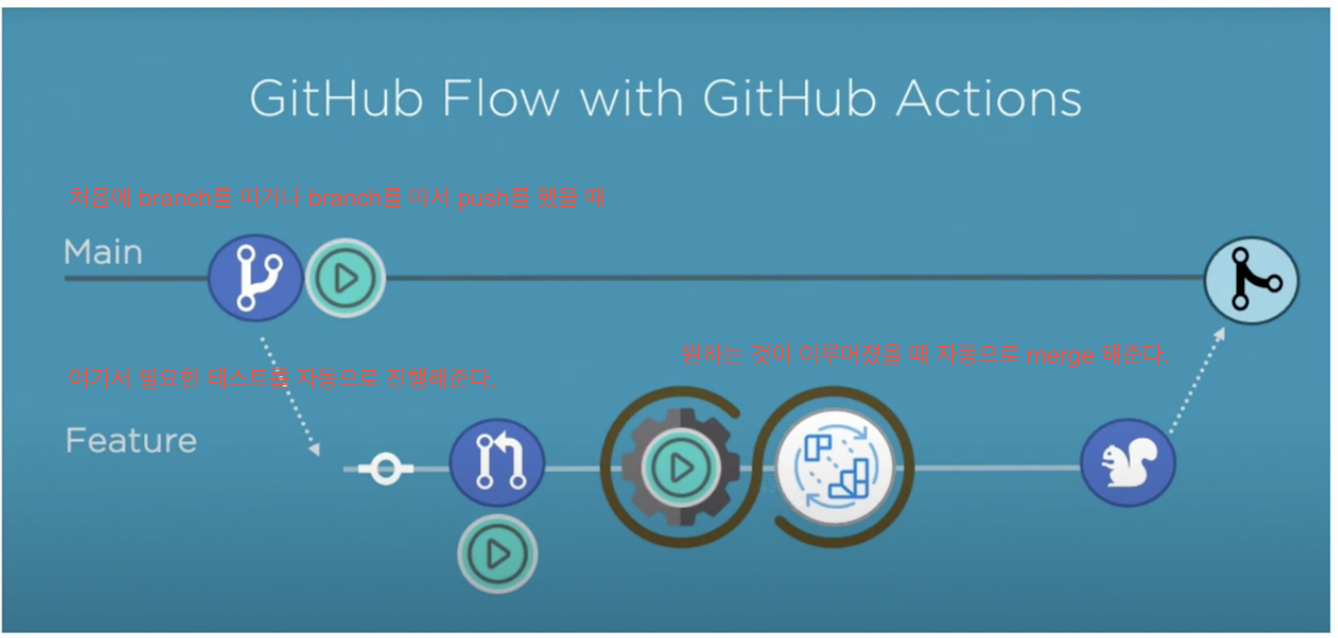
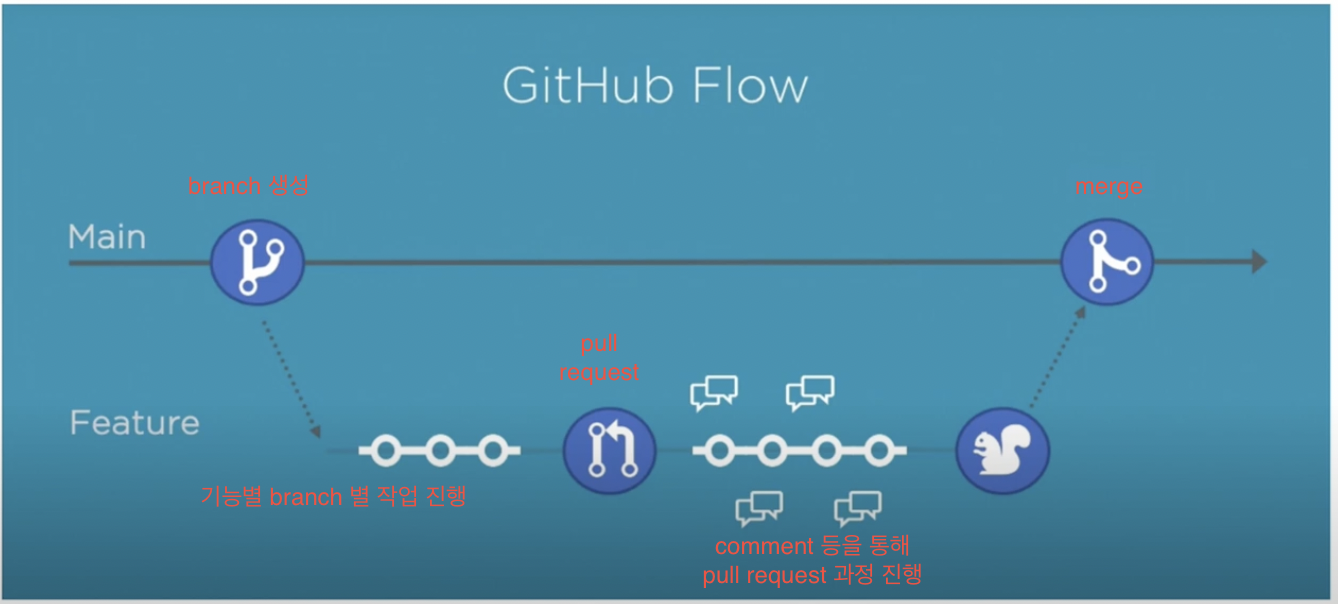
- 현재 우리가 github을 사용할 때 다음과 같은 흐름으로 작업을 하게 된다. 해당 과정들을 일일이 사람이 확인하고 있다.

github actions는 이러한 과정을자동화해준다.
- 이를 통해 개발자는 개발에 더 집중할 수 있게 된다.
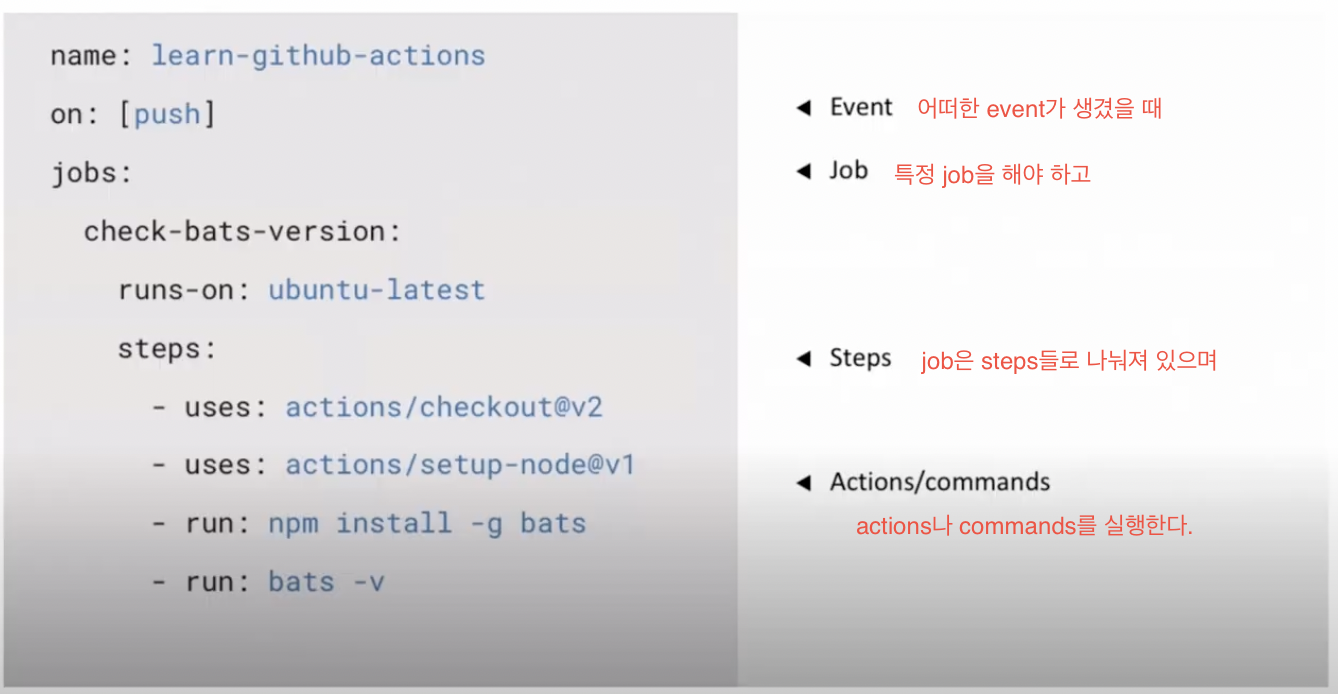
- github actions는 다음과 같이 작업을 진행한다.
- 이렇게 github actions가 해야 할 일들을 정해 놓으면
자동으로 build나 test 등을수행하고, 이것들이 성공적으로 수행되었다면 개발자가 merge를 할 수 있도록 돕는다.
github actions 사용
- 먼저 github에 코드를 올리는 프로젝트를 하나 찾아 아래와 같은 경로로 폴더와 파일을 생성해준다.
>>> .github/workflows/github-actions-demo.yaml- 해당 파일에 아래의 내용을 입력해 준다.
name: github actions의 이름on: 언제 github actions가 작동될지 결정- 해당 파일에서는 push할 때마다 작동
jobs- job의 이름은
Explore-GitHub-Actions - 사용하는 환경은
ubuntu-latest stepsrun: 코드 실행echo를 통해 코드가 console에 프린트가 되도록 함
- job의 이름은
name: GitHub Actions Demo
on: [push]
jobs:
  Explore-GitHub-Actions:
    runs-on: ubuntu-latest
    steps:
      - run: echo "🎉 The job was automatically triggered by a ${{ github.event_name }} event."
      - run: echo "🐧 This job is now running on a ${{ runner.os }} server hosted by GitHub!"
      - run: echo "🔎 The name of your branch is ${{ github.ref }} and your repository is ${{ github.repository }}."
      - name: Check out repository code
        uses: actions/checkout@v3
      - run: echo "💡 The ${{ github.repository }} repository has been cloned to the runner."
      - run: echo "🖥️ The workflow is now ready to test your code on the runner."
      - name: List files in the repository
        run: |
          ls ${{ github.workspace }}
- run: echo "🍏 This job's status is ${{ job.status }}."- 위와 같이 코드를 파일 안에 입력하고, branch로 푸시하도록 하자.
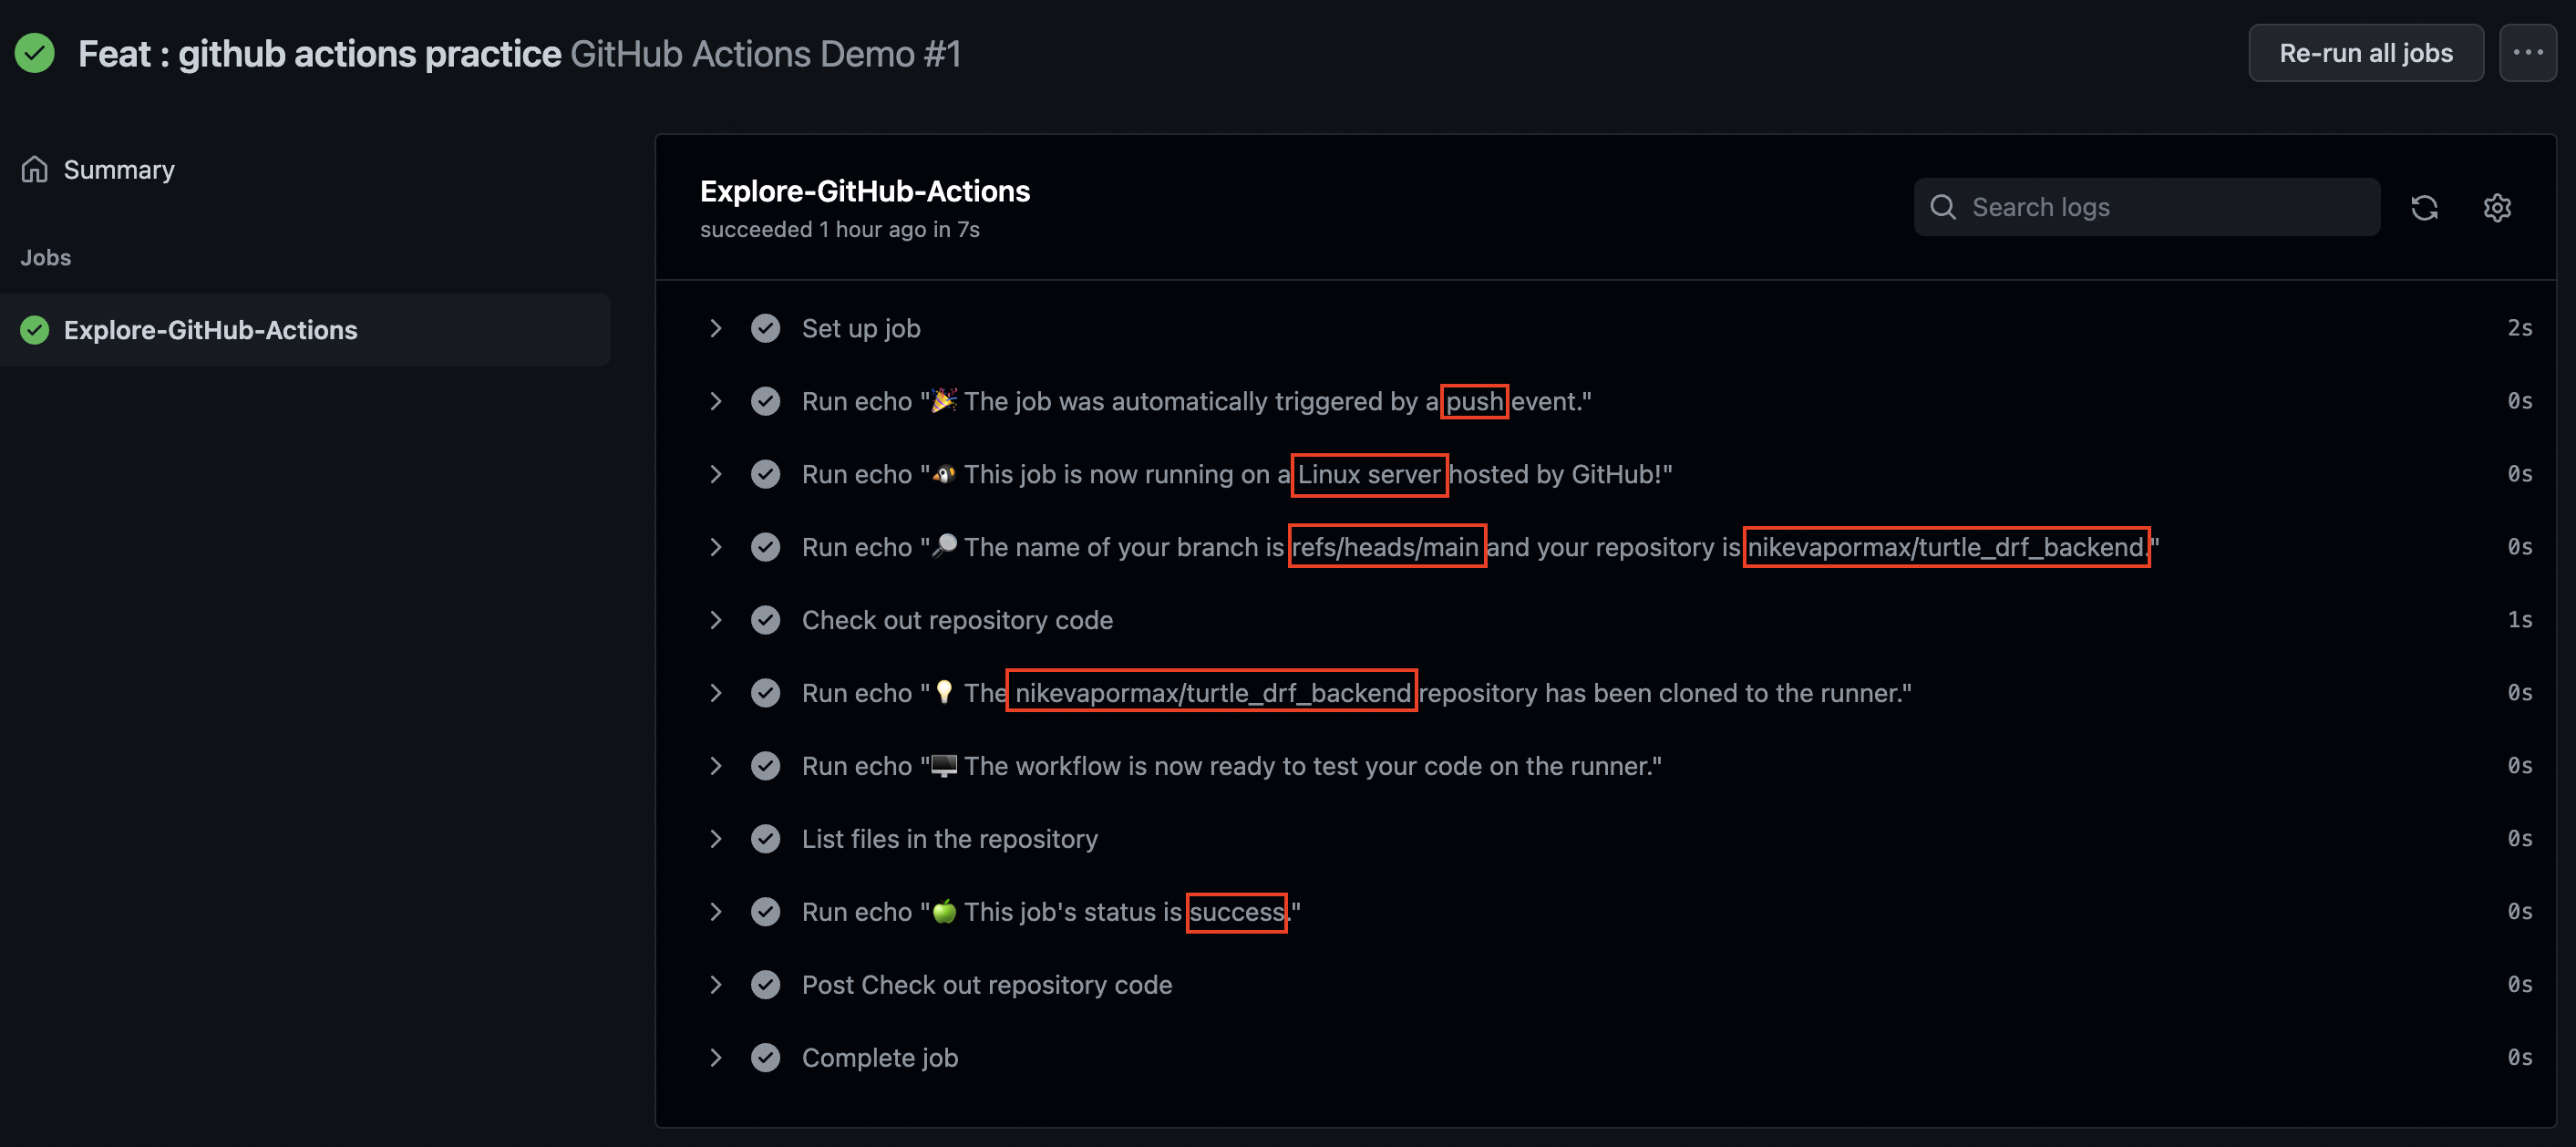
- 푸시를 하게 되면 다음과 같이 actions 탭에서 알아서 돌아가는 것을 볼 수 있고, 성공적으로 진행되었기 때문에 초록색 체크가 뜨는 것을 볼 수 있다.
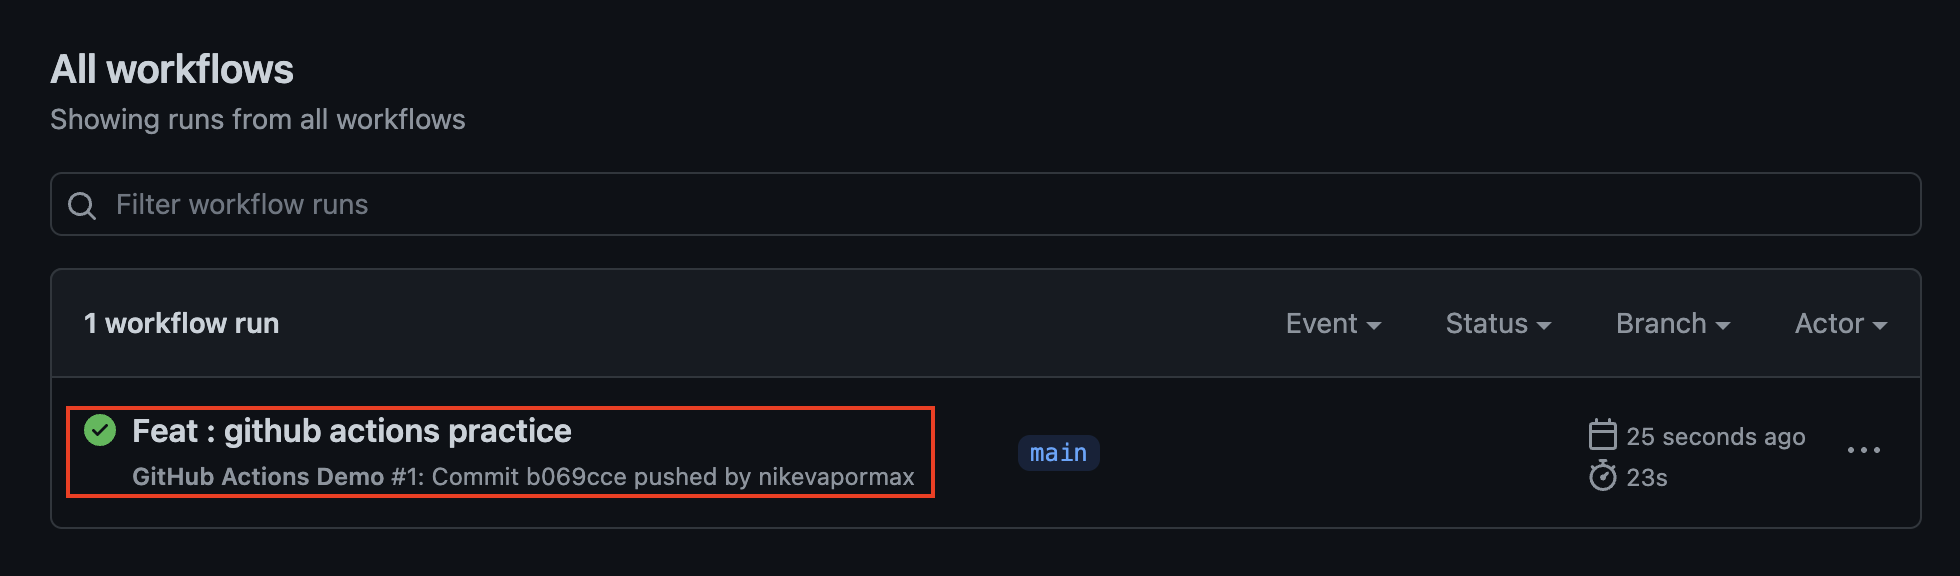
- 옆에 workflow 목록을 보면 내가 코드에 작성한 데로 이름이
GitHub Actions Demo로 적혀있는 것을 볼 수 있다.
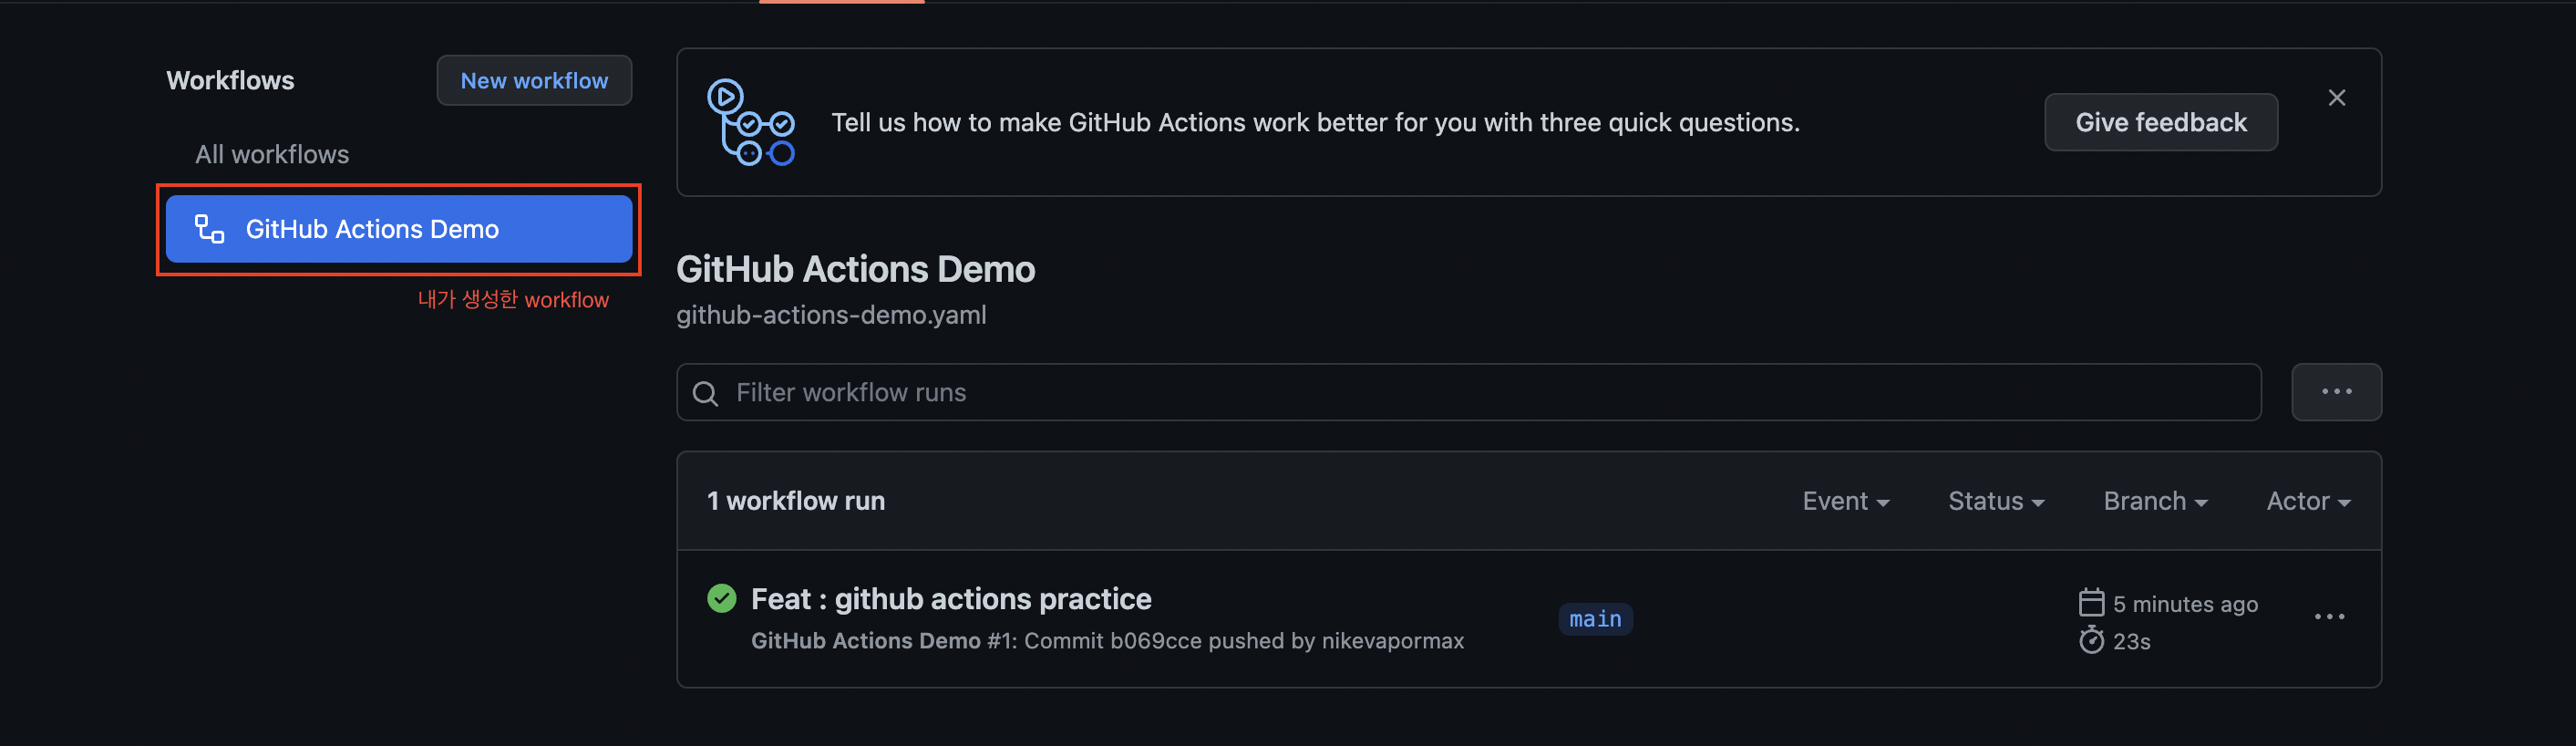
- 내가 푸시한 것을 눌러서 들어가보면 jobs를 볼 수 있다.
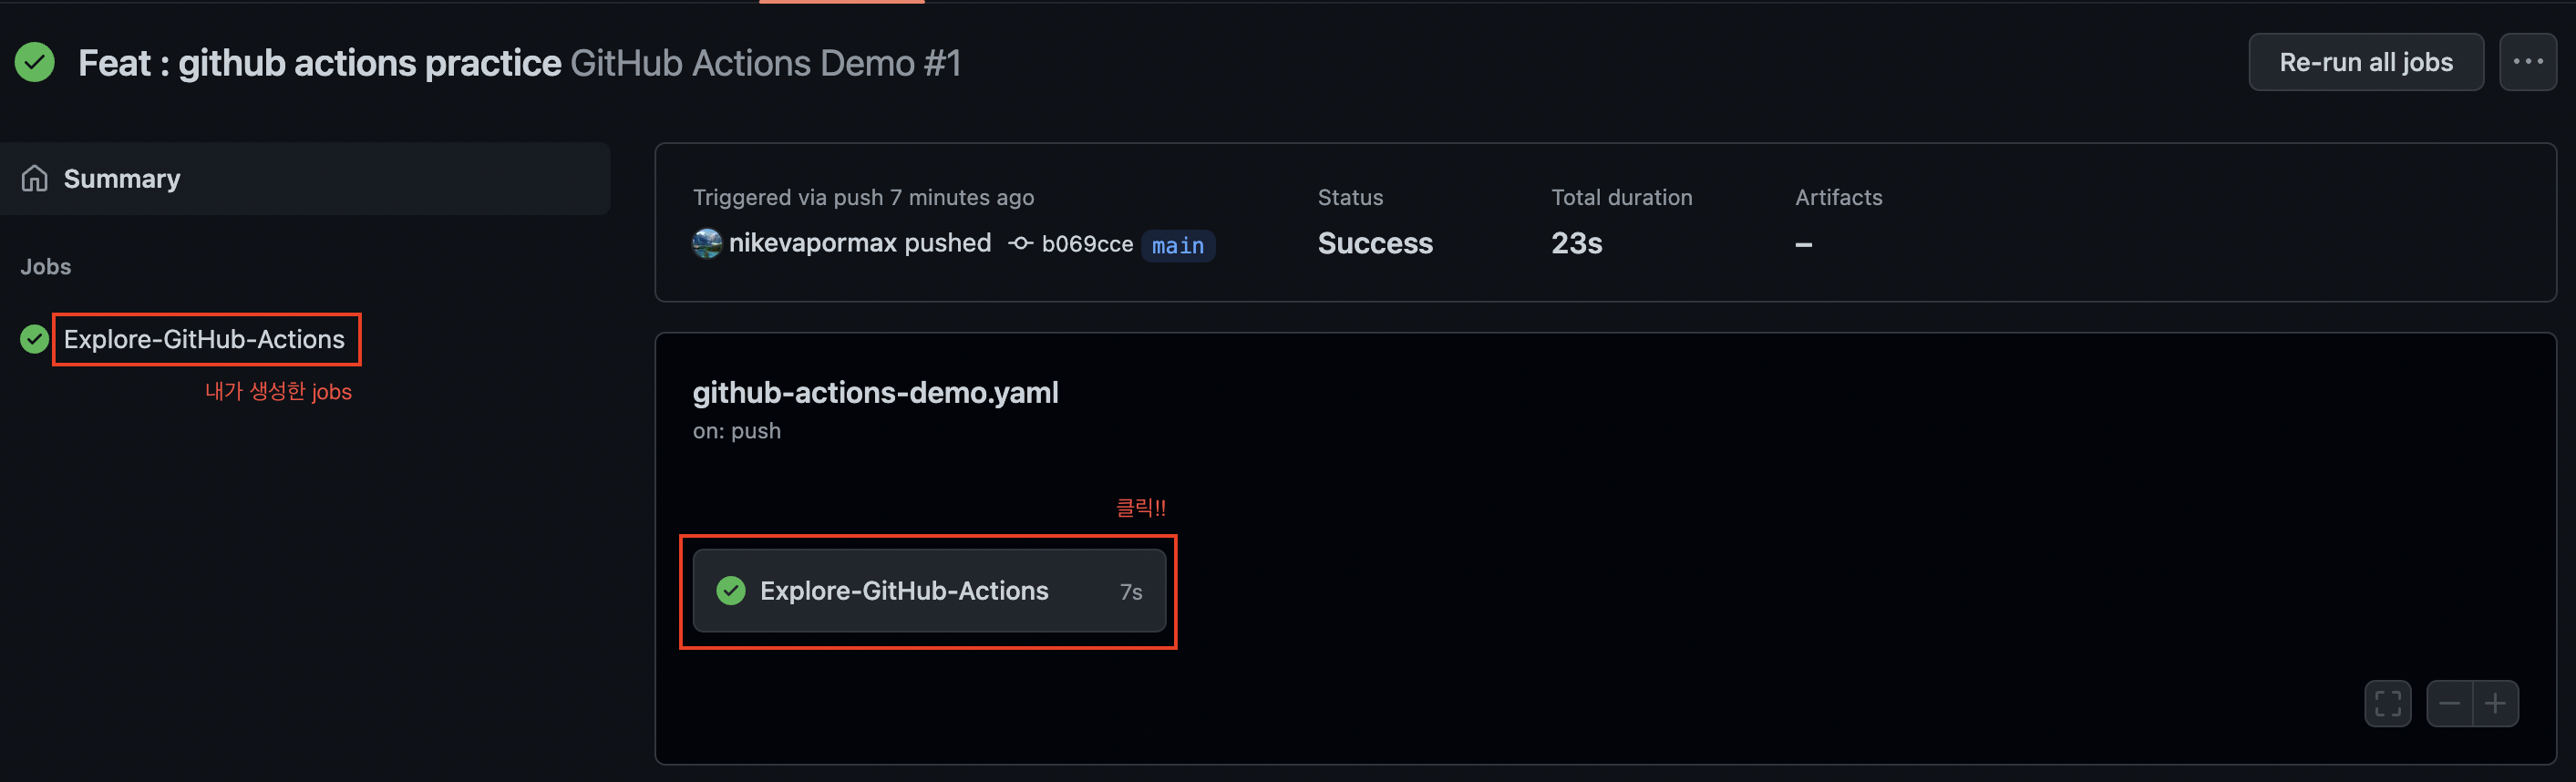
- 한 번 더
Explore-GitHub-Actions를 눌러보면 우리가 입력했던 steps들을 확인할 수 있다.
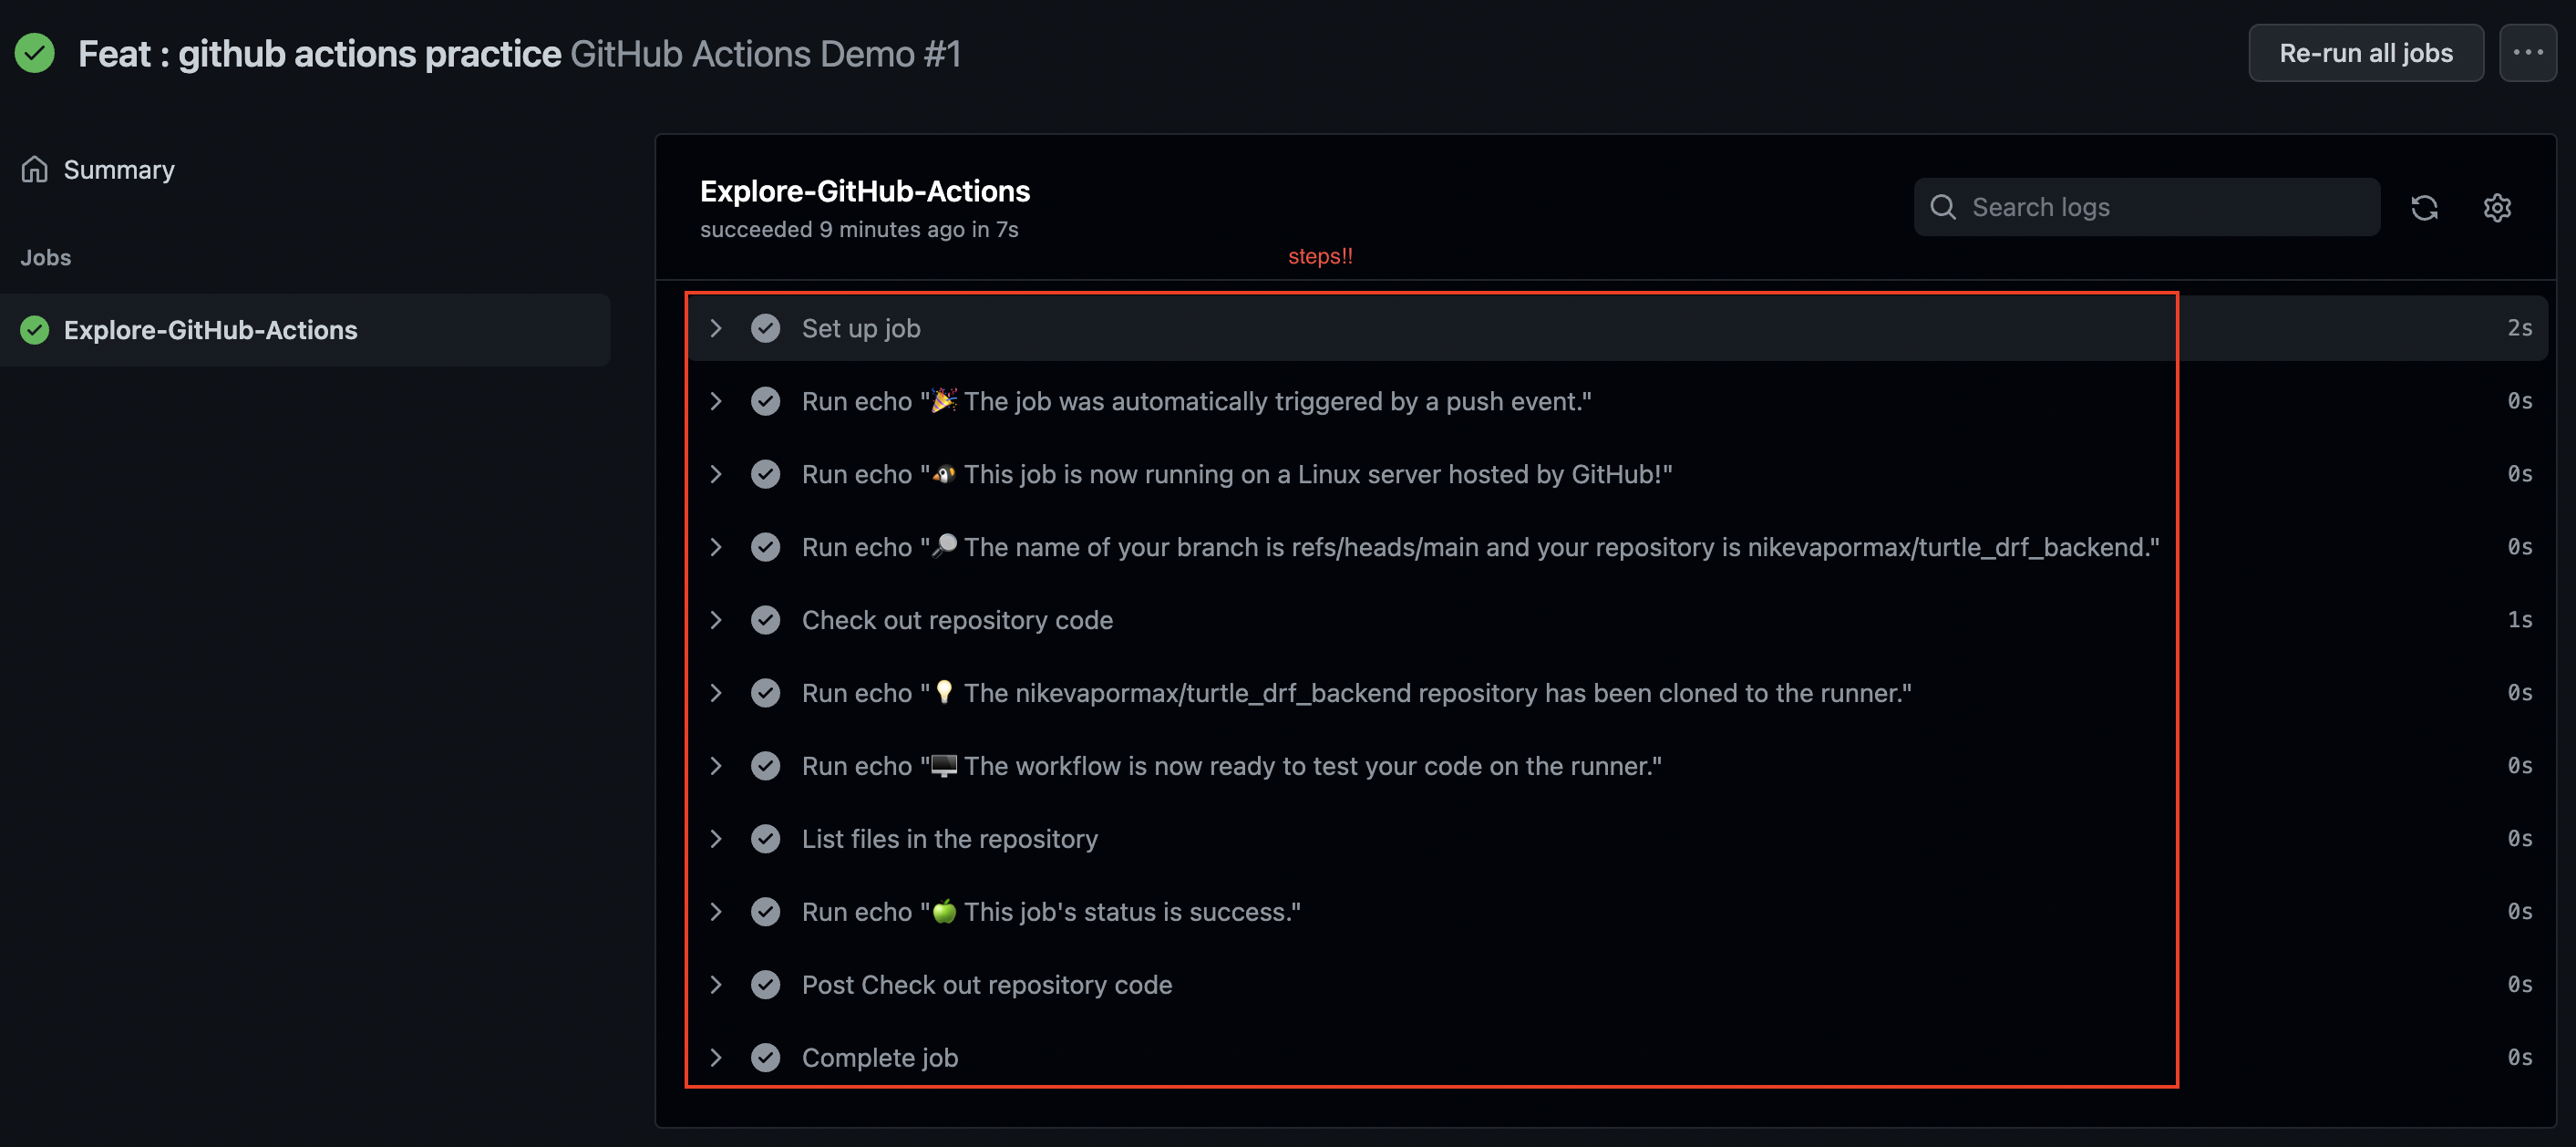
- 어떻게 흘러가는지 확인했으니 좀 더 자세히 개념을 이해해보자.
workflows: 하나 혹은 그 이상의 job들을 돌릴 수 있는 자동화된 프로세스- 작성하는 곳은
.github/workflows디렉토리 - 레포지토리 당
여러 개의 workflow를 가지는 것이가능하다.- 예를 들어, build에 대한 것과 deploy에 대한 것 등을 가질 수 있다.
- 다른 사람들이 만들어 둔 workflow를 가져다 쓸 수도 있다.
- 작성하는 곳은
event: 우리가 코드에 작성한on: [push]가 이에 해당한다.- 이벤트 트리거인
[push]를 통해 어떤 사람이나 코드를 push할 때마다 이벤트가 발생되도록 하였다.- pull request, issue 등 다양한 이벤트 설정이 가능하다.
- 다양한 방식이 있으며, workflow syntax에서 확인 가능하다.
- 이벤트 트리거인
jobs: 여러 개의 step들을 묶어준다.- 내가 작성한 위의 코드를 보면 하나의 job 안에
여러 step이 담겨 있는 것을 확인할 수 있다. - 각 step은
shell script나여러 action들로 구성된다. 작성된 순서대로 진행하게 된다. 먼저 실행된 것에 대해 그 다음에 실행될 step이 접근할 수 있다. (새로운 데이터가 생기게 된다면)의존성이 없는 job들은 별도로 생성해야 한다.- job들은 step과 다르게
병렬로 실행되게 된다. 따라서 실행되는 순서는 작성된 순서와 전혀 일치하지 않다. (결과를 빠르게 얻을 수 있다.) - 그런데 각 job들이 의존성이 있다면??
의존성이 있는job들은 이전 것이 끝나기 전까지기다리게 할 수 있다.
- 내가 작성한 위의 코드를 보면 하나의 job 안에
actions: github actions 플랫폼에서 제공해주는 복잡하지만 자주 사용되는 task- action을 입력함으로 인해
여러 반복되는 코드들을 손쉽게 실행할 수 있다. 직접 작성할 수도 있고다른 사람이 만든 것을 사용할 수도 있다.
- action을 입력함으로 인해
runs-on:실행환경을 설정한다.- 위의 코드에서는 가장 최신 버전의 ubuntu를 사용하고 있다.
- github에서 제공하는 virtual machine에서 코드를 실행하게 되는데, 이 때 사용할 실행환경을 선택하는 것!
runners: 우리가 실행할workflow가 실행되는 서버- 각 runner는 하나의 일을 할 수 있다.
- 각 운영체제 별 runner를 제공하고 있으며, 현재 나는 ububtu를 사용한다.
ubuntu,windows,mac os
- 각 workflow 마다
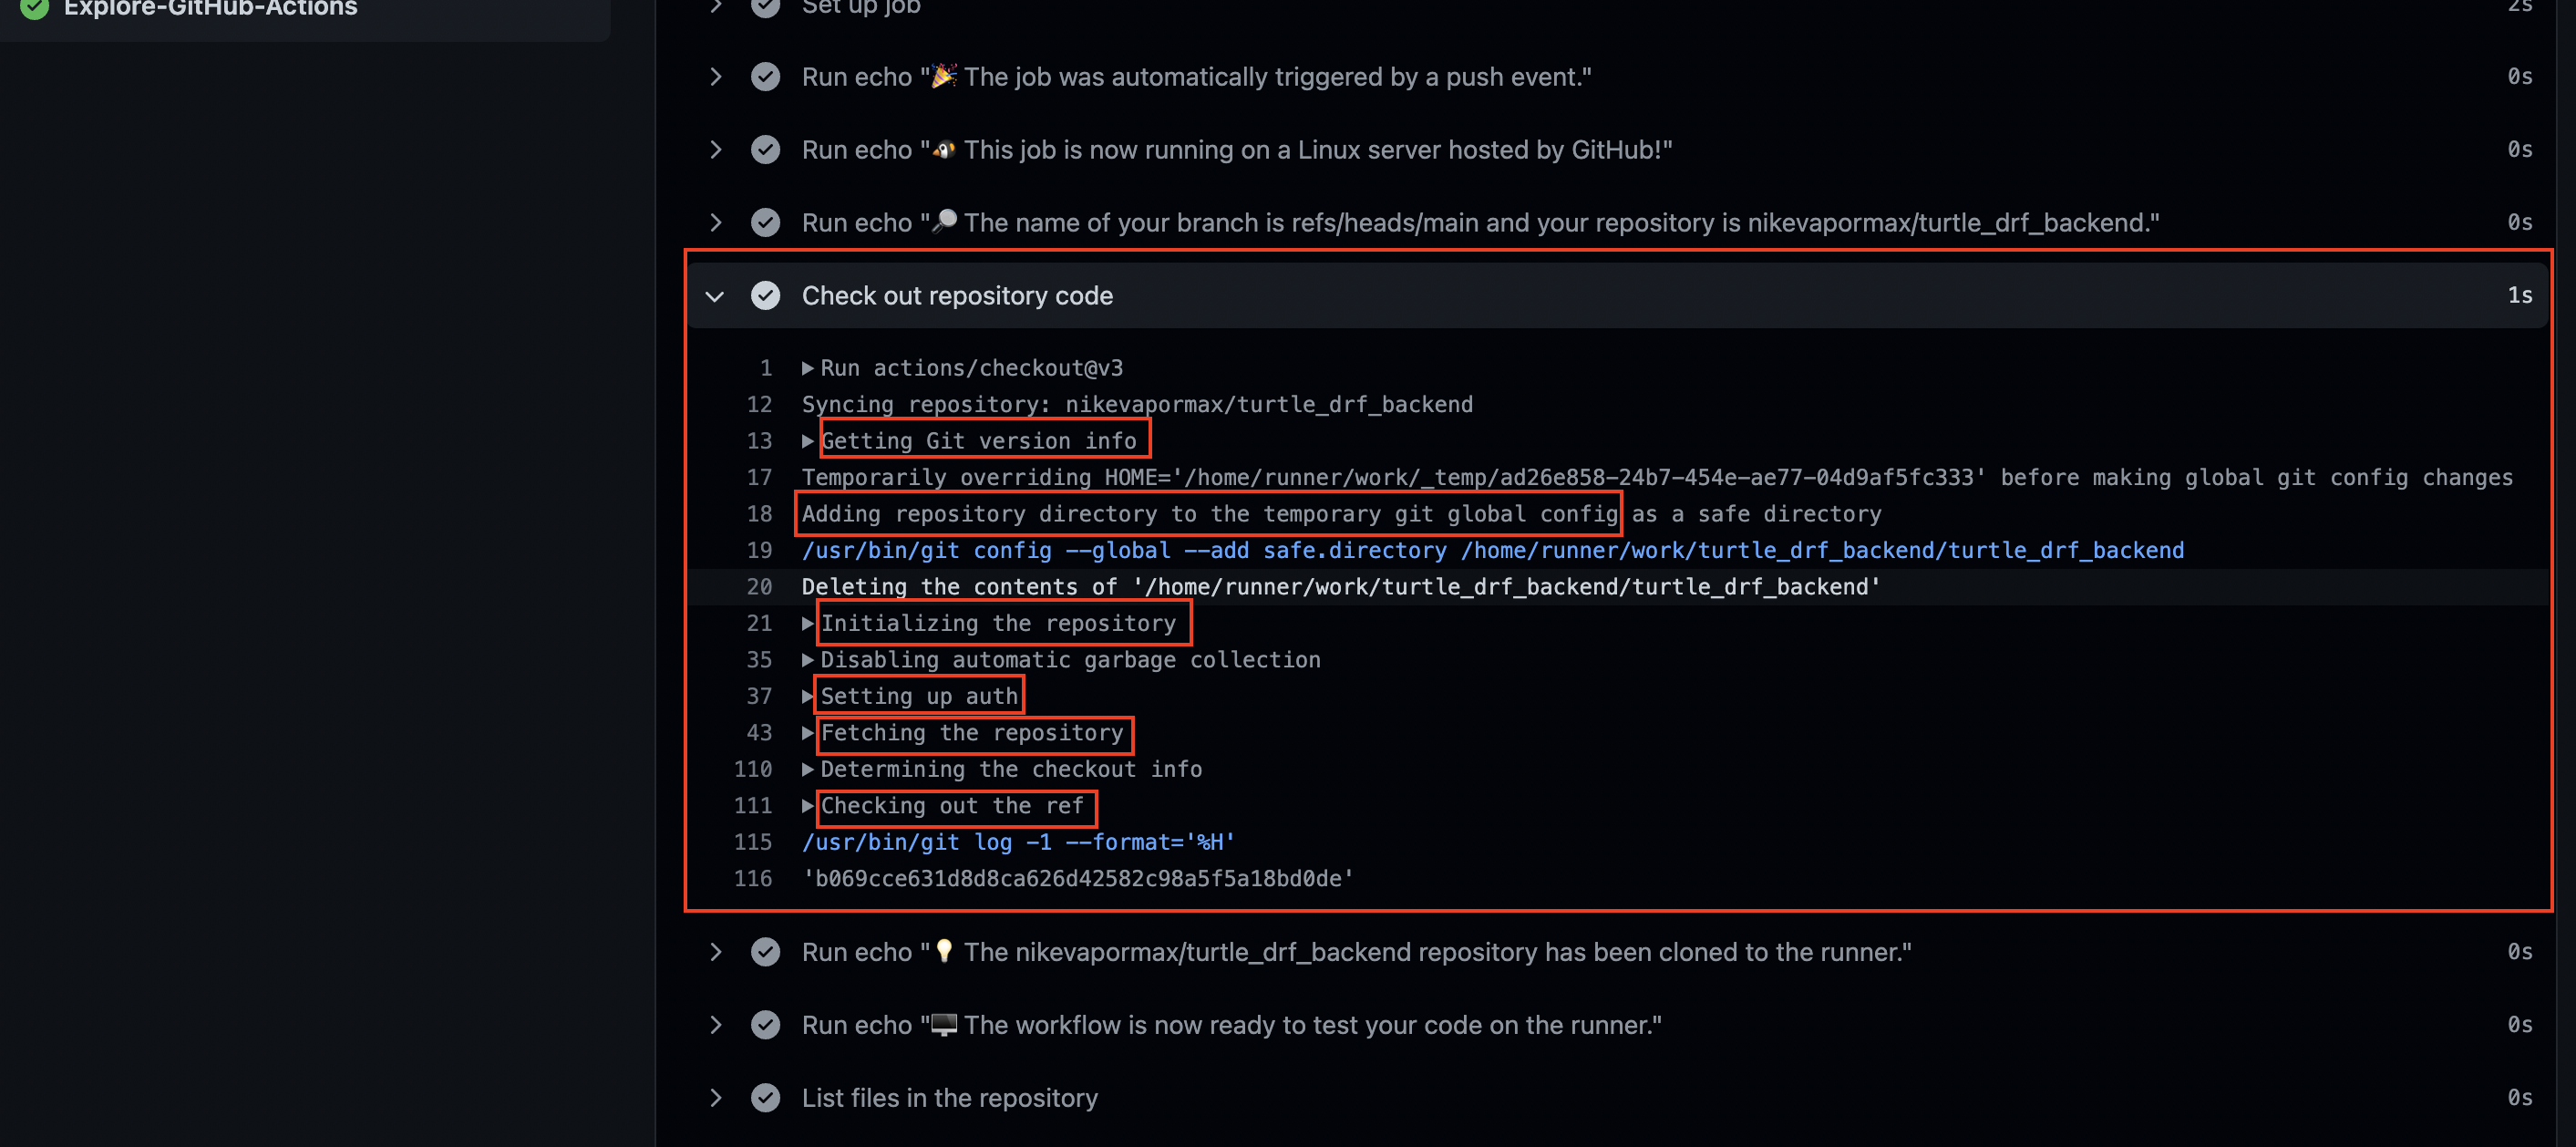
새로운 실행환경을 설정할 수 있으며, 이로 인해 runner도각기 다른 실행환경을 가질 수 있다. uses: actions/checkout@v3로 작성된 부분이 action을 설정해 준 부분이다.checkout@v3: 나의 레포지토리에 있는 코드들을 ubuntu 환경으로 clone해서 작동되도록 해준다.
- 다음 과정들을 보면 실제로 나의 레포지토리를 가져다 작업을 해주는 것을 볼 수 있다.
- 위에서 내가 입력했던 코드를 보면
${{ }}로 작성한 부분들이 있다. 다시 github actions의 실행 화면을 보면 그 값들이 현재 사용하고 있는 것들의 이름으로 채워져 있는 것을 볼 수 있다.
django project CI 설정하기
- github Actions Documentaion
- 내가 현재 사용하고 있는 언어를 선택해 들어가보자.
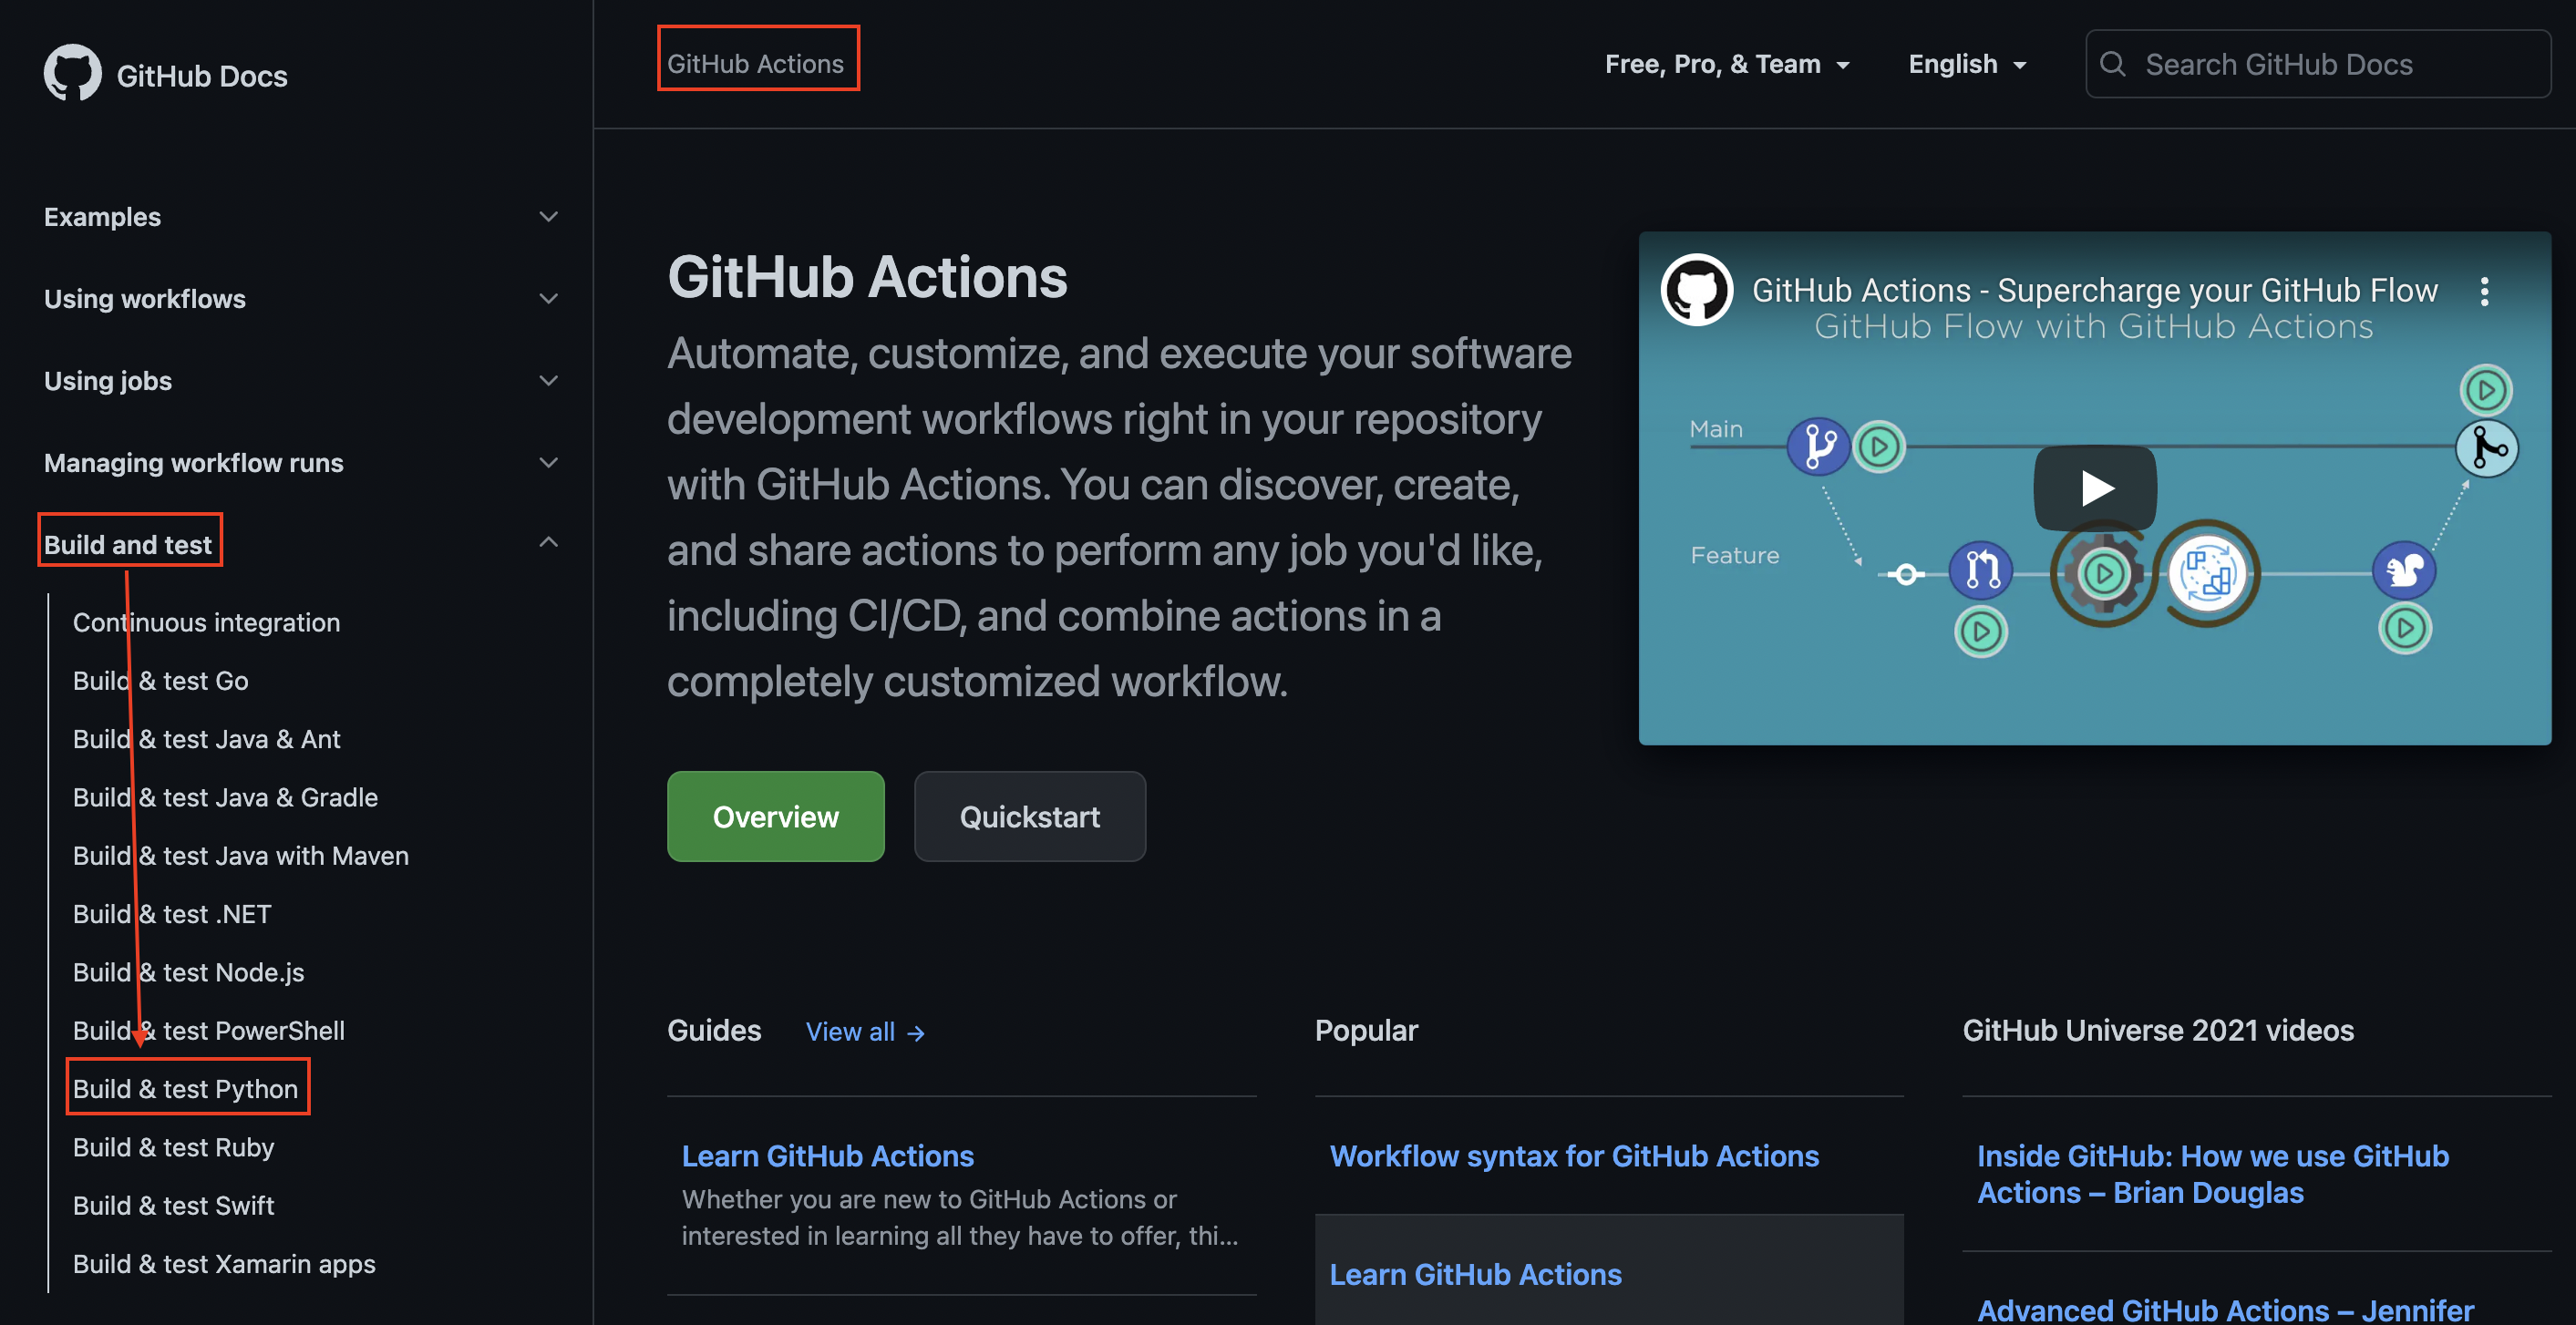
- 아래로 스크롤을 내려 yaml 파일을 복사해주자.
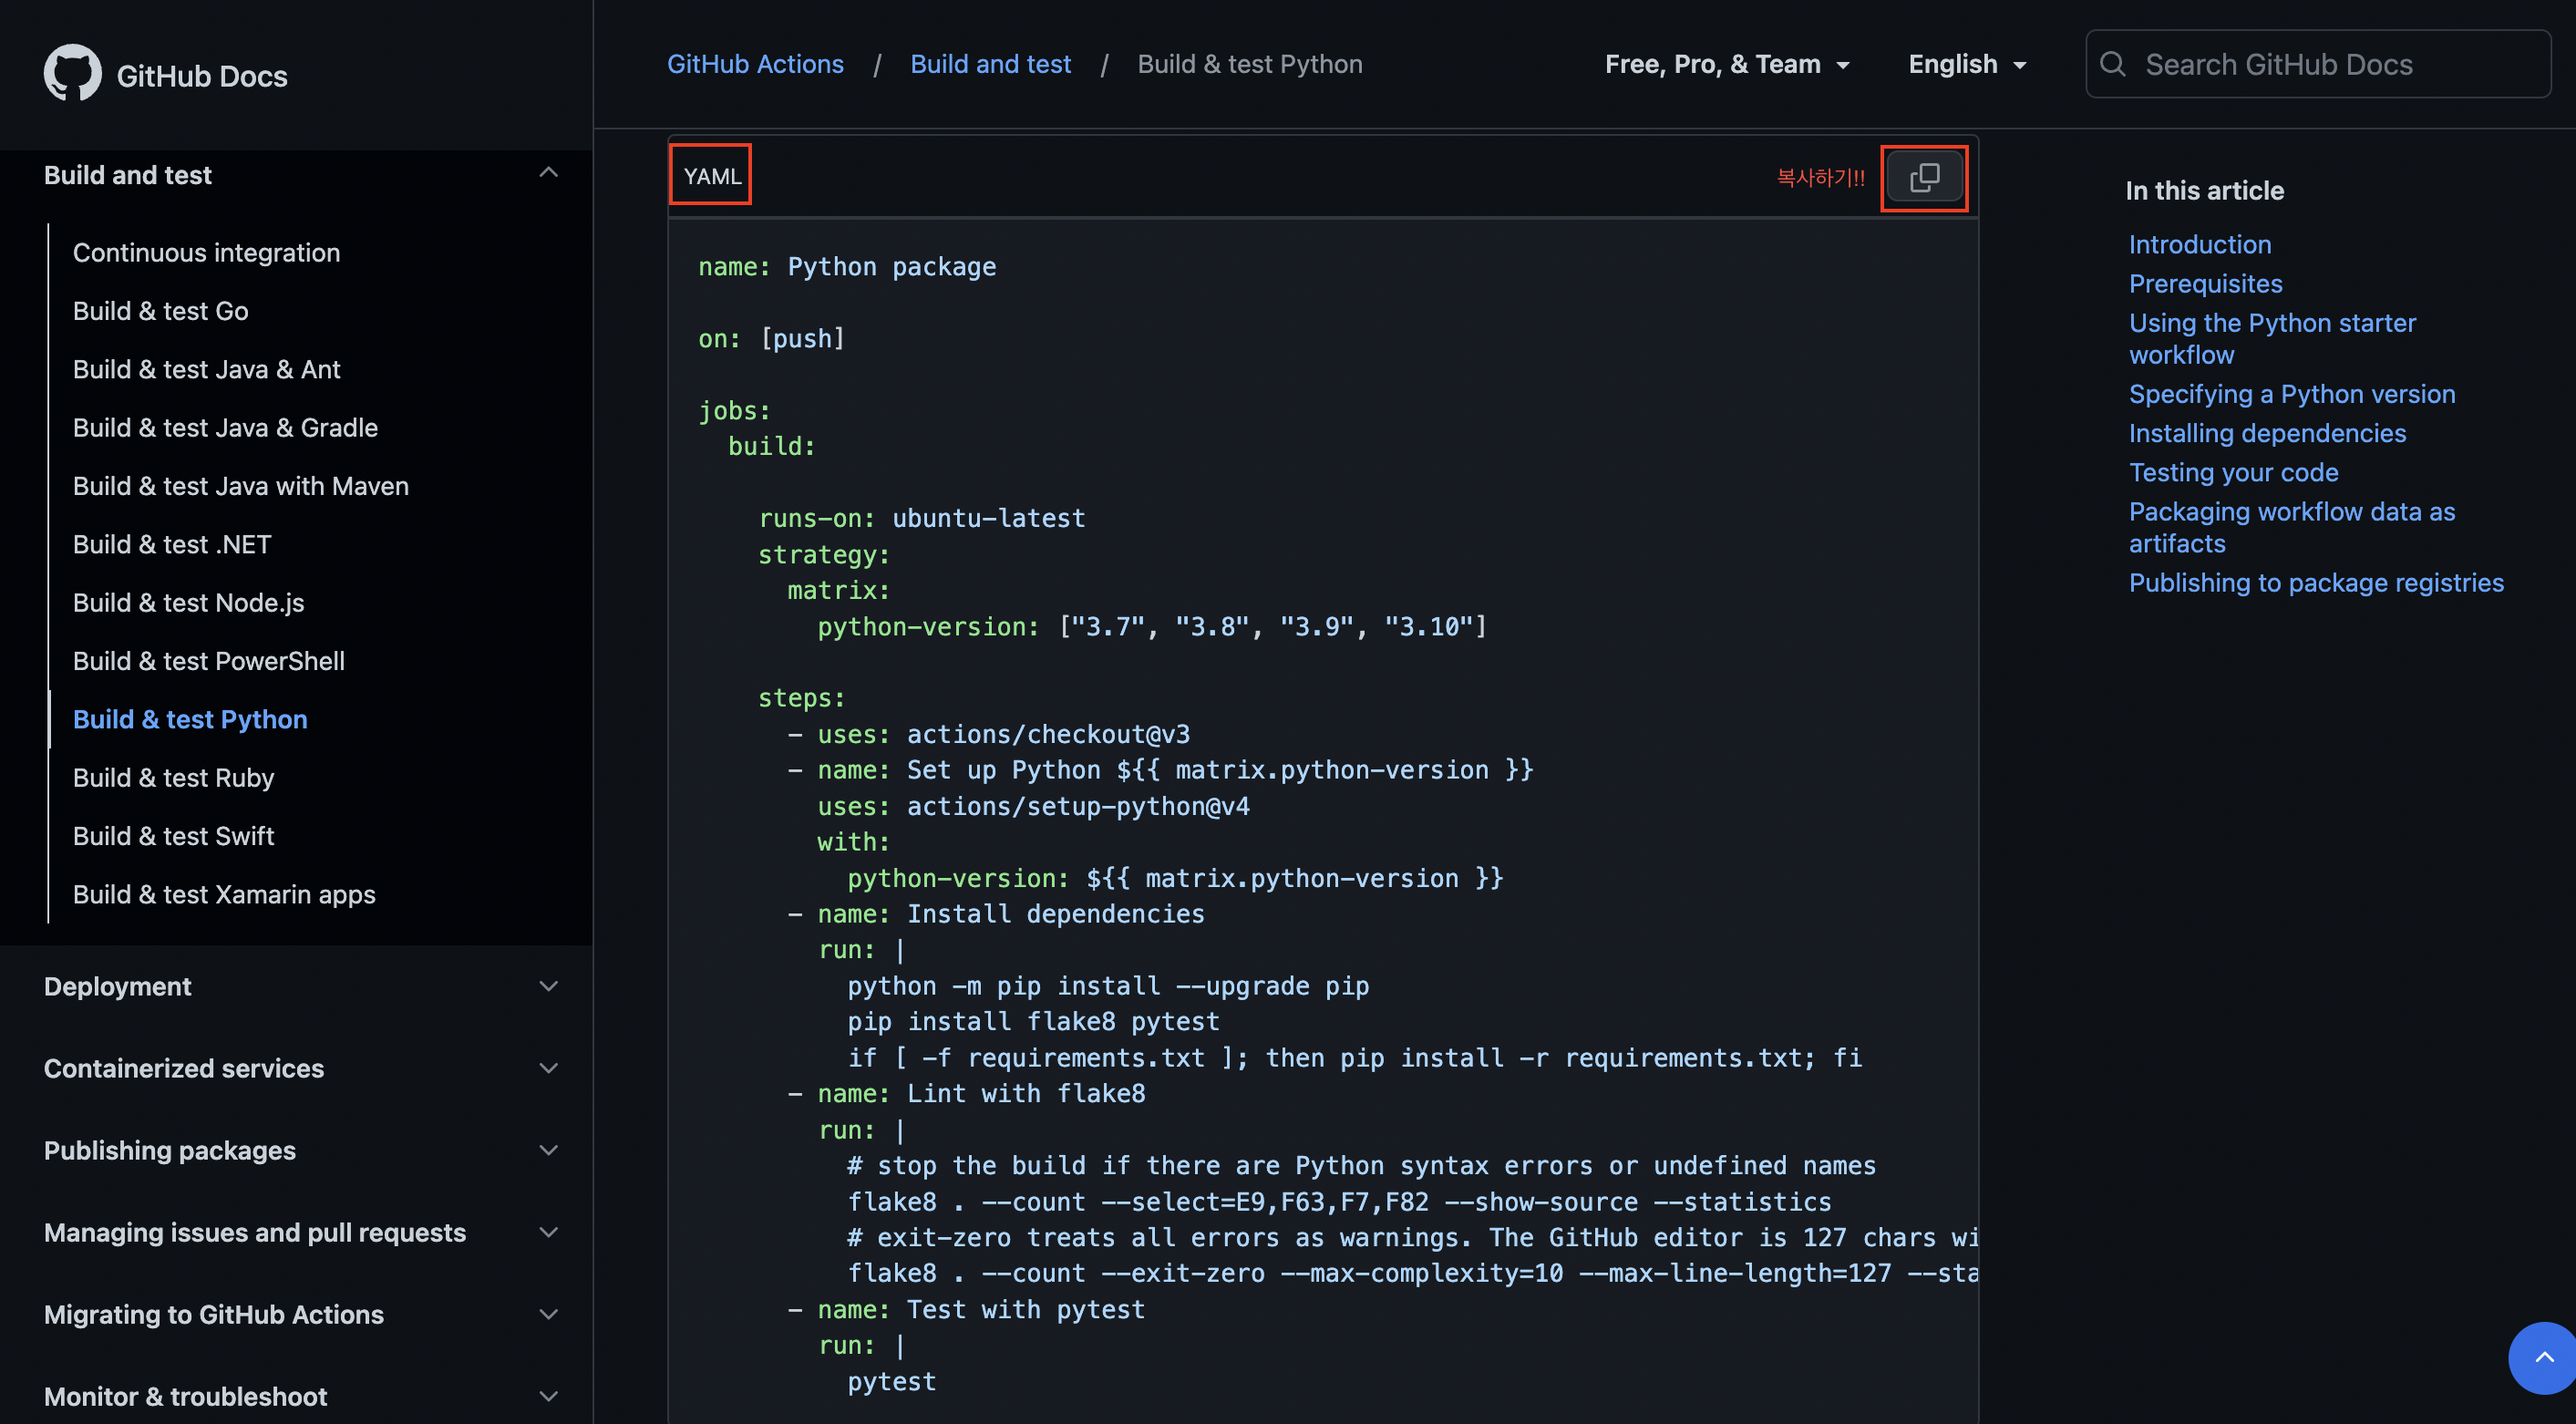
name: Python package

on: [push]

jobs:
  build:

    runs-on: ubuntu-latest
    strategy:
      matrix:
        python-version: ["3.7", "3.8", "3.9", "3.10"]

    steps:
      - uses: actions/checkout@v3
      - name: Set up Python ${{ matrix.python-version }}
        uses: actions/setup-python@v4
        with:
          python-version: ${{ matrix.python-version }}
      - name: Install dependencies
        run: |
          python -m pip install --upgrade pip
          pip install flake8 pytest
          if [ -f requirements.txt ]; then pip install -r requirements.txt; fi
      - name: Lint with flake8
        run: |
          # stop the build if there are Python syntax errors or undefined names
          flake8 . --count --select=E9,F63,F7,F82 --show-source --statistics
          # exit-zero treats all errors as warnings. The GitHub editor is 127 chars wide
          flake8 . --count --exit-zero --max-complexity=10 --max-line-length=127 --statistics
      - name: Test with pytest
        run: |
pytest- 복사한 것을 아래의 파일을 생성해 붙여넣는다.
>>> .github/workflows/django-test.yml- 그리고 위에서 복사한 코드를 나의 파일에 맞게 수정해 주었다.
name: Python package

on: [push]

jobs:
  build:

    runs-on: ubuntu-latest
    strategy:
      matrix:
        # 각 파이썬 버전에 대해 테스트를 진행한다.
        python-version: ["3.7", "3.8", "3.9", "3.10"]

    steps:
      - uses: actions/checkout@v3
      # 각 버전에 파이썬의 버전 별로 병렬로 실행하게 된다.
      - name: Set up Python ${{ matrix.python-version }}
        uses: actions/setup-python@v4
        with:
          python-version: ${{ matrix.python-version }}
      - name: Install dependencies
        run: |
          python -m pip install --upgrade pip
        # 원래 pytest가 있었지만 나의 프로젝트에서는 사용하지 않았기 때문에 삭제함
          pip install flake8
        # 나는 requirements.txt가 있기 때문에 바로 실행해주는 것으로 수정
          pip install -r requirements.txt
      - name: Lint with flake8
        run: |
          # stop the build if there are Python syntax errors or undefined names
          flake8 . --count --select=E9,F63,F7,F82 --show-source --statistics
          # exit-zero treats all errors as warnings. The GitHub editor is 127 chars wide
          flake8 . --count --exit-zero --max-complexity=10 --max-line-length=127 --statistics
      # pytest를 사용하지 않고 아래의 코드를 사용함(나의 tests.py 사용)
      - name: Run Tests
        run: |
python manage.py test- 그리고 해당 파일을 git에 push 해준다.
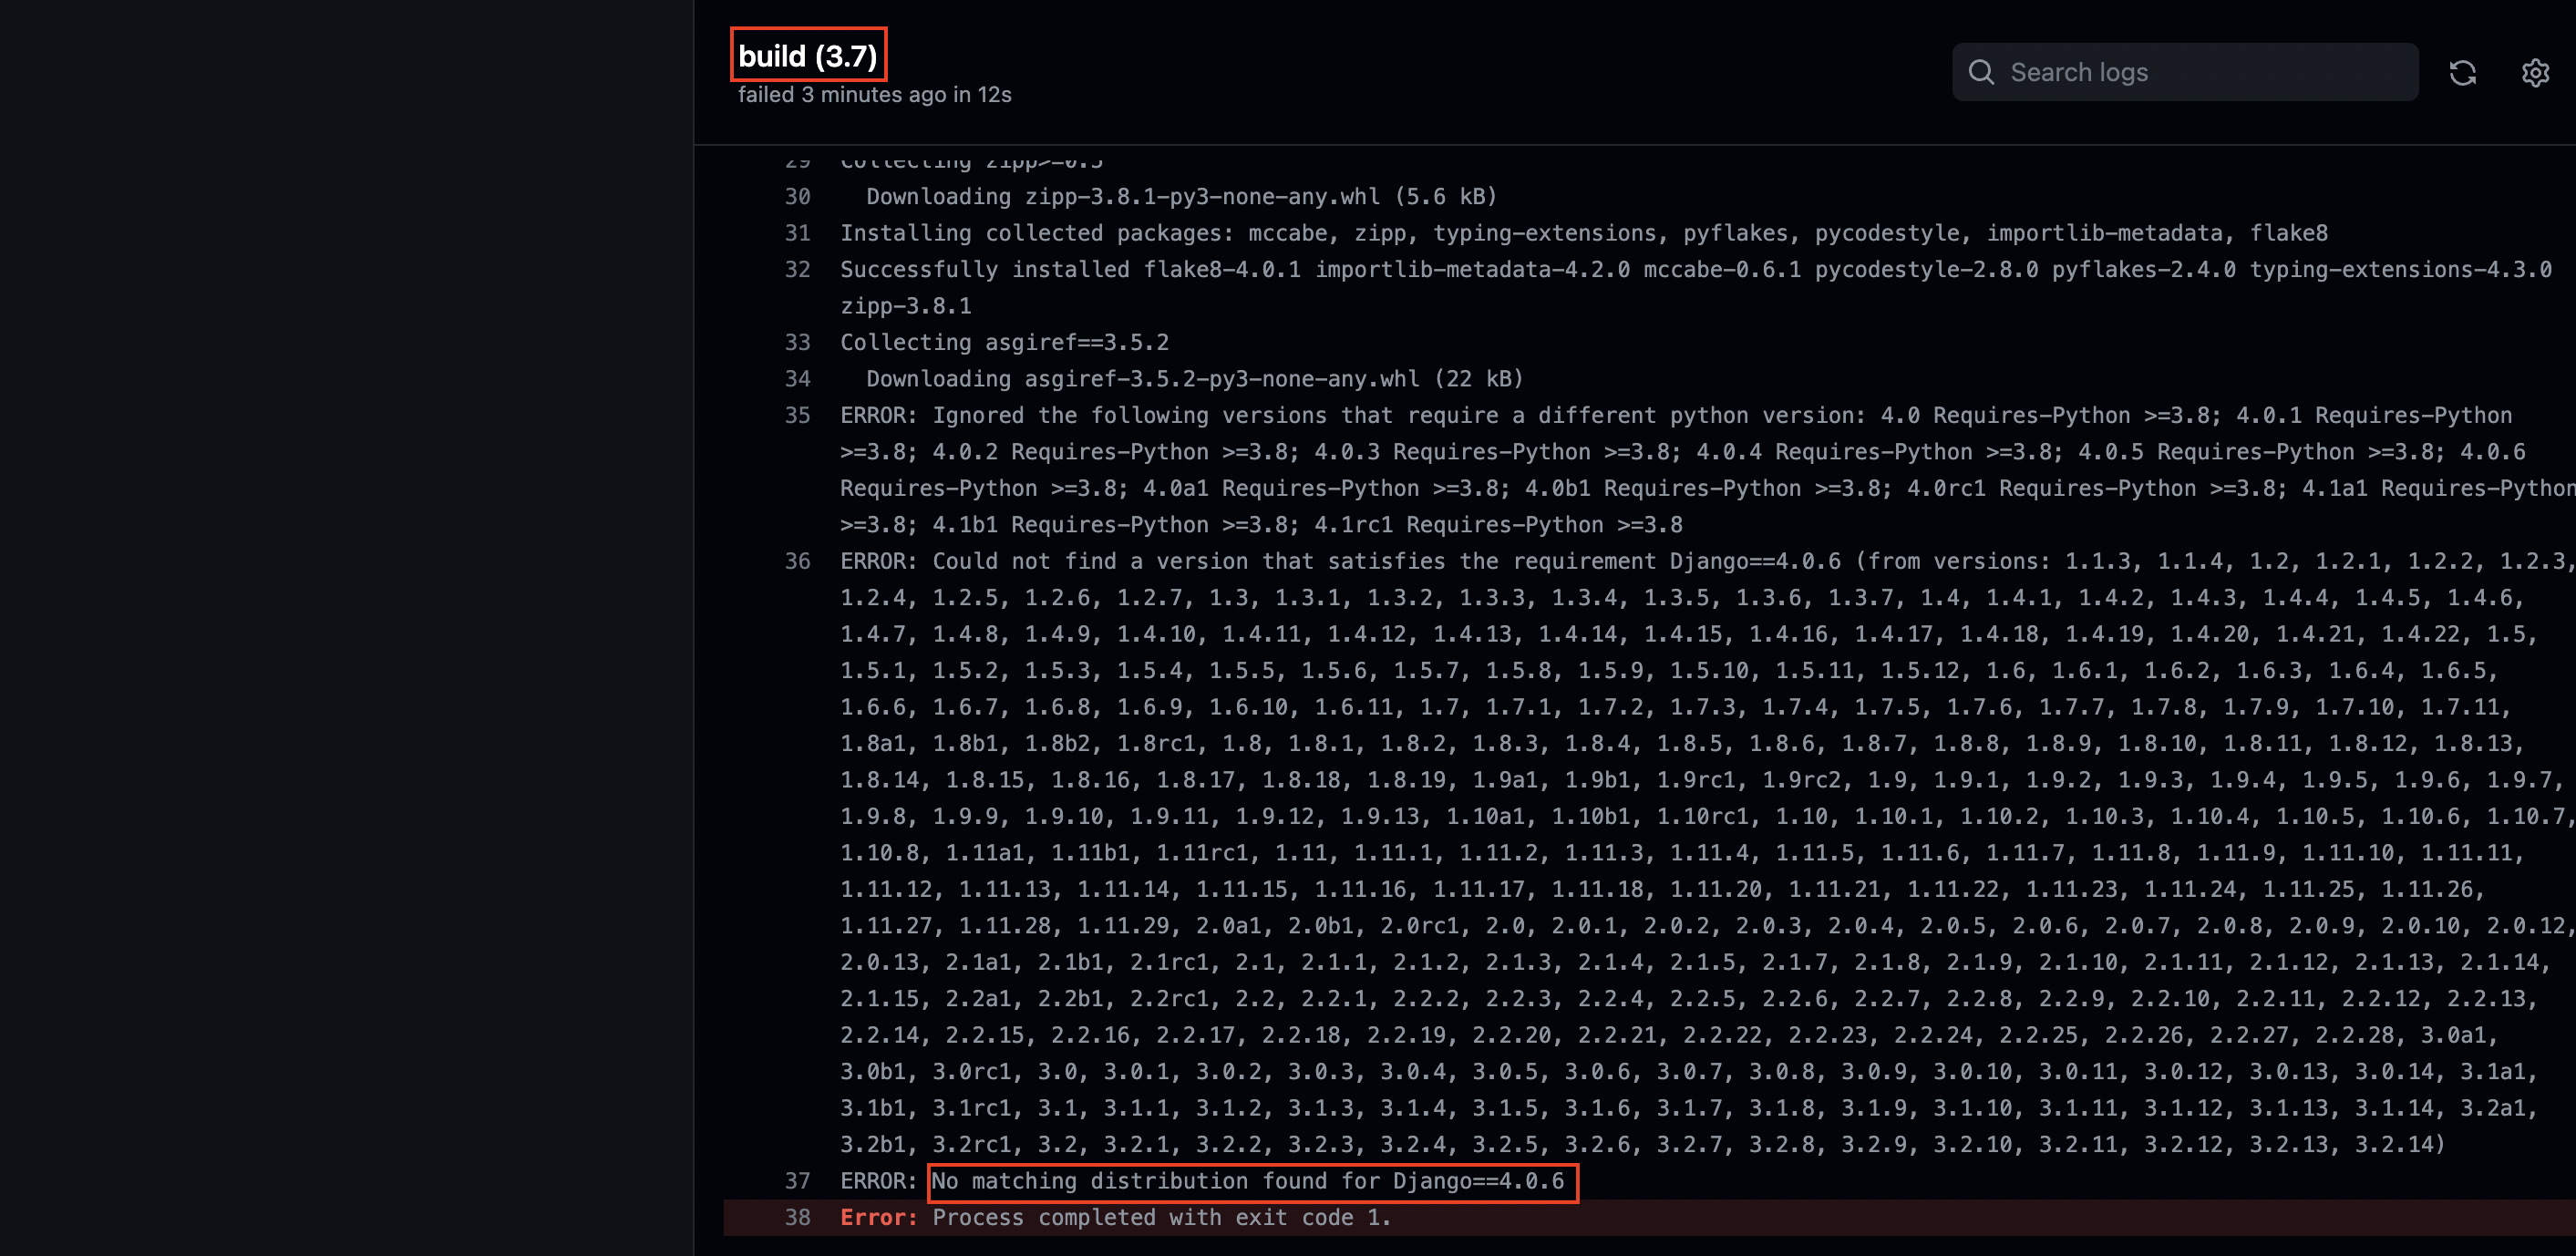
- github actions 탭으로 가 진행상황을 확인해보자.
- 들어가보면 에러가 산더미인데, 3.7의 경우 django의 버전이 너무 높아 커버하지 못하기 때문에 난 것이다.
- 추후에 조정해줄 것이다.
- 추후에 조정해줄 것이다.
- 나머지 3.8, 3.9, 3.10의 경우, 3.7이 깔리지 않아서 에러가 나게 되었다.
- 하나가 실패하면 다 멈추게 된다는 것을 알 수 있다.
- 추가적으로 에러가 난 부분들이다.
- settings.py의 timezone이
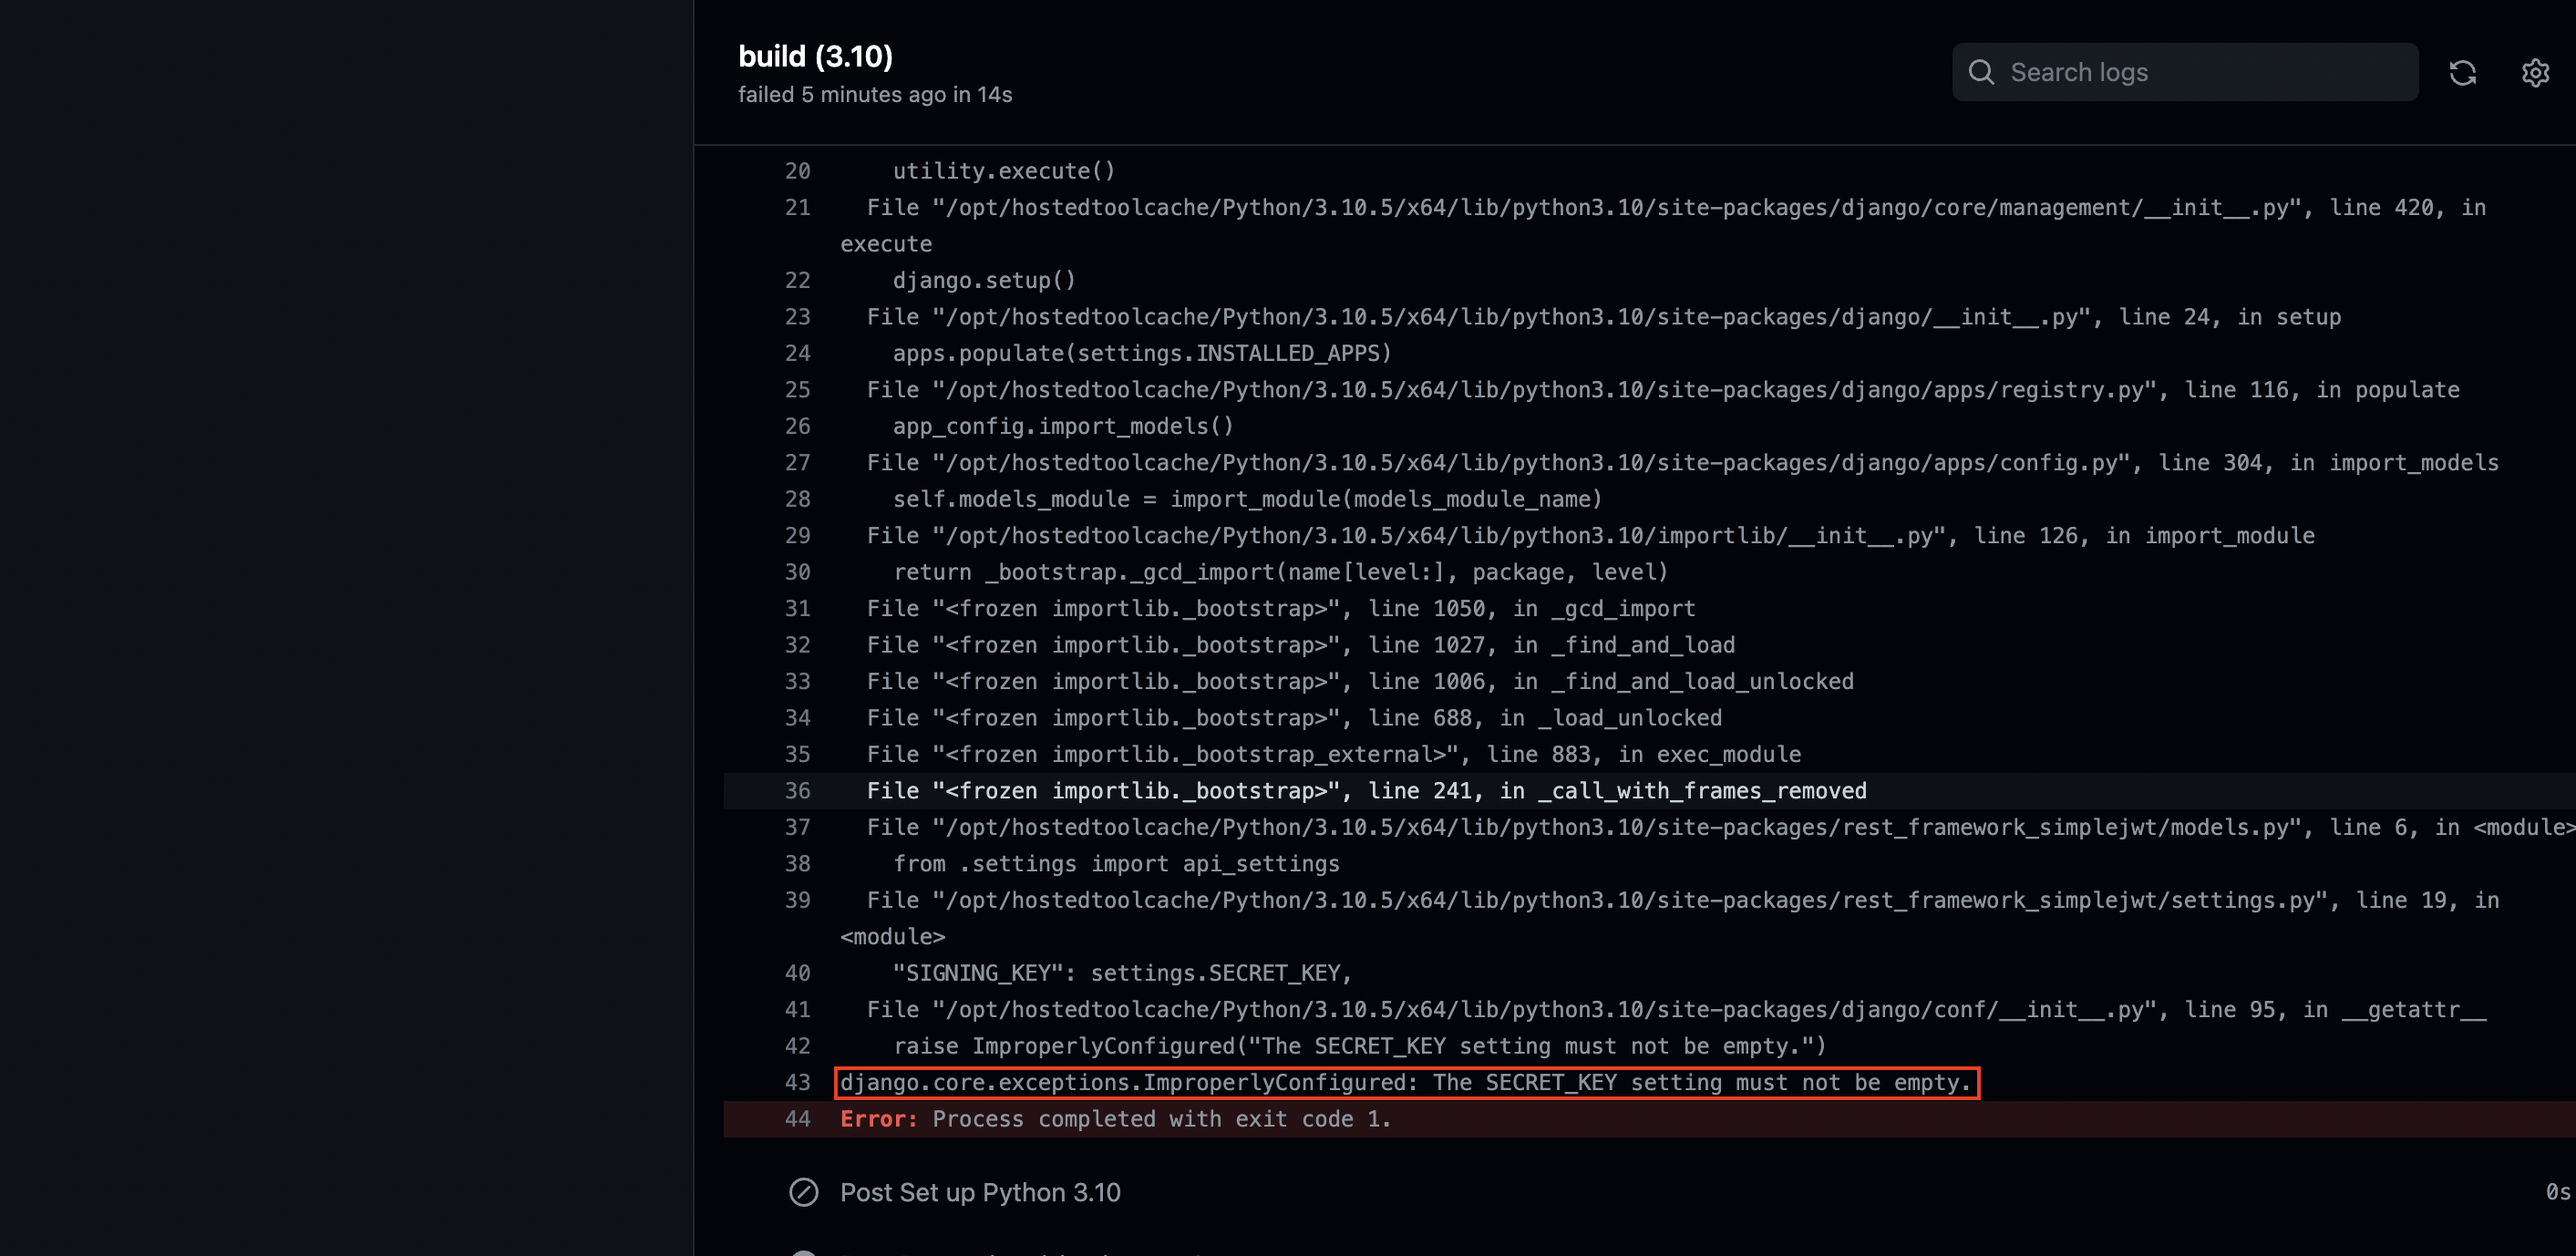
Asia/Seoul인 경우 에러가 났다. 따라서 맨 처음의 세팅과 같이UTC로 바꿔주었다. - 나는 현재 SECRET_KEY를
.env파일에서 관리하고 있다. 이 경우
아래의 에러가 나게 된다.
- 이를 해결하기 위해
dummy SECRET_KEY를 생성하는 방법을 사용했다. 프로젝트로 돌아와 가상환경을 키고 아래의 키를 터미널에서 실행시키면 된다.$ python -c 'from django.core.management.utils import get_random_secret_key; print(get_random_secret_key())' - 또는 github의 settings로 가
환경변수를 설정하는 방법이 있다.
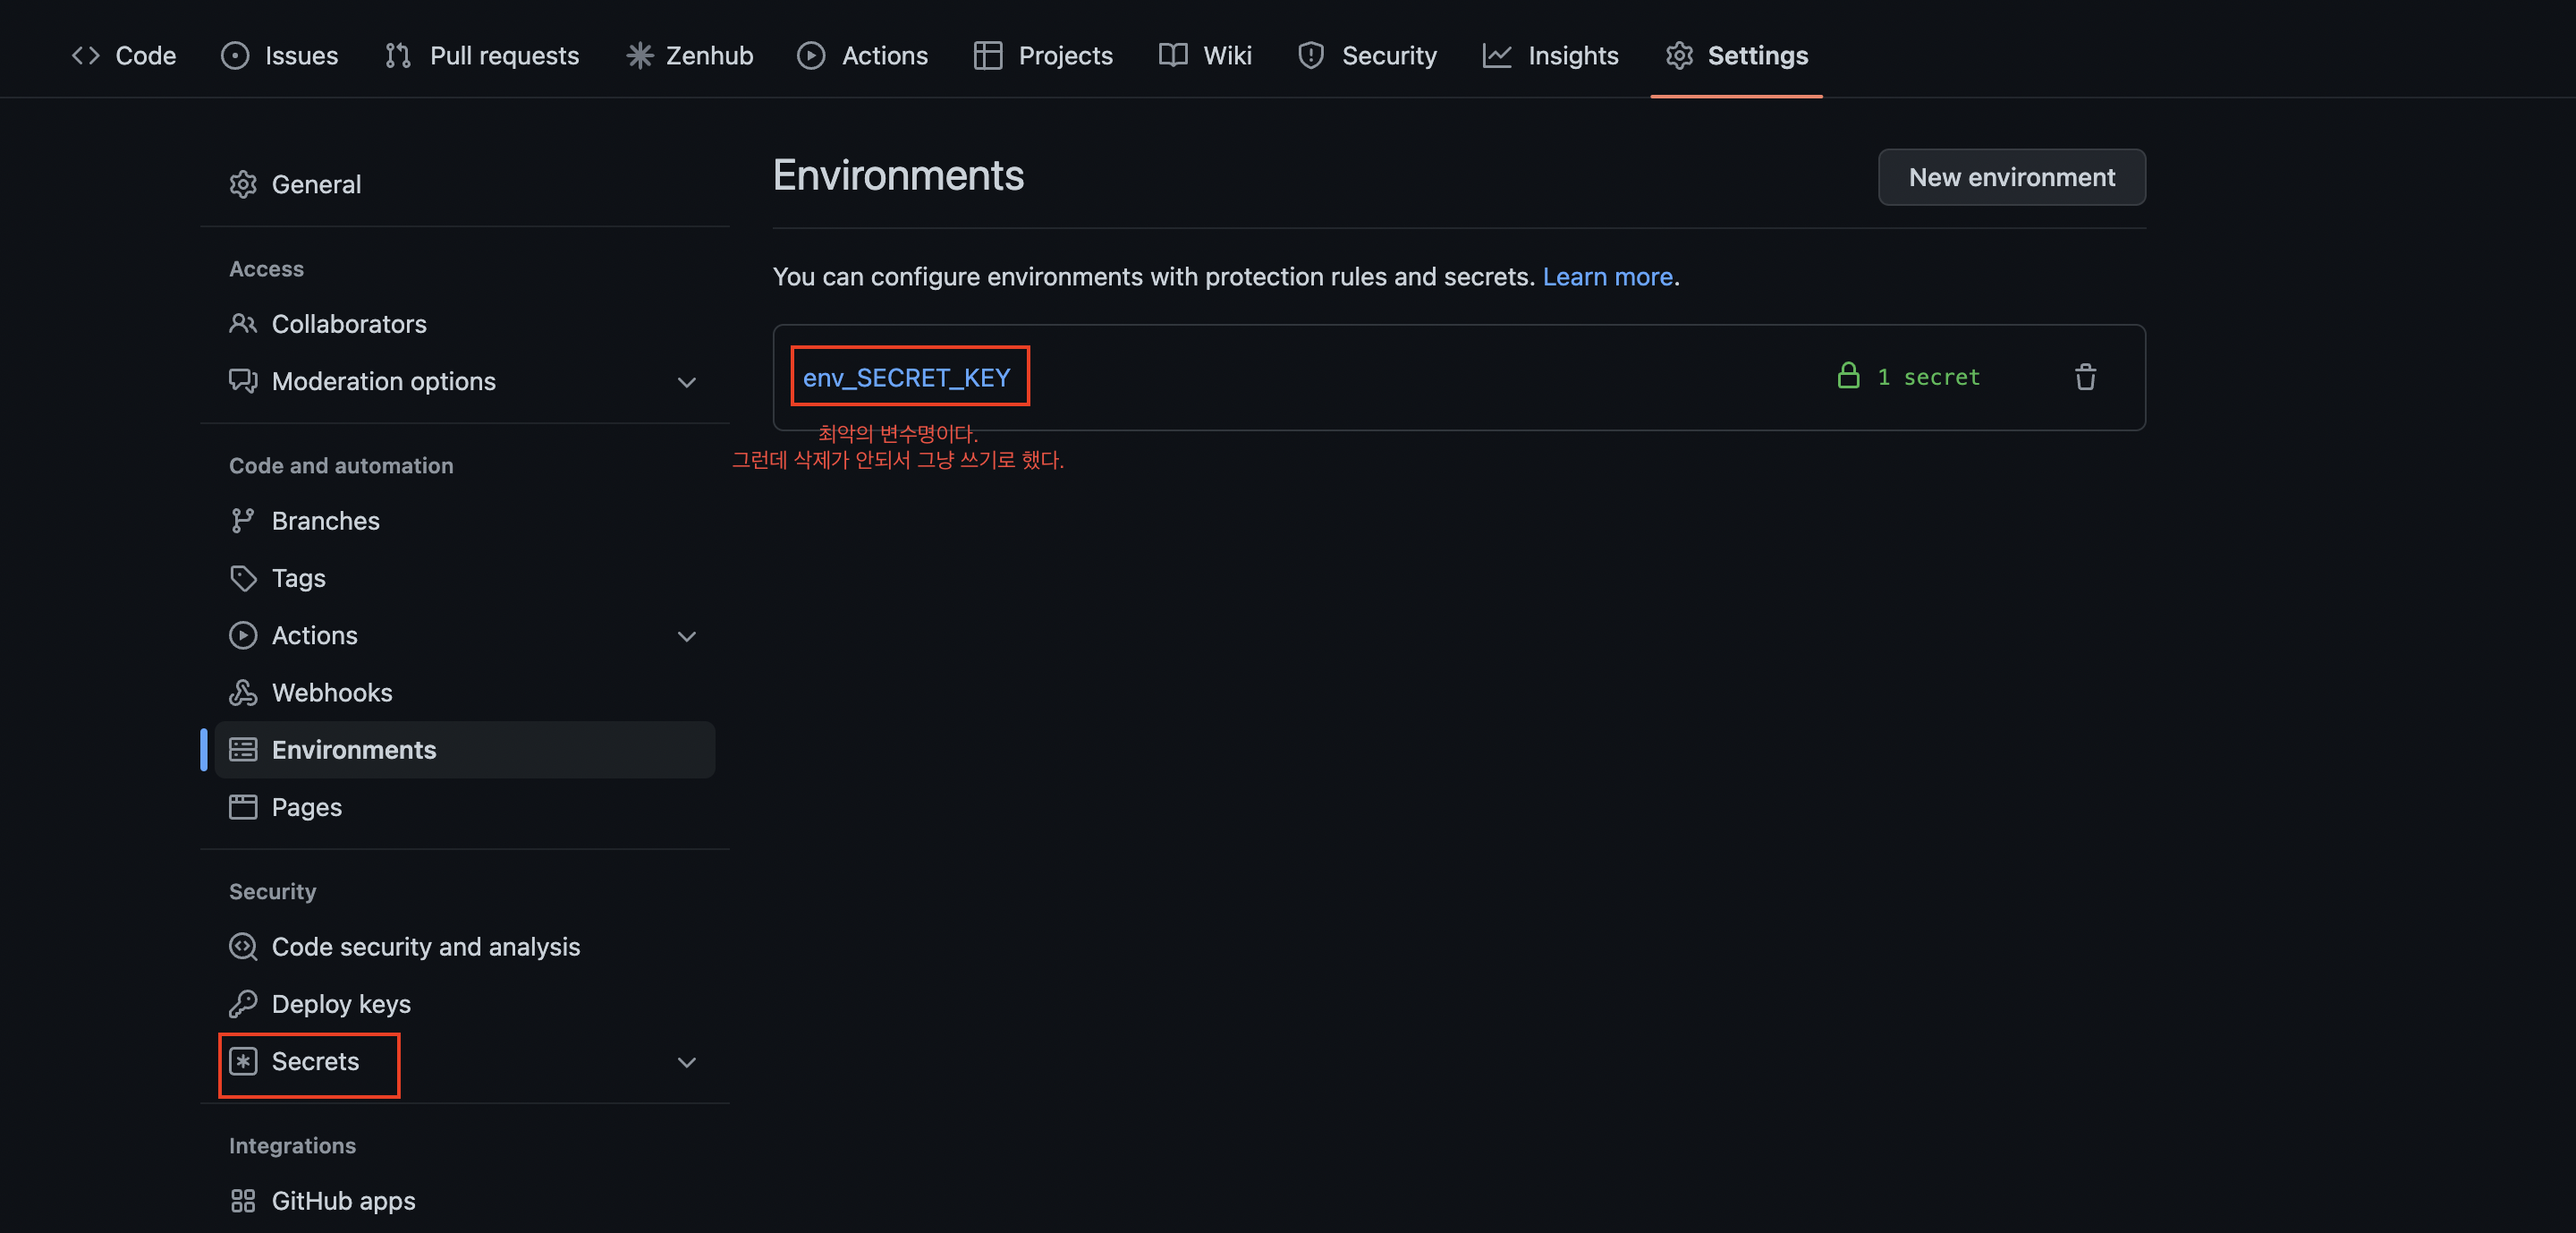
- 위의 빨간 박스 중
Secrets로 가서 설정할 수 있다. 변수명이 아주 좋지 않지만 삭제가 되지 않아 일단 사용하기로 했다. - 아래에 있는
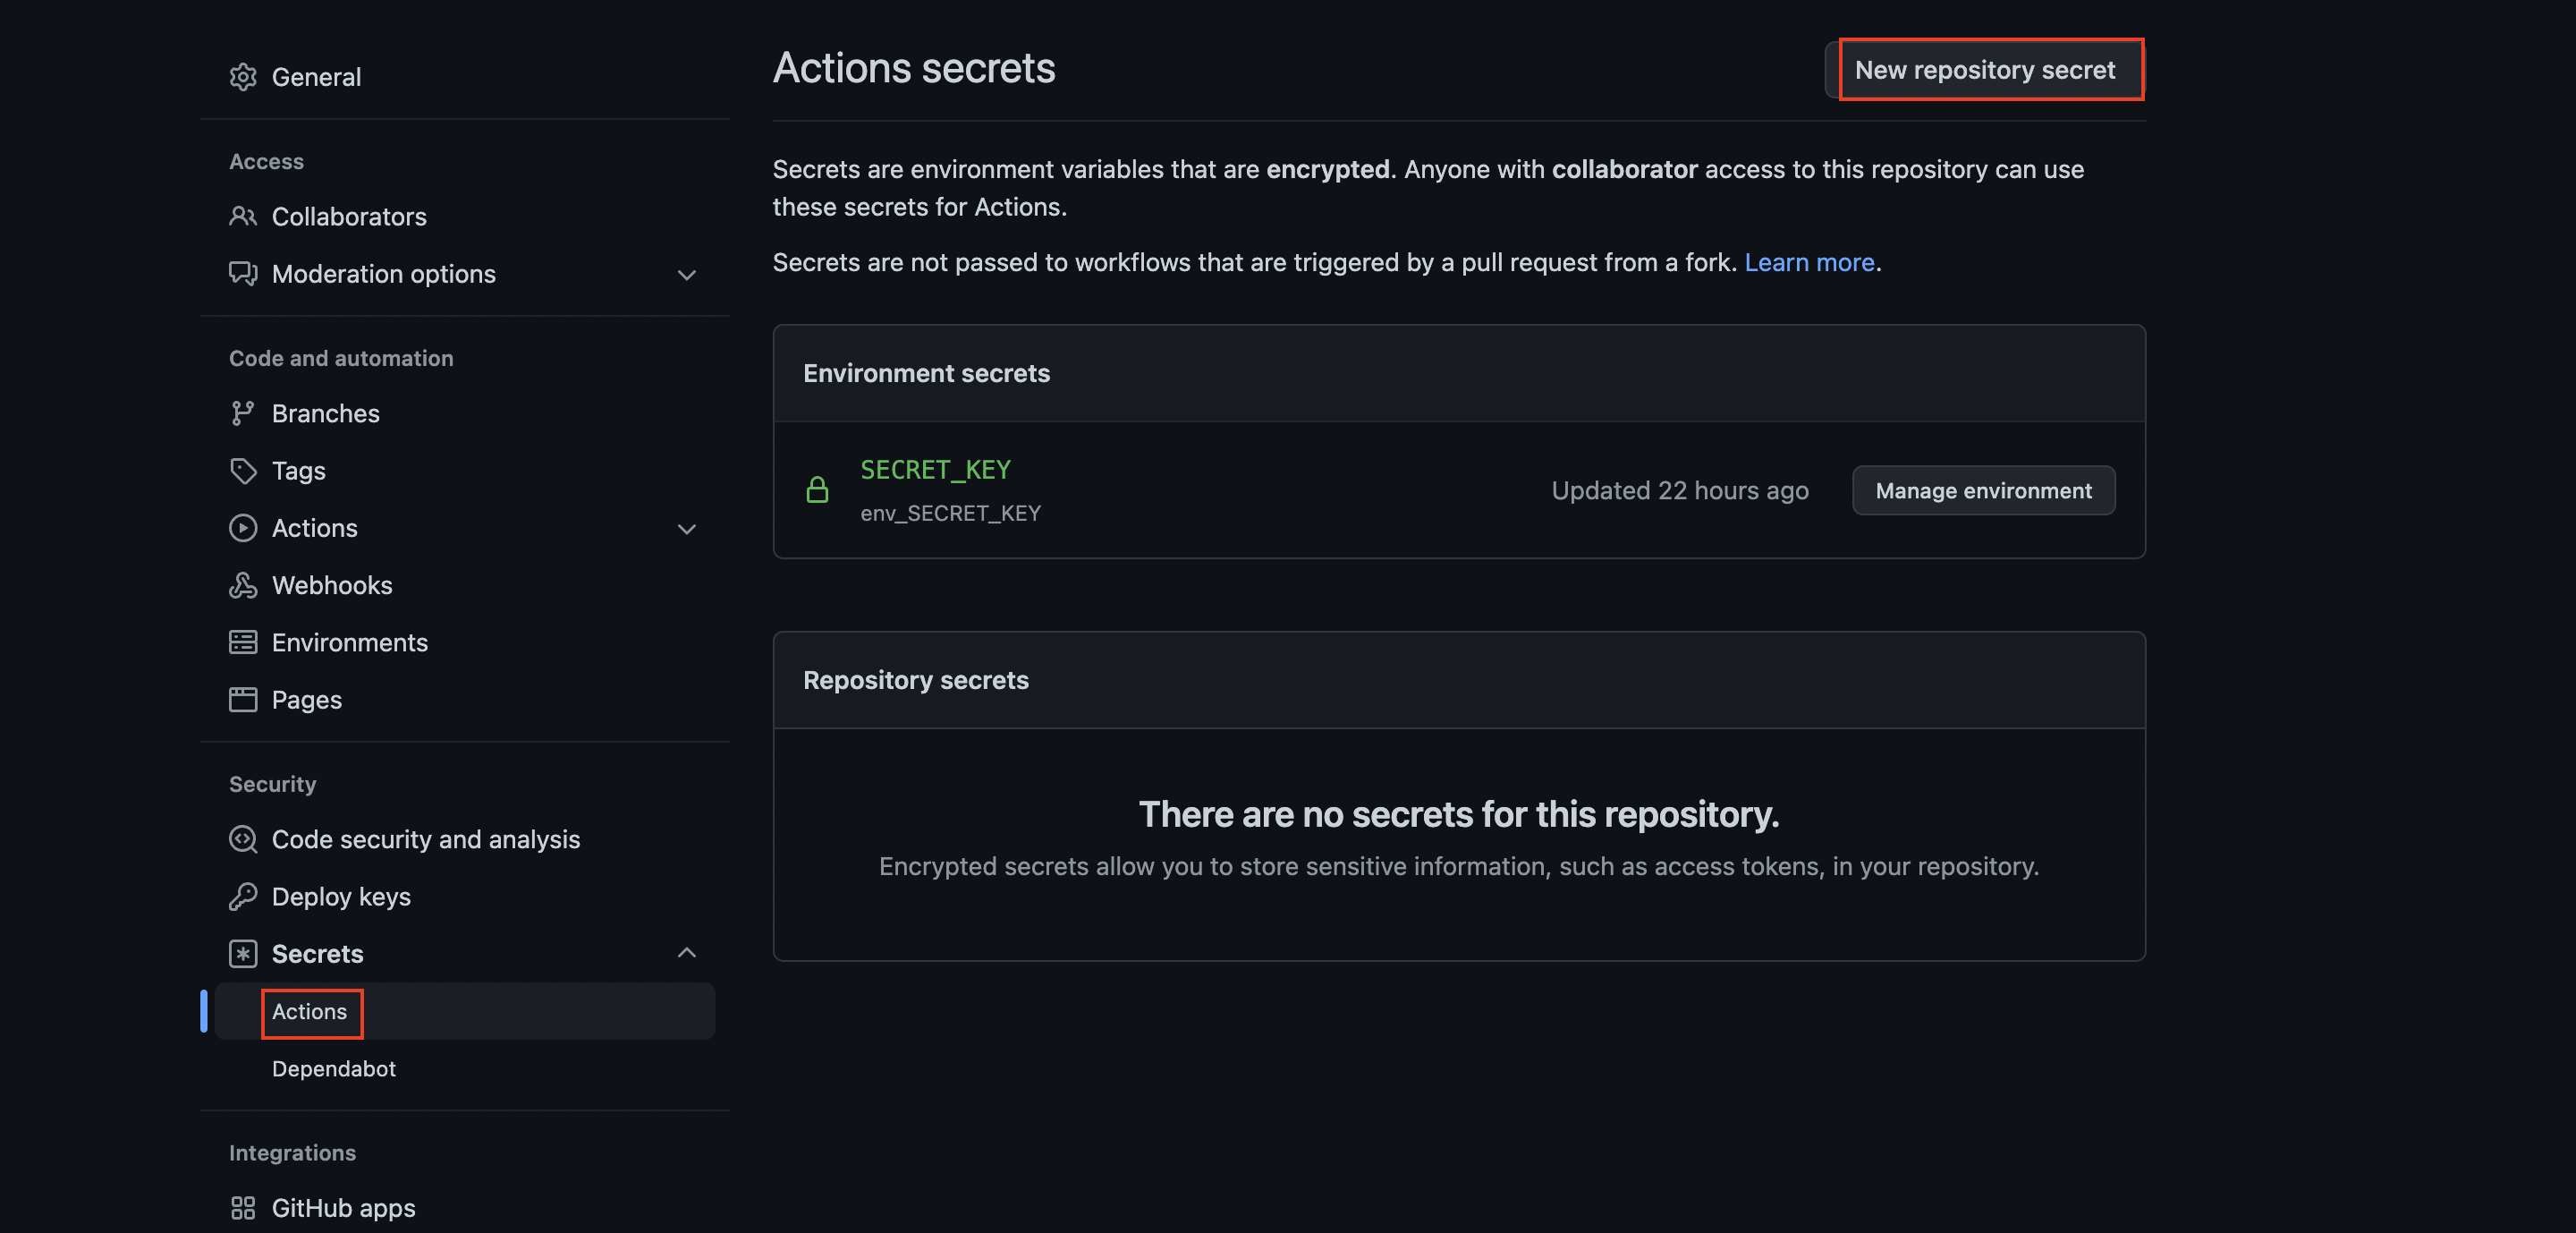
New Repository secret버튼을 눌러 세팅을 진행해주면 된다.
- 그리고 yaml 파일을 아래와 같이 변경해주면 된다.
- settings.py의 timezone이
  name: Django Test

  on: [push]

  jobs:
    build:

    runs-on: ubuntu-latest
    strategy:
      matrix:
        python-version: ["3.8", "3.9", "3.10"]

    steps:
      - uses: actions/checkout@v3
      - name: Set up Python ${{ matrix.python-version }}
        uses: actions/setup-python@v4
        with:
          python-version: ${{ matrix.python-version }}
      - name: Install dependencies
        run: |
          python -m pip install --upgrade pip
          pip install flake8
          pip install -r requirements.txt
      - name: Lint with flake8
        run: |
          # stop the build if there are Python syntax errors or undefined names
          flake8 . --count --select=E9,F63,F7,F82 --show-source --statistics
          # exit-zero treats all errors as warnings. The GitHub editor is 127 chars wide
          flake8 . --count --exit-zero --max-complexity=10 --max-line-length=127 --statistics
      - name: Run Tests
        env:
          SECRET_KEY: ${{secrets.SECRET_KEY}}
        run: |
          python manage.py test
- 이제 3.7의 에러를 잡아보겠다.
- 일단 한쪽에서 에러가 나더라도 다른 것들은 돌아갈 수 있도록 설정해보자.
name: Django Test

on: [push]

jobs:
  build:

    runs-on: ubuntu-latest
    strategy:
      matrix:
        python-version: ["3.7", "3.8", "3.9", "3.10"]
      fail-fast: false

    steps:
      - uses: actions/checkout@v3
      - name: Set up Python ${{ matrix.python-version }}
        uses: actions/setup-python@v4
        with:
          python-version: ${{ matrix.python-version }}
      - name: Install dependencies
        run: |
          python -m pip install --upgrade pip
          pip install flake8
          pip install -r requirements.txt
      - name: Lint with flake8
        run: |
          # stop the build if there are Python syntax errors or undefined names
          flake8 . --count --select=E9,F63,F7,F82 --show-source --statistics
          # exit-zero treats all errors as warnings. The GitHub editor is 127 chars wide
          flake8 . --count --exit-zero --max-complexity=10 --max-line-length=127 --statistics
      - name: Run Tests
        env:
          SECRET_KEY: _-nghz+-mgqg6*lv61yjk-bsvb^al2^0^^j*1h^6q(v-lfo(o$
        run: |
python manage.py test- 위와 같이 설정하게 되면 3.7에서 에러가 나더라도 다른 버전의 파이썬은 설치되어 실행되는 것을 알 수 있다.
- 현재 나의 작업 환경은 3.9.10이다. 따라서 그냥 3.7은 삭제해주도록 하겠다.
name: Django Test

on: [push]

jobs:
  build:

    runs-on: ubuntu-latest
    strategy:
      matrix:
        python-version: ["3.8", "3.9", "3.10"]

    steps:
      - uses: actions/checkout@v3
      - name: Set up Python ${{ matrix.python-version }}
        uses: actions/setup-python@v4
        with:
          python-version: ${{ matrix.python-version }}
      - name: Install dependencies
        run: |
          python -m pip install --upgrade pip
          pip install flake8
          pip install -r requirements.txt
      - name: Lint with flake8
        run: |
          # stop the build if there are Python syntax errors or undefined names
          flake8 . --count --select=E9,F63,F7,F82 --show-source --statistics
          # exit-zero treats all errors as warnings. The GitHub editor is 127 chars wide
          flake8 . --count --exit-zero --max-complexity=10 --max-line-length=127 --statistics
      - name: Run Tests
        env:
          SECRET_KEY: _-nghz+-mgqg6*lv61yjk-bsvb^al2^0^^j*1h^6q(v-lfo(o$
        run: |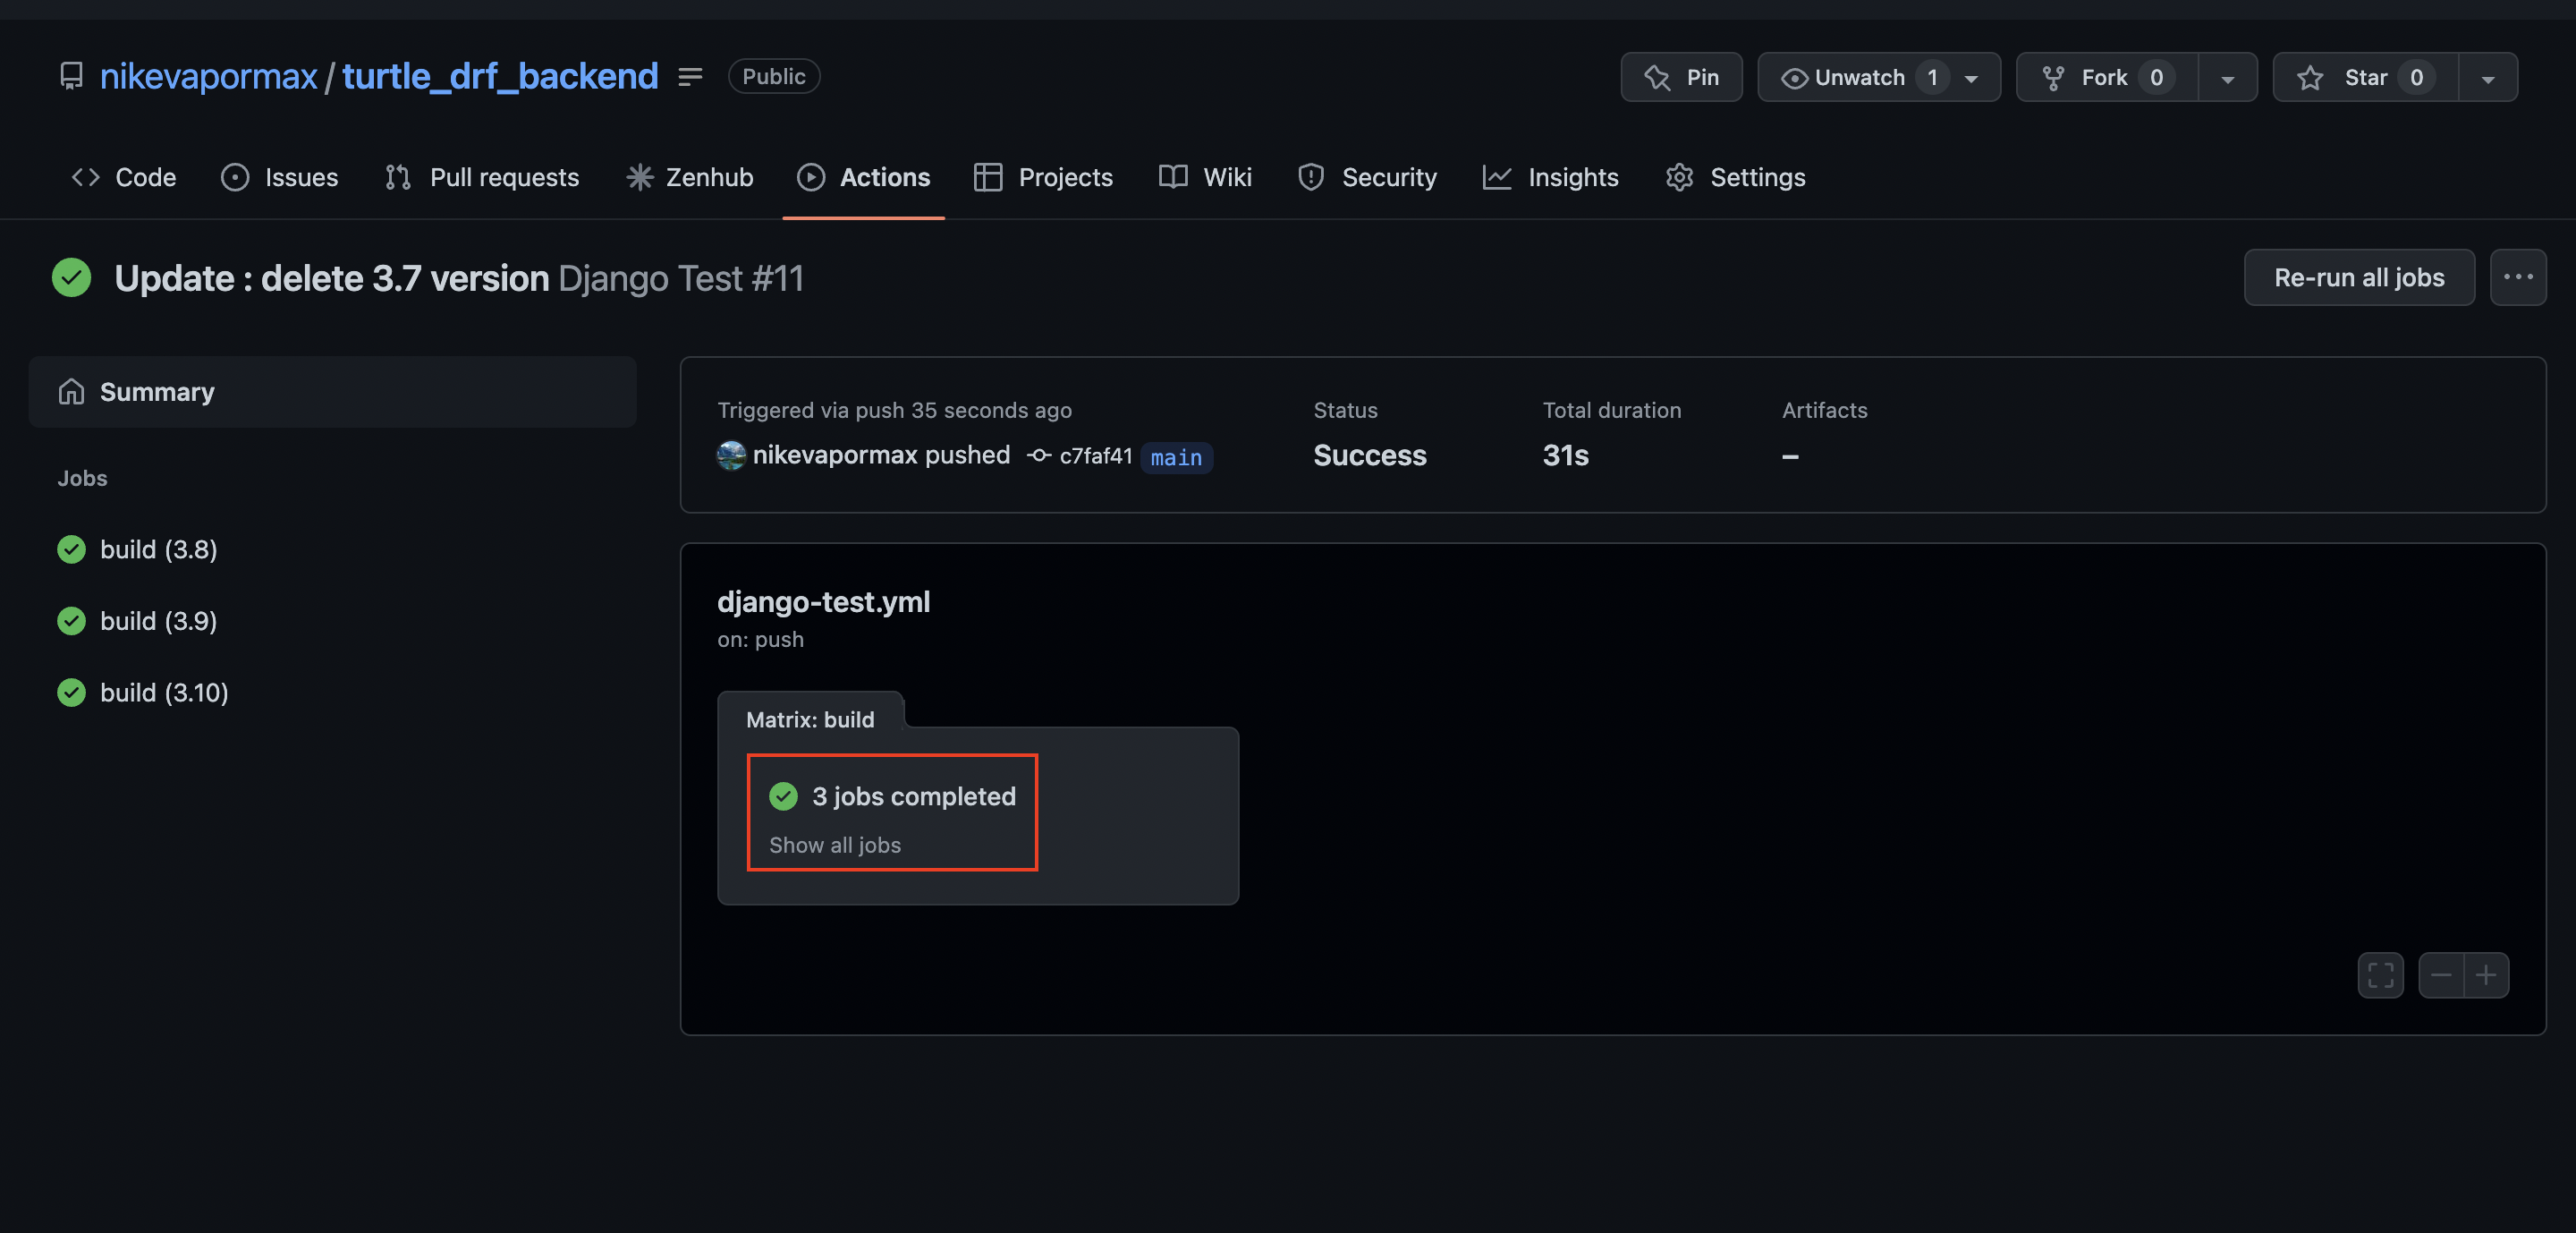
python manage.py test- 이제 깃헙에 가서 actions 탭을 확인하면 세 가지 모두 다 통과되는 것을 볼 수 있다.

https://github.com/nikevapormax