이 글은 이 곳 의 포스트를 번역한 글입니다. 의역 및 재구성이 있을 수 있습니다.

들어가며
사용자가 웹 어플리케이션의 로딩 속도가 너무 느리다는 피드백을 준 적이 있나요? 이는 보통 긴 I/O바운드 호출이나, 시간이 많이 걸리는 프로세스 때문일 수 있습니다. 예를 들어, 고객이 웹사이트에 가입했을 때 우리는 이메일 주소 확인 메일을 보내야 합니다. 정상적인 경우에는 이메일을 보내고 200 status OK 응답을 회원가입 POST요청에 보냅니다. 하지만 우리는 200OK 응답을 먼저 준 후에 이메일을 보낼 수도 있습니다. 하지만 이는 MVC 패러다임에 촘촘히 얽힌 Django에서는 그리 간단한 작업이 아닙니다.
그럼 어떻게 해야할까요? 가장 먼저 생각한 것은 파이썬 스레드링 모듈입니다. 다만 Python 스레드는 GIL(Global Interpreter Lock)때문에, Python 프로세스는 한 번에 하나의 스레드만 실행합니다. 결국 스레드를 이용한 방식 역시 코드를 유지, 관리, 확장하기에는 어려움이 있습니다.
필수요소
이 포스트의 내용은 Django와 AWS Elastic Beanstalk에 대한 기본적인 지식을 가져야 읽기 편할 수 있습니다.
Celery
Celery가 위에서 든 예시에서 구원투수로 등장할 수 있습니다. Celery는 요청-응답의 과정에서 오래 걸리는 작업 (무거운 task, I/O바운드 task) 이 있을 때 도움이 될 수 있습니다. Celery는 분산 메시지 전달을 기반으로하는 오픈 소스 비동기 작업 대기열입니다. 이 포스트에서Elastic Beanstalk에 Django, SQS와 함께 Celery를 구성하는 방법을 안내해드리겠습니다.
왜 Celery여야만 할까요?
셀러리는 기존 코드베이스와 통합하기가 매우 쉽습니다. 비동기 작업을 원하는 기존 함수에 decorator를 쓰고, 해당 함수의 .delay 메서드를 사용하여 해당 함수를 호출하기만 하면 됩니다.
from celery import Celery

app = Celery('hello', broker='amqp://guest@localhost//')

@app.task
def hello():
    return 'hello world'
# Calling a celery task
hello.delay()Broker
Celery를 구성하기 위해서는 일단 메세지 브로커가 필요합니다. 이 포스트가 작성되는 시점에 Celery는 메세지 브로커로 RabbitMQ, Redis 및 Amazon SQS(완전하지는 않음)를 지원합니다.
SQS는 아직 원격 제어명령과 이벤트를 지원하지 않기 떄문에, 저처럼 AWS 생태계를 고집하려고 하지 않는다면 일반적으로는 RabbitMQ나 Redis를 통해 진행하는 것이 추천드립니다.
자세한 내용은 여기를 참조하세요. SQS를 사용하는 이유중 하나는 매달 1백만의 무료 리퀘스트를 지원하는 가격 정책 입니다.
SQS를 계속 진행하려면 AWS SQS 대시보드로 이동하여 새 SQS 대기열을 만드세요. 대기열 생성 버튼을 클릭합니다.

필요사항에 따라서 모든 유형의 대기열을 선택할 수 있습니다. 대기열 이름은 dev-celery로 하겠습니다.
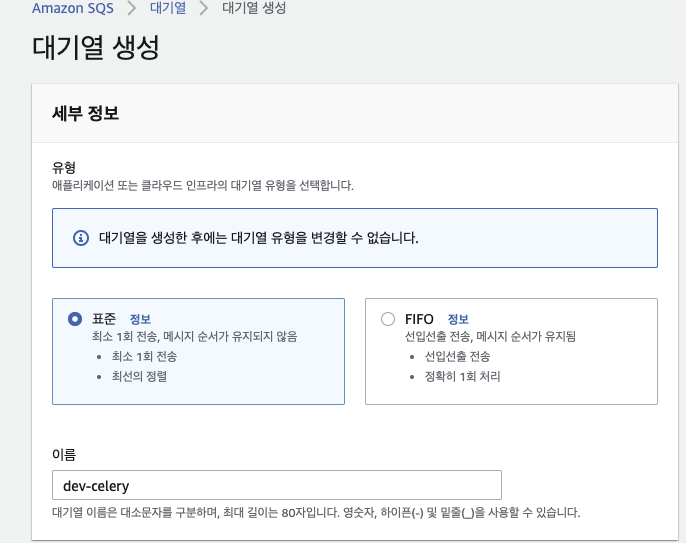
나머지 정보는 바꾸지 않고 일단 대기열 생성을 해주겠습니다.

설치하기
Celery는 아주 좋은 공식 문서를 가지고 있습니다. 설치와 구성에 대한 설명은 여기 있습니다. 편의를 위해 여기에서도 단계를 설명드리겠습니다.
가상환경을 구성한 경우 가상환경을 활성화 시키고 Celery를 설치합니다
pip install celery[sqs]
구성하기
Celery는 django에 대한 bulit-in 지원을 가지고 있습니다. Celery는 django의 settings.py에서 CELERY_로 시작하는 자신의 설정 변수들을 가져옵니다. 그러니 아래의 설정 변수를 settings.py 에 써줍니다.
# Amazon credentials will be taken from environment variable.
CELERY_BROKER_URL = 'sqs://'
*AWS 로그인 credential (AWS_ACCESS_KEY_ID 와 AWS_SECRET_ACCESS_KEY) 이 환경변수에 있어야 합니다.
CELERY_BROKER_TRANSPORT_OPTIONS = {
  'region': 'us-west-2',
  'visibility_timeout': 3600,
  'polling_interval': 10,
  'queue_name_prefix': '%s-' % {
    True: 'dev',
    False: 'production'}[DEBUG],
  'CELERYD_PREFETCH_MULTIPLIER': 0,
}
이제 django 코드 내에서 셀러리 앱을 구성하겠습니다. django의 settings.py 외에 celery.py 파일을 생성합니다.
from __future__ import absolute_import, unicode_literals
import os
from celery import Celery

# set the default Django settings module for the 'celery' program.
os.environ.setdefault('DJANGO_SETTINGS_MODULE', 'proj.settings')

app = Celery('proj')

# Using a string here means the worker doesn't have to serialize
# the configuration object to child processes.
# - namespace='CELERY' means all celery-related configuration keys
#   should have a `CELERY_` prefix.
app.config_from_object('django.conf:settings', namespace='CELERY')

# Load task modules from all registered Django app configs.
app.autodiscover_tasks()

@app.task(bind=True)
def debug_task(self):
   print('Request: {0!r}'.format(self.request))
그리고 프로젝트의 __init__.py 파일에 아래 코드를 넣어줍니다.
from __future__ import absolute_import, unicode_literals

# This will make sure the app is always imported when
# Django starts so that shared_task will use this app.
from .celery import app as celery_app

__all__ = ('celery_app',)
테스트하기
이제 구성된 사항들을 테스트해봅시다. 터미널을 열고 Celery를 실행합니다.
터미널 1
$ celery worker --app=proj --loglevel=INFO
-------------- celery@lintel v4.1.0 (latentcall)
---- **** -----
--- * ***  * -- Linux-4.15.0-24-generic-x86_64-with-Ubuntu-18.04-bionic 2018-07-04 11:18:57
-- * - **** ---
- ** ---------- [config]
- ** ---------- .> app:         enq_web:0x7f0ba29fa3d0
- ** ---------- .> transport:   sqs://localhost//
- ** ---------- .> results:     disabled://
- *** --- * --- .> concurrency: 4 (prefork)
-- ******* ---- .> task events: OFF (enable -E to monitor tasks in this worker)
--- ***** -----
-------------- [queues]
               .> celery           exchange=celery(direct) key=celery
[tasks]
 . enq_web._celery.debug_task
Celery 데코레이터를 사용하여 Celery를 사용하도록 등록된 모든 작업들을 Celery를 시작하는 동안 여기에 나타납니다. 작업이 여기에 나타나지 않으면, 시작할 때 작업이 포함된 모듈을 가져와야 합니다.
이제 다른 터미널에서 django 셸을 엽니다.
터미널 2
$ python manage.py shell

In [1]: from proj import celery
In [2]: celery.debug_task() # ←← ← Not through celery
In [3]: celery.debug_task.delay() # ←← ← This is through celery
delay 메서드로 task 기능을 실행한 후, 다른 터미널의 이벤트를 받는 작업자 프로세스에서 해당 작업이 실행되어야 합니다. 이 Celery는 SQS를 듣고 있던 작업 및 작업자 프로세스의 세부 정보가 포함된 메시지를 SQS에 전송하여 이를 수신하고 작업자 프로세스에서 작업이 실행되었습니다. 다음은 터미널 1에서 볼 수 있는 내용입니다.
Request: <Context: {'origin': 'gen14099@lintel', u'args': [], 'chain': None, 'root_id': '041be6c3-419d-4aa0-
822f-d50da1b340a0', 'expires': None, u'is_eager': False, u'correlation_id': '041be6c3-419d-4aa0-822f-
d50da1b340a0', 'chord': None, u'reply_to': 'd2e76b9b-094b-33b4-a873-db5d2ace8881', 'id': '041be6c3-419d-
4aa0-822f-d50da1b340a0', 'kwargsrepr': '{}', 'lang': 'py', 'retries': 0, 'task': 'proj.celery.debug_task',
'group': None, 'timelimit': [None, None], u'delivery_info': {u'priority': 0, u'redelivered': None,
u'routing_key': 'celery', u'exchange': u''}, u'hostname': u'celery@lintel', 'called_directly': False,
'parent_id': None, 'argsrepr': '()', 'errbacks': None, 'callbacks': None, u'kwargs': {}, 'eta': None,
'_protected': 1}>
Celery 프로세스를 AWS Elastic Beanstalk에 배포하기
Celery는 multi라는 데몬화 서브 커맨드를 가지고 있지만, 프로덕션 환경에서 사용할 수 없습니다. Celery는 여러 데몬화(daemonization) 툴들을 사용하기를 권장합니다.
http://docs.celeryproject.org/en/latest/userguide/daemonizing.html
AWS Elastic Beanstalk에는 이미 web server process를 관리하기 위해 supervisord를 사용하고 있습니다. Celery 역시도 supervisord 툴을 이용해서 구성될 수 있습니다. Celery의 공식 문서에는 Celery supervisord 구성의 좋은 예시가 있습니다. 이를 기반으로 우리는 .ebextensions 아래에 상당한 코드를 작성할 것입니다.
.ebextensions 디렉토리 아래에 두 개의 파일을 만듭니다. Celery.sh 파일은 환경 변수를 추출하고 셀러리 구성을 생성하며, 셀러리 구성은 /opt/tc/celery.conf 파일에 복사되고 supervisord가 재시작됩니다.
기본 셀러리 명령:
celery worker -A PROJECT_NAME -P solo --loglevel=INFO -n worker.%%h.당시 이 블로그에서 셀러리 글을 작성 할 때 https://github.com/celery/celery/issues/3759 이슈가 있었습니다. 이 문제에 대한 해결책으로 "-P solo"를 추가합니다. 이렇게 하면 단일 작업자 프로세스에 대해 순차적으로 작업이 실행됩니다.
File: celery-worker.sh
#!/usr/bin/env bash

# Get django environment variables
celeryenv=`cat /opt/python/current/env | tr '\n' ',' | sed 's/export //g' | sed 's/$PATH/%(ENV_PATH)s/g' | sed 's/$PYTHONPATH//g' | sed 's/$LD_LIBRARY_PATH//g'`
celeryenv=${celeryenv%?}

# Create celery configuraiton script
celeryconf="[program:celeryd-worker]
; Set full path to celery program if using virtualenv
command=/opt/python/run/venv/bin/celery worker -A PROJECT_NAME -P solo --loglevel=INFO -n worker.%%h

directory=/opt/python/current/app/enq_web
user=nobody
numprocs=1
stdout_logfile=/var/log/celery/worker.log
stderr_logfile=/var/log/celery/worker.log
autostart=true
autorestart=true
startsecs=10

; Need to wait for currently executing tasks to finish at shutdown.
; Increase this if you have very long running tasks.
stopwaitsecs = 600

; When resorting to send SIGKILL to the program to terminate it
; send SIGKILL to its whole process group instead,
; taking care of its children as well.
killasgroup=true

; if rabbitmq is supervised, set its priority higher
; so it starts first
priority=998

environment=$celeryenv
"

# Create the celery supervisord conf script
echo "$celeryconf" | tee /opt/python/etc/celery.conf

# Add configuration script to supervisord conf (if not there already)
if ! grep -Fxq "[include]" /opt/python/etc/supervisord.conf
  then
  echo "[include]" | tee -a /opt/python/etc/supervisord.conf
  echo "files: celery.conf" | tee -a /opt/python/etc/supervisord.conf
fi

# Reread the supervisord config
/usr/local/bin/supervisorctl -c /opt/python/etc/supervisord.conf reread

# Update supervisord in cache without restarting all services
/usr/local/bin/supervisorctl -c /opt/python/etc/supervisord.conf update

# Start/Restart celeryd through supervisord
/usr/local/bin/supervisorctl -c /opt/python/etc/supervisord.conf restart celeryd-worker
이제 아래와 같이 Elastic Beanstalk 구성 파일을 생성합니다. pycurl과 celery가 requirements.txt에 존재하는지 확인하세요.
pycurl libcurl-devel 을 설치하려면 yum package manager 를 사용해야 합니다.
File: celery.config
packages:
  yum:
    libcurl-devel: []

container_commands:
    01_mkdir_for_log_and_pid:
        command: "mkdir -p /var/log/celery/ /var/run/celery/"
    02_celery_configure:
        command: "cp .ebextensions/celery-worker.sh /opt/elasticbeanstalk/hooks/appdeploy/post/ && chmod 744 /opt/elasticbeanstalk/hooks/appdeploy/post/celery-worker.sh"
        cwd: "/opt/python/ondeck/app"
    03_celery_run:
        command: "/opt/elasticbeanstalk/hooks/appdeploy/post/celery-worker.sh"
위의 파일들을 git에 추가하고 Elastic Beanstalk에 배포합니다.
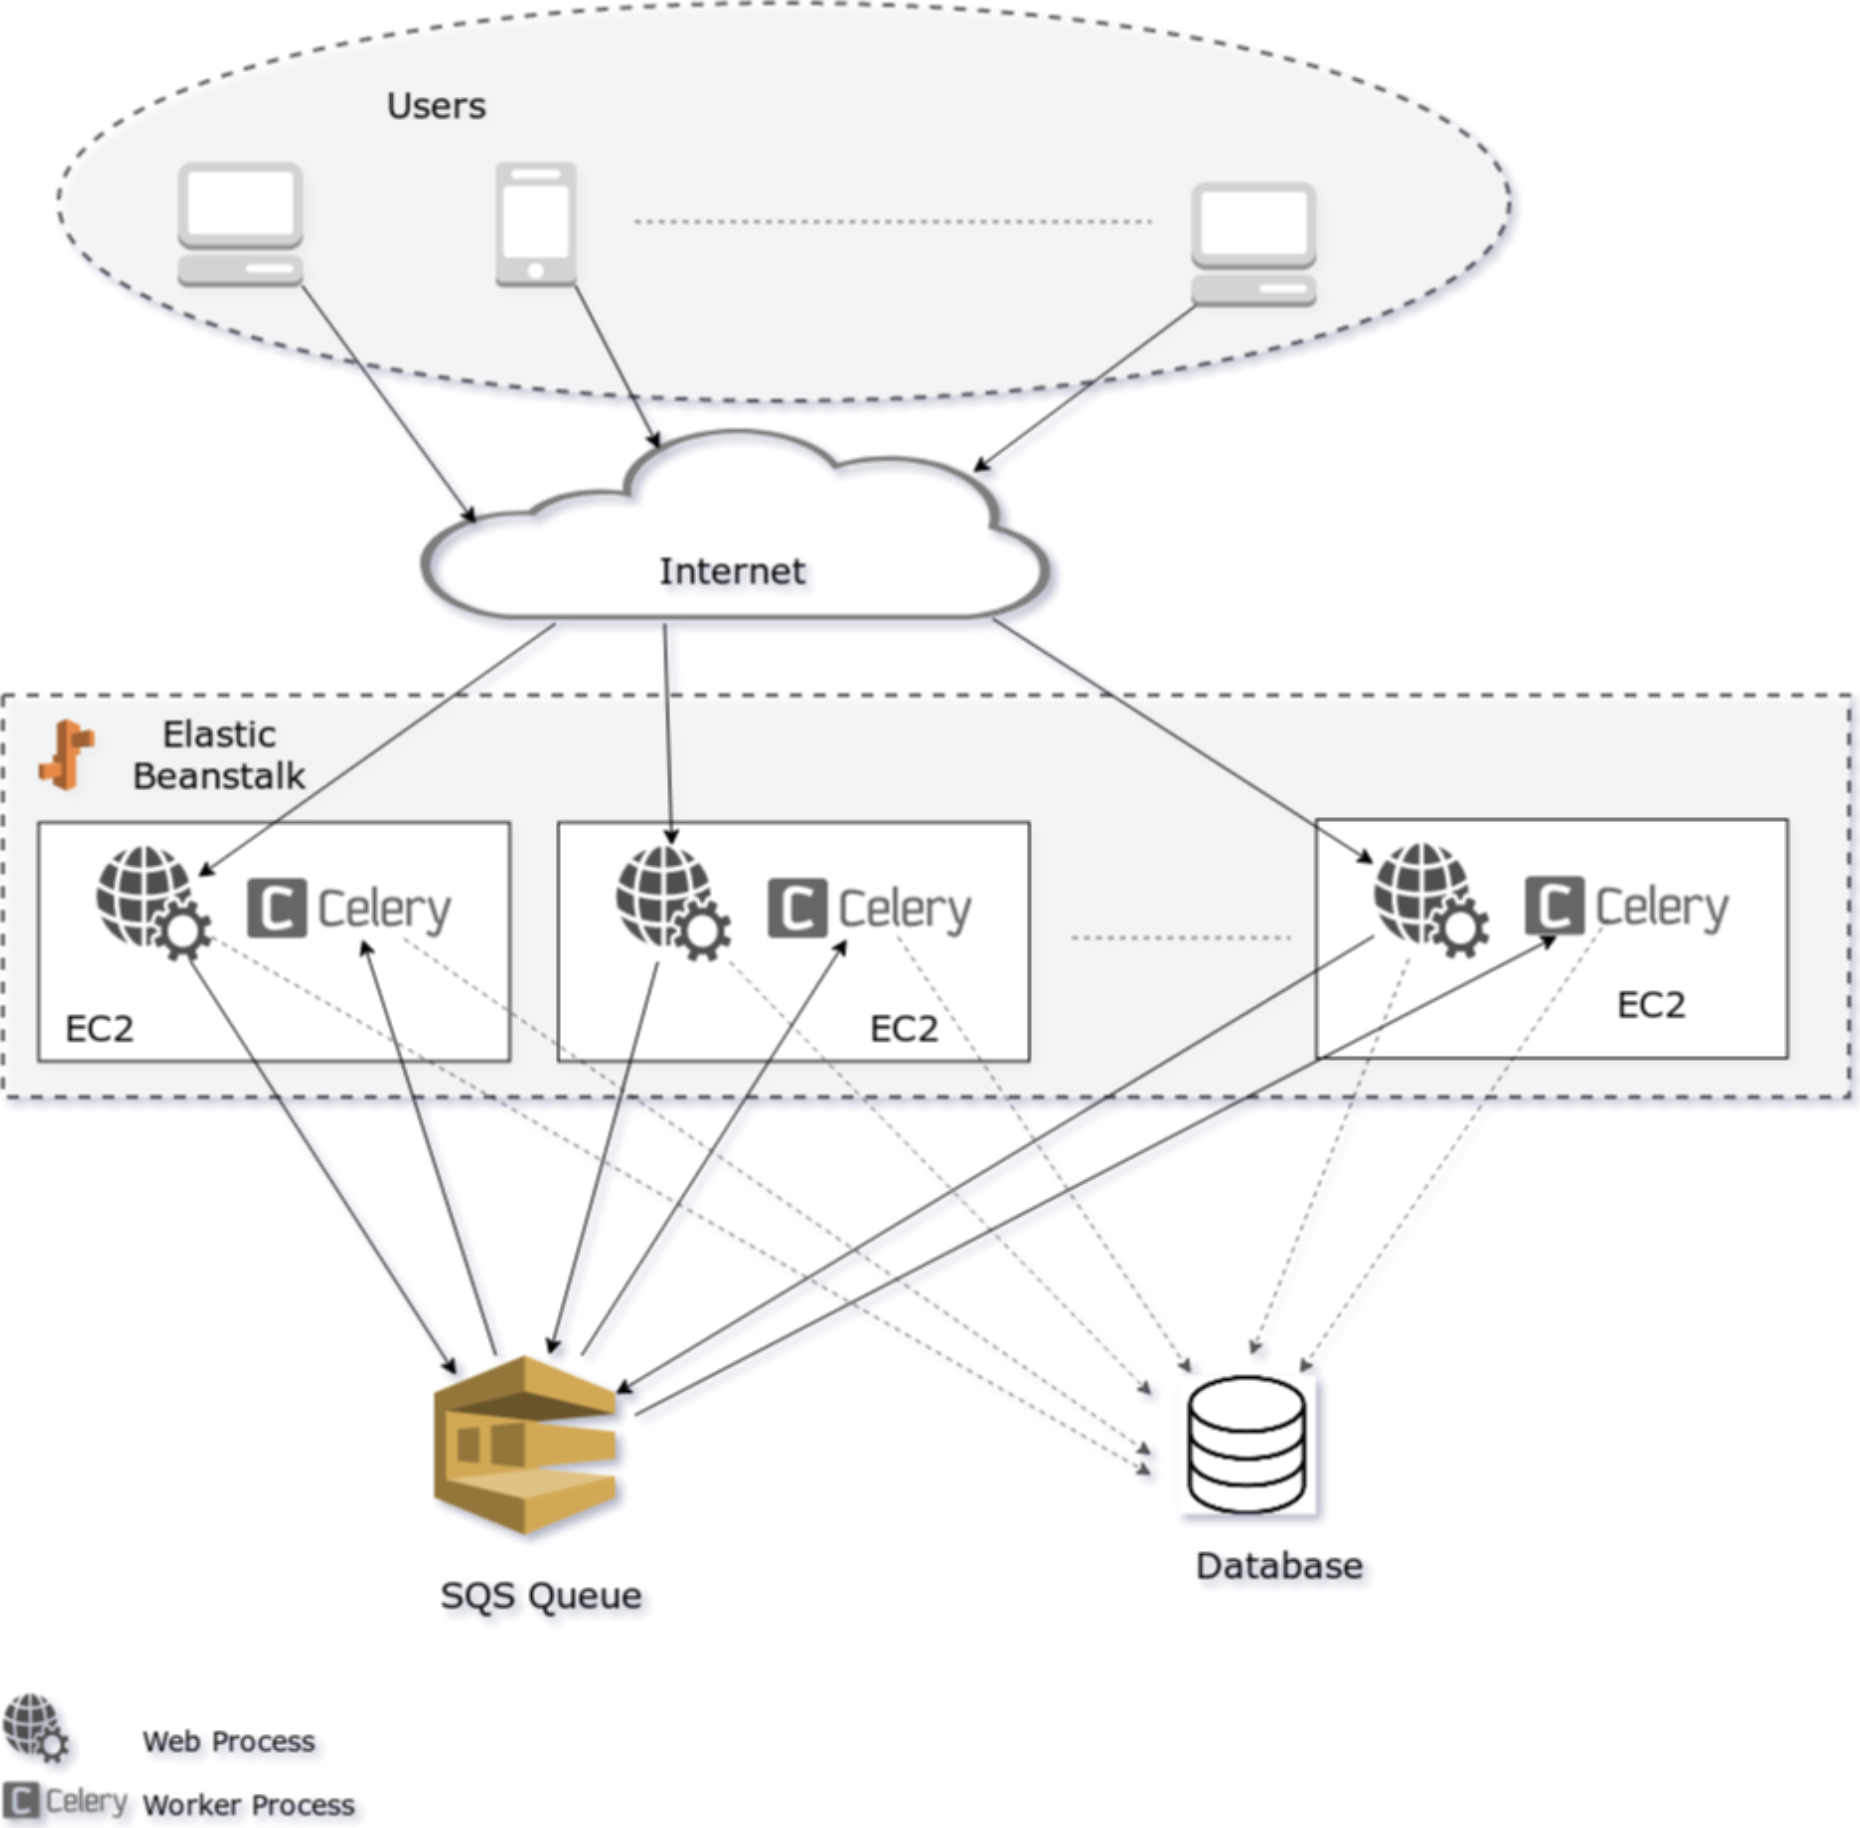
아래는 Django, Celery, Elastic Beanstalk 아키텍쳐를 보여주는 그림입니다.