우선 canvas JS 의 이해가 필요하다
html :
<!DOCTYPE html>
<html lang="en">
<head>
<meta charset="UTF-8">
<meta http-equiv="X-UA-Compatible" content="IE=edge">
<meta name="viewport" content="width=device-width, initial-scale=1.0">
<title>ONE</title>
<style>
body {
background: #000;
overflow: hidden;
}
canvas {
width: 100%;
height: 100%;
position: absolute;
}
canvas.interactive {
cursor: none;
}
</style>
</head>
<body>
<canvas id="canvas"></canvas>
<script src="js.js"></script>
</body>
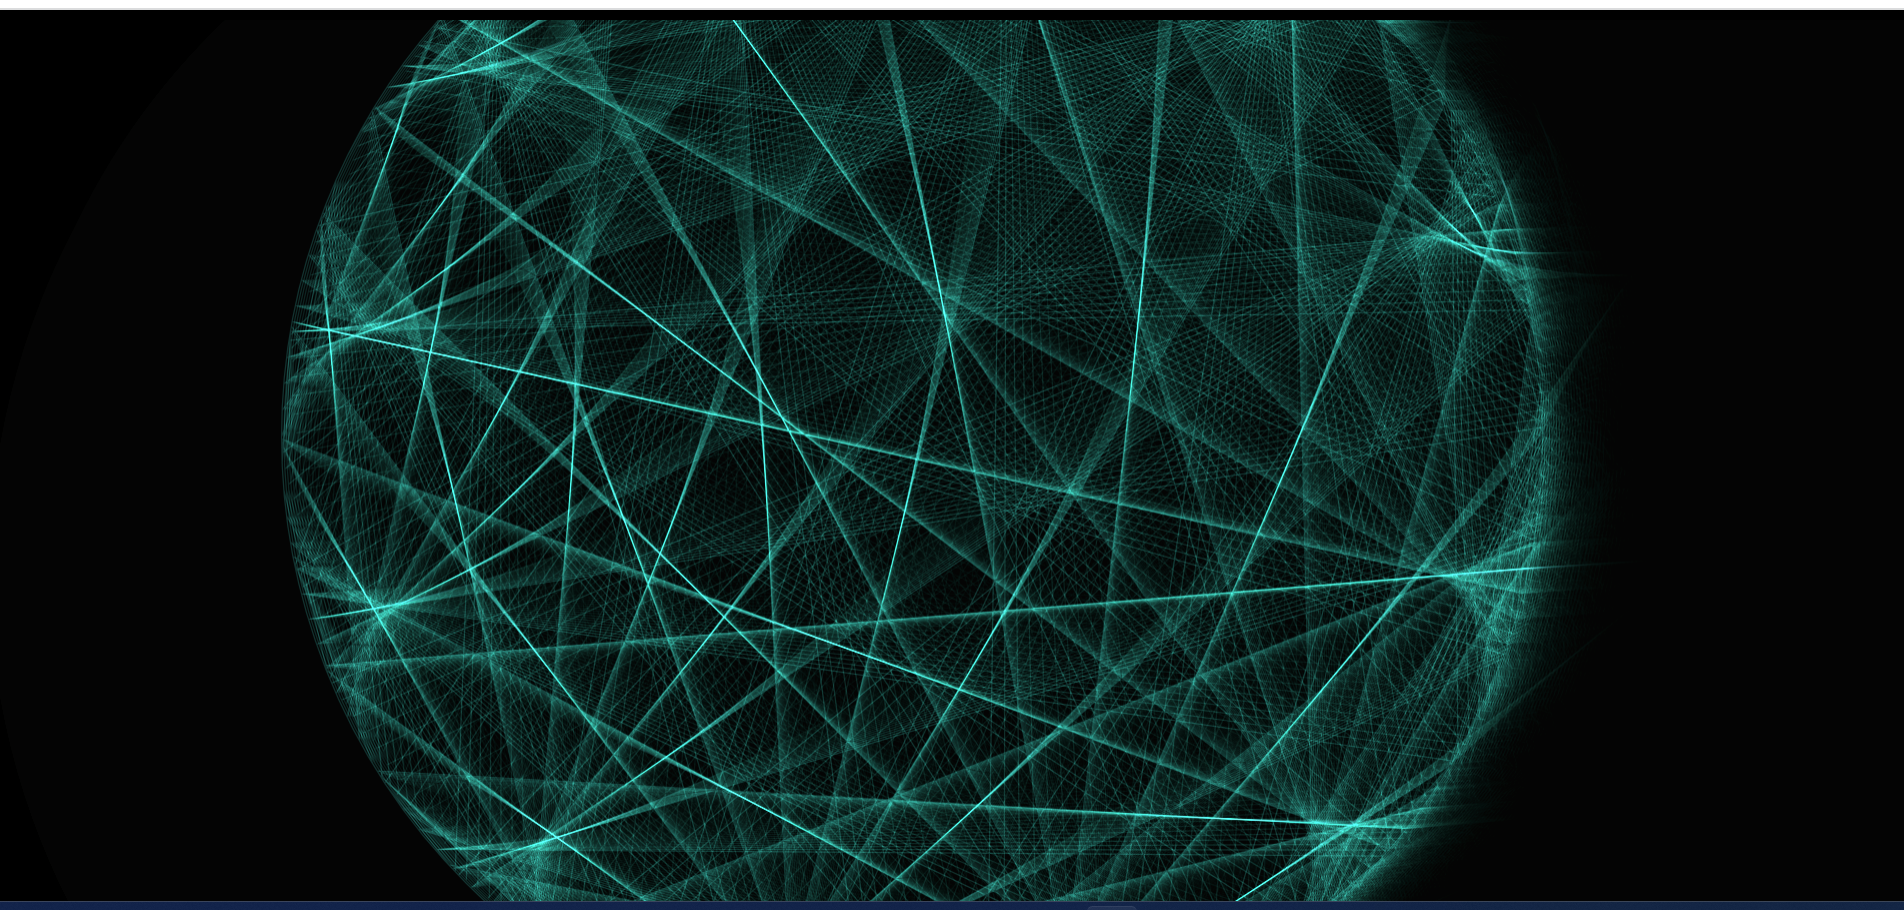
</html>다음은 원의 지름을 그리는 js 핵심 코드 이다.
draw() {
    let radius = this.radius.val

    const w2 = this.center.x,
          h2 = this.center.y

    this.ctx.beginPath()

    const points = this.point.value
    const multiplier = this.multiplier.value

    for (let i = 0; i < points; i++) {
      const t = (i / points) * Math.PI * 2
      const t2 = ((i * multiplier) / points) * Math.PI * 2
      const x = radius * Math.cos(t) + w2
      const y = radius * Math.sin(t) + h2
      const x2 = radius * Math.cos(t2) + w2
      const y2 = radius * Math.sin(t2) + h2

      this.ctx.moveTo(x, y)
      this.ctx.lineTo(x2, y2)
    }

    this.ctx.arc(w2, h2, radius, 0, 2*Math.PI)

    this.ctx.stroke()
    this.ctx.closePath()
  }
위 코드에선 우선 radius 는 원의 반지름, w2와 h2는 원의 중심 좌표this.radius.val 와 this.center.x와 this.center.y 값을 가져와 초기화합니다.
그래픽 컨텍스트를 시작 (ctx.beginPath()).
points 는 원 주위에 그려질 선의 개수,
this.point.value 값을 가져와 초기화.
multiplier 변수는 선이 원 주위에 회전 수,
this.multiplier.value 값을 가져와 초기화.
for 사용하여 선을 그림. i 변수는 0부터 points 값까지 반복됨.
t 변수는 현재 각도, t2 변수는 선의 각도를 나타 낸다.
원의 주위에 그려질 선의 위치를 계산하기 위해 사용됨.
x와 y는 현재 각도에 따른 원 위의 점의 좌표입니다.
x2와 y2는 선의 각도에 따른 원 위의 점의 좌표입니다.
this.ctx.moveTo(x, y)를 사용하여 현재 점에서 시작점으로 이동.
this.ctx.lineTo(x2, y2)를 사용하여 시작점에서 끝점까지 선을 그린다.
this.ctx.arc(w2, h2, radius, 0, 2*Math.PI)를 사용하여 원을 그린다.
중심 좌표 w2 와 h2, 반지름 radius를 기준으로 0부터 2π(원의 전체 각도)까지의 호를 그린다.
this.ctx.stroke() 를 불러와 그려진 모든 경로를 선으로 그립니다.
this.ctx.closePath()를 불러서 경로를 닫습니다.
그럼 radius에 지정된 크기와 중심 좌표에 원과 선이 그려진 그림을 볼수 있다.
js 전체 코드
class Canvas {
  constructor(element, ctx, w, h) {
    this.element = element
    this.ctx = ctx
    this.width = w
    this.height = h

    this.interactive = false
    this.playing = true

    this.point = {
      value: 150,
      speed: 0.25,
      limit: 70,
      floor: 10,
      up: true,
      animating: false
    }

    this.multiplier = {
      value: 1,
      speed: 0.005,
      limit: 20,
      floor: -5,
      up: true,
      animating: true
    }

    this.center = {
      x: w / 2,
      y: h / 2,
      targetX: w / 2,
      targetY: h / 2,
      easing: 0.02
    }

    this.radius = {
      val: h / 2.2,
      targetVal: h / 2.2,
      easing: 0.02
    }
    document.body.addEventListener('click', this.click.bind(this))
    document.body.addEventListener('mousemove', this.move.bind(this))
    document.body.addEventListener('keyup', this.keyup.bind(this))

    this.hue = 160
  }

  click(e) {
    this.interactive = !this.interactive

    if (!this.interactive) {
      this.center.targetX = this.width / 2
      this.center.targetY = this.height / 2
      this.radius.targetVal = this.height / 2.2

      this.element.classList.remove('interactive')
    } else {
      this.element.classList.add('interactive')
    }
  }

  move(e) {
    if (!this.interactive) { return }

    const h3 = this.height / 3

    this.center.targetX = e.pageX
    this.center.targetY = Math.max(e.pageY, h3)

    this.radius.targetVal = h3 + (e.pageY * 0.8)
  }

  keyup(e) {
    if (e.which != 32) { return }

    this.playing = !this.playing

    if (this.playing && this.drawLoop) {
      this.drawLoop()
    }
  }

  update() {
    this.clear()

    this.animate(this.point)
    this.animate(this.multiplier)
    this.ease(this.center)
    this.ease(this.radius)

    this.hue += 0.3

    const h = (this.hue % 360)

    this.ctx.globalCompositeOperation = 'lighter'
    this.ctx.strokeStyle = 'hsla('+h+',80%,60%,0.2)'
  }

  clear() {
    this.ctx.globalCompositeOperation = 'source-over'
    this.ctx.fillStyle = 'rgba(0,0,0,0.1)'
    this.ctx.rect(0,0,this.width, this.height)
    this.ctx.fill()
  }

  draw() {
    let radius = this.radius.val

    const w2 = this.center.x, h2 = this.center.y
    this.ctx.beginPath()

    const points = this.point.value
    const multiplier = this.multiplier.value

    for (let i = 0; i < points; i++) {
      const t = (i / points) * Math.PI * 2
      const t2 = ((i * multiplier) / points) * Math.PI * 2
      const x = radius * Math.cos(t) + w2
      const y = radius * Math.sin(t) + h2
      const x2 = radius * Math.cos(t2) + w2
      const y2 = radius * Math.sin(t2) + h2

      this.ctx.moveTo(x, y)
      this.ctx.lineTo(x2, y2)
    }
    this.ctx.arc(w2, h2, radius, 0, 2*Math.PI)
    this.ctx.stroke()
    this.ctx.closePath()
  }

  animate(object) {
    if (!object.animating) { return }

    if (object.up) {
      object.value += object.speed
    } else {
      object.value -= object.speed
    }

    if (object.value > object.limit) {
      object.up = false
    } else if (object.value < object.floor) {
      object.up = true
    }
  }

  ease(object) {
    if (object.val) {
      const dv = object.targetVal - object.val
      object.val += dv * object.easing

      return
    }

    const dx = object.targetX - object.x
    const dy = object.targetY - object.y
    object.x += dx * object.easing
    object.y += dy * object.easing
  }

  random(from, to) {
    return from + (Math.rand() * (to - from))
  }

  resize(w, h) {
    this.width = w
    this.height = h
    this.center.targetX = w / 2
    this.center.targetY = h / 2

    this.radius.targetVal = h / 2.2
  }
}

(_ => {
  const canvasElement = document.getElementById('canvas'),
        ctx = canvasElement.getContext('2d')

  let w = canvasElement.width = window.innerWidth,
      h = canvasElement.height = window.innerHeight,
      density = 1

  const canvas = new Canvas(canvasElement, ctx, w, h)

  const setup = ()=> {
    window.addEventListener('resize', resize)

    density = window.devicePixelRatio != undefined ? window.devicePixelRatio : 1.0

    canvasElement.width = w * density
		canvasElement.height = h * density

    canvas.width = w
    canvas.height = h
    canvas.drawLoop = draw

		ctx.scale(density,density)

    draw()
  }

  const draw = () => {
    canvas.update()
    canvas.draw()

    if (canvas.playing) {
      window.requestAnimationFrame(draw)
    }
  }

  const resize = () => {
    w = canvasElement.width = window.innerWidth
    h = canvasElement.height = window.innerHeight

    canvasElement.width = w * density
		canvasElement.height = h * density

    canvas.resize(w, h)

    ctx.scale(density, density)
  }

  setup()
})()
함수가 하는 일 들을 알아 보겠습니다.
click(e) {
    this.interactive = !this.interactive

    if (!this.interactive) {
      this.center.targetX = this.width / 2
      this.center.targetY = this.height / 2
      this.radius.targetVal = this.height / 2.2

      this.element.classList.remove('interactive')
    } else {
      this.element.classList.add('interactive')
    }
  }
click() : 이 함수는 클릭할 때마다 interactive 속성의 값이 반전됩니다.
move(e) {
    if (!this.interactive) { return }

    const h3 = this.height / 3

    this.center.targetX = e.pageX
    this.center.targetY = Math.max(e.pageY, h3)

    this.radius.targetVal = h3 + (e.pageY * 0.8)
  }
move() : 마우스를 움직일 때 발생하는 이벤트에 응답하여 객체의 상태를 변경합니다. center.targetX와 center.targetY 속성은 마우스의 위치에 따라 이동하고, radius.targetVal 속성은 마우스의 위치에 따라 크기가 조정됩니다.
keyup(e) {
    if (e.which != 32) { return }

    this.playing = !this.playing

    if (this.playing && this.drawLoop) {
      this.drawLoop()
    }
  }
keyup() : 스페이스바를 누를 때마다 playing 속성의 값을 토글(toggle)하여 재생 상태를 변경합니다. 또한, drawLoop 함수가 정의되어 있고 playing 값이 true인 경우에만 drawLoop 함수를 호출합니다. 이 코드는 주로 재생/정지 버튼과 같은 UI 요소에 적용되며, 스페이스바를 눌러 재생 및 일시정지 기능을 구현하는 데 사용될 수 있습니다.
update() {
    this.clear()

    this.animate(this.point)
    this.animate(this.multiplier)
    this.ease(this.center)
    this.ease(this.radius)

    this.hue += 0.3

    const h = (this.hue % 360)

    this.ctx.globalCompositeOperation = 'lighter'
    this.ctx.strokeStyle = 'hsla('+h+',80%,60%,0.2)'
  }
update() : 애니메이션을 업데이트하고, 그리기 컨텍스트(ctx)의 속성을 설정하여 다음 프레임에서 애니메이션을 그릴 준비를 합니다. 애니메이션 객체들을 업데이트하고, 캔버스를 지우며, 애니메이션의 색상과 효과를 설정합니다.
clear() {
    this.ctx.globalCompositeOperation = 'source-over'
    this.ctx.fillStyle = 'rgba(0,0,0,0.1)'
    this.ctx.rect(0,0,this.width, this.height)
    this.ctx.fill()
  }
clear() : 캔버스를 지우고 초기화하는 역할을 합니다.
animate(object) {
    if (!object.animating) { return }

    if (object.up) {
      object.value += object.speed
    } else {
      object.value -= object.speed
    }

    if (object.value > object.limit) {
      object.up = false
    } else if (object.value < object.floor) {
      object.up = true
    }
  }
animate() : 객체의 애니메이션 상태를 업데이트하는 역할을 합니다. animating 속성이 true일 때 value를 증가시키거나 감소시키고, value가 지정한 한계를 초과하면 방향을 변경합니다.
ease(object) {
    if (object.val) {
      const dv = object.targetVal - object.val
      object.val += dv * object.easing

      return
    }

    const dx = object.targetX - object.x
    const dy = object.targetY - object.y
    object.x += dx * object.easing
    object.y += dy * object.easing
  }
ease() : 객체의 속성을 일정 비율로 부드럽게 조정하여 애니메이션 효과를 생성합니다. val 속성이 존재하면 targetVal과의 차이를 easing 비율로 보간하고, 그렇지 않으면 targetX와 targetY를 기준으로 x와 y 속성을 부드럽게 이동시킵니다.
random(from, to) {
    return from + (Math.rand() * (to - from))
  }
random() : from과 to 사이의 임의의 값을 반환합니다. Math.random() 함수는 0 이상 1 미만의 임의의 실수를 반환하므로, 이를 활용하여 범위 내에서 임의의 값을 생성합니다.
resize(w, h) {
    this.width = w
    this.height = h
    this.center.targetX = w / 2
    this.center.targetY = h / 2

    this.radius.targetVal = h / 2.2
  }
resize() : 주어진 너비(w)와 높이(h)로 화면 크기를 조정하는 역할을 합니다. 함수는 너비와 높이를 매개변수로 받아 객체의 width와 height 속성을 갱신합니다. 또한, center 객체의 targetX와 targetY를 너비와 높이의 중심으로 설정하고, radius 객체의 targetVal을 높이의 2.2로 나눈 값으로 설정합니다.
(_ => {
  const canvasElement = document.getElementById('canvas'),
        ctx = canvasElement.getContext('2d')

  let w = canvasElement.width = window.innerWidth,
      h = canvasElement.height = window.innerHeight,
      density = 1

  const canvas = new Canvas(canvasElement, ctx, w, h)

  const setup = ()=> {
    window.addEventListener('resize', resize)

    density = window.devicePixelRatio != undefined ? window.devicePixelRatio : 1.0

    canvasElement.width = w * density
		canvasElement.height = h * density

    canvas.width = w
    canvas.height = h
    canvas.drawLoop = draw

		ctx.scale(density,density)

    draw()
  }

  const draw = () => {
    canvas.update()
    canvas.draw()

    if (canvas.playing) {
      window.requestAnimationFrame(draw)
    }
  }

  const resize = () => {
    w = canvasElement.width = window.innerWidth
    h = canvasElement.height = window.innerHeight

    canvasElement.width = w * density
		canvasElement.height = h * density

    canvas.resize(w, h)

    ctx.scale(density, density)
  }

  setup()
})()
익명 함수는 실행될 때 바로 호출됩니다. 이를 통해 코드 블록 내의 변수와 함수들이 즉시 선언되고 실행됩니다.
canvasElement 변수는 'canvas'라는 id를 가진 html 요소를 가져옵니다.
ctx 변수는 캔버스 요소의 2d 컨텍스트를 가져옵니다.
w와 h 변수는 초기값으로 현재 창의 너비와 높이를 가져옵니다.
density 변수는 초기값으로 1을 설정합니다. 이는 픽셀 밀도를 나타내며, 기기의 디스플레이 특성에 따라 조정될 수 있습니다.
Canvas 클래스의 인스턴스인 canvas 객체를 생성합니다. 이 때, canvasElement, ctx, w, h 값을 전달하여 초기화합니다.
setup 함수는 초기화 작업을 수행합니다. resize 이벤트를 감지하고, density 값을 설정하며, 캔버스 요소의 크기를 조정하고, draw 함수를 호출하여 애니메이션을 시작합니다.
draw 함수는 캔버스를 업데이트하고 그리는 역할을 합니다. 먼저 canvas 객체의 update 메서드를 호출하여 애니메이션 상태를 업데이트하고, 그림을 그립니다. 그 후, canvas 객체의 playing 상태를 확인하여 애니메이션을 반복 호출합니다.
resize 함수는 창의 크기가 변경될 때 호출되며, 캔버스와 컨텍스트의 크기를 업데이트하고, canvas 객체의 resize 메서드를 호출하여 애니메이션 요소의 크기를 조정합니다.
마지막으로 setup 함수를 호출하여 초기화 작업을 실행합니다.
