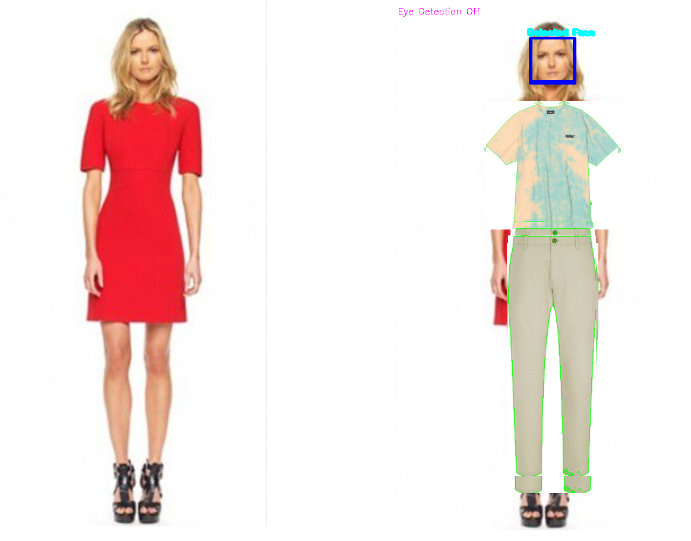
1
쓸데없이 너무 오래 끌었다. 쉬는날이 너무 많았다. 원하는 기능을 다 성공하지 못했다.
1-1 구현하지 못한 기능들
웹캠을 통해 이미지 합성하기
- 노트북의 웹캠은 가로로 긴 형태였다. 옷을 합성하기 위해서는 얼굴과 상 하의가 모두 나와야 했다. 그래서 가로로 긴 화면의 형태에서는 이미지의 크기가 맞지 않아 포기해야 했다. 그 대신 미리 저장된 사진을 이용하여 진행하였다.
옷의 윤곽선 따라 이미지 저장하기
- 옷의 윤곽선을 따라 그리는 것까지는 쉽게 하였지만 그 형태대로 잘라 이미지를 저장할 수는 없었다. convex hull 을 이용하여 거의 윤곽선에 가까운 형태로 잘라보고자 했지만 이 또한 실패했다. 그래서 최소 경계상자로 잘라 진행하였다.
좋지 않은 조명 환경에 의한 실패
- 조명이 고르지 않아 옷이나 얼굴인식을 100%로 성공하지 못했다. 고개를 돌리면 잠깐 얼굴인식이 끊기거나, 웹캠을 통해 옷을 인식해야할 때는 제대로 윤곽선을 파악하지 못했다.
1-2 변경된 프로젝트의 구성
조명 환경이 좋지 않아 실시간으로 옷을 파악할 수 없어, 인터넷에서 깔끔한 조명아래의 옷들을 서칭했다. 그 결과 빠른 결과를 얻어낼 수 있었고, 처음 의도했던 "옷을 사기 전, 옷들의 조합이 어울릴까 혹은 나와 어울릴까"를 알아내기 위함에는 변화가 없다고 판단하여 진행하였다.
2 다듬기를 위한 과정
지금까지 크게 step3 으로 구성하여 해왔던 공부와 코딩들을 바탕으로 하나의 프로그램으로 완성시켜야했다. 사용자를 위한 입력창들을 추가하여 다듬기 시작했다.
2-1 과정
크게 4가지로 나눴다.
- 옷을 입힐 대상을 사진 혹은 실시간으로 인식하기
- 옷 이미지를 불러와 contour를 통해 자르기
- 상의/하의 경우를 나누어 모델이미지에 합성하기
- 합성된 이미지를 저장하기
2-2 옷을 입힐 대상을 불러오기
import cv2 as cv
import numpy as np
from PIL import Image

print("START")

print("옷을 입힐 대상을 불러오세요. ")
print("1. 사진으로 불러오기")
print("2. 카메라를 통해 사진찍기")
print("3. 카메라로 실시간 인식하기")

Input = input()


if Input == "1":
    print("파일명을 입력해주세요!")
    model_img = input()
    i = Image.open(model_img)
    X, Y = i.size


    print(X,Y)

elif Input == "2":
    print("스페이스바를 눌러 캡쳐해주세요!")
    cam = cv.VideoCapture(0)

    cv.namedWindow("capture")

    while True:
        ret, frame = cam.read()
        cv.imshow("capture", frame)

        if not ret:
            break
        k = cv.waitKey(1)

        if k%256 == 27:
            print("Closing")
            break

        elif k%256 == 32:
            img_name = "model_cap.png"
            cv.imwrite(img_name, frame)
            print("{} written!".format(img_name))

        cam.release()
        cv.destroyAllWindows()

#else:
총세가지 경우로 인물사진을 불러오도록 하였으며, 사진으로 불러오기 / 카메라를 통해 사진찍기/ 카메라로 실시간 인식하기 가 있다.
앞서 이야기 했듯 노트북 웹캠으로는 한계가 있어 첫번째 경우인 사진으로 불러오기 만을 이용하여 진행하였다. 두번째 경우인 카메라를 통해 사진찍기까지 구현하였다.
사진으로 불러오기를 선택하게되면 파일명을 입력하도록 하고, 그 파일의 사이즈를 X,Y로 저장한다.
카메라를 통해 사진찍기 혹은 구현하지 않은 카메라로 실시간 인식하기를 선택하면, cam = cv.VideoCapture(0) 을 통해 웹캠을 불러온다. 그리고 스페이스바를 눌러 화면을 캡쳐하여 저장하도록 한다.
2-3 옷 이미지를 불러와 contour를 통해 자르기
def nothing(x):
      pass


print("옷의 이미지를 불러오세요. ")
clothes_img = input()

cv.namedWindow('binary')
cv.createTrackbar('threshold', 'binary', 0, 255, nothing)
cv.setTrackbarPos('threshold', 'binary', 127)

img_color = cv.imread(clothes_img)
img_gray = cv.cvtColor(img_color, cv.COLOR_BGR2GRAY)


while(True):

    low = cv.getTrackbarPos('threshold', 'binary')

    ret,img_binary = cv.threshold(img_gray, low, 255, cv.THRESH_BINARY_INV)
    cv.imshow('binary', img_binary)

    kernel = np.ones((1,1), np.uint8)

    img_mask = cv.morphologyEx(img_binary, cv.MORPH_OPEN, kernel)
    img_mask = cv.morphologyEx(img_binary, cv.MORPH_CLOSE, kernel)
    img_result = cv.bitwise_and(img_mask, img_mask, mask = img_mask)
    contours, hierarchy = cv.findContours(img_binary, cv.RETR_LIST, cv.CHAIN_APPROX_NONE)

    cv.drawContours(img_color, contours, 0, (0, 255, 0), 1)

    cv.imshow('result', img_result)

    cv.imshow("color", img_color)

    contours_xy = np.array(contours)
    contours_xy.shape


    x_min, x_max = 0,0
    value = list()

    for i in range(len(contours_xy)):
        for j in range(len(contours_xy[i])):
            value.append(contours_xy[i][j][0][0])
            x_min = min(value)
            x_max = max(value)

    y_min, y_max = 0,0
    value = list()
    for i in range(len(contours_xy)):
        for j in range(len(contours_xy[i])):
            value.append(contours_xy[i][j][0][1])
            y_min = min(value)
            y_max = max(value)


    x = x_min
    y = y_min
    w = x_max-x_min
    h = y_max-y_min


    #if cv.waitKey(1)%256 == 32:
    img_crop = img_color[y:y+h, x:x+w]
    img_name = "crop_0.png"
    cv.imwrite(img_name, img_crop)
    crop_image = cv.imread(img_name)

    if cv.waitKey(1)&0xFF == 27: # esc 누르면 닫음
        break


cv.imshow('crop result', crop_image)
cv.waitKey(0)
cv.destroyAllWindows()

cv.destroyAllWindows()


cv.waitKey(0)


print("자를 옷이 남았나요? (Y/N)")
crop_input = input()
상의와 하의만을 다루기 때문에 최대 두개의 경우를 생각하였다. 먼저 옷의 이미지 파일을 입력하고 트랙바를 통해 바이너리이미지를 조정하여 contour를 진행한다. 윤곽선이 나타나면 최소 경계상자로 자르게 되고 잘린 이미지를 "crop_{}.png" 의 이름으로 저장한다.
한번의 수행이 끝나면 자를 옷이 남아있는지 물어보고, 있다면 같은 과정을 반복, 아니라면 다음 단계로 넘어가게 된다.
2-4 상의/하의 경우를 나누어 모델이미지에 합성하기
i = Image.open("crop_0.png")

cropX, cropY = i.size

crop = cropY/cropX


i2 = Image.open("crop_1.png")

cropX2, cropY2 = i2.size

crop2 = cropY2/cropX2


font = cv.FONT_HERSHEY_SIMPLEX

def faceDetect():
    eye_detect = False
    face_cascade = cv.CascadeClassifier('haarcascade_frontface.xml')
    eye_cascade = cv.CascadeClassifier('haarcascade_eye.xml')
    info = ''

    if Input == "1":
        try:
            model = cv.imread(model_img)

        except:
            print("Not Found")
            return

    if Input == "2":
        try:
            model = cv.imread("model_cap.png")
        except:
            print("Not Found")
            return


    print("상의/하의 중 입히고 싶은 옷은 무엇인가요?")
    print("1. 상의만")
    print("2. 하의만")
    print("3. 상 하의 둘다")

    plus_input = input()


    while True:
        if eye_detect:
            info = 'Eye Detection On'
        else:
            info = 'Eye Detection Off'

        gray = cv.cvtColor(model, cv.COLOR_BGR2GRAY)
        faces = face_cascade.detectMultiScale(gray, 1.3, 5)


        cv.putText(model, info, (5, 15), font, 0.5, (255, 0, 255), 1)

        for (x, y, w, h) in faces:
            cv.rectangle(model, (x, y), (x + w, y + h), (255, 0, 0), 2 )
            cv.putText(model, 'Detected Face', (x - 5, y - 5), font, 0.5, (255, 255, 0), 2)
            crop_img = cv.imread('crop_0.png')
            crop_img1 = cv.imread('crop_1.png')

            if plus_input == "1":

                resize_img = cv.resize(crop_img, dsize=(int(3 * w), int(crop * 3 * h)), interpolation=cv.INTER_AREA)

                model[y+h+(int)(h*0.5):y+h+(int)(h*0.5) + int(crop * 3*h), x - w:x - w + int(3*w)] = resize_img


            elif plus_input == "2":

                resize_img1 = cv.resize(crop_img1, dsize=(int(2 * w), int(crop2 * 2 * h)), interpolation=cv.INTER_AREA)

                model[y+h+(int)(h*0.5) + int(3*h):y+h+(int)(h*0.5) + int(3*h) + int(crop2*2*h), x - int(w*0.5):x - int(w*0.5) + int(2*w)] = resize_img1


            elif plus_input == "3":

                resize_img = cv.resize(crop_img, dsize=(int(3 * w), int(crop * 3 * h)), interpolation=cv.INTER_AREA)
                resize_img1 = cv.resize(crop_img1, dsize=(int(2 * w), int(crop2 * 2 * h)), interpolation=cv.INTER_AREA)

                model[y+h+(int)(h*0.5):y+h+(int)(h*0.5) + int(crop *3*h), x - w:x - w + int(3*w)] = resize_img
                model[y+h+(int)(h*0.5) + int(3*h):y+h+(int)(h*0.5) + int(3*h) + int(crop2*2*h), x - int(w*0.5):x - int(w*0.5) + int(2*w)] = resize_img1


            if eye_detect:
                roi_gray = gray[y:y+h, x:x+w]
                roi_color = frame[y:y+h, x:x+w]
                eyes = eye_cascade.detectMultiScale(roi_gray)
                for (ex, ey, ew, eh) in eyes:
                    cv.rectangle(roi_color, (ex, ey), (ex+ew, ey+eh), (0, 255, 0), 1)


        cv.imshow('result', model)
        k = cv.waitKey(30)

        if k == ord('i'):
            eye_detect = not eye_detect
        if k == 27:
            break


    cv.destroyAllWindows()

faceDetect()
먼저, 잘린 옷들의 가로세로를 cropX, cropY 로 선언하고 상의나 하의의 비율에 따라 인물에 합성되도록 한다. 예를 들어 짧은 치마와 긴 치마가 같은 비율로 리사이징 되면 안되기때문에 원래 옷의 비율로 계산하기 위함이다.
그 계산법은
resize_img = cv.resize(crop_img, dsize=(int(3 * w), int(crop * 3 * h)), interpolation=cv.INTER_AREA)
resize_img1 = cv.resize(crop_img1, dsize=(int(2 * w), int(crop2 * 2 * h)), interpolation=cv.INTER_AREA)
model[y+h+(int)(h*0.5):y+h+(int)(h*0.5) + int(crop *3*h), x - w:x - w + int(3*w)] = resize_img
model[y+h+(int)(h*0.5) + int(3*h):y+h+(int)(h*0.5) + int(3*h) + int(crop2*2*h), x - int(w*0.5):x - int(w*0.5) + int(2*w)] = resize_img1
에 나타난다.
상의 / 하의 / 상의,하의 경우로 나누어 합성을 진행하였다. 모델이미지에서 얼굴을 인식하고, 그 얼굴을 기준으로 상의와 하의가 입혀질 곳을 옷이미지로 바꾸는 방식이다. 웹캠또한 고려하여 만든 코드라 while문을 통해 반복되어 얼굴인식이 여러번 된 경우가 있었다. 그에 따라 옷이미지또한 여러번 겹쳐 합성되었으나, 범위를 많이 벗어나지는 않았다.
2-5 합성된 이미지를 저장하기
이제 상의 하의가 합성된 모델이미지를 저장하는 단계이다.
3 결과
3-1 실패 과정
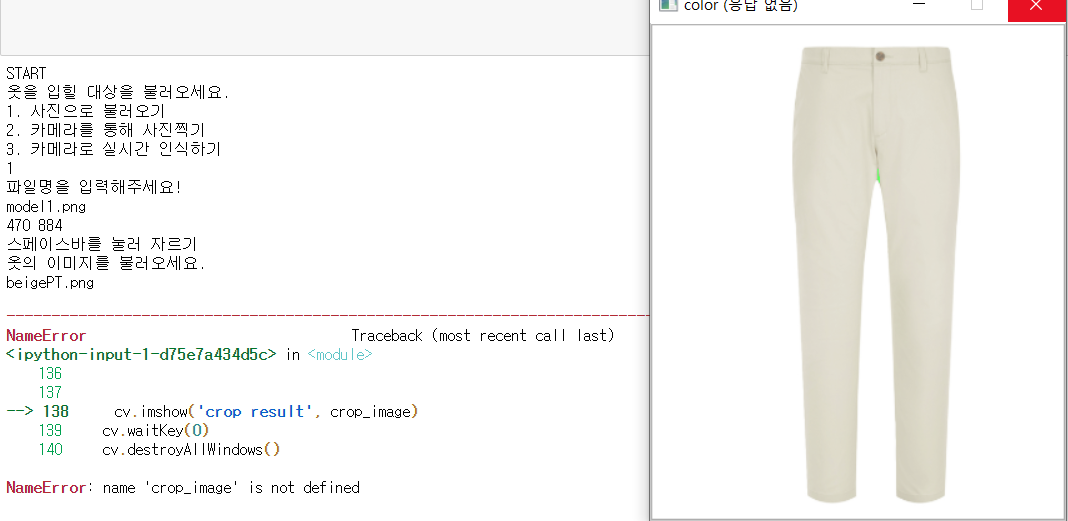
crop_image를 제대로 저장하지 않았다.

옷의 비율에 맞추어 리사이징 하는 과정에서 왜인지 모르겠지만 문법적으로 오류가 계속 났다. 그래서 cropY/cropX 부분을 따로 저장하여 진행했다.

마지막에 이미지 저장이 안되었다. 얼굴인식을 위한 함수 face detect 안에서 만들어낸 변수 model 을 저장하기 위해 함수내에 그 이미지를 저장하는 기능을 구현하였다.
3-2 성공 결과
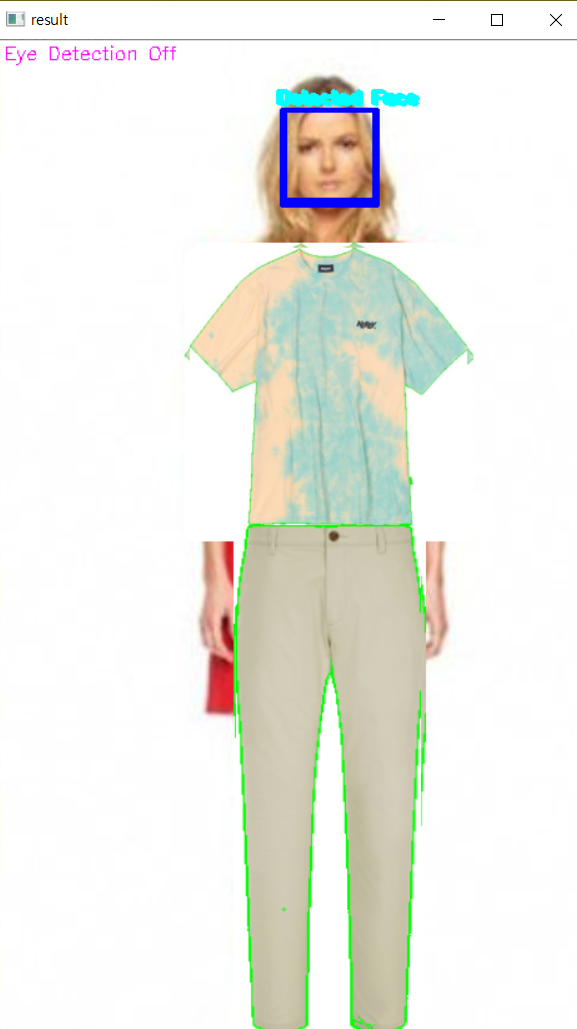
성공!
실행폴더에 result.png 로 결과이미지가 저장된 것을 확인할 수 있다.
