Seller
판매자 홈
ALTER TABLE ITEM ADD SELLER VARCHAR2(50);Item에 SELLER를 추가하고
public class Item {

	private long no;
	private String name;
	private String content; //clob
	private long price;
	private long quantity;
	private Date regdate ;
	private String seller; // 판매자아이디

	private long imageNo; // 대표이미지 번호를 저장할 임시변수
}
dto에도 추가한다.
home.html
<body>
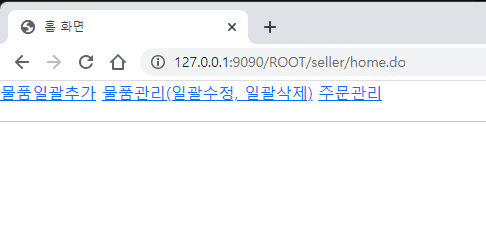
<a th:href="@{/seller/home.do(menu=1)}">물품일괄추가</a>
<a th:href="@{/seller/home.do(menu=2)}">물품관리(일괄수정, 일괄삭제)</a>
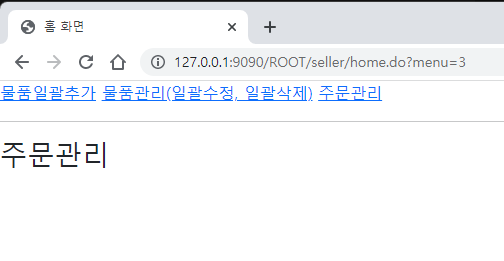
<a th:href="@{/seller/home.do(menu=3)}">주문관리</a>
<hr />
<div th:if="${#strings.equals(param.menu, '1')}">
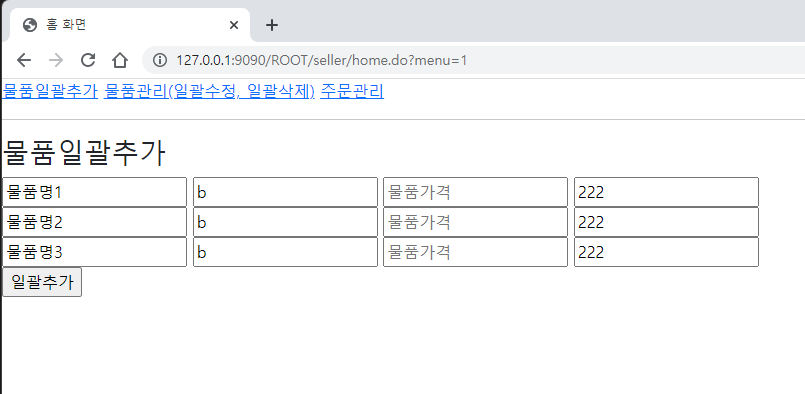
<h3>물품일괄추가</h3>
<form th:action="@{/seller/home.do?menu=1}" method="post">
<th:block th:each="num: ${#numbers.sequence(1,3)}"> <!-- 반복문 -->
<input type="text" name="name[]" th:value="|물품명${num}|" placeholder="물품명" />
<input type="text" name="content[]" value="b" placeholder="물품내용" />
<input type="number" name="price[]" th:value="${num+100}" placeholder="물품가격" />
<input type="number" name="quantity[]" value="222" placeholder="물품수량" />
<br />
</th:block>
<input type="submit" value="일괄추가" />
</form>
</div>
<div th:if="${#strings.equals(param.menu, '2')}">
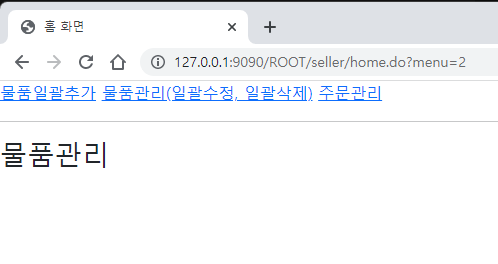
<h3>물품관리</h3>
</div>
<div th:if="${#strings.equals(param.menu, '3')}">
<h3>주문관리</h3>
</div>
</body>home.html을 생성한다.
물품일괄추가 (반복문)
SellerController
@Controller
@RequestMapping(value="/seller")
public class SellerController {

    //127.0.0.1:9090/ROOT/seller/home.do
    @GetMapping(value="/home.do")
    public String homeGET(){
        return "/seller/home";
    }
}
SellerController에 위 코드를 추가한다.
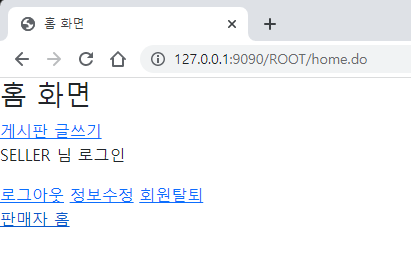
판매자로 로그인을 하고 판매자 홈을 누르면
판매자 홈으로 이동하게 된다.
menu=1 일 때 물품일괄추가
menu=2 일 때 물품관리
menu=3 일 때 주문관리
// /ROOT/seller/home.do?menu=1
@PostMapping(value="/home.do")
public String homePOST(
    @RequestParam(name = "menu", defaultValue = "0", required = false) int menu,
    @RequestParam(name = "name[]", required = false) String[] name,
    @RequestParam(name = "content[]", required = false) String[] content,
    @RequestParam(name = "price[]", required = false) long[] price,
    @RequestParam(name = "quantity[]", required = false) long[] quantity ){
    if( menu == 0 )
        return "redirect:home.do?menu=1";

    if( menu == 1){ // 일괄등록
        List<Item> list = new ArrayList<>();
        for(int i=0; i<name.length; i++){
            Item item = new Item();
            item.setName(name[i]);
            item.setContent(content[i]);
            item.setPrice(price[i]);
            item.setQuantity(quantity[i]);
            list.add(item);
        }
        log.info("seller.do => {}", list.toString());
    }
    else if (menu == 2){

    }

    return "redirect:home.do?menu=" + menu;
}
homePOST도 추가한다.
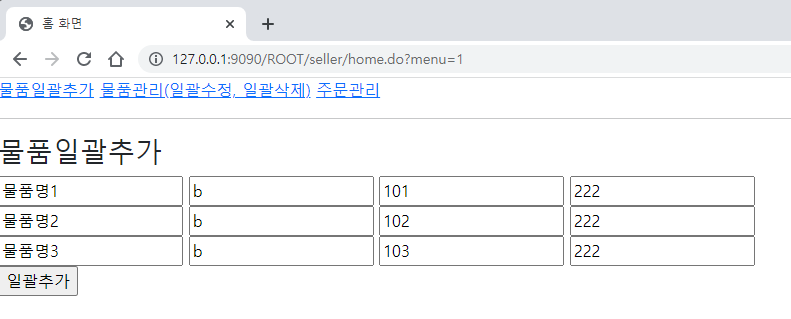

일괄추가를 누르면 아래 터미널에 list의 값이 나오게 된다.
Mapper
// 일괄추가
    public int insertItemBatch(List<Item> list);
ItemMapper에 추가하고
<insert id="insertItemBatch" parameterType="List">
    INSERT INTO item(no,name, content, price, quantity, seller)
    SELECT SEQ_ITEM_NO.NEXTVAL, T1.* FROM (
        <foreach item="obj" collection="list" separator="UNION ALL">
            SELECT '${obj.name}' NAME, '${obj.content}' CONTENT, ${obj.price} PRICE,
            ${obj.quantity} QUANTITY, '${obj.seller}' SELLER FROM DUAL
        </foreach>
    ) T1
</insert>
그에 맞게 itemMapper.xml에도 추가한다.
// /ROOT/seller/home.do?menu=1
@PostMapping(value="/home.do")
public String homePOST(
    @RequestParam(name = "menu", defaultValue = "0", required = false) int menu,
    @RequestParam(name = "name[]", required = false) String[] name,
    @RequestParam(name = "content[]", required = false) String[] content,
    @RequestParam(name = "price[]", required = false) long[] price,
    @RequestParam(name = "quantity[]", required = false) long[] quantity ){
    if( menu == 0 )
        return "redirect:home.do?menu=1";

    if( menu == 1){ // 일괄등록
        List<Item> list = new ArrayList<>();
        for(int i=0; i<name.length; i++){
            Item item = new Item();
            item.setName(name[i]);
            item.setContent(content[i]);
            item.setPrice(price[i]);
            item.setQuantity(quantity[i]);
            item.setSeller( (String) httpSession.getAttribute("USERID") ); // 로그인 확인
            list.add(item);
        }
        log.info("seller.do => {}", list.toString());
        int ret = iMapper.insertItemBatch(list);
        log.info("seller.do => {}",ret);
    }
SellectController를 위처럼 수정하고
일괄추가를 누르면

로그가 생성이 되고
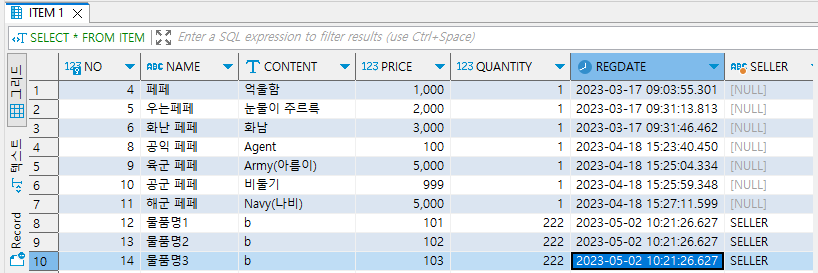
DB에 추가된다.
삭제
Mapper
// 판매자가 오면 해당물품 반환
public List<Item> selectItemSellerList(String seller);
ItemMapper에 추가하고
<select id="selectItemSellerList" parameterType="string" resultType="com.example.dto.Item">
    SELECT * FROM item WHERE SELLER =#{seller} ORDER BY no DESC
</select>
itemMapper.xml에도 추가한다.
SellerController
//127.0.0.1:9090/ROOT/seller/home.do
@GetMapping(value="/home.do")
public String homeGET(
    Model model,
    @RequestParam(name = "menu", defaultValue = "0", required = false) int menu){
    if( menu == 1){
    }
    else if( menu == 2 ){
        String userid = (String) httpSession.getAttribute("USERID");
        List<Item> list = iMapper.selectItemSellerList( userid );
        model.addAttribute(("list"), list);
    }
    return "/seller/home";
}
homeGET을 위처럼 수정하고
home.html
<div th:if="${#strings.equals(param.menu, '2')}">
<h3>물품관리</h3>
<form th:action="@{/seller/home.do(menu=2)}" method="post" id="form2">
<table>
<tr th:each="obj:${list}">
<td><input type="checkbox" name="chk[]" th:value="${obj.no}"></td>
<td th:text="${obj.no}"></td>
<td th:text="${obj.name}"></td>
<td th:text="${obj.content}"></td>
<td th:text="${obj.price}"></td>
<td th:text="${obj.quantity}"></td>
<td th:text="${obj.regdate}"></td>
</tr>
</table>
<input type="hidden" name="btn" id="btn" />
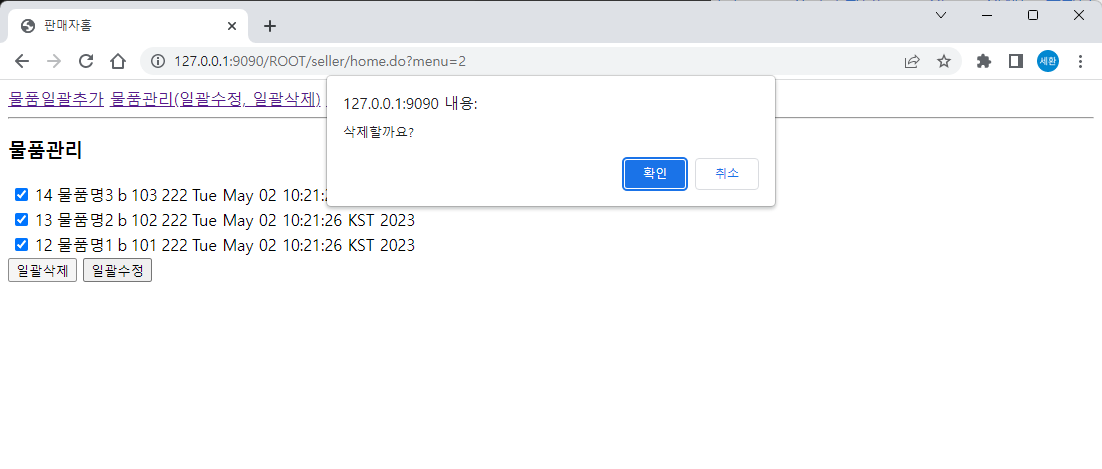
<input type="button" name="btn" value="일괄삭제" onclick="deleteItemAction()" />
<input type="button" value="일괄수정" onclick="updateItemAction()" />
</form>
</div>
...
<script>
function deleteItemAction(){
if( confirm('삭제할까요?') ){
const btn = document/getElementById('btn');
const form2 = document.getElementById('form2');
btn.value='일괄삭제';
form2.submit();
}
}
</script>물품관리 구역을 위처럼 수정한다.
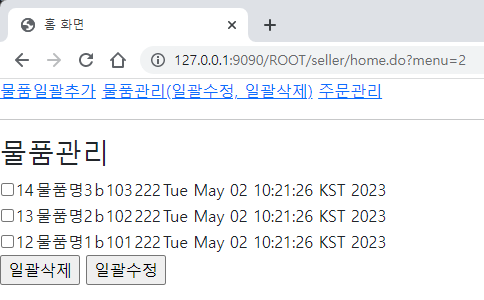
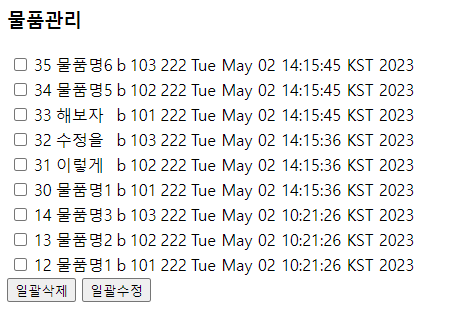
이런 화면이 나오게 된다.

이렇게 나온다면 성공
Mapper
// 물품 일괄 삭제
public int deleteItemBatch(long[] no);
ItemMapper에 추가하고
<delete id="deleteItemBatch" parameterType="arraylist">
    DELETE FROM item WHERE no IN (
        <foreach collection="array" item="tmp" separator=" , ">
            #{tmp}
        </foreach>
    )
</delete>
itemMapper.xml에도 추가한다.
else if (menu == 2){
    log.info("seller.do => {}, {}", no, btn);
    if(btn.equals("일괄삭제")){
        List<Item> list = new ArrayList<>();
        for(int i=0; i<no.length; i++){
        Item item = new Item();
        item.setNo(no[i]);
        list.add(item);
        }
        log.info("seller.do => {}", list.toString());
        int ret = iMapper.deleteItemBatch(no);
        log.info("seller.do =>", ret);
    }
homePOST의 else if 구문을 위처럼 수정한다.
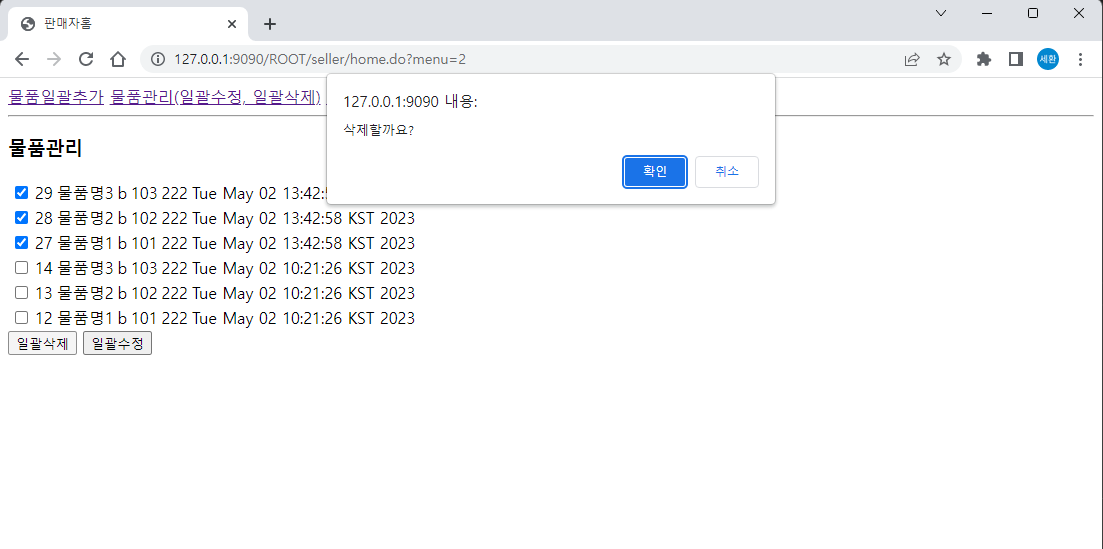
확인을 누르면

선택한 항목들이 삭제된다.
일괄수정
home.html
function updateItemAction() {
    if( confirm('수정할까요?') ) {
        const btn    = document.getElementById('btn');
        const form2  = document.getElementById('form2');
        btn.value='일괄 수정';
        form2.submit();
    }
}
home.html의 script에 function을 위처럼 수정한다
Mapper
// 물품번호에 해당하는 항목 반환
public List<Item> selectItemNoList(long[] no);
Mapper를 생성하고
<select id="selectItemNoList" parameterType="arrayList" resultType="com.example.dto.Item">
    <foreach collection="array" item="tmp" separator=" , " open=" SELECT * FROM item WHERE no IN (" close=" ) ">
        #{tmp}
    </foreach>
</select>
그에 알맞게 itemMapper.xml을 작성한다.
SellerController
        else if(btn.equals("일괄 수정")){
            // 체크한 항목 정보를 가지고 있음
            // redirect => get으로 이동후에 화면표시
            httpSession.setAttribute("chk[]", no);
            return "redirect:updatebatch.do";
        }
    }
    return "redirect:home.do?menu=" + menu;
}

@GetMapping(value="/updatebatch.do")
public String updateBatchGET(Model model){
    long[] no = (long[]) httpSession.getAttribute("chk[]"); // obj => long[]
    log.info("updatebatch.do[GET] => {}", no);

    List<Item> list = iMapper.selectItemNoList(no);
    log.info("updatebatch.do[GET] => {}", list.toString());
    model.addAttribute("list", list);

    return "/item/updatebatch";
}
SellerController를 위처럼 수정, 추가한다.
updatebatch.html
<body>
    <h3>일괄수정</h3>

    <table>
        <tr th:each="obj : ${list}">
            <td><input type="text" th:value="${obj.no}" readonly></td>
            <td><input type="text" th:value="${obj.name}"></td>
            <td><input type="text" th:value="${obj.content}"></td>
            <td><input type="number" th:value="${obj.price}"></td>
            <td><input type="number" th:value="${obj.quantity}"></td>
        </tr>
    </table>
    <a th:href="@{/seller/home.do?(menu=2)}">물품관리</a>

</body>
updatebatch.html을 작성해준다.
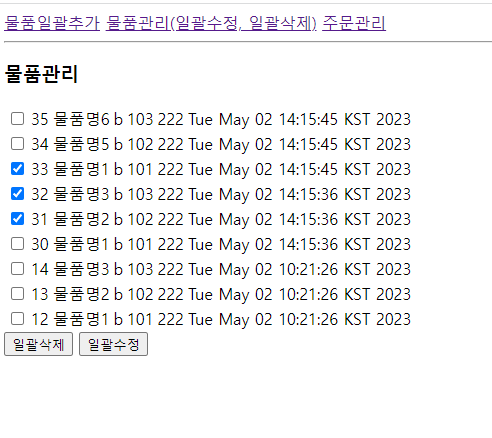
항목들을 체크하고 일괄수정을 누르면
체크한 항목들의 텍스트를 변경할 수 있다.
수정 적용
updatebatch.html
<body>
    <h3>일괄수정</h3>

    <form th:action="@{/seller/updatebatch.do}" method="post">
        <table>
            <tr th:each="obj : ${list}">
                <td><input type="text" name="no[]" th:value="${obj.no}" readonly></td>
                <td><input type="text" name="name[]" th:value="${obj.name}"></td>
                <td><input type="text" name="content[]" th:value="${obj.content}"></td>
                <td><input type="number" name="price[]" th:value="${obj.price}"></td>
                <td><input type="number" name="quantity[]" th:value="${obj.quantity}"></td>
            </tr>
        </table>
        <a th:href="@{/seller/home.do?(menu=2)}">물품관리</a>
        <input type="submit" value="일괄수정" />
    </form>
</body>
</html>
form 태그를 추가한다.
Mapper
<update id="updateItemBatch" parameterType="List">
    UPDATE item SELECT
        name = ( CASE
            <foreach collection ="list" item="obj" separator=" ">
                WHEN NO = #{obj.no} THEN #{obj.name}
            </foreach>
        END ),
        content = ( CASE
            <foreach collection ="list" item="obj" separator=" ">
                WHEN NO = #{obj.no} THEN #{obj.content}
            </foreach>
        END ),
        price = ( CASE
            <foreach collection ="list" item="obj" separator=" ">
                WHEN NO = #{obj.no} THEN #{obj.price}
            </foreach>
        END ),
        quantity = ( CASE
            <foreach collection ="list" item="obj" separator=" ">
                WHEN NO = #{obj.no} THEN #{obj.quantity}
            </foreach>
        END )
    WHERE no IN (
        <foreach collection="list" item="obj" separator=" , ">
            #{obj.no}
        </foreach>
    )
</update>
itemMapper.xml에 추가한다
@PostMapping(value="/updatebatch.do")
public String updateBatchPOST(
        @RequestParam(name = "no[]") long[] no,
        @RequestParam(name = "name[]") String[] name,
        @RequestParam(name = "content[]") String[] content,
        @RequestParam(name = "price[]") long[] price,
        @RequestParam(name = "quantity[]") long[] quantity){
    List<Item> list = new ArrayList<>();
    for(int i=0; i<no.length; i++)    {
        Item item = new Item();
        item.setNo(no[i]);
        item.setName(name[i]);
        item.setContent(content[i]);
        item.setPrice(price[i]);
        item.setQuantity(quantity[i]);
        list.add(item);
    }
    log.info("updatebatch.do[POST] => {}", list.toString());
    int ret = iMapper.updateItemBatch(no);
    log.info("updatebatch.do[POST] => {}", ret);
    return "redirect:/seller/home.do?menu=2";
}
SellerController에 updateBatchPOST를 추가한다.
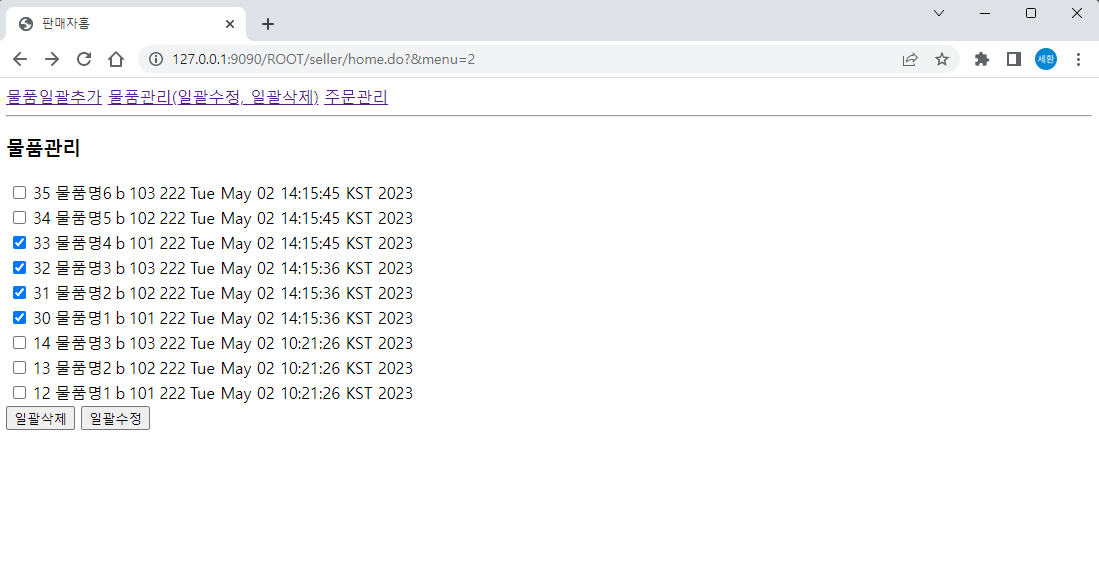
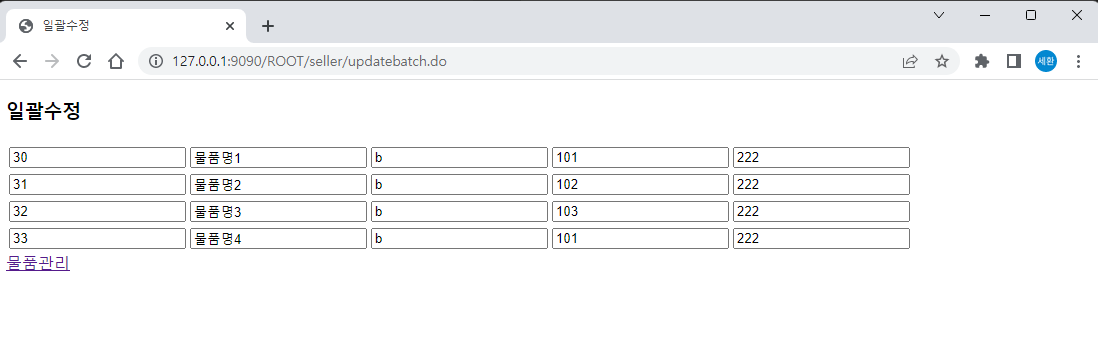
31 32 33을 체크하고 일괄수정을 눌러보자.
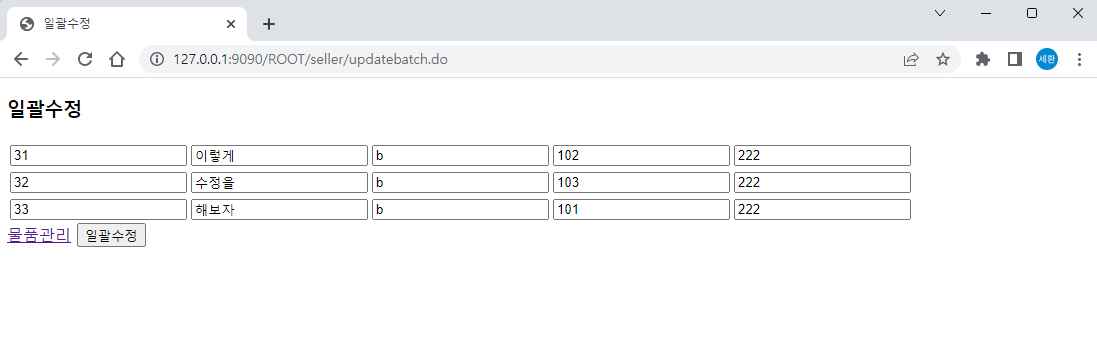
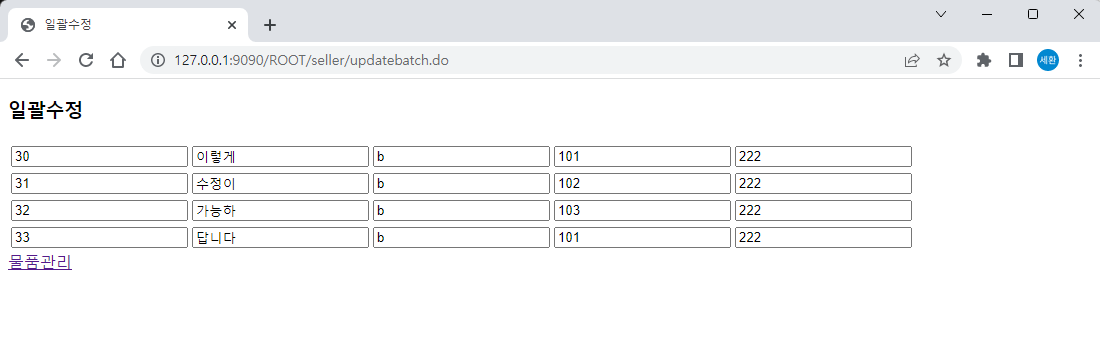
여기서 수정하고 싶은 항목을 수정하고 일괄수정을 누르게 되면
이렇게 수정된 모습을 볼 수 있다.
Security
준비단계
<dependency>
	<groupId>org.springframework.boot</groupId>
	<artifactId>spring-boot-starter-security</artifactId>
</dependency>
pom.xml에 위 dependency를 추가하고
@ComponentScan(basePackages = {"com.example.controller", "com.example.service","com.example.config"}) //컨트롤러, 서비스 위치위 코드를 입력하여 config를 추가한다.
@Configuration // 환경설정파일. 서버가 구동되기 전에 호출됨.
@EnableWebSecurity // 시큐리티를 사용
@Slf4j
public class SecurityConfig {

    @Bean // 객체를 생성함
    public SecurityFilterChain filterChain(HttpSecurity http) throws Exception{
        log.info("SecurityConfig => {}", "start filter chain");
        // 로그인, 로그아웃, 권한설정...
        return http.build();
    }
}
example 아래에 SecurityConfig.java를 생성하고 서버를 구동하면

터미널에 위 사진처럼 뜬다.
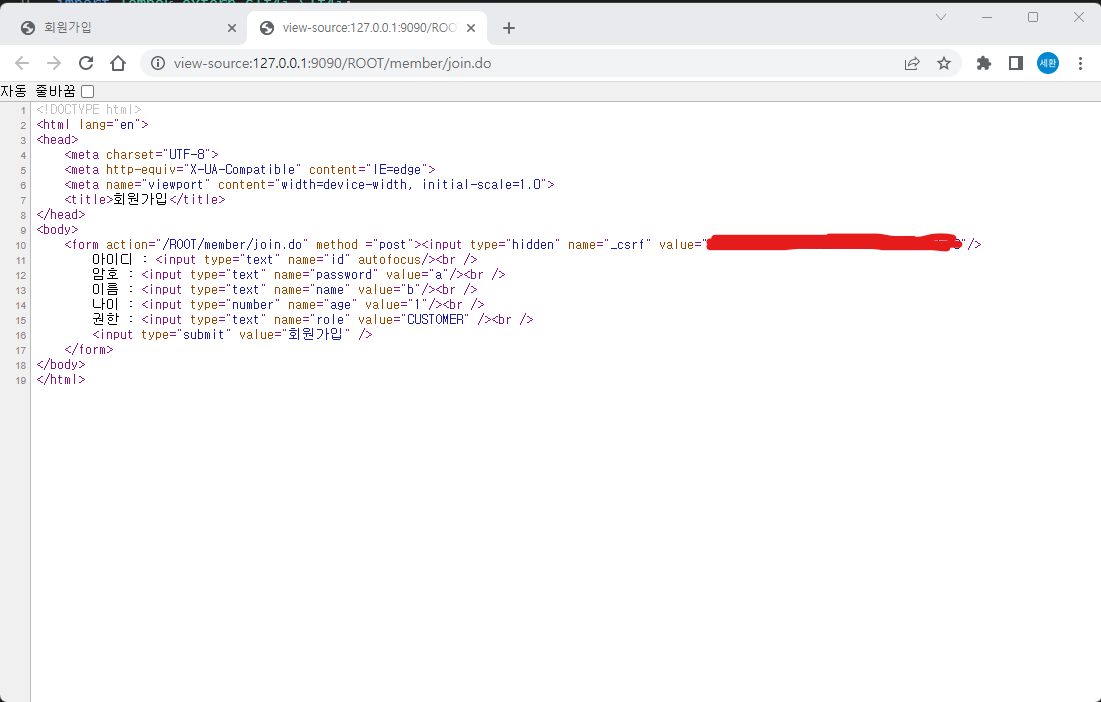
member/join.do로 접속해보았다.
페이지 소스 보기를 들어가보니 Security 암호가 들어간 것을 볼 수 있다. (빨갛게 지운 곳)