
MS To do App을 Clone 하면서 redux-saga, firebase 등을 공부해보고자 프로젝트를 진행했습니다.
참고 :
https://redux-saga-firebase.js.org/
https://github.com/n6g7/redux-saga-firebase
1. 들어가면서
redux-saga를 접하고 적당히 써가면서 익혀보고자 간단한 앱을 하나 개발하려 생각하다가 To do App이 워낙 간단하고(처음 생각에는) 가볍게 진행할 수 있겠다 싶어서 정했습니다.
디자인 안목이 겁이나게 낮기 때문에 적절한 clone 사이트를 물색하다가 MS To do App이 보여서 선정하였습니다.
MS To do : https://todo.microsoft.com/tasks/ko-kr
(매우 직관적이고 간편하고 쉽게 다룰 수 있는 점이 좋았습니다.)

2. Project Stack
CRA --template typescript
react와 typescript를 사용하기 위해 CRA typescript를 이용해 프로젝트를 생성하여 진행합니다.
npx create-react-app template to-do-app --template typescriptMain Stack
- firebase(authentication, firestore)
- typescript
- react
- react-router
- react-redux
- redux-saga
- typesafe-redux
- styled-components
- immer
Redux Stack
- pattern : + ducks
- mapStateToProps, mapStateToProps: use hooks(react-redux)
- snyc reducer : typesafe-actions > reducer
- async reducer : redux-saga, generator
- immutability: immer.js
- throttle, debounce: lodash
Directory Structure
React functional component를 사용하고 모든 state관리는 redux와 hook으로 진행했습니다.
src
├── components
│   ├── base
│   ├── common
│   ├── home
│   ├── sidebar
│   └── todo
├── lib
│   ├── api
│   └── hooks
│       ├── common
│       └── redux
│           ├── auth
│           ├── base
│           ├── todos
│           └── user
├── pages
├── static
│   └── images
├── store
│   └── modules
└── styles
    └── lib
3. Design Style
figma를 통해 디자인을 해보려고 시도했다가 하루종일 하나가지고 고치고 있는 내 모습을 보면서 이대로 안되겠다 싶어 과감히 clone design에 집중하였습니다.
(로고도 비슷하게 따서 사용했습니다.)
Loading 화면
4. styled-components
css, sass로 할까 styled-components로 할까 요즘 많이 사용한다던 emotion으로 해볼까 하다가 css-in-js로 진행하기로 하고 그나마 좀 익숙하던 styled-components로 진행하였습니다.
with typescript
typescript로 진행하려 했기 때문에 theme을 포함해서 모두 type을 지정해주어 사용합니다.
(처음에는 지정하기에 불편하지만 나중에는 intelliSense, complie error등 개발에 도움을 많이 줍니다.)
참고로 IDE는 vs code로 진행하였습니다.
GlobalStyle
styled-component에는 global style을 지정할 수 있게 해주는 기능이 존재합니다.
전역에 스타일을 적용하기 위해 사용하는 것입니다.
그리고 css reset도 같이 적용하기 위해 styled-reset도 같이 적용해봅니다.
import { createGlobalStyle } from 'styled-components';
import reset from 'styled-reset';

export const GlobalStyle = createGlobalStyle`
    ${reset}
    * {
    	margin: 0;
        padding: 0;
        box-sizing: border-box;
    }
    ...
`
위 GlobalStyle component를 App 최상위에 선언해두고 사용하면 됩니다. render되는 모든 component에 global style로 적용이 되어야하니 이렇게 지정해둡니다.
function App() {
  return (
    ...
          <GlobalStyle />
          <AppRouter />
    ...
  );
}

export default App;
Theme
styled-component에서 제공해주는 theme이 존재합니다.
말그대로 사용자가 사용하기 쉽게 테마(색상, 글자크기 등)를 선언하고 사용합니다.
typescript와 함께 쓰기 위해 type을 지정해줍니다.
styled-component에서 제공되는 theme타입인 DefaultTheme 타입이 비어져 있는 상태로 제공되어집니다.
이 곳에 타입을 지정하고 사용하도록 합시다.
또한 주요하게 쓰일만한 값들도 같이 지정해주면 개발할 때 편하게 진행할 수 있습니다.
//styles.d.ts
import 'styled-components';

declare module 'styled-components' {
  interface MajorSize {
    sidebarOpenWidth: string;
    sidebarCloseWidth: string;
  }
  interface ZIndex {
    prev: number;
    default: number;
    headerSticky: number;
    menu: number;
    popup: number;
    toast: number;
    modal: number;
  }
  interface DefaultTheme {
    fontSizes: string[];
    space: string[];
    whiteColor: string;
    blackColor: string;
    grayColor: string;
    grayLightColor: string;
    grayDarkColor: string;
    primaryColor: string;
    primaryLightColor: string;
    primaryDarkColor: string;
    secondaryColor: string;
    secondaryLightColor: string;
    secondaryDarkColor: string;
    blueColor: string;
    blueDarkColor: string;
    blueLightColor: string;
    redColor: string;
    redDarkColor: string;
    redLightColor: string;
    alertColor: string;
    informColor: string;
    facebookBlue: string;
    githubGray: string;
    zIndex: ZIndex;
    majorSize: MajorSize;
  }
}
사용하고자 하는 style 종류를 지정해두고 타입을 지정합니다.
(css style을 참고하여 타입을 지정하시면 됩니다.
z-index는 number로 사용되고, color는 string으로 사용됩니다. 등)
실제 값을 지정할 시에는 아래와 같이 지정하면 됩니다.
import { DefaultTheme, MajorSize, ZIndex } from 'styled-components';

const fontSizes = [
  '0.4rem',
  '0.6rem',
  '0.8rem',
  '1rem',
  ...
];
const space = [
  '0.4rem',
  '0.6rem',
  '0.8rem',
  '1rem',
  ...
];

const majorSize: MajorSize = {
  sidebarOpenWidth: '12rem',
  sidebarCloseWidth: '3.125rem',
};

const zIndex: ZIndex = {
  prev: -1,
  default: 0,
  headerSticky: 5,
  menu: 10,
  popup: 100,
  modal: 200,
  toast: 500,
};

const commonTheme = {
  whiteColor: '#ffffff',
  blackColor: '#000000',
  grayColor: '#9e9e9e',
  grayLightColor: '#eeeeee',
  grayDarkColor: '#616161',
  redColor: '#f44336',
  redDarkColor: '#ba000d',
  redLightColor: '#ff7961',
  blueColor: '#2196f3',
  blueDarkColor: '#0069c0',
  blueLightColor: '#6ec6ff',
  alertColor: '#d50000',
  informColor: '#00c853',
  facebookBlue: '#4267B2',
  githubGray: '#211F1F',
  fontSizes,
  space,
  zIndex,
  majorSize,
};

const lightTheme: DefaultTheme = {
  ...commonTheme,
  primaryColor: '#64b5f6',
  primaryLightColor: '#9be7ff',
  primaryDarkColor: '#2286c3',
  secondaryColor: '#4dd0e1',
  secondaryLightColor: '#88ffff',
  secondaryDarkColor: '#009faf',
};

const darkTheme: DefaultTheme = {
  ...commonTheme,
  primaryColor: '#263238',
  primaryLightColor: '#4f5b62',
  primaryDarkColor: '#000a12',
  secondaryColor: '#006064',
  secondaryLightColor: '#428e92',
  secondaryDarkColor: '#00363a',
};

export const theme = {
  lightTheme,
  darkTheme,
};
(light, dark theme를 적용하기 위해 위에서는 나누어져있습니다.)
위 export된 theme은 ThemeProvider를 통해 theme prop으로 사용합니다.
globalStyle과 마찬가지로 모든 component에서 theme을 사용하기 위해서 최상단에 지정해줍니다.
...
import { ThemeProvider } from 'styled-components';
import { theme } from 'styles/theme';
...

function App() {
  return (
...
      <ThemeProvider theme={theme.lightTheme}>
          <GlobalStyle />
          <AppRouter />
      </ThemeProvider>
...
   );
}

export default App;
여기까지 하면 대충 style을 사용하기 위한 준비는 어느정도 끝냈습니다.
추가로 아래와 같은 도구로 편리하게 mixin도 사용할 수 있습니다.
css, keyframesinstyled-components- polished package
5. Firebase
Backed by Google and loved by app development
teams - from startups to global enterprises
구글에서 제공하는 Firebase는 앱 개발에 필요한 인증, DB, Storage 등 다양한 백엔드(서버) 서비스를 쉽고 빠르게 제공하여 사용할 수 있게 해주는 통합 플랫폼입니다.
(제공하는 서비스는 Firebase 사이트에 가면 볼 수 있습니다.)
간편하게 사용할 수 있는 인증, db, 파일 저장 등을 통해 redux-saga를 써보기 위해 정했습니다.
- Authentication: email, OAuth
- Cloud Firestore: NoSql DB(Document)
- Storage
- Functions: serverless
baas(backend-as-a-service)라고도 하며 AWS에는 Amplify가 있습니다.
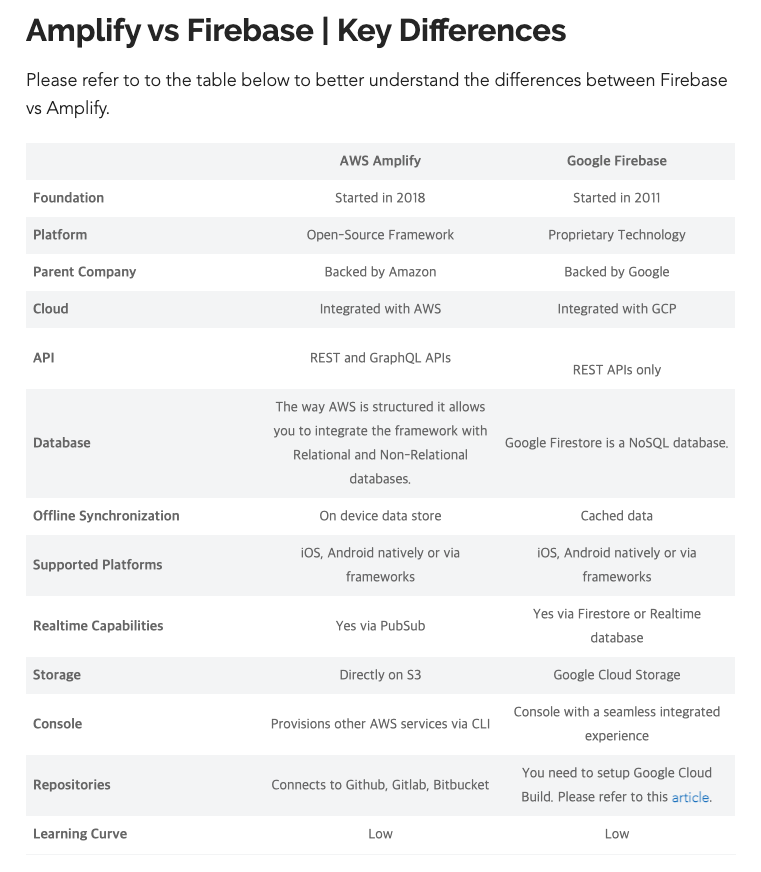
GCP Firebase vs AWS Amplify
Firebase vs Amplify
Firebase is suitable for small-scale projects with a lean team, because it is quite fast to implement. AWS Amplify, in contrast, is suitable for more mature and large-scale enterprises because of its more stable features.Firebase는 구현속도가 매우 빠르기 때문에
lean team(고객의 문제를 빠르게 해결하여 고객을 확보하며 자신들의 가설을 증명해 나아가는 팀)이 진행하는 소규모 프로젝트에 적당합니다.
반면에 AWS Amplify는 더 안정적인 기능을 가지므로 더 성숙하고 좀 더 큰규모 기업에 적합합니다
- Which is Better?
Firebase Project 생성, 연결
a. Firebase 콘솔로 이동하여 Web 프로젝트를 생성합니다.
프로젝트 이름과 리소스 위치 등 몇가지만 설정하면 빠르게 생성할 수 있습니다.
Firebase 콘솔에서 새 Firebase 프로젝트를 만들면 내부적으로 GCP(Google Cloud Platform) 프로젝트가 생성됩니다.
GCP 프로젝트는 데이터, 코드, 구성, 서비스의 가상 컨테이너라고 볼 수 있습니다.
Firebase 프로젝트는 Firebase 관련 구성 및 서비스가 추가적으로 포함된 GCP 프로젝트입니다.
GCP 프로젝트부터 만들고 나중에 Firebase를 프로젝트에 추가할 수도 있습니다.
b. Firebase 서비스를 이용하기 위한 App Configuration snippet을 알려줍니다.
프로젝트에 설정하도록 합니다.
firebase, @types/firebase 도 설치하여 준비하도록 합니다.
import firebase from 'firebase/app';
import 'firebase/auth';
import 'firebase/firestore';

const {
  REACT_APP_APIKEY,
  REACT_APP_AUTHDOMAIN,
  REACT_APP_DATABASEURL,
  REACT_APP_PROJECTID,
  REACT_APP_STORAGEBUCKET,
  REACT_APP_MESSAGINGSENDERID,
  REACT_APP_APPID,
  REACT_APP_MEASUREMENTID,
} = process.env;

// For Firebase JS SDK v7.20.0 and later, measurementId is optional
const firebaseConfig = {
  apiKey: REACT_APP_APIKEY,
  authDomain: REACT_APP_AUTHDOMAIN,
  databaseURL: REACT_APP_DATABASEURL,
  projectId: REACT_APP_PROJECTID,
  storageBucket: REACT_APP_STORAGEBUCKET,
  messagingSenderId: REACT_APP_MESSAGINGSENDERID,
  appId: REACT_APP_APPID,
  measurementId: REACT_APP_MEASUREMENTID,
};

firebase.initializeApp(firebaseConfig);

// Initialize Firebase
export const firebaseInstance = firebase;
export const authService = firebase.auth();
export const dbService = firebase.firestore();
//  firebase.analytics();
c. Firebase initializeApp
https://firebase.google.com/docs/web/setup#add_firebase_to_your_app
firebase.initializeApp({
  // Auth / General Use
  apiKey: "AIza....",
  // General Use
  appId: "1:27992087142:web:ce....",
  // General Use
  projectId: "my-firebase-project",
  // Auth with popup/redirect
  authDomain: "YOUR_APP.firebaseapp.com",
  // Realtime Database
  databaseURL: "https://YOUR_APP.firebaseio.com",
  // Storage
  storageBucket: "YOUR_APP.appspot.com",
  // Cloud Messaging
  messagingSenderId: "123456789",
  // Analytics
  measurementId: "G-12345"
});

export const firebaseInstance = firebase;
export const authService = firebase.auth();
export const dbService = firebase.firestore();
Firebase, 기능들을 초기화하면 사용할 준비는 완료되었습니다.
인증기능과 NoSQL DB를 사용하기 위해 위와 같이 작성하였습니다.
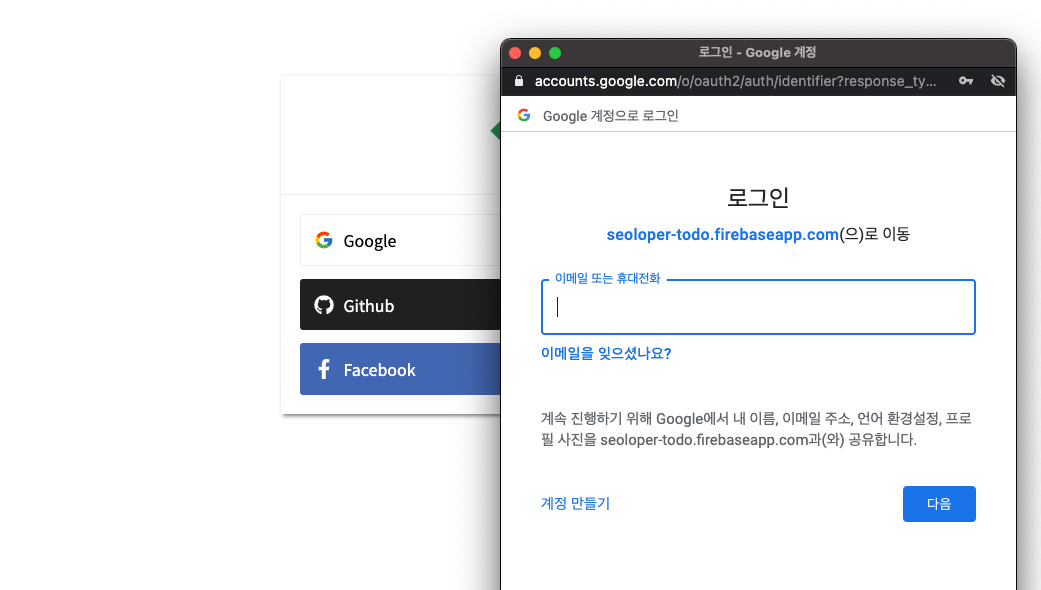
Authentication
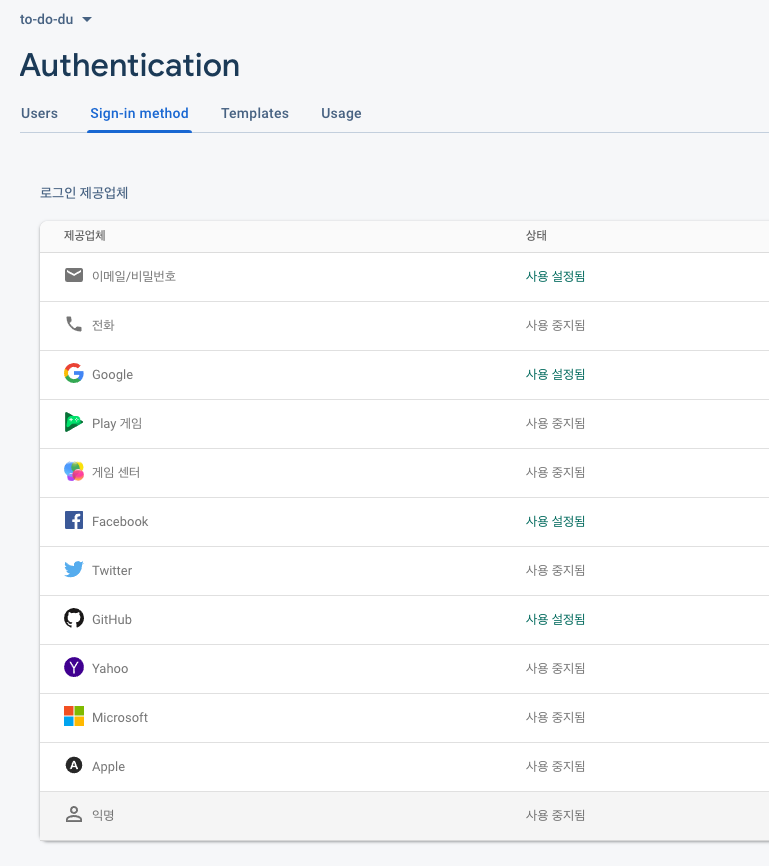
email 인증부터 다양한 OAuth를 제공합니다.
OAuth Google, Facebook, Github을 사용하기 위해 설정합니다.
설정버튼을 누르면 자세하게 설명이 나와있어서 쉽게 연결가능합니다.
Firestore
NoSQL DB(Document)
document nosql db 입니다.
Data가 모여서 하나의 문서 즉 Document를 구성하며 Document가 모여서 하나의 Collection을 구성하는 형태를 가집니다.
Document형태는 JSON 형태로 저장됩니다.

Collection
|
└─ Document
   Document
   ...
   |
   └─ Data
      Data
      ...
스키마가 없어 변형이 자유롭고 언제든지 형태를 바꿔 사용할 수 있습니다.
컬렉션을 직접 '생성' 또는 '삭제'할 필요는 없습니다.
컬렉션에 첫 번째 문서를 만들면 컬렉션이 생성됩니다.
컬렉션의 모든 문서를 삭제하면 컬렉션도 삭제됩니다.
규칙
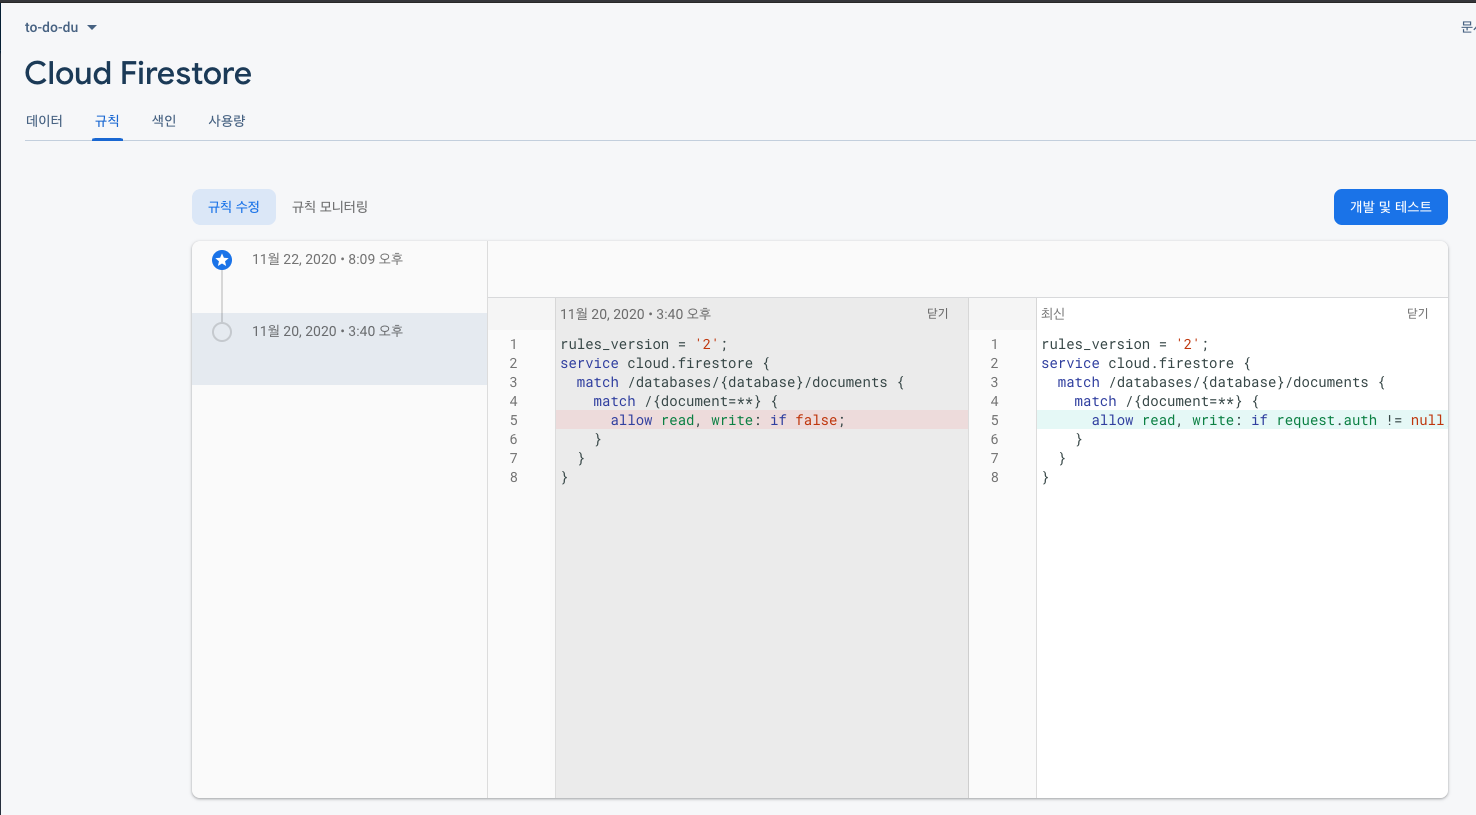
초기값은 read, write가 아래와 같이 허용이 되어있지 않습니다.
service cloud.firestore {
  match /databases/{database}/documents {
    match /{document=**} {
      allow read, write: if false;
    }
  }
}
인증되었다면 read, write 허용하도록 바꾸어 줍시다.
service cloud.firestore {
  match /databases/{database}/documents {
    match /{document=**} {
      allow read, write: if request.auth != null;
    }
  }
}
위 문법은 google cloud shell 입니다.
자세한 내용은 여기서 확인하세요.
사용
collection을 통해doc에 접근할 수 있는 방법doc에서 구성요소를 슬래시(/)로 구분한 문자열로 문서 또는 컬렉션의 경로를 지정
import { dbService } from 'myFb';

// collection.doc
const userRef = dbService.collection('users').doc(id);

// doc("collectionName/docId");
const userRef = dbService.doc(`users/${id}`);
위 변수들은 firebase.firestore.DocumentReference type으로 지정됩니다.
해당 위치에 데이터가 있는지 여부에 관계없이 참조를 만들 수 있으며,
참조를 만들어도 네트워크 작업이 수행되지 않습니다.
실제로 CRUD 작업 일어날 때 발생하게 됩니다.
6. Redux-Saga
redux-saga에 대해 잠시 공부를 하고 넘어가보고자 합니다.
참고:
https://react.vlpt.us/redux-middleware/10-redux-saga.html
https://react.vlpt.us/redux-middleware/11-redux-saga-with-promise.html
https://meetup.toast.com/posts/140
6.1 Generator function?
redux-saga 핵심은 es6 generator 함수에 있습니다.
function* generatorFunction() {
  ...
  yield...
  ...
}
generator함수는 함수 흐름을 멈추었다가 진행하였다가 할 수 있는 기능을 가지고 있습니다.
yield를 통해 흐름을 잡고, generator.next()를 통해 다음으로 이어져 나갑니다.
6.2 saga?
즉, saga는 generator함수이다.
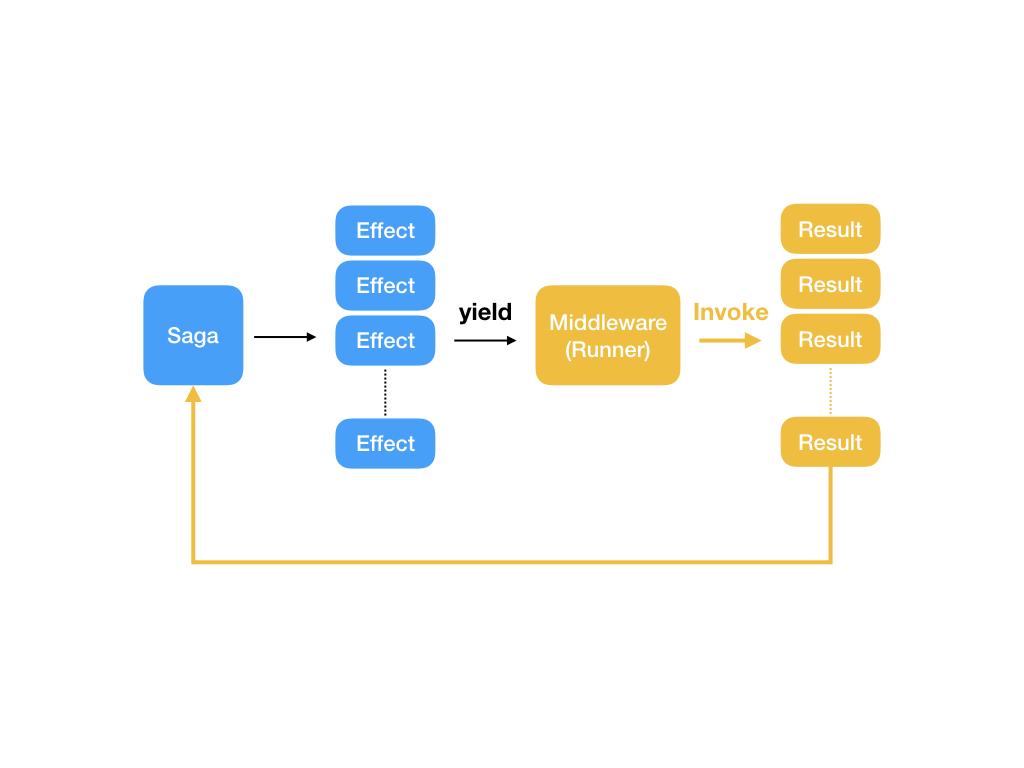
간단하게 설명하면 App에서 실행되는 모든 액션을 모니터링 하고 있다가 사용자가 설정한 액션이 들어오면 generator.next()를 실행하게 되는 것입니다.
6.3 Helper
https://blog.javarouka.me/2019/04/02/redux-saga-1/
https://soshace.com/handling-side-effects-in-redux-redux-saga/
redux-saga는 task(promise, saga, ...whatever)를 다루기 위해 몇가지 helper effect를 제공합니다.
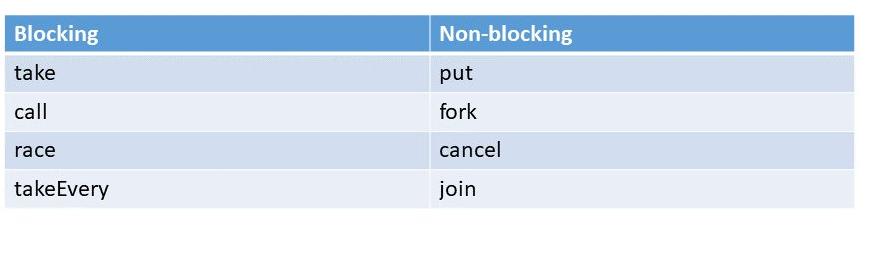
block / non-block
A blocking call means that the saga yielded an effect and will wait for the outcome of its execution before resuming execution inside the generator function.
A non-blocking call means the saga will resume immediately after yielding the effect.
blocking call은 effect를 실행했을 때 generator함수에서 그 effect 실행이 끝나기를 기다리고 재개(next())하는 것을 의미합니다.
non-blocking call은 effect를 실행한 후에 generator함수에서 바로 재개(next())하는 것을 의미합니다.
react-redux/effect
- call: fork를 실행하고 완료를 기다린다.(block)
block fork라고 보면 된다.- put:
Dispatch역할(store에 dispatch)(non-block)- take: 특정 Action의 발생을 기다린다.(block)
- select:
state에 접근한다.(block)- fork: task 분리(non-block)
부모task: caller saga
자식task: fork되는 saga
concurrent(동시성 패턴)
- takeEvery: take시에 saga가 동시에 fork되게 합니다.
- takeLatest: take시에 여러 개의 saga들이 동시에 실행되게 하지 않습니다. 새로운 액션이 dispatch되자 마자, 그것은 자신을 제외한 이전의 모든 fork된 task를 취소합니다.(이미 작동 중이더라도)
6.4 handling
saga생성의 기본적인 룰은
- request를 call하고,
- 그 결과에 따라 success, failure를 put하는 것입니다.
그리고 해당 saga를
- request action에 대해 모니터링하도록 합니다.
take(takeEvery, takeLatest 포함)를 통해 기다리는 것입니다.
function* formalSaga(action: ReturnType<typeof sampleAction.request>){
  try{
    const result = yield call(API.apiFunc, action.payload);

    if(isGood(result)){
      yield put(sampleAction.success(result));
    } else {
      yield put(sampleAction.failure("is not good"));
    }
  }
  catch(e){
    yield put(sampleAction.failure(e.message));
  }
}
yield takeEvery(SAMPLE_ACTION.REQUEST, formalSaga);7. React-Redux
공부하려고 작성해놓은 글이 있는데 한 번 읽어보시면 참고가 될 수 있습니다.
주요 구성요소 4가지(+ saga)를 어떤방식으로 접근하는지 확인해 봅니다.
- action
- reducer
- dispatch
- store
- AND saga
우선 프로젝트 설정에 대해 알아봅시다.
redux 프로젝트 설정
redux를 프로젝트에 설정하기 위해서는 역으로 생각해보면 이해하기 쉬울 것 같습니다.
- 전역에서 접근가능해야 한다: redux provider 설정
- provider에 store를 설정해줘야 한다: store 생성
- store에 필요한 configure를 작성해야 한다: configure 생성
- store에는 reducer + saga가 등록되어야 한다: reducer, saga 생성
4번부터 차근차근 진행하면 적절하게 접근할 수 있을 것 같습니다.
4. reducer, saga 생성
ducks 패턴을 적절히 이용하여 설정하였습니다.
주요 기능 또는 모듈 별로 적당히 나누어 파일을 생성하였습니다.
src/store
├── configure.ts
├── index.ts
└── modules
    ├── auth.ts
    ├── base.ts
    ├── index.ts
    ├── todos.ts
    └── user.ts
각 모듈에는 reducer와 saga가 export 되고 있습니다.
그걸 index.ts 파일에서 하나로 통합하여 export 합니다.
reducer를 하나로 모으기 위해 combineReducers를 이용합니다.
saga를 하나로 모으기 위해 all([])을 사용합니다.
(all : 배열 안의 여러 saga를 동시에 실행시켜줍니다.)
// src/modules/index.ts
import { combineReducers } from 'redux';
import { StateType } from 'typesafe-actions';
import { all } from 'redux-saga/effects';
import { reducer as authReducer, saga as authSaga } from './auth';
import { reducer as baseReducer } from './base';
import { reducer as todosReducer, saga as todoSaga } from './todos';
import {
  ASYNC_LOG_OUT,
  reducer as userReducer,
  saga as userSaga,
} from './user';

const appReducer = combineReducers({
  auth: authReducer,
  base: baseReducer,
  todos: todosReducer,
  user: userReducer,
});

const rootReducer = (state: any, action: any) => {
  if (action.type === ASYNC_LOG_OUT.SUCCESS) {
    state = undefined;
  }
  return appReducer(state, action);
};

export default rootReducer;

export function* rootSaga() {
  yield all([authSaga(), userSaga(), todoSaga()]);
}

declare module 'typesafe-actions' {
  export type RootState = StateType<typeof rootReducer>;
}
중간에 로그아웃 시 state를 초기화 하기 위한 wrapper 함수를 생성했습니다.
3. configure 생성
saga middleware를 설정한다던지, redux-dev-tools를 설정한다던지 등을 셋팅하는 configure파일을 생성하여 적용하였습니다.
saga이용 시 redirect 기능을 사용하기 위해 history를 context로 설정하여 줍니다.
// store/configure.ts
import { createStore, compose, applyMiddleware } from 'redux';
import createSagaMiddleware from 'redux-saga';
import { createBrowserHistory } from 'history';
import modules, { rootSaga } from './modules';

const isDev = process.env.NODE_ENV === 'development';

const devTools = isDev && (window as any).__REDUX_DEVTOOLS_EXTENSION_COMPOSE__;
const composeEnhancers = devTools || compose;
const customHistory = createBrowserHistory();
const sagaMiddleware = createSagaMiddleware({
  context: {
    history: customHistory,
  },
});
const middleware = [sagaMiddleware];

const configure = (preloadedState: any) => {
  const store = createStore(
    modules,
    preloadedState,
    composeEnhancers(applyMiddleware(...middleware))
  );

  sagaMiddleware.run(rootSaga);
  return store;
};

export default configure;
configure 함수를 export 하였기 때문에 import 시에 실행을 시키면 redux store(saga 설정이 된)가 return 됩니다.
2. store 생성
// store/index.ts
import configure from './configure';

const store = configure(
  typeof window === 'undefined' ? undefined : (window as any).__REDUX_STATE__
);

export default store;
1. redux provider 설정
전역에서 사용할 수 있게 App 최상단에 provider를 설정해줍니다.
import React from 'react';
import { Provider } from 'react-redux';
import { HelmetProvider } from 'react-helmet-async';
import { ThemeProvider } from 'styled-components';
import AppRouter from 'components/AppRouter';
import HelmetGlobal from 'components/base/HelmetGlobal';
import store from 'store';
import { GlobalStyle } from 'styles/globalStyles';
import { theme } from 'styles/theme';

function App() {
  return (
    <Provider store={store}>
      <ThemeProvider theme={theme.lightTheme}>
        <HelmetProvider>
          <HelmetGlobal />
          <GlobalStyle />
          <AppRouter />
        </HelmetProvider>
      </ThemeProvider>
    </Provider>
  );
}

export default App;
redux 설정이 마무리되었고 사용할 수 있습니다.
Action
Action을 작성해봅니다.
Sync
react-redux에서 제공하는 것과 더불어 typesafe-action을 이용해 구성합니다.
import {
  ActionType,
  createAction
} from 'typesafe-actions';
const OPEN_SIDEBAR = '@@base/OPEN_SIDEBAR';
const openSidebar = createAction(OPEN_SIDEBAR)();한 가지 주의해야 할 점이 있는데 createAction함수를 반드시 호출 해줘야 한다는 점입니다.
dispatch를 통해 action을 호출하기 위해 전체 action을 export하는 object를 만들어줍니다.(type 또한 actions, state type export해줍니다)
export const actions = {
  openSidebar,
  ...
}

export type BaseAction = ActionType<typeof actions>;

export type BaseState = {
  sidebar: boolean;
  userMenu: boolean;
};
Async
async 처리를 위해 saga를 이용합니다.
socialLogin 기능을 예를 들어보겠습니다.
redux
typesafe-actions에서는 createAsyncAction을 통해 async action을 생성할 수 있게 합니다.
createAcyncAction은 3개 Action Type argument를 지정해주어야 합니다.
- Request: request 때
- Success: result 성공일 때
- Failure: result 실패일 때
promise에 대한 요청, 응답(성공, 실패)에 대한 reducer를 위해 3가지를 지정하는 것입니다. 그리고 type 지정은 payload에 대해 지정해주면 됩니다.
- request payload:
provider string을 넘기기 위해 string 지정합니다. - success payload:
firebase login user result를 담기 위한 type을 지정합니다. - failure payload:
error message를 담기 위해 string으로 지정합니다.
import { ActionType, createAsyncAction, createReducer } from 'typesafe-actions';
import * as AuthAPI from 'lib/api/auth';

// Action Type
const ASYNC_SOCIAL_LOGIN = {
  REQEUST: '@@auth/ASYNC_SOCIAL_LOGIN_REQUEST',
  SUCCESS: '@@auth/ASYNC_SOCIAL_LOGIN_SUCCESS',
  FAILURE: '@@auth/ASYNC_SOCIAL_LOGIN_FAILURE',
};

const asyncSocialLogin = createAsyncAction(
  ASYNC_SOCIAL_LOGIN.REQEUST,
  ASYNC_SOCIAL_LOGIN.SUCCESS,
  ASYNC_SOCIAL_LOGIN.FAILURE
)<string, AuthResult, string>();

const initialState: AuthState = {
  loading: false,
  authResult: undefined,
  error: undefined,
};
createAction과 마찬가지로 호출이 반드시 들어가야 됩니다.
saga
asycn 작업을 캐치하고 로직을 처리하기 위해 saga를 작성해 봅니다.
function* socialLoginSaga(action: ReturnType<typeof asyncSocialLogin.request>) {
  try {
    const authProvider = FbUtils.getStringToAuthProvider(action.payload);
    if (!authProvider) {
      yield put(asyncSocialLogin.failure('Not Exists Auth Provider'));
      return;
    }
    const authResult = yield call(AuthAPI.signInWithPopup, authProvider);
    yield put(asyncSocialLogin.success(authResult));
  } catch (e) {
    if (e.code === AUTH_ACCOUNT_EXISTS_CODE) {
      // auth/account-exists-with-different-credential
      // 위 code가 오면 같은 계정으로 이미 등록되어 있단 뜻으로 link 시켜준다.
      const providers = yield call(AuthAPI.fetchProvidersForEmail, e.email);
      if (!providers || providers.length === 0) {
        yield put(
          asyncSocialLogin.failure('Not Exists Auth Account for your Email')
        );
        return;
      }

      // OAuth provider에 따라서 재 로그인을 하도록 한다.
      // google..., facebook..., github...
      const firstProvider = supportedProviders.find((provider) =>
        providers.find((p: string) => p === provider.providerId)
      );
      if (!firstProvider) {
        yield put(
          asyncSocialLogin.failure('Not Exists Auth Provider for your Email')
        );
        return;
      }

      // 재 로그인
      const linkProvider = FbUtils.getStringToAuthProvider(
        firstProvider.providerName
      );
      if (!linkProvider) {
        yield put(asyncSocialLogin.failure('Not Exists Link Provider'));
        return;
      }

      const linkCredential = yield call(AuthAPI.signInWithPopup, linkProvider);
      if (!linkCredential) {
        yield put(asyncSocialLogin.failure('Not Exists Link Credential'));
        return;
      }

      const user = yield call(AuthAPI.signInWithCredential, linkCredential);

      if (!user || !e.credential) {
        yield put(asyncSocialLogin.failure('Not Find Linking User'));
        return;
      }

      const linkResult = yield call(
        AuthAPI.linkWithCredential,
        user,
        e.credential
      );

      if (!linkResult || !linkResult.credential) {
        yield put(asyncSocialLogin.failure('Not Linked User'));
        return;
      }

      yield put(asyncSocialLogin.success(linkResult.credential));
    } else {
      yield put(asyncSocialLogin.failure(e.message));
    }
  }
}

export function* saga() {
  yield takeEvery(ASYNC_SOCIAL_LOGIN.REQEUST, socialLoginSaga);
}
social login 하는 saga를 작성해보았습니다.
같은 email을 가진 계정이 존재하게 되면 link하게 해주는 것 까지 처리하여 소셜 로그인을 구현 하였습니다.
Reducer
action을 통한 state관리를 위해 Reducer 작성을 해봅니다.
immutablity 관리 편의성을 위해 immer package를 이용합니다.
yarn add immer위 socialLogin 예제를 이용해 reducer를 작성해보겠습니다.
export const reducer = createReducer<AuthState>(initialState, {
  [ASYNC_SOCIAL_LOGIN.REQEUST]: (state) =>
    produce(state, (draft) => {
      draft.loading = true;
    }),
  [ASYNC_SOCIAL_LOGIN.SUCCESS]: (
    state,
    action: ActionType<typeof asyncSocialLogin.success>
  ) => {
    return produce(state, (draft) => {
      if (!action) return;
      const { payload: authResult } = action;
      draft.authResult = authResult;
      draft.loading = false;
      draft.error = undefined;
    });
  },
  [ASYNC_SOCIAL_LOGIN.FAILURE]: (
    state,
    action: ActionType<typeof asyncSocialLogin.failure>
  ) => {
    return produce(state, (draft) => {
      if (!action) return;
      const { payload: message } = action;
      draft.loading = false;
      draft.error = message;
    });
  },
});typesafe-actions에 createReducer를 이용해 reducer를 작성합니다.
createAsycnAction에 의해 action당 3개 Action Type이 존재하게 됩니다.
그에 맞추어 reducer를 구성하면 됩니다.
- 요청 시 : loading을 true로 합니다.
- 성공 시 :
loading을 false로 합니다.
result 값을 넣습니다. - 실패 시 :
loading을 false로 합니다.
error 값을 넣습니다.
위 처럼 object 방식(+ switch case) 말고 handleAction을 통한 메서드 체이닝 방식도 있으니 참고해서 편한 방식으로 사용하면 됩니다.
// handleAction
const counterReducer = createReducer(0)
  .handleAction('ADD', (state, action) => state + action.payload)
  .handleAction('INCREMENT', (state, _) => state + 1);
Dispatch
외부에서 state를 업데이트를 하기 위해 사용하는 Dispatch를 구현해봅니다.
hook으로 사용하기 위해 useDispatch를 사용합니다.
기존 connect를 통한 HOC에서 기존 mapDispatchToProps에 매칭되는 녀석입니다.
여기서는 dispatch를 hook을 통해 구현해 보았습니다.
useDispatch: dispatch를 사용할 수 있도록 react-redux package에서 제공하는 hook입니다.useCallback: useCallback은 함수의 Memoization을 담당하는 훅입니다. 두 번째 파라미터인 deps 배열 안의 값이 바뀌었을 때만 새로운 함수를 생성하여 조금의 성능 개선이 이루어집니다.
// useToggleSidebar.ts
import { useCallback } from 'react';
import { useDispatch } from 'react-redux';
import { actions } from 'store/modules/base';

const useToggleSidebar = () => {
  const dispatch = useDispatch();

  return useCallback(
    (isShow: boolean) =>
      dispatch(isShow ?
               actions.openSidebar()
               : actions.closeSidebar()),
    [dispatch]
  );
};

export default useToggleSidebar;
// Sidebar.tsx
import { useSelector, shallowEqual } from 'react-redux';
import { RootState } from 'typesafe-actions';
import useToggleSidebar from 'lib/hooks/redux/base/useToggleSidebar';
export default useBaseState;

const Sidebar = () => {
  const toggleSidebar = useToggleSidebar();
  const sidebar = useSelector(
    ({ base }): RootState) => base.sidebar, shallowEqual
  );

  const onClick = () => {
    toggleSidebar(!sidebar);
  };

  return (
    ...
        <MenuIcon onClick={onClick}>
          <FiMenu />
        </MenuIcon>
    ...
  );
};

export default Sidebar;
무엇보다 간단하게 불러서 사용할 수 있다는 점이 좋았습니다.
앞으로도 특별한 이유가 있지 않는 한 hook을 통해서 작성할 것 같습니다.
Store
store 셋팅은 위에 redux 프로젝트 생성 부분을 참고하시면 될 것 같씁니다.
AND saga
각 모듈에 saga가 한 개이상이 존재한다면 해당 saga를 all을 통해 모아서 export 해줍니다.
export function* saga() {
  yield all([
    takeEvery(ASYNC_ADD_TODO.REQUEST, addTodoSaga),
    takeEvery(ASYNC_GET_TODOS.REQUEST, getTodosSaga),
    takeEvery(ASYNC_DELETE_TODO.REQUEST, deleteTodoSaga),
    takeEvery(ASYNC_UPDATE_TODO_ITEM.REQUEST, updateTodoItemSaga),
    takeLatest(ASYNC_SYNC_TODOS.REQUEST, syncTodosSagaWithLogInfo),
  ]);
}
8. API
firebase를 그대로 써도 되지만 내부 처리를 위해 api를 작성해 보았습니다.
API for firebase
firebase에서 제공하는 함수들은 promise를 기본적으로 제공하므로 saga를 통해 yield 바로 하는 것이 문제없습니다.
하지만 호출하기 전이나, 후 처리를 해주기 위해 generator함수로 한 번 감싸서 처리하도록 합니다.
import firebase from 'firebase/app';
import { authService } from 'fBase';
import { call } from 'redux-saga/effects';
import { CallReturnType } from 'lib/sagaUtils';

export function* signInWithPopup(authProvider: firebase.auth.AuthProvider) {
  const auth = authService;
  const {
    credential,
  }: CallReturnType<typeof auth.signInWithPopup> = yield call(
    [auth, auth.signInWithPopup],
    authProvider
  );

  return credential;
}firebase.auth에서 제공하는 signInWithPopup함수를 generator함수로 wrapping하여 사용했습니다.
사실 saga와 typescript와 쓰기에는 처음이라 접근법을 어떻게 해야 할지 잘 몰라서 사이트들을 많이 참고해서 작성한 부분이 많습니다.
use generic type: https://spin.atomicobject.com/2020/08/06/redux-saga-call-effect/
typed-redux-saga: https://github.com/agiledigital/typed-redux-saga#usage
9. 주요 기능
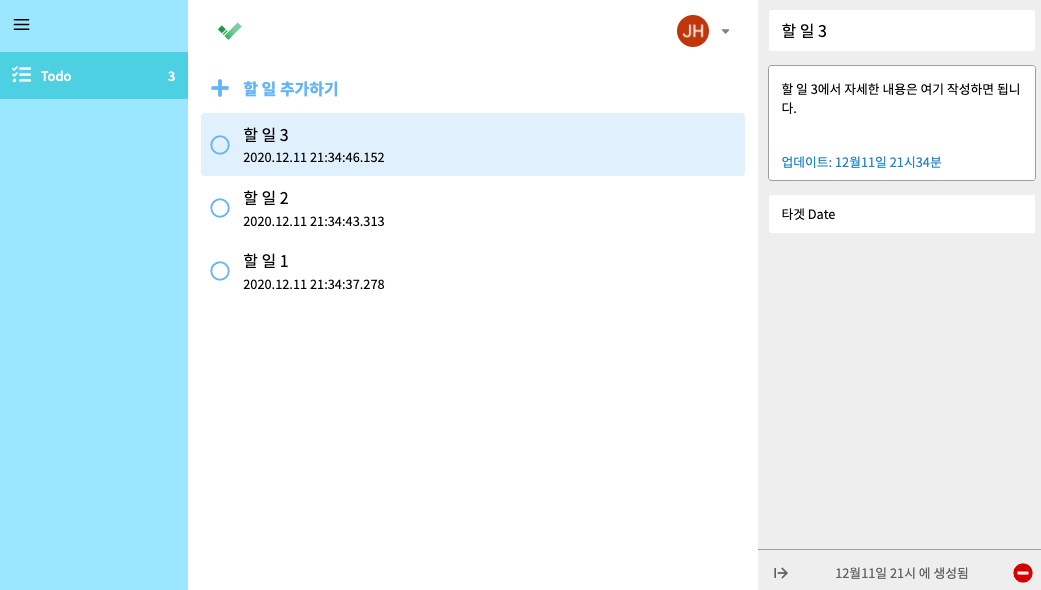
- Social Login: Github, Google, Facebook
- To Do: Add, Update, Delete
- To Do content: debounce update
- responsive: 1 breakpoint
마무리하며
사실 완벽하게 프로젝트를 완성한 것은 아닙니다만
이렇게 글을 쓰게 된 이유는 redux, redux-saga에 대해 다시 한 번 더 학습하며 스스로 익숙해지고 이해하기 위해서 글을 작성하게 되었습니다.
아마 내용 중에 틀린 부분도 많을 것 같고 비 효율적인 부분도 있을 거라고 생각하지만 그래도 글을 써가면서 새롭게 배운 부분도 많았고 이해도 어느정도 많이 되어서 도움이 많이 된 것 같습니다.
모든 것을 완벽하기를 바라기 보단 어느정도 틀린 경험을 해보는것도 중요하다고 생각합니다.
머리도 느리기도 하고 퇴근하고 저녁에 잠깐 잠깐 하다보니 대략 1달 가까이 걸려버렸는데 뭐... 상관없습니다.
지금 당장 하는게 중요하니깐요
제 미흡한 코드는 저의 깃헙에서 확인하실 수 있습니다.
https://github.com/JHSeo-git/to-do-du

참고가 되었습니다 감사합니다~~