
IaC (Infrastructure as Code-코드형 인프라)
- 인프라를 웹 인터페이스 및 대화형식의 도구를 사용해 수동적으로 인프라를 구성하는 것이 아닌, 시스템이 읽을 수 있는 인프라 정의 파일을 통해 인프라의 구성 관리 및 배포를 자동화 하는 것
- 인프라는 물리적 하드웨어 뿐만 아니라 가상 컴퓨터, 클라우드 등 관련 리소스를 IaC를 통해 구성 관리 및 배포할 수 있음
- IaC는 폭발적으로 확장되는 컴퓨팅과 차세대 웹 프레임워크와 같은 새로운 기술을 구현하고 구성하는 어려움에 대한 해결책으로 발전하게 되었고, 기업들은 이런 기술을 통해 스케일링 확장하는 문제도 해결할 수 있었음
<장점>
- 비용절감 : 사람의 노력적인 측면에서 인프라 관리를 수동적으로 하지 않음으로 다른 생산적인 작업에 노력을 집중할 수 있음
- 빠른 속도 : 인프라 구성 관리 및 배포를 자동화 함으로 신속한 실행을 가능하게 하고,효율적으로 작업할 수 있는 가시성을 제공
- 안정성 : 수동으로 구성할 때와 같은 사람의 실수와 관련 위험을 제거할 수 있음
- 코드화 및 버전관리 : 표준화된 포맷과 규칙으로 작성된 코드 문서를 통해 누구나 읽을 수 있고 확인할 수 있다. 또한 코드는 변경 사항 이력을 남길 수 있어 추후 문제 발생 시 어떤 부분이 변경되어 발생한 문제인지 확인하기 쉬움
- 재사용성 : 인프라를 코드화 하고 관련 리소스를 그룹 및 모듈화 해서 필요 시 필요한 부분을 재사용 할 수 있음
<구성관리 / 배포도구>
구성관리
- 물리(Baremetal) 시스템, 가상 컴퓨터 및 클라우드 인스턴스 내에서 패키지 설치, 애플리케이션 구성, 운영체제 관련 구성 및 구성 변경을 관리하는 도구
📒 Ansible, Chef, Puppet, SaltStack 등
배포
- 새로운 인프라 리소스를 배포하고 이미 배포된 인 프라 리소스의 생명 주기를 관리하는 도구
📒 AWS CloudFormation, OpenStack Heat, Terraform 등
<마스터 및 에이전트 유무>
마스터
- 인프라의 정보와 구성 관리 및 배포를 위한 정보를 가지고 있음
- 장점 : 중앙 집중화 된 관리 및 모니터링이 가능
- 단점 : 추가적인 리소스의 필요, 마스터의 관리, 장애 등이 존재
에이전트
- 서버가 관리할 인프라에 에이전트 소프트웨어가 설치되어 있음
Ansible
애플리케이션 및 IT 인프라를 자동화 할 수 있는 도구
- Ansible을 사용하여 호스트를 구성하고, 소프트웨어를 배포하고, 지속적인 배포 및 다운 타임 없는 롤링 업데이트 등 고급 IT 작업은 조율할 수 있음
- Ansible의 주요 목적은 간결성과 사용 용이성이며 또한 보안과 신뢰성을 바탕으로 OpenSSH를 기본 전송 방법으로 사용
- 컨트롤 노드(=마스터 노드)는 리눅스나 유닉스 시스템만 가능
- 관리 노드는 어떠한 시스템이든 상관없음
- 시스템 관리에 특별한 에이전트가 필요하지 않지만 파이썬을 이용해서 해당 작업들을 행해야 되기 때문에 컨트롤 노드든 관리 노드든 파이썬이 설치되어 있어야 함
컨트롤 노드
- Ansible이 설치된 모든 호스트
- 컨트롤 노드에서는 ansible 또는 ansible-playbook 명령을 이용하여 작업을 실행할 수 있음
- Python이 설치된 모든 호스트를 제어 노드로 사용할 수 있음
- Windows 호스트를 컨트롤 노드로 사용할 수 없음
관리 노드
- 컨트롤 머신에서 접근하여 모듈을 설치하고, 원격의 명령을 실행하는 작업을 수행하는 시스템. 쉽게 말해 컨트롤 머신에 관리되는 시스템을 의미함
- Ansible은 관리 노드에 설치되지 않음
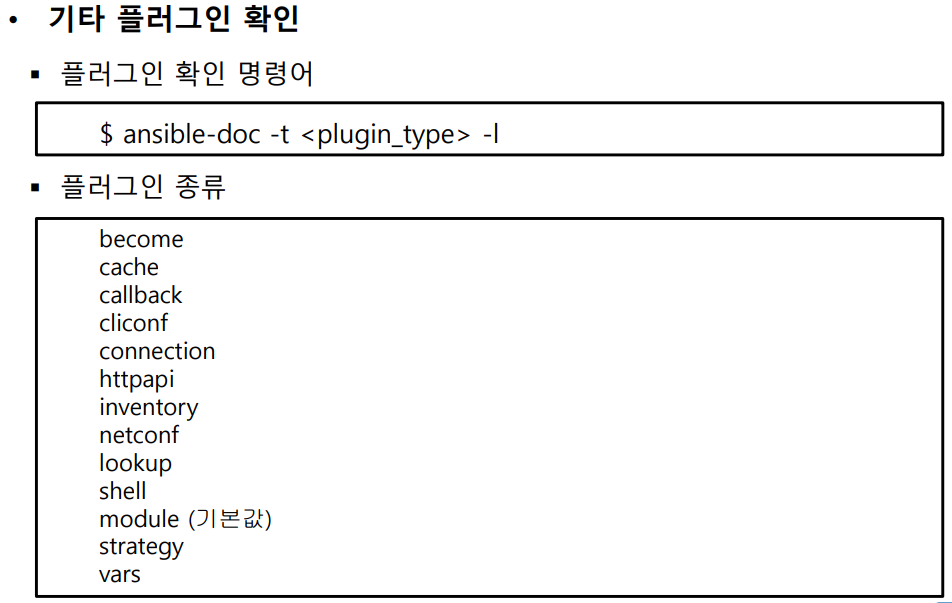
플러그인
- Ansible의 핵심 기능을 확장할 수 있도록 다양한 플러그인을 제공
인벤토리
- 관리 노드의 목록으로, 관리 노드에 대한 호스트 이름이나 IP 주소와 같은 정보를 지정
- 여러 관리 노드를 그룹으로 조직화 할수 있고, 중첩 그룹을 사용할 수 있음
모듈
- Ansible을 실행하는 Python 코드 단위
- 하나의 모듈은 하나의 작업을 실행할 수 있고, 플레이북을 이용해 여러 모듈을 선언해 여러 작업을 수행할 수 있음
작업(Task)
- Ansible의 작업 실행 단위
- 하나의 모듈이 하나의 작업이 되며, Ad-hoc 명령을 통해 단일 작업을 실행하거나, 플레이북을 작성해 여러작업을 실행할 수 있
Ad-hoc 명령
- Ansible 명령을 이용하여 단일 작업을 실행할 수 있음
플레이
- 특정 관리 노드를 대상으로한 순서가 지정된 작업 목록
플레이북
- 관리 노드에서 실행할 모듈을 인자와 함께 정의한 파일
- YAML로 작성되며, Ansible의 핵심
- ansible-playbook 명령을 이용해 플레이북을 실행할 수 있음
📒 모듈 < task < 플레이 < 플레이북
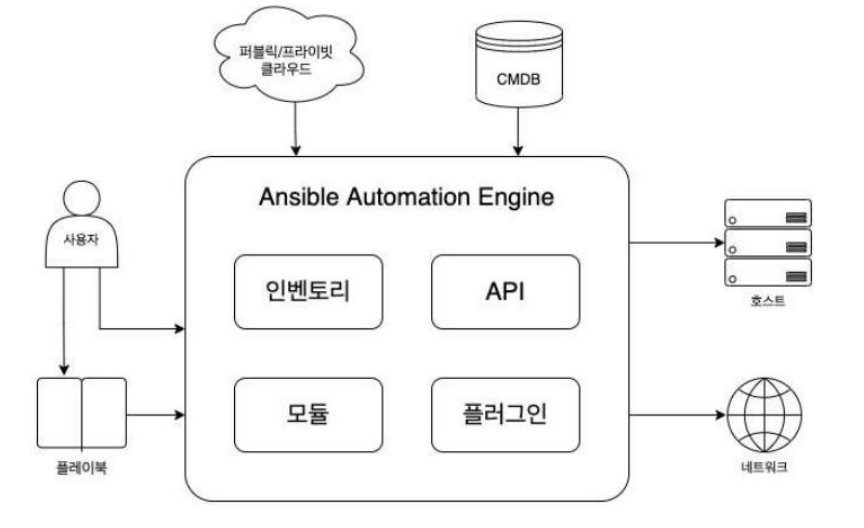
Ansible 아키텍쳐
Ansible 실습
<vagrant 설치 및 설정 / 실행>
- Vagrant를 다운로드 받는다
📒 설치 파일 및 패키지(수동 설치) - virtual box의 host only network와 확장팩이 존재하는지 확인
- c드라이브에 ansi폴더 생성
- ansi 폴더에 vagrantfile 삽입
-> 터미널에서 파일 있는지 확인 - c드라이브의 users의 계정명이 영어야 오류가 안난다
📒 한글이면 사용자 추가해야 함 vagrant plugin install vagrant-hostmanagervagrant plugin install vagrant-disksizevagrant plugin listvagrant box add ubuntu/bionic64
-> vagrant는 원하는 스펙(ip설정이나, cpu개수 등)의 동일한 가상머신을 아주 편리하게 몇개든 적은 용량으로 설치할 수 있다.vagrant box list
-> ansi 폴더에 있는 vagrantfile에 원하는 스펙이 작성되어 있다
-> 만일 가상머신을 몇개가 아닌 몇백개를 설치/실행해야 한다면 일일이 설치하는 것은 매우 비효율적이다. vagrant는 이것을 해결해주는 서비스이다.
<vagrant를 이용한 Ansible VM배포>
VM배포 / 실행vagrant up
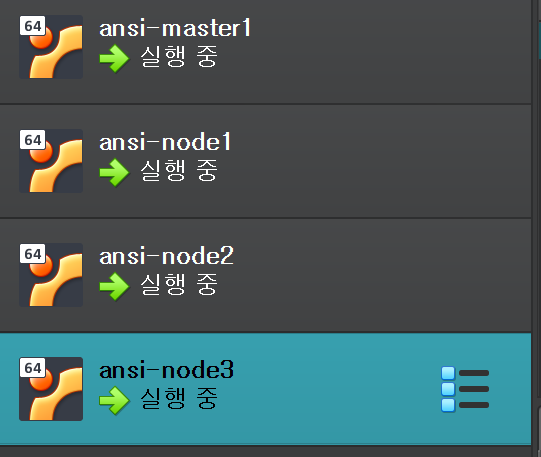
-> 총 4개의 컨트롤/관리 노드가 배포된것을 볼 수 있다.
<Ansible 서버 설정 및 접속>
원하는 가상머신 ip입력해서 ssh로 접속 (pw : vagrant입력)ssh vagrant@192.168.56.11
-> 컨트롤 머신(마스터)에 접속
키 생성ssh-keygen
자신의 ip에 대해 키 복사ssh-copy-id vagrant@localhost
node1에 대해서 키 복사ssh-copy-id vagrant@ansi-node1
node2에 대해서 키 복사ssh-copy-id vagrant@ansi-node2
node3에 대해서 키 복사ssh-copy-id vagrant@ansi-node3
각 노드들에 대해서 암호 입력없이 ssh 접속이 된다면 키 기반 접속이 완료된 것이다.ssh ansi-node1
📒 Ansible 컨트롤 머신은 각각 노드들에 대해서 ssh를 통해서 지시를 내리게 됨. ssh 접속시에 암호를 입력함으로써 접속하게 되면 안된다. 그렇기 때문에 키 기반 등록을 진행해 주어야 함sudo apt updatesudo apt install -y software-properties-commonsudo apt-add-repository -y -u ppa:ansible/ansiblesudo apt install -y ansible
Ansible 명령 쉘 자동완성sudo apt install -y python3-argcomplete
Ansible 명령 쉘 자동완성sudo activate-global-python-argcomplete3
Ansible Lint 설치sudo apt install -y ansible-lintexec bashansible입력 후 tab키
master서버에서 bash파일 접속 후 아래 처럼 설정 변경vi .bashrc

- 재접속하면 아래 처럼 prompt창이 바뀌어있다

-> 나중에 내용이 많아지면 줄이 밀리는 현상이 발생하기 때문에 prompt창의 형식을 바꾸어 준 것이다
<Ansible 구성 파일>
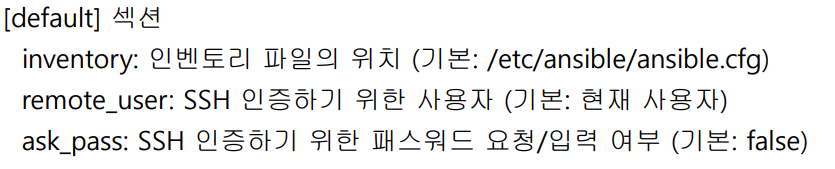
- Ansible의 작동 방식을 구성하는 파일
- 인벤토리 파일의 위치, 관리 노드에 연결하는 방법, 연결 한 후 작동 방법 등 무수히 많은 구성을 지정할 수 있음
- 기본 Ansible 구성 파일의 위치는 /etc/ansible/ansible.cfg
구성파일을 직접확인해도 되지만 해당 명령어를 이용해 구성 파일 및 설정에 대해 확인할 수 있다ansible-config view
현재 적용된 모든 구성 정보 확인ansible-config dump
설정 가능한 모든 설정 항목ansible-config list- 구성파일 우선순위
- ANSIBLE_CONFIG 환경 변수
- 현재 디렉토리의 ansible.cfg
- 홈 디렉토리의 ~/.ansible.cfg
- /etc/ansible/ansible.cfg
📒 만약 현재 디렉토리에 설정값이 다른 ansible.cfg파일이 있다면 해당 파일의 설정 내용을 다른 cfg파일보다 우선적으로 적용한다
- 구성파일 내용

<정적 인벤토리 생성>
-
Ansible은 인프라에 존재하는 여러 호스트를 관리함
-
호스트의 목록 또는 그룹을 지정한 인벤토리 파일이 필요하며 인벤토리가 정의되면 패턴을 사용하여 Ansible을 실행할 노드 또는 그룹을 선택함
-
기본 인벤토리 파일은 /etc/ansible/hosts 이며, -i 옵션을 사용하여 다른 인벤토리 파일을 지정할 수 있음
-
인벤토리 파일은 일반적으로 INI 파일 형식을 가지고 있으며, YAML 형식으로 지정할 수 있음
-
정적 인벤토리 : 사용자가 직접 INI 또는 YAML 형식으로 파일을 직접 작성
-
기본 그룹
- all : 모든 호스트 포함
- ungrouped : 그룹에 속하지 않은 모든 호스트 포함
-
여러 그룹에 속한 호스트
- 각 호스트는 하나 이상의 그룹에 속할 수 있음
- 중첩 그룹을 이용한 인벤토리 단순화
현재 디렉터리(ansitest)에 원본 ansible.cfg 복사cp /etc/ansible/ansible.cfg ./vi ansible.cfg:%d 수행- 아래 내용 입력 후 저장

-> 새로운 inventory를 만들기 위해 현재 디렉터리에 새로운 구성 파일 생성 vi inventory- 아래 내용 입력 후 저장
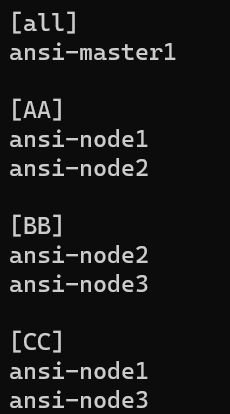
📒 ansi-node1처럼 이름을 입력할 수 있는 이유는 /etc/hosts에 각 ip에 해당하는 이름이 정의되어 있기 때문이다 - inventory파일에 아래 내용 추가 입력 후 저장
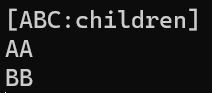
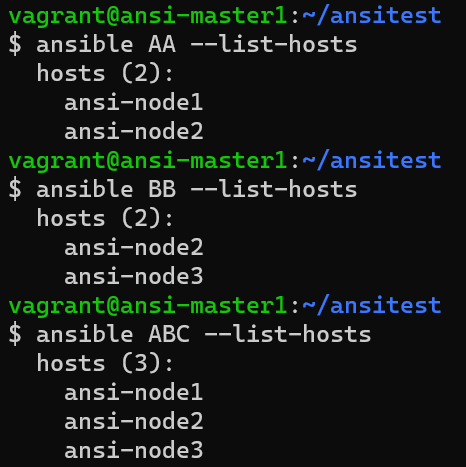
-> 중첩 그룹 만들기 - 아래 명령어 입력했을 때 4개의 host가 나타난다

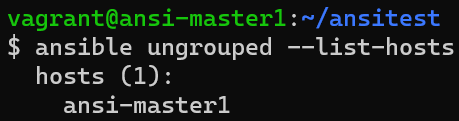
- 아래 명령어 입력했을 때 group이 없는 master가 나타난다
- 아래와 같이 특정 group을 확인 할 수 있다.
그룹에 대한 정보를 YAML형식으로 보기ansible-inventory --list
📒 기본 인벤토리 파일이 아닌 경우는 -i옵션을 사용할 수 있다
<패턴>
- Ad-hoc 명령 또는 플레이북을 실행할 때 작업을 실행할 관리 노드 또는 그룹을 지정할 때 패턴을 이용해 관리 노드를 선택
- 패턴은 단일 호스트, IP 주소, 인벤토리 그룹을 참조할 수 있고, 집합, 와일드카드, 정규화 표현식 등 사용이 가능
- Ad-hoc 명령
ansible <pattern> <options>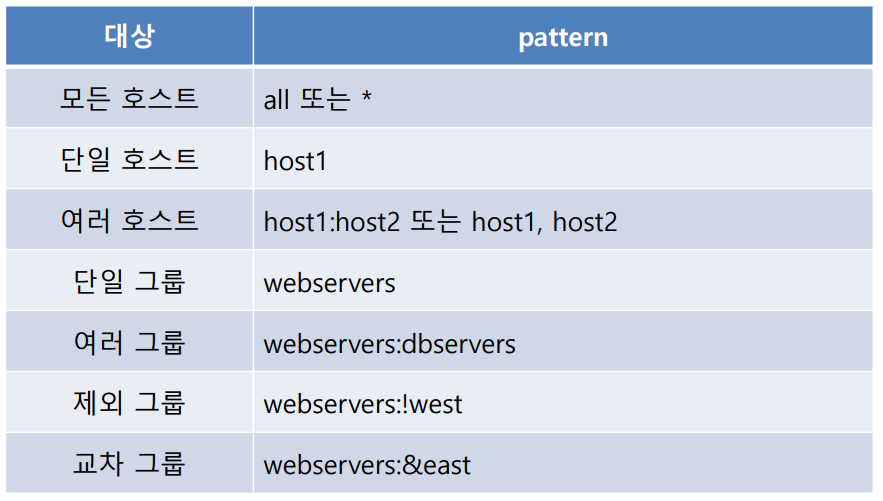
위에서 만든 기본 인벤토리파일이 아닌 새로운 인벤토리파일 생성vi testhost- all과 그룹 생성
testhost 인벤토리 파일의 모든 host출력ansible \* --list-hosts -i testhost
testhost 인벤토리의 그룹 A,B에 포함된 호스트 출력ansible groupA:groupB --list-hosts -i testhost
💡 위의 기본 인벤터리도 패턴 사용 가능
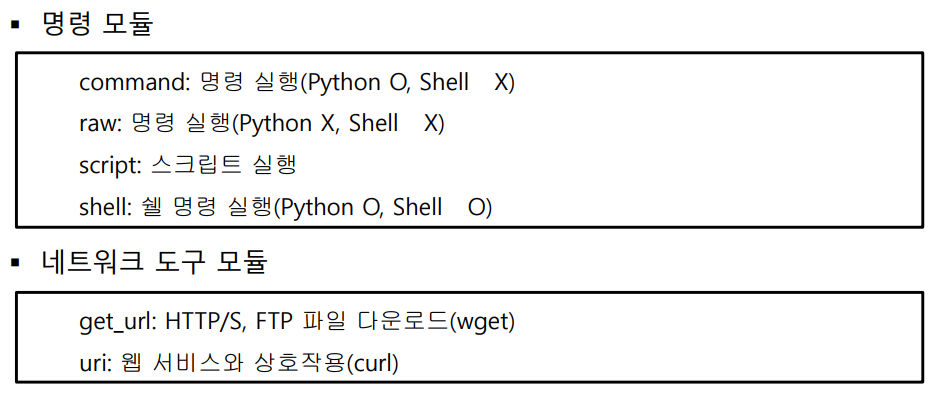
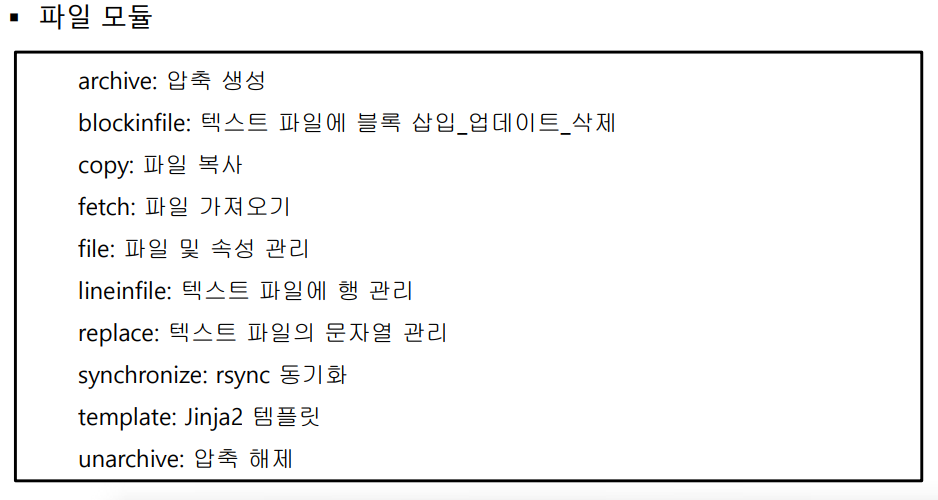
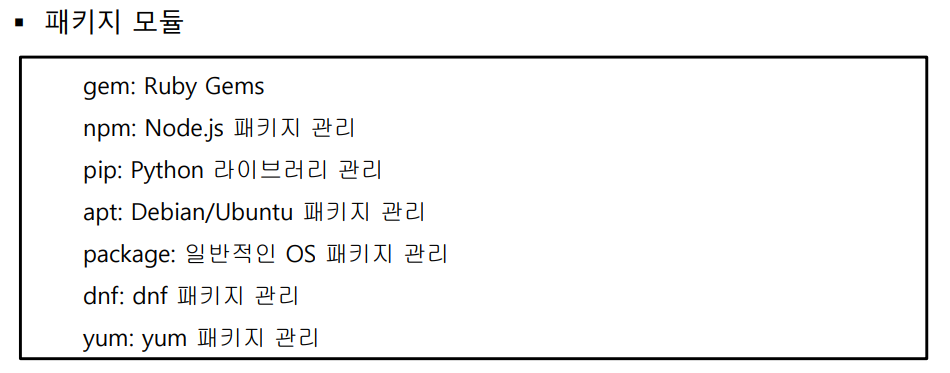
<모듈>
- 모듈은 Ansible을 이용해 관리 노드에 작업을 실행하는 핵심 요소
- 모듈은 Python 코드로 이루어져 있으며, /usr/lib/python3/dist-packages/ansible 경로에 있음.
모듈 목록 확인ansible-doc -l
특정 모듈 확인ansible-doc <module_name>- 자주 사용되는 모듈


<Ad-hoc 명령>
- 모듈을 실행시키는 명령어로 단 한번만 수행한다.
- Ansible ad-hoc 명령은 하나 이상의 관리 노드에 단일 작업을 실행하는 임시 명령
- 임시 명령은 거의 반복하지 않는 간단한 작업에 주로 사용
- 형식 : ansible [pattern] -m [module] -a "[module options]"
-> pattern에 '특정 호스트', '인벤토리에 지정한 그룹', '패턴을 통한 원하는 호스트/그룹'을 입력하고 -m으로 원하는 모듈을 Ad-hoc으로 실행
ansi-node1에 ping을 보낸다ansible ansi-node1 -m ping
그룹 AA에 ping을 보낸다ansible AA -m ping
ansi-node1을 재부팅하는 세가지 방법ansible ansi-node1 -m reboot, ansible ansi-node1 -a "/sbin/reboot/", ansible ansi-node1 -m shell -a "/sbin/reboot/"
AA그룹을 대상으로 testfile을 해당 디렉터리에 복사한다touch testfile ansible AA -m copy -a "src=/home/vagrant/ansitest/testfile dest=/home/vagrant/"
호스트에 해당 경로를 ls로 보면 testfile이 복사된것을 확인ssh ansi-node1 ls /home/vagrant
-> 직접 접속하지 않아도 명령어를 입력할 수 있다
파일의 권한 변경ansible ansi-node1 -m file -a "dest=/home/vagrant/testfile mode=600"
이전에 만든 경로의 파일 삭제ansible AA -m file -a "dest=/home/vagrant/testfile state=absent"
node1에게 suhwan이라는 유저 생성ansible ansi-node1 -m user -a "name=suhwan password='1234'"
suhwan 유저 제거ansible ansi-node1 -m user -a "name=suhwan state=absent"
패키지 설치 및 업데이트ansible ansi-node3 -m apt -a "name=apache2 update_cahce=yes state=present"
서비스 시작ansible ansi-node3 -m service -a "name=apache2 state=started"
서비스 재시작ansible ansi-node3 -m service -a "name=apache2 state=restarted"
서비스 중지ansible ansi-node3 -m service -a "name=apache2 state=stopped"
패키지 제거ansible ansi-node3 -m apt -a "name=apache2 state=absent"- 구성파일의 become을 False로 바꾸게 된다면 cp,apt,user등의 모듈을 실행할 때 사용자의 권한(vagrant)으로 실행하겠다는 뜻

-> apt나 user등 과 같은 모듈은 root권한을 필요로 하기 때문에 become=False라면 해당 모듈을 관리 노드들에게 작업시킬 수 없다
📒 False인 상태에서 --become 옵션으로 root권한 사용 가능

성실하게 열심히!