EKS
- window powershell, 터미널 대신 git-bash 다운로드
- kubectl을 설치하기 위해서는 curl명령이 필요한데, 일일이 다운받기 보다는 윈도우 패키지인 chocolatey를사용
- chocolatey홈페이지에 원하는 패키지를 검색하면 다운로드 명령어를 알 수 있다.
choco install kubernetes-cli --version=1.24.10
#chocolatey 설치 후 kubectl 명령어 설치

kubectl version
#kubectl 다운로드 확인

1 . git bash 접속 후 control-plane에 접속
2 . cat ~/.kube/config # 내용 복사
3 . exit로 나와서 /users/사용자/.kube 디렉터리 생성
4 . vi config # config(=kube config) 파일 생성
5 . 복사한 내용 삽입 및 아래와 같이 클러스터의 서버 ip주소를 control-plane의 ip로 설정
-> 이제 윈도우에서도 kubectl 명령을 통해 control-plane접속 및 이전에 linux환경에서의 작업을 모두 실행 가능
📗 choco는 항상 관리자권한으로 쉘을 열고 작업
1 . AWS EKS를 사용하기 위해 eksctl 명령어를 설치
choco install eksctl # 파워쉘에서 관리자 권한으로 작업
eksctl version # 설치 확인2 . AWS EKS를 사용하기 위해 aws 명령어를 설치
choco install awscli # 파워쉘에서 관리자 권한으로 작업
aws --version # 설치 확인
3 . AWS EKS를 사용하기 위해 aws-iam-authentication 명령어 설치
choco install aws-iam-authenticator # 파워쉘에서 관리자 권한으로 작업
aws-iam-authenticator version # 설치 확인
📗 EKS를 사용하기 위해서는 kubectl, eksctl, aws, aws-iam-auth 총 4개가 필요하다.
choco install kubernetes-helm
# 나중에 애드온을 설치하기위한 helm도 추가 설치
aws홈페이지에서 iam사용자에 들어가 보안 자격 증명에서 엑세스 키 생성 및 csv파일로 다운로드
aws configure # 쉘(git-bash)에서 명령어 입력 - csv파일의 엑세스키와 시크릿 키, 리전(ap-northeast-2), json(default) 입력
aws sts get-caller-identity
#계정에 엑세스 되는지 확인

eksctl create cluster --name myeks --region ap-northeast-2
#aws에 클러스터 배포, 리전은 서울리전으로 다시한번 설정
#배포하는데 보통 15분정도 걸린다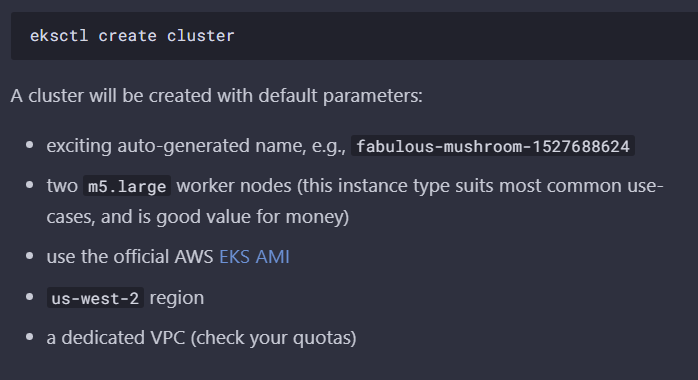
- yaml파일 작성 및 eksctl로 클러스터를 배포하는 것이 아닌 eksctl 기본으로만 클러스터를 생성하면 위의 내용들이 기본으로 설치된다
aws콘솔에서 eks검색하면 myeks가 존재하는 것을 확인
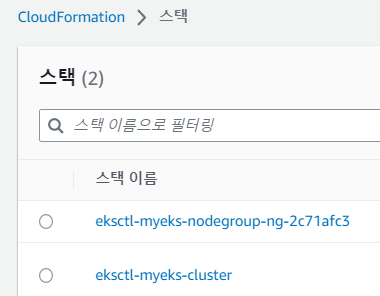
- aws에서 cloudformation을 보면 node와 control-plane이 존재한다.
- 해당 스택에 들어가 템플릿을 누르게되면 템플릿 양식이 코드로 작성되어있는 것을 볼 수 있다. 이것은 eksctl이 자동으로 cloudformation을 생성한것이다.
- cloudformation(배포 템플릿)을 이용하여 클러스터를 배포한 것이다.
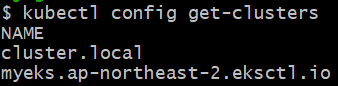
- 클러스터가 두개인것을 확인
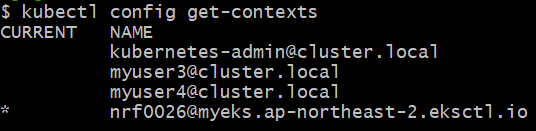
- 컨텍스트가 생성된 것을 확인

- 해당 컨텍스트에서 node를 검색하면 기존의 admin클러스터가 가진 노드와 다른 노드를 가진 것을 알 수 있다.
eksctl delete cluster --name myeks # 클러스터 삭제클러스터 생성
1 . YAML파일로 클러스터 스펙 구성
apiVersion: eksctl.io/v1alpha5
kind: ClusterConfig

metadata:
  name: mycluster
  region: ap-northeast-2 # 서울 리전
  version: "1.24" # 버전 지정

#AZ
availabilityZones: ["ap-northeast-2a", "ap-northeast-2b",  "ap-northeast-2c", "ap-northeast-2d"]

# IAM OIDC & Service Account
iam:
  withOIDC: true # IAM과 서비스 계정의 인증을 동기화
  serviceAccounts:
    - metadata: # ingress용
        name: aws-load-balancer-controller
        namespace: kube-system
      wellKnownPolicies:
        awsLoadBalancerController: true
    - metadata: # pvc(볼륨)용
        name: ebs-csi-controller-sa
        namespace: kube-system
      wellKnownPolicies:
        ebsCSIController: true
    - metadata: # autoscailing용
        name: cluster-autoscaler
        namespace: kube-system
      wellKnownPolicies:
        autoScaler: true

# Unmanaged Node Groups, 비관리형은 관리형에 비해 돈이 안든다. 대신 업데이트등을 수동으로 해야한다.
nodeGroups:
  # On-Demand Instance / Public Network / SSH
  - name: ng-1
    instanceType: t3.medium
    desiredCapacity: 1
    availabilityZones: ["ap-northeast-2a", "ap-northeast-2b"]
    ssh:
      allow: true
      publicKeyPath: ./eks-key.pub

  # Spot Instances / Scaling / Private Network
  # IAM Policy: AutoScaler, ALB Ingress, CloudWatch, EBS
  - name: ng-spot-2
    minSize: 1 # min,max를 구성하면 자동으로 스케일링
    desiredCapacity: 2
    maxSize: 3
    privateNetworking: true # 프라이빗 네트워크로 구성
    instancesDistribution:
      maxPrice: 0.01
      instanceTypes: ["t3.small", "t3.medium"]
      onDemandBaseCapacity: 0
      onDemandPercentageAboveBaseCapacity: 0
      spotInstancePools: 2
    availabilityZones: ["ap-northeast-2c", "ap-northeast-2d"]
    iam:
      withAddonPolicies:
        autoScaler: true
        albIngress: true
        cloudWatch: true
        ebs: true

  # Mixed(On-Demand/Spot) Instances
  - name: ng-mixed-3
    desiredCapacity: 2
    instancesDistribution:
      maxPrice: 0.01
      instanceTypes: ["t3.small", "t3.small"]
      onDemandBaseCapacity: 1
      onDemandPercentageAboveBaseCapacity: 50

# Managed Node Groups
managedNodeGroups:
  # On-Demand Instance
  - name: managed-ng-1
    instanceType: t3.small
    desiredCapacity: 2

  # Spot Instance
  - name: managed-ng-spot-2
    instanceTypes: ["t3.small", "t3.medium"]
    desiredCapacity: 1
    spot: true

# Fargate Profiles, 서버리스의 종류
fargateProfiles:
  - name: fg-1
    selectors:
    - namespace: dev
      labels:
        env: fargate

# CloudWatch Logging
cloudWatch: # control-plane의 로그를 클라우드워치에 남긴다
  clusterLogging:
    enableTypes: ["api", "scheduler"] # control-plane만 지정
2 . YAML파일로 클러스터 스펙 구성, 실제 클러스터 배포는 2번코드로 진행할 것이다.
# myeks.yaml파일
apiVersion: eksctl.io/v1alpha5
kind: ClusterConfig

metadata:
  name: myeks
  region: ap-northeast-2
  version: "1.24"

# AZ
availabilityZones: ["ap-northeast-2a", "ap-northeast-2b",  "ap-northeast-2c"]

# IAM OIDC & Service Account
iam:
  withOIDC: true
  serviceAccounts:
    - metadata: # ingress,LB를 위한 loadbalancer controller 애드온 추가
        name: aws-load-balancer-controller
        namespace: kube-system
      wellKnownPolicies:
        awsLoadBalancerController: true
    - metadata: # 스토리지 클래스를 위한 애드온 추가
        name: ebs-csi-controller-sa
        namespace: kube-system
      wellKnownPolicies:
        ebsCSIController: true
    - metadata: # HPA를 위한 Metrics-server 애드온 추가
        name: cluster-autoscaler
        namespace: kube-system
      wellKnownPolicies:
        autoScaler: true

# Managed Node Groups
managedNodeGroups:
  # On-Demand Instance
  - name: mynodes-t3
    instanceType: t3.medium
    minSize: 1
    desiredCapacity: 2
    maxSize: 3
    privateNetworking: true # 워커노드를 프라이빗 네트워크에 감춘다.
    #ssh:
      #allow: true
      #publicKeyPath: ./keypair/myeks.pub
    availabilityZones: ["ap-northeast-2a", "ap-northeast-2b", "ap-northeast-2c"]
    iam:
      withAddonPolicies:
        autoScaler: true
        albIngress: true
        cloudWatch: true
        ebs: true

# Fargate Profiles
fargateProfiles:
  - name: myfg
    selectors:
    - namespace: dev
      labels:
        env: dev

# CloudWatch Logging
cloudWatch:
  clusterLogging:
enableTypes: ["*"] # 모든 로그를 클라우드워치에 남긴다-
2번코드의 yaml파일을 window환경에서 실행시키면 클러스터가 배포될 것이다.
eksctl create cluster -f myeks.yaml # 20분정도 소요
eksctl delete cluster -f myeks.yaml # 클러스터 삭제- 실습이 끝난후 필요하지 않다면 삭제헤줘야 예상치 못한 과금을 피할 수 있다.
온프레미스와 클라우드의 차이점
이전의 실습들은 모두 온프레미스 환경에서 작업을 한 것이였다.
하지만 클라우드에서 클러스터를 배포해 사용하게 되면 몇가지 다른 점이 존재하고, 사용법도 다르다.
1 . Network : NodePort, LoadBalancer, Ingress
2 . 스토리지 : pvc, pv( =볼륨)
3 . 스케일링 : HPA
1 . Network
< NodePort >
- 위의 2번코드 배포한 클러스터에서 NodePort와 파드를 생성 후 실행시켜보면 curl명령이 실행되지 않는다.
-> NodePort로 외부에 노출시켜서 클라이언트가 해당 노드포트로 들어와야 하지만 노드( =EC2인스턴스)의 보안그룹은 애초에 3만번대 Port에 대해서는 허용하지 못한다.
-> 만약에 허용을 한다하더라도 2번코드에서
'privateNetworking : true'에 의해 각 노드는 프라이빗 서브넷에 감춰진 상태이다. 프라이빗 서브넷의 ip는 외부와 연결이 되어있지 않기때문에 프라이빗ip에 NodePort를 뚫는다 하더라도
프라이빗IP: Nodeport로는 직접 들어오지 못한다. 반드시 퍼블릭 서브넷의 ip를 거쳐서 들어가고 나와야 한다.
-> 만약 보안그룹이 3만번대를 허용할 수 있으면서 동시에 퍼블릭 서브넷에 노드가 배치되었다면, NodePort로도 접속이 가능하긴하다.
-> 하지만 퍼블릭서브넷에 바로 노드를 배치하는 것은 외부에서 쉽게 접속이 가능하기 때문에 보안이 좋지 않은 설계이다
-> 따라서 프라이빗 서브넷에 노드를 배치하고 외부와 통신(노출)을 하기 위해서는 로드밸런서나 Ingress를 이용하면 된다.
< Loadbalancer > : clb 사용 x nlb사용 - > 에드온


- LoadBalancer와 파드를 생성하면 aws 콘솔에도 로드밸런서가 생성되고, 브라우저에도 외부용 ip를 통해 접속이 잘되는 것을 확인할 수 있다.
- 하지만 보시다시피 로드밸런서의 타입이 classic로드밸런서이다.
이것은 Layer4에서 작동하는 로드밸런서이고, 현재는 classic이 아닌 NLB로드밸런서를 사용한다. - NLB로드밸런서를 사용하기 위해 별도의
Loadbalancer Controller 애드온이 필요한데, 이 애드온을 설치하기 위해 위의 2번코드에서 With OIDC 부분에서 Service Account를 추가한 것이다
< ingress >
- 위의 로드밸런서와 마찬가지로 Loadbanlancer Controller 애드온을 설치해야한다.
2 . 스토리지
< PVC,PV (볼륨) >
- PVC를 동적프로비저닝해서 PV를 자동을 생성하기 위해서는 PV의 프로파일 정보를 가진 스토리지 클래스가 필요하다. 따라서 이 SC를 설치할 수 있는 EBS CSI Driver 프로비저너 라는 애드온이 필요하다
- 마찬가지로 2번 코드에서 이 애드온을 추가하기 위해 서비스 계정을 추가하였다
3 . 스케일링
< HPA >
- 이전의 실습은 Metric Server를 애드온했기 때문에 가능했지만
AWS 클라우드에는 metric 서버가 없기때문에 HPA가 Metric을 수집하지 못해 실행이 되지 않는다. - top 커멘드 또한 실행이 되지 않는다
- Metric Server를 위해 Cluster Autoscaler라는 애드온을 추가하여야 한다.
- 마찬가지로 2번 코드에서 이 애드온을 추가하기 위해 서비스 계정을 추가하였다.
< fargate Profile >
- k8s Serverless 애드온이 필요하다.
📒 privateNetworking : false로 한다면 노드를 퍼블릭 네트워크에 배치하기 때문에 노출이되어 위험하다. 따라서 일반적으로는 true로 설정
zsh 설치
- 좀 더 편하게 작업을 하기 위해 zsh과 ohmyz를 설치한다.
https://mirror.msys2.org/msys/x86_64/zsh-5.9-2-x86_64.pkg.tar.zst
# 해당 링크 클릭후 tar파일 다운로드- tar파일 압축해제하기 위해 반디집 다운로드
- tar파일 '알아서 압축해제' 클릭 , 두번 해제해야 한다.
- usr와 etc디렉터리를 복사
- c드라이브에 program files에 Git디렉터리 이동
- 복사한 usr, etc 디렉터리 덮어씌우기
vi ~/.bashrc # git-bash접속 후 bashrc접속, 아래 텍스트 입력

if [ -t 1 ]; then
  exec zsh
fi
< zsh 설치 후 ohmyz.sh 설치 >
-
ohmyz.sh : zsh의 프레임워크
-
install클릭
sh -c "$(curl -fsSL https://raw.githubusercontent.com/ohmyzsh/ohmyzsh/master/tools/install.sh)"
# 해당 명령어를 재접속한 git-bash에 입력
< 폰트 설정 및 기타설정과 플러그인 설정 >
- 아래 4가지 ttf파일을 다운로드 해준다
- 다운로드후 실행시켜서 pc에 다운로드 해준다
git-bash 실행 후 우클릭
- 옵션 -> text -> select -> 다운받은 MesloLGS NF(Nerd Font)로 설정
📗 Nerd Font 참조 : 엔지니어를 위한 특수 폰트
# Install Powerlevel10k
git clone --depth=1 https://github.com/romkatv/powerlevel10k.git ${ZSH_CUSTOM:-$HOME/.oh-my-zsh/custom}/themes/powerlevel10k

# zsh의 설정파일
vi ~/.zshrc

11번째줄 수정
ZSH_THEME="powerlevel10k/powerlevel10k"


# 저장후 git bash를 껏다가 다시 켜면 아래처럼 새로운 화면이 나올 것이다.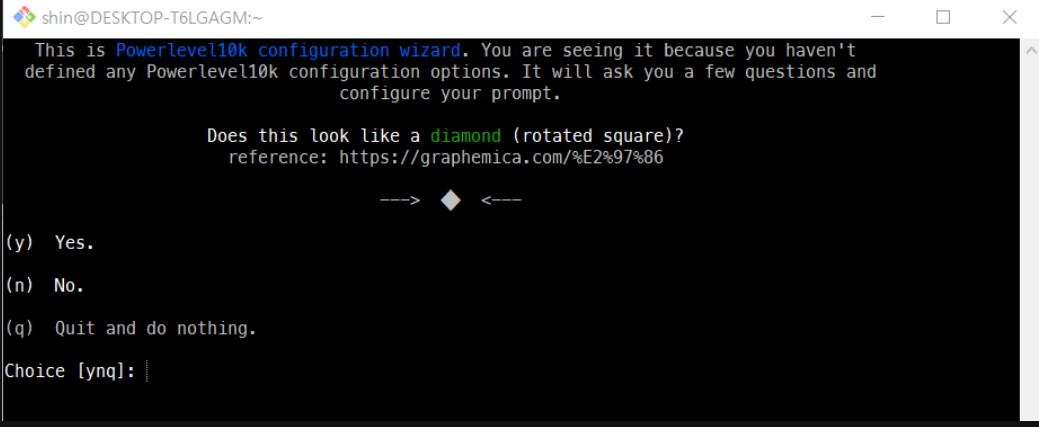
마음에 드는 형태로 설정
- 필자는 "y y y y 1(Unicode) 2(24시간) 2(two line) 2(Dotted) 2(left) 2(white) 2(sparse) 2(many icon) 2(Fluent) y 1(verbose) y" 순서로 입력하였다.
📌 p10k configure로 처음부터 다시 세팅가능
플러그인 설정
vi ~/.zshrc

plugins=(git kubectl kube-ps1 helm) # 80번째 수정