✅SPA

기존에는 사용자가 다른 페이지로 이동할 때마다 새로운 HTML을 받아 오고, 이 페이지 로딩할 때마다 서버에서 리소스를 전달받아 화면에 보여주었다. 즉, 사용자에게 보이는 화면을 서버 측에서 준비했다.
요즘은 웹에서 제공되는 정보가 매우 많아 서버 측에서 모든 뷰를 준비한다면 성능상의 문제가 생길 수 있다. 따라서 리액트와 같은 라이브러리, 프레임워크를 사용하여 뷰 렌더링을 사용자의 브라우저가 담당하도록 하고, 우선 애플리케이션을 브라우저에 불러와 실행시킨 후에 사용자와 인터랙션이 발생하면 필요한 부분만 자바스크립트를 사용해 업데이트한다. 새로운 데이터가 필요하다면 API를 호출해 필요한 데이터만 새로 불러온다.
-
SPA (Single Page Application) : 페이지가 한 개인 애플리케이션
-
MPA (Multi Page Application) : 페이지가 여러 개인 애플리케이션

리액트 프로젝트에서 .html 파일의 갯수는 1개이다. 한 개의 웹 페이지(html) 내에서 여러 개의 페이지를 보여주는 방법은 Routing이다.
라우팅이란?
사용자가 요청한 URL에 따라 해당 URL에 맞는 페이지를 보여주는 것이다. 리액트 자체에는 이러한 기능이 내장되어 있지 않지만 라우팅 관련 라이브러리가 많다.react-router는 라우팅 기능을 위해 가장 많이 사용되는 라이브러리 중 하나이다.
✅프로젝트 준비
$ yarn create react-app router-tutorial
$ cd router-tutorial
$ yarn add react-router-dom@6
// v6 설치
$ yarn start
라우팅 기능을 사용하려면 BrowserRouter 컴포넌트를 최상위 태그에 감싸주면 된다. 즉, src/index.js 파일에서 react-router-dom에 내장되어 있는 BrowserRouter 컴포넌트를 사용해 App을 감싸면 된다. 이 컴포넌트는 웹 애플리케이션에 HTML5 History API를 사용해 페이지를 새로고침하지 않고도 주소를 변경하고, 현재 주소와 관련된 정보를 props로 쉽게 조회하거나 사용할 수 있게 해준다.
BrowserRouter
브라우저 History API를 사용해 현재 위치의 URL을 저장해주는 역할이다.Routes
자식 route들을 구성하고 있는 단위이다.Route
path를 통해 URL을 분기시킬 수 있다. 중첩해서 사용할 수 있다. (중첩 라우팅)Link
페이지를 갱신하지 않고 렌더링 방식으로 이동import { BrowserRouter,Routes,Route,Link } from 'react-router-dom';
// src/index.js

import React from 'react';
import ReactDOM from 'react-dom/client';

// 리액트 라우터 라이브러리
import { BrowserRouter } from 'react-router-dom';

import './index.css';
import App from './App';
import reportWebVitals from './reportWebVitals';

const root = ReactDOM.createRoot(document.getElementById('root'));
root.render(
  <BrowserRouter>
    <App />
  </BrowserRouter>
);

// If you want to start measuring performance in your app, pass a function
// to log results (for example: reportWebVitals(console.log))
// or send to an analytics endpoint. Learn more: https://bit.ly/CRA-vitals
reportWebVitals();
✅기본적인 사용법
1. 페이지 만들기
라우트로 사용할 페이지 컴포넌트를 만들어보자. 사용자가 웹 사이트에 처음 들어왔을 때 보여줄 Home 컴포넌트와 웹 사이트를 소개하는 About 컴포넌트를 만들 것이다. src 폴더에 다음 두 파일을 만든다.
🏷️Home.js
import React from "react";

const Home = () => {
    return (
        <div>
            <h1>Home</h1>
            <p>홈페이지: 가장 먼저 보여지는 페이지</p>
        </div>
    )
}

export default Home🏷️About.js
import React from "react";

const About = () => {
    return (
        <div>
            <h1>소개</h1>
            <p>이 페이지는 리액트 라우터 기초를 실습하는 예제 프로젝트이다.</p>
        </div>
    )
}

export default About
2. Route 컴포넌트로 특정 주소에 컴포넌트 연결
Route 컴포넌트를 사용하여 사용자의 현재 경로에 따라 다른 컴포넌트를 보여줄 것이다, 사용 방식은 다음과 같다.
import { Routes, Route } from 'react-router-dom'

<Routes>
	<Route path="주소 규칙" element={ <컴포넌트 이름/> }/>
</Routes>🏷️App.js
import { Route, Routes } from 'react-router-dom';
import Home from './Home';
import About from './About';

const App= () => {
  return (
    <div>
      <Routes>
        <Route path="/" element={<Home />}/>
        <Route path="/about" element={<About />}/>
      </Routes>
    </div>
  )
}

export default App;
3. Link 컴포넌트를 사용하여 다른 주소로 이동하기
❗일반 웹앱에서는
<a>태그를 사용해 페이지를 전환하는데, 리액트 라우터를 사용할 때는 이 태그를 직접 사용하면 안된다.<a>태그는 페이지를 전환하는 과정에서 페이지를 새로 불러오기 때문에 앱이 들고 있던 상태를 모두 날려버린다. 렌더링 된 컴포넌트들도 모두 사리지고 다시 렌더링하게 된다.
Link 컴포넌트는 클릭하면 다른 주소로 이동시켜 주는 컴포넌트이다. Link 컴포넌트를 사용해 화면 전환하면 페이지를 새로 불러오지 않고 앱을 그대로 유지한 상태에서 History API를 사용해 페이지의 주소만 변경해준다.
* Link 컴포넌트 자체는 <a> 태그로 이루어져 있지만 페이지 전환을 방지하는 기능 내장
<Link to="주소">내용</Link>🏷️App.js
import { Route, Routes, Link } from 'react-router-dom';
import Home from './Home';
import About from './About';

const App= () => {
  return (
    <div>
      <ul>
        <li><Link to="/">홈</Link></li>
        <li><Link to="/about">소개</Link></li>
      </ul>
      <hr/>
      <Routes>
        <Route path="/" element={<Home />}/>
        <Route path="/about" element={<About />}/>
      </Routes>
    </div>
  )
}

export default App;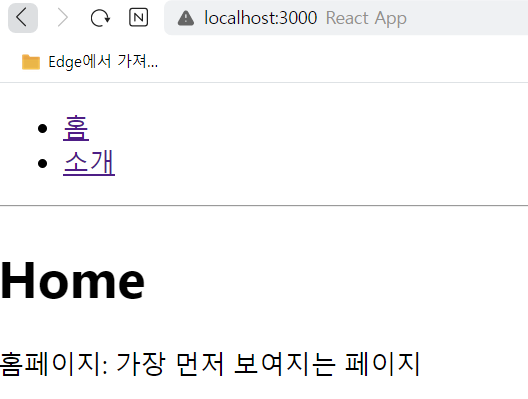
✅URL 파라미터와 쿼리
페이지 주소를 정의할 때 가끔 유동적인 값을 전달해야 할 때가 있다. 이는 파라미터와 쿼리로 나눌 수 있다.
- 파라미터: /profiles/
velopert - 쿼리: /about?
details=true
이것을 사용하는 것에 대해 무조건 따라야 하는 규칙은 없지만, 일반적으로는 파라미터는 특정 id, 이름을 가지고 조회할 때 사용하고, 쿼리의 경우 어떤 키워드를 검색하거나, 요청을 할 때 필요한 옵션을 전달할 때 사용된다.
useParams hook
The useParams hook is used to read the dynamic params from the current URL that were matched by . For example, if a route looks like this:
/some-path/:name/:idThen the useParams hook will return an object with key/value pairs looking like so:
{
   name: <some value>,
   id: <some value>
}
🏷️Profile.js
import React from "react";
import { useParams } from 'react-router-dom';

const data = {
    wendy: {
        name: '웬디',
        description: 'like water'
    },
    iu: {
        name: '아이유',
        description: '겨울잠'
    }
}

const Profile = ( ) => {
    const { username } = useParams(); // wendy or iu
    const profile = data[username];

    if(!profile){
        return <div>존재하지 않는 사용자입니다.</div>
    }
    return (
        <div>
            <h3>{username}({profile.name})</h3>
            <p>{profile.description}</p>
        </div>
    )
}

export default Profile🏷️App.js
import React from 'react';
import { Route, Routes, Link } from 'react-router-dom';
import Home from './Home';
import About from './About';
import Profile from './Profile';

const App= () => {
  return (
    <div>
      <ul>
        <li>
          <Link to='/'>홈</Link>
        </li>
        <li>
          <Link to='/about'>소개</Link>
        </li>
        <li>
          <Link to='/profile/wendy'>wendy 프로필</Link>
        </li>
        <li>
          <Link to='/profile/iu'>iu 프로필</Link>
        </li>
      </ul>
      <Routes>
        <Route path="/" element={<Home />}/>
        <Route path="/about" element={<About />}/>
        <Route path="/profile/:username" element={<Profile />}/>
      </Routes>
    </div>
  )
}

export default App;
URL 쿼리
쿼리 스트링은 문자열의 형태를 띄며
key=value로 표현한다. URL 의 일부이므로?를 통해 여기부터 시작이라고 표시해야 하고, 각 페어의 구분은&로 한다. react-router-dom에서 쿼리 스트링 값을 가져올 수 있는 hook으로는 useLocation, useSearchParams 2개가 있다.
useLocation
useLocation 훅은 현재의 Location 객체를 반환한다.
import { useLocation } from "react-router-dom"
const location = useLocation();
console.log(location);
console.log(location.search); // => ?sort=popular
Location.search 프로퍼티가 퀴리 스트링 값을 담고 있다. 이렇게 가져온 값에서 popular만 뽑아서 사용하려면 별도의 작업을 해야 하므로 복잡하다. (여러 개의 페어가 존재한다면 더더욱)
이럴 때 다양한 메소드를 제공해 원하는 값을 가져올 수 있게 하는 것이 useSearchParams 훅이다.
useSearchParams hook
The useSearchParams hook is used to Read and Modify the query string in the URL for the current location. Similar to the useState hook of React, the useSearchParams hook of React Router returns an array with two elements: the first is the current location’s search params, and the latter is a function that can be used to update them:
import { useSearchParams } from 'react-router-dom';

const App = () => {
   const [searchParams, setSearchParams] = useSearchParams();
   return /* ... */
}- 값을 읽어오는 메서드
searchParams.get(key)- 특정한 key의 value를 가져오는 메소드. 해당 key의 value가 2개라면 제일 먼저 나온 value만 리턴
searchParams.getAll(key)- 특정 key에 해당하는 모든 value를 가져오는 메소드
searchParams.toString()- 쿼리 스트링을 string 형태로 리턴
- 값을 변경하는 메서드
searchParams.set(key, value)- 인자로 전달한 key 값을 value로 설정. 기존에 값이 존재했다면 그 값은 삭제된다.
searchParams.append(key, value)- 기존 값을 변경하거나 삭제하지 않고 추가하는 방식
❗serchParams를 변경하는 메소드로 값을 변경해도 실제 url 쿼리 스트링은 변경되지 않는다. 이를 변경하려면 setSearchParams를 사용해야 한다.
✅서브 라우트
서브 라우트는 라우트 내부에 또 라우트를 정의하는 것이다. 라우트로 사용되고 있는 컴포넌트 내부에 Route 컴포넌트를 또 사용하면 된다.
🏷️App.js
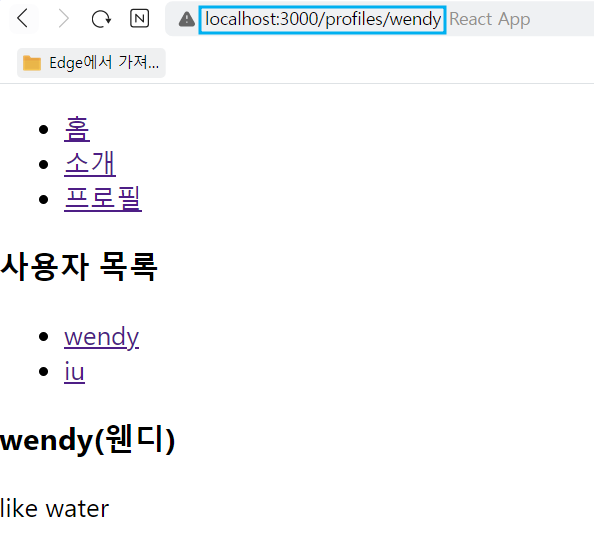
<Route path="/profiles/*" element={<Profiles />}/>
하위 페이지가 있다면 부모 Route에/*을 추가해줘야 한다.
import React from 'react';
import { Route, Routes, Link } from 'react-router-dom';
import Home from './Home';
import About from './About';
import Profiles from './Profiles';

const App= () => {
  return (
    <div>
      <ul>
        <li>
          <Link to='/'>홈</Link>
        </li>
        <li>
          <Link to='/about'>소개</Link>
        </li>
        <li>
          <Link to='/profiles'>프로필</Link>
        </li>
      </ul>
      <Routes>
        <Route path="/" element={<Home />}/>
        <Route path="/about" element={<About />}/>
        <Route path="/profiles/*" element={<Profiles />}/>
      </Routes>
    </div>
  )
}

export default App;🏷️Profiles.js
<Route path=':username' element={<Profile/>} />
path에 부모 경로까지 적을 필요 없이 파라미터만 적어준다
<Route path='/' element='{<div>유저를 선택해주세요</div>}' />
컴포넌트 자체를 전달하는 것이 아니라 보여주고 싶은 JSX를 넣어줄 수 있다.
import React from "react";
import {Link, Route, Routes} from 'react-router-dom'
import Profile from "./Profile";

const Profiles = () => {
    return(
        <div>
            <h3>사용자 목록</h3>
            <ul>
                <li><Link to='/profiles/wendy'>wendy</Link></li>
                <li><Link to='/profiles/iu'>iu</Link></li>
            </ul>

            <Routes>
                <Route path='/' element='{<div>유저를 선택해주세요</div>}' />
                <Route path=':username' element={<Profile/>} />
            </Routes>
        </div>
    )
}

export default Profiles🏷️Profile.js
import React from "react";
import { useParams } from 'react-router-dom';

const data = {
    wendy: {
        name: '웬디',
        description: 'like water'
    },
    iu: {
        name: '아이유',
        description: '겨울잠'
    }
}

const Profile = ( ) => {
    const { username } = useParams(); // wendy or iu
    const profile = data[username];

    if(!profile){
        return <div>존재하지 않는 사용자입니다.</div>
    }
    return (
        <div>
            <h3>{username}({profile.name})</h3>
            <p>{profile.description}</p>
        </div>
    )
}

export default Profile
리액트 라우터 부가 기능
useNavigate
❗v5에서 사용하던 history 객체는 라우트로 사용된 컴포넌트에게 match, location과 함께 전달되는 props 중 하나이다. 앞으로 v6부터
useHistory는 아예 사라졌고, history도 기존에 선언하는 방식처럼 선언하면 안된다.useNavigate를 사용해야 한다.
useNavigate를 호출하면 페이지 이동을 할 수 있게 해주는 함수를 반환한다. 반환하는 함수를 navigate라는 변수에 저장한다. navigate의 인자로 이동시킬 페이지의 주소를 넣거나 -1 과 같은 값을 넣어 해당 경로로 이동할 수 있다.
조건이 필요한 곳에서 navigate 함수를 호출해 경로를 이동할 수 있다.
ex) 로그인 페이지에서 아이디, 비밀번호를 입력하고 로그인 버튼을 클릭했을 때 다른 페이지로 이동
Link vs. useNavigate
1.Link
클릭 시 바로 이동하는 로직 구현 시에 사용
ex) 상품 리스트에서 상세 페이지 이동 시
2.useNavigate
페이지 전환 시 추가로 처리해야 하는 로직이 있을 경우 사용
ex) 로그인 버튼 클릭 시
회원가입 되어 있는 사용자 -> Main 페이지로 이동
회원가입이 되어 있지 않은 사용자 -> SignUp 페이지로 이동
🏷️App.js
import React from 'react';
import { Route, Routes, Link } from 'react-router-dom';
import Home from './Home';
import About from './About';
import Profiles from './Profiles';
import History from "./History";

const App= () => {
  return (
    <div>
      <ul>
        <li>
          <Link to='/'>홈</Link>
        </li>
        <li>
          <Link to='/about'>소개</Link>
        </li>
        <li>
          <Link to='/profiles'>프로필</Link>
        </li>
        <li>
          <Link to="/history">History 예제</Link>
        </li>
      </ul>
      <Routes>
        <Route path="/" element={<Home />}/>
        <Route path="/about" element={<About />}/>
        <Route path="/profiles/*" element={<Profiles />}/>
        <Route path="/history" element={<History />} />
      </Routes>
    </div>
  )
}

export default App;🏷️History.js
import React from "react";
import { useNavigate } from "react-router-dom";

const History = () => {
    const navigate = useNavigate();

	// 뒤로가기
	// 인덱스로 처리, 두번 뒤로 가고싶으면 -2
	const handleGoBack = () => {
		navigate(-1);
	}

	// 홈으로 가기
	const handleGoHome = () => {
		navigate('/');
	}

    return (
        <div>
            <button name="back" onClick={handleGoBack}>뒤로</button>
            <button name="go" onClick={handleGoHome}>홈으로</button>
        </div>
    )
}

export default History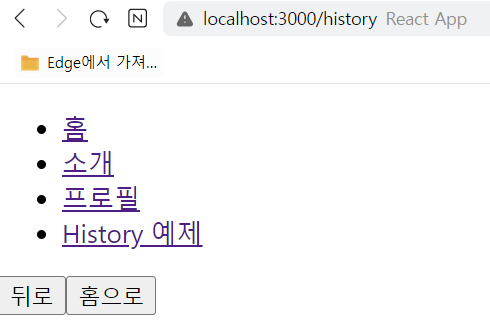
withRouter
withRouter 함수는 라우트로 사용된 컴포넌트가 아니어도 match, location, history 객체를 접근할 수 있게 해준다. v5에서 사용한 withRouter 함수가 사라진 관계로 v6에서 아래 함수를 사용한다.
→ useparms, useLocation, useNavigate
🏷️WithRouter.js
JSON.stringify의 2,3번째 파라미터를 null, 2로 설정해주면 JSON에 들여쓰기가 적용된 상태로 문자열이 만들어진다.
import { useParams, useLocation, useNavigate } from 'react-router-dom';

const WithRouter = () => {
  const params = useParams();
  const location = useLocation();
  const navigate = useNavigate();

  return (
    <>
      <h4>Location</h4>
      <textarea style={{ height:'150px' }} value={JSON.stringify(location, null, 2)} readOnly />

      <h4>Params</h4>
      <textarea style={{ height:'150px' }} value={JSON.stringify(params)} readOnly />

      <hr/>
      <button onClick={() => navigate('/')}>홈으로</button>
    </>
  );
};


export default WithRouter;🏷️Profile.js
이전에 작성한 Profile 파일에 새로 추가한 widthRouterSample 컴포넌트를 호출한다.
import React from "react";
import { useParams } from 'react-router-dom';
import WithRouter from "./WithRouter";

const data = {
    wendy: {
        name: '웬디',
        description: 'like water'
    },
    iu: {
        name: '아이유',
        description: '겨울잠'
    }
}

const Profile = ( ) => {
    const { username } = useParams(); // wendy or iu
    const profile = data[username];

    if(!profile){
        return <div>존재하지 않는 사용자입니다.</div>
    }
    return (
        <div>
            <h3>{username}({profile.name})</h3>
            <p>{profile.description}</p>
            <WithRouter/>
        </div>
    )
}

export default Profile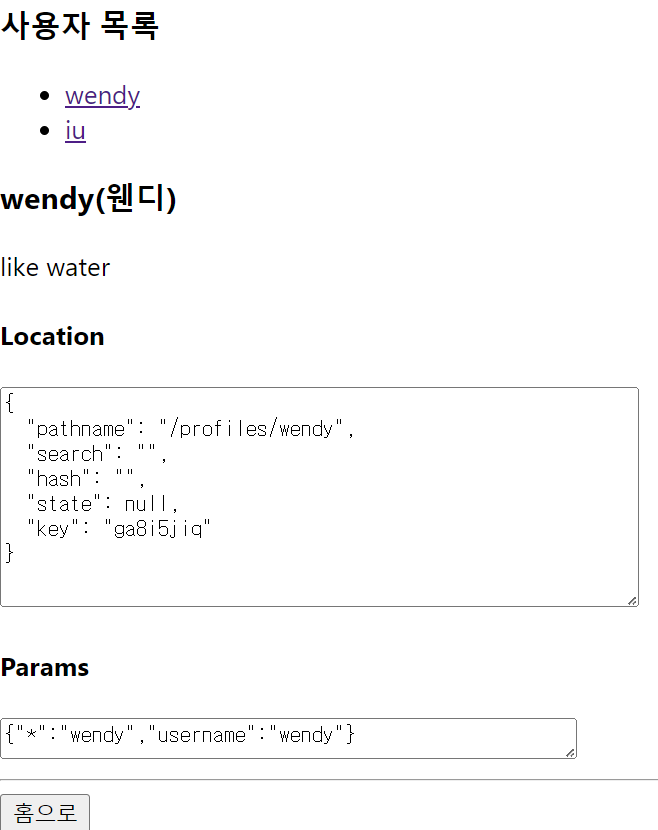
v5 switch → v6 Routes
switch 컴포넌트는 여러 Route를 감싸 그중 일치하는 단 하나의 라우트만을 렌더링시켜 준다. 모든 규칙과 일치하지 않을 때 보여줄 Not Found 페이지도 구현할 수 있다.
v6 버전에서 Switch 사용하려면 Routes로 라우팅 경로만 설정해주면 된다.
<Routes>
   <Route path="/" element={<Home />}/>
   <Route path="/about" element={<About />}/>
   <Route path="/profiles/*" element={<Profiles />}/>
   <Route path="/history" element={<History />} />
   <Route path="/*" element={<h1>404 페이지를 찾을 수 없습니다.</h1>} />
</Routes>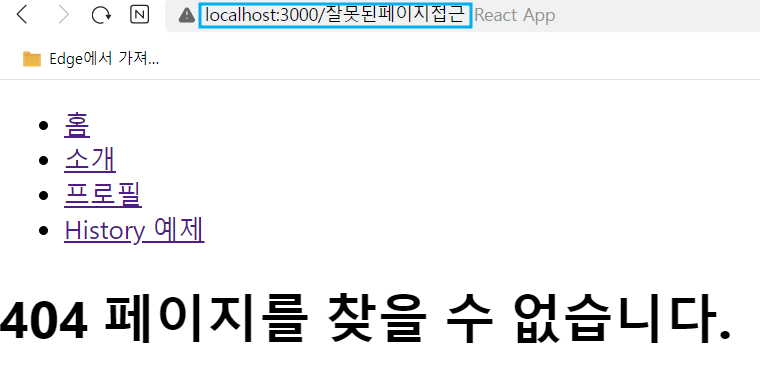
NavLink
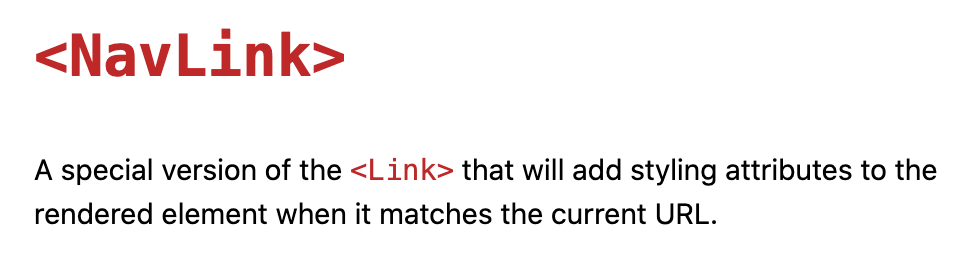
NavLink는 Link와 비슷하다. 현재 경로와 Link에서 사용하는 경로가 일치하는 경우 특정 스타일 혹은 클래스를 적용할 수 있는 컴포넌트이다. v6 버전에서 NavLink 사용 방법은 동일하나 activeStyle, activeClassName 속성이 삭제되었다. 따라서 아래와 같이 NavLink 태그 안에 isActive를 선언하여 활성화시키고 싶은 스타일에 css를 적용할 수 있다.
🏷️Profiles.js
import React from "react";
import {NavLink, Route, Routes} from 'react-router-dom'
import Profile from "./Profile";
const Profiles = () => {
return(
<div>
<h3>사용자 목록</h3>
<ul>
<li>
<NavLink to="/profiles/wendy" style={({ isActive }) =>
({ color: isActive ? 'black' : 'yellow' })}>wendy</NavLink>
</li>
<li>
<NavLink to="/profiles/iu" className={({ isActive }) =>
"nav-link" + (isActive ? " activated" : "")}>iu</NavLink>
</li>
</ul>
<Routes>
<Route path='/' element={<div>유저를 선택해주세요</div>} />
<Route path=':username' element={<Profile/>} />
</Routes>
</div>
)
}
export default Profiles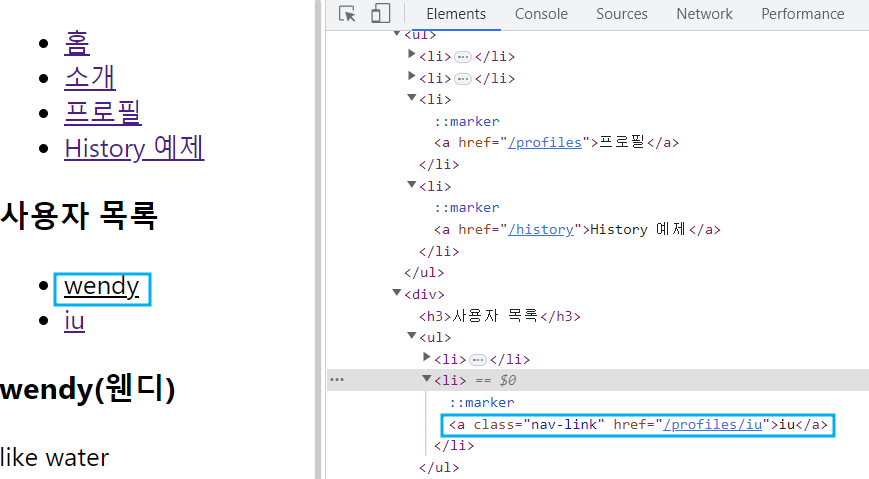 활성화된 사용자의 class 요소가 active로 변경되고, 컬러가 black으로 바뀐다.
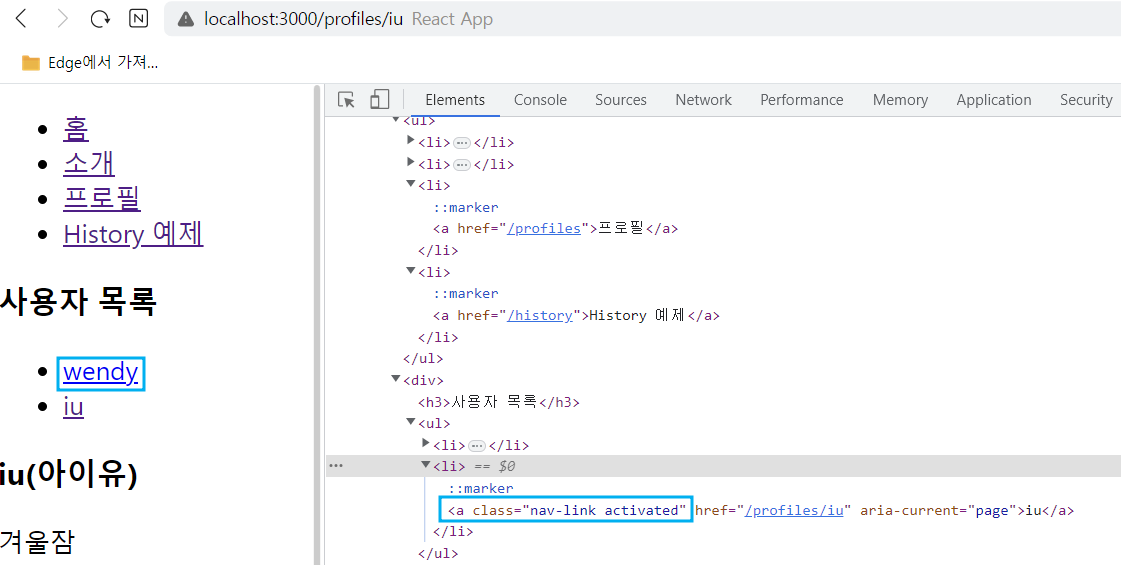
✅정리
리액트 라우터를 사용해 주소 경로에 따라 다양한 페이지를 보여주는 방법에 대해 알아보았다.
위의 프로젝트에서는 사용자가 /about 페이지에 들어왔을 때 당장 필요하지 않은 Profile 컴포넌트까지 불러온다. 라우트에 따라 필요한 컴포넌트만 불러오고 다른 컴포넌트는 필요한 시점에 불러오는 것이 더 효율적이다. 이를 해결하는 기술이 바로 코드 스플라이팅이다. 이는 추후에 학습하도록 하자.