Anchor Tag
<!-- a태그..링크 -->
    <a href="http://www.naver.com"><img src="../html_img/naver.gif"></a><br>
    <a href="http://www.nate.com" target="_blank"><img src="../html_img/nate.gif"></a><br>
<a href="http://www.google.com" target="_new">Google</a><br>- <a>는 하이퍼링크를 만들어주는 태그로 <a ref=”(주소 or 경로)”>로 활용
- 문자 외에 이미지도 하이퍼링크 가능
Image
<!-- 이미지 -->
    <a href="https://cafe.naver.com/javasoo">
		<img title="공룡이미지" src="../flower_ani/s9.JPG"
		border="1" hspace="50" vspace="50">
		</a><br>

    <img title="사자이미지" src="../flower_ani/star8.png"
style="border: 10px groove magenta; width: 100px; height: 50px;">- <img src=”(이미지 경로)”>
Marquee
<marquee direction="right" bgcolor="#ff00ff">우리는 오늘 HTML 공부중입니다</marquee>
<marquee direction="left" bgcolor="#cfc">우리는 오늘 HTML 공부중입니다</marquee>- <marquee></marquee>는 글 혹은 이미지를 수평 이동해주는 태그
- direction은 이동 방향 의미하며 default는 left이고, bgcolor는 이동 경로 전체의 배경색
Align(정렬)
<h1 align="center">오늘은 목요일</h1>
<h1 align="left">오늘은 목요일</h1>
<h1 align="right">오늘은 목요일</h1>- 정렬
특수 기호
<!-- 특수기호 -->
A b c<br>
©쌍용교육센터<br>
<!-- <지금시각은 10시8분> -->
<지금시각은 10시8분>- & nbsp : 한 칸 띄기 / & copy : © / & lt and & gt : < and >
List
Ordered List
<ol>
  <h2>순서있는 리스트(OrderedList)</h2>
  <li>자바</li>
  <li>오라클</li>
  <li>Html</li>
  <li>JavaScript</li>
  <li>Ajax</li>
</ol>- <li> 태그 내부를 1~n의 숫자로 순서를 만드는 리스트
<ol type="A">
  <h2>순서있는 리스트 _A_(OrderedList)</h2>
  <li>자바</li>
  <li>오라클</li>
</ol>- <ol type=”x”>로 순서를 만드는 유형을 달리 하기 가능
- x=A : 대문자 알파벳 순 / a : 소문자 알파벳 순 / I : 대문자 로마 숫자 / i : 소문자 로마 숫자
<ol start="30">
  <h2>지정된 순서있는 리스트(OrderedList)</h2>
  <li>자바</li>
  <li>오라클</li>
</ol>

<ol start="30" reversed>
  <h2>지정된 순서 거꾸로 리스트(OrderedList)</h2>
  <li>자바</li>
  <li>오라클</li>
</ol>- <ol start=”x”>로 시작 숫자를 지정 가능(시작 숫자부터 1씩 증가)
- <ol start=”x” reversed>로 지정 숫자부터 1씩 감소하는 리스트 작성
Unordered List
<ul>
  <h2>순서없는 리스트(UnorderedList)</h2>
  <li>미국</li>
  <li>영국</li>
</ul>- <ul>은 순서 없이 동일한 리스트 작성
<ul type="circle">
  <h2>순서없는 리스트(UnorderedList)</h2>
  <li>미국</li>
  <li>영국</li>
</ul>- <ul type=”x”>로 리스트를 나타내는 기호 변경 가능
- x=circle : 속이 빈 원형 / square : 속이 찬 검은 사각형 / default : 속이 찬 검은 원형
<ul style="list-style: none;">
  <h2>순서없는 리스트(UnorderedList)</h2>
  <li>미국</li>
  <li>영국</li>
</ul>- 리스트를 나타내는 기호를 사라지게 만드는 style;
Style Tag
- 지정된 태그에 해당하는 모든 태그의 속성을 자동으로 부여하는 태그
- <head>태그 위에 일반적으로 위치
<!DOCTYPE html>
<html lang="en">
<head>
    <meta charset="UTF-8">
    <meta name="viewport" content="width=device-width, initial-scale=1.0">
    <title>Document</title>

    <style>
        h1{
            font-family: 'Times New Roman', Times, serif;
            font-size: 30pt;
            color: green;
        }

        h2{
            font-family: '궁서체';
            font-size: 30pt;
        }
    </style>
</head>
<body>
    <h1>Have a Nice Day</h1>
    <h2>오늘은 비오는목요일</h2>
</body>
</html>- 모든 <h1>과 <h2> 태그에 각각에 해당하는 속성을 부여
Style Attributes to Decorate Lists
li{
    list-style: none;
    float: left;
    width: 150px;
    height: 50px;
    border: 1px solid gray;
    text-align: center; /*정렬, 상하는 안됨*/
    line-height: 50px; /*상하 조절, height와 같은 수치로 해야*/
    margin-right: 10px; /*박스 오른쪽 간격 띄기*/
    background-color: azure;
    font-size: 25px;
    font-family: 'Nanum Pen Script';
    border-radius: 20px; /*박스 굴곡 조절*/
}

li:hover{
    background-color: blueviolet; /*배경색*/
    color: white; /*글자색*/
    box-shadow: 5px 5px 5px gray;
    cursor: pointer; /*커서 인식 시 커서 모양 변경*/
}- li:hover은 리스트가 마우스 커서를 인식했을 시 반응하는 style
- 위의 style 속성을 이용한 리스트 작성(▽)
<h3>ul을 이용 간단메뉴</h3>
<br>
<ul>
  <li>Home</li>
  <li>집소개</li>
  <li>게시판</li>
  <li>방명록</li>
  <li>오시는길</li>
  <li>Q&A</li>
</ul>
Class
- class는 여러 군데 부여 가능
<style>
    p{
       font-family: 'Noto Serif KR';
       font-size: 20px;
       width: 800px;
     }

     /* class . 으로 구분*/
    p.txt1{
       background-color: bisque;
       padding: 20px;
     }

    p.txt2{
       background-color: aquamarine;
       padding: 10px 20px 30px 40px;
     }

    p.txt3{
       background-color: pink;
       margin: 40px;
       text-align: center;
     }

    p.txt4{
       background-color: aliceblue;

     }
</style>- style 코드
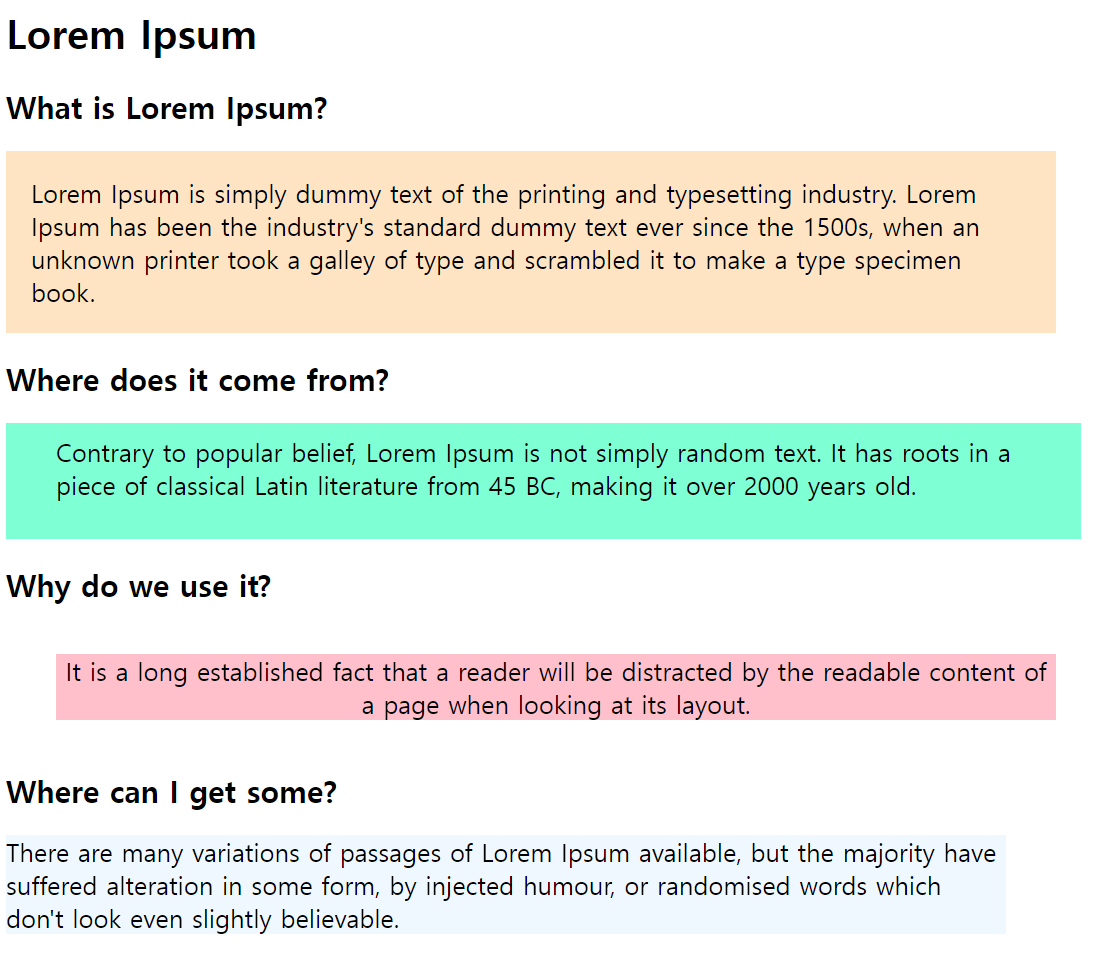
<h1>Lorem Ipsum</h1>
    <h2>What is Lorem Ipsum?</h2>
        <p class="txt1">
            Lorem Ipsum is simply dummy text of the printing and typesetting industry. Lorem Ipsum has been the industry's standard dummy text ever since the 1500s, when an unknown printer took a galley of type and scrambled it to make a type specimen book.
        </p>
    <h2>Where does it come from?</h2>
        <p class="txt2">
            Contrary to popular belief, Lorem Ipsum is not simply random text. It has roots in a piece of classical Latin literature from 45 BC, making it over 2000 years old.
        </p>
    <h2>Why do we use it?</h2>
        <p class="txt3">
            It is a long established fact that a reader will be distracted by the readable content of a page when looking at its layout.
        </p>
    <h2>Where can I get some?</h2>
        <p class="txt4">
            There are many variations of passages of Lorem Ipsum available, but the majority have suffered alteration in some form, by injected humour, or randomised words which don't look even slightly believable.
</p>- 본문 코드
Class Usages
<style>
    /* class: .   id: # */
    .happy{ /* happy라는 class 전체태그에 적용 */
        color: #ffccff;
        font-size: 30px;
        font-family: 'Dongle';
    }

    b.nice{ /* b태그영역에서만 적용되는 클래스 */
        text-decoration: underline;
        color: blue;
        text-shadow: 3px 3px 3px #ccc;
}- 클래스 적용할 특정한 태그를 공백으로 비워두면 ‘모든 태그에 적용’함을 의미 ( .happy)
div.b>figure{ /*>는 바로 아래 지칭, 띄어쓰기는 하위*/
        float: left;
    }

div.b>figure>img{ /*img 특정 안하면 figcaption까지 변경*/
        border: 3px solid green;
        border-radius: 30px 60px 100px 20px;/*왼쪽 상단모서리부터 시계방향*/
    }

div.b>figure>figcaption>b{
        font-size: 25px;
        margin-left: 20px;
        font-family: 'Dongle'
}- class에서 >는 ‘바로 아래’를 의미
- 바로 아래에 2개 이상의 태그가 있을 시 class 받을 태그를 명시하지 않으면 전부에 적용
div.d img{ /*div태그의 d클래스 하위의 img태그*/
        border: 2px solid green;
        box-shadow: 15px 15px 15px gray;
        border-radius: 20px;
    }

div.d b{  /*div태그의 d클래스 하위의 b태그*/
        margin-left: 25px;
        font-family: 'Nanum Pen Scipt';
        color: brown;
}- class에서 띄어쓰기는 ‘하위’를 의미
- 상위 class만 부여하면 자동으로 설정된 하위 태그에 속성 공동 부여
ID
- id는 오직 한 곳에만 부여 가능
<style>
    /* 클래스는 동시에 여러군데 사용가능(.으로 만든다)
    아이디는 #으로 만드는데 딱 한군데 사용가능 */
    #bts{
        position: absolute; /*상대적 아닌 절대적 위치 부여*/
				top: 400px;
				left: 200px;
    }
</style>- position: absolute 속성으로 절대적 위치 부여 가능 (top, left로 위치 정렬)
<body>
		<div id="bts">여기는 쌍용 자바반 입니다</div>
</body>
ID Usages
<!DOCTYPE html>
<html lang="en">
<head>
    <meta charset="UTF-8">
    <meta name="viewport" content="width=device-width, initial-scale=1.0">
    <link rel="stylesheet" href="../CSS/style3.css">
    <title>Document</title>
</head>
<body>
    <div id="box1">
        <h1>div는 블럭요소입니다</h1>
        <p>
            주로 블럭요소로 그룹화할때 사용,레이아웃(top,bottom,center,aside)
            을 구현할때 쓰는 요소입니다
        </p>
        <ul>
            <li>레이아웃구현</li>
            <li>다른 div도 포함될수 있다</li>
            <li>블럭요소를 그룹화</li>
            <li>id는 유일한 값</li>
        </ul>
    </div>
</body>
</html>- <div>태그에 box1이라는 id를 부여
#box1{
    background-color: bisque;
    border: 2px solid brown;
    border-radius: 20px;
}

#box1 h1{
    text-align: center; padding: 20px;
}

#box1 p{
    text-align: center;
}

#box1 li{
    list-style: none;
    text-align: center;
}- id는 부여 받은 태그에만 적용
- 부여 받은 태그의 하위 태그에 적용하기 위해서는 위와 같이 따로 설정 필수
- 상위 태그에 부여된 id 속성은 자동으로 설정된 하위 태그까지 공동 부여
Style Link(CSS)
<!DOCTYPE html>
<html lang="en">
<head>
    <meta charset="UTF-8">
    <meta name="viewport" content="width=device-width, initial-scale=1.0">
    <!-- css링크 -->
    <link rel="stylesheet" href="../css/style1.css">
    <title>Document</title>

</head>
<body>

</body>
</html>- <link rel=”stylesheet” href=”(주소 혹은 경로)”>를 통해 css의 class와 id를 소환 가능
- 이 경우 <style></style>을 대체하여 <body>태그 내의 태그에 class와 id 적용 가능

초보개발자