Entity -> DTO
사용 목적
SchoolDto 를 세 번이나 호출해야 하는 데 builder().build() 를 사용하려니 세 번이나 반복해야 하는 작업을 간소화 하기 위해 사용함.
사용 방법
1. DTO에 해당 ResponseDTO를 반환하는 from() 메서드를 생성한다.
@Data
public class SchoolDto {
private Long schoolId;
private String schoolType;
private String schoolName;
private String major;
private String grade;
private LocalDateTime enterDate;
private LocalDateTime graduateDate;
private Integer totalNum;
private Double totalGrade;
private Double totalPoint;
private Integer majorNum;
private Double majorGrade;
private Double majorPoint;
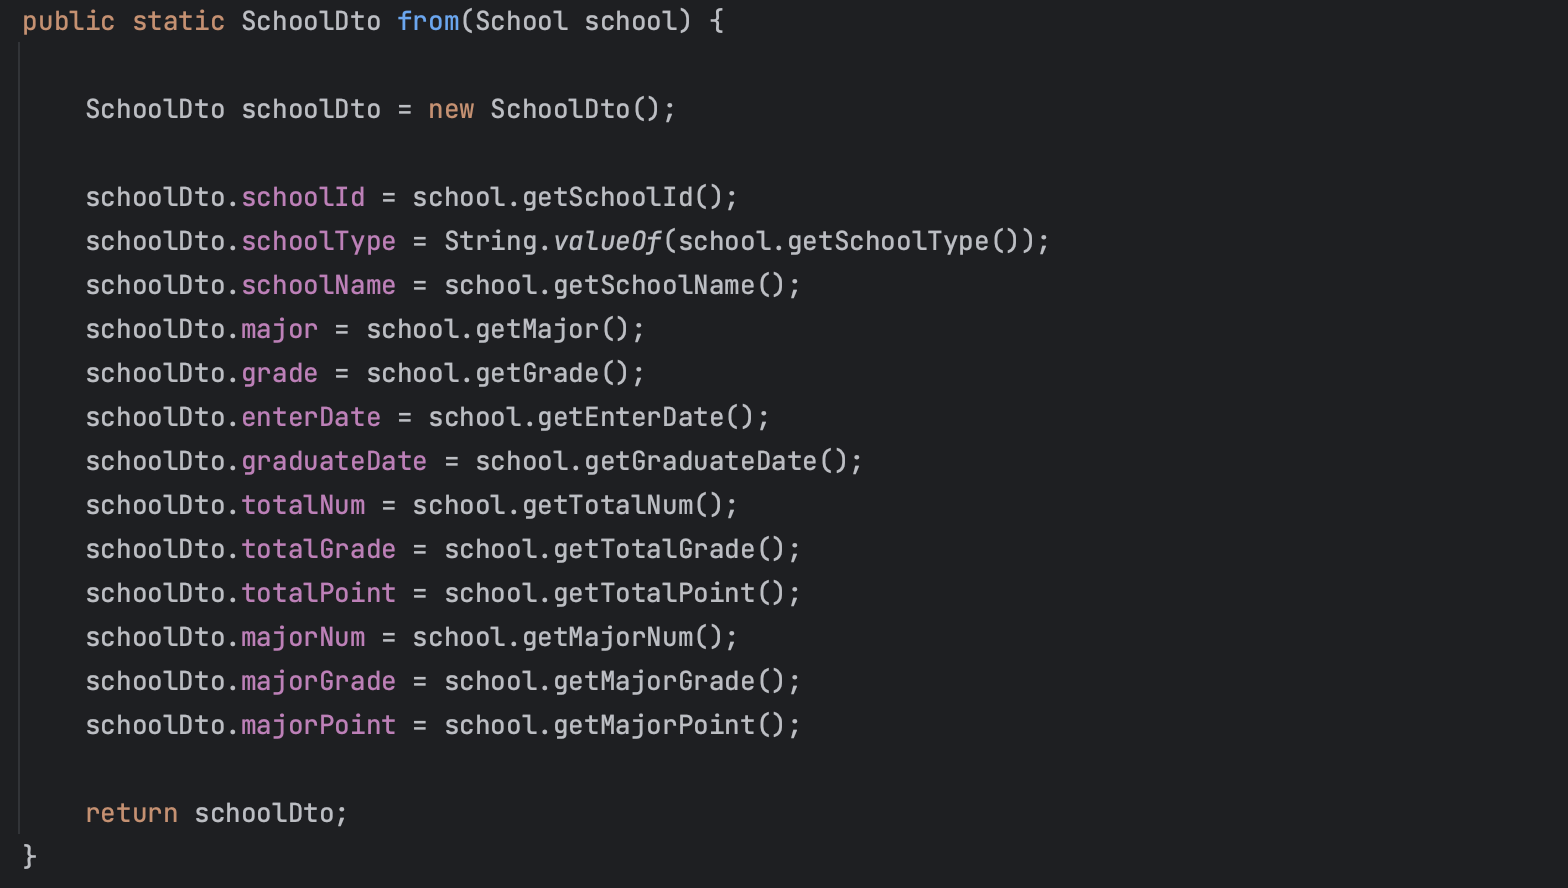
public static SchoolDto from(School school) {
SchoolDto schoolDto = new SchoolDto();
schoolDto.schoolId = school.getSchoolId();
schoolDto.schoolType = String.valueOf(school.getSchoolType());
schoolDto.schoolName = school.getSchoolName();
schoolDto.major = school.getMajor();
schoolDto.grade = school.getGrade();
schoolDto.enterDate = school.getEnterDate();
schoolDto.graduateDate = school.getGraduateDate();
schoolDto.totalNum = school.getTotalNum();
schoolDto.totalGrade = school.getTotalGrade();
schoolDto.totalPoint = school.getTotalPoint();
schoolDto.majorNum = school.getMajorNum();
schoolDto.majorGrade = school.getMajorGrade();
schoolDto.majorPoint = school.getMajorPoint();
return schoolDto;
}
}2. 레포지토리를 다녀와 찾아온 엔티티가 있다.
- 객체로 받아야 하는 경우
Entity entity = entityRepository.findById(id)
.orElseThrow(() -> new NotFoundException(NotFoundException.BLABLA_NOT_FOUND);
- 리스트로 받아야 하는 경우
이 경우에는 list 사이즈가 0이어도 예외 발생하지 않으므로 에러 핸들링을 하지 않았다.
public ResponseSchoolDto viewSchool(Long userId) {

        // schoolType (HIGH, UNI, GRAD) 에 따라 리스트를 다르게 보낸다.
        List<School> highSchools = schoolRepository.findByUserUserIdAndSchoolType(userId, SchoolType.HIGH);
        List<School> uniSchools = schoolRepository.findByUserUserIdAndSchoolType(userId, SchoolType.UNI);
        List<School> gradSchools = schoolRepository.findByUserUserIdAndSchoolType(userId, SchoolType.GRAD);

    }
3. 이를 from 메서드를 통해 우리가 응답할 DTO에 주입한다.
- 객체로 받아야 하는 경우
ResponseDto responseDto = ResponseDto.from(entity);- 리스트로 받아야 하는 경우
List<SchoolDto> highSchoolDtos = highSchools.stream()
                .map(SchoolDto::from)
                .collect(Collectors.toList());
전 코드
public ResponseSchoolDto viewSchool(Long userId) {

        // schoolType (HIGH, UNI, GRAD) 에 따라 리스트를 다르게 보낸다.
        List<School> highSchools = schoolRepository.findByUserUserIdAndSchoolType(userId, SchoolType.HIGH);
        List<School> uniSchools = schoolRepository.findByUserUserIdAndSchoolType(userId, SchoolType.UNI);
        List<School> gradSchools = schoolRepository.findByUserUserIdAndSchoolType(userId, SchoolType.GRAD);

                List<SchoolDto> highSchoolDtos = highSchools.stream()
                .map(SchoolDto::from)
                .collect(Collectors.toList());
        List<SchoolDto> uniSchoolDtos = uniSchools.stream()
                .map(SchoolDto::from)
                .collect(Collectors.toList());
        List<SchoolDto> gradSchoolDtos = gradSchools.stream()
                .map(SchoolDto::from)
                .collect(Collectors.toList());

        return ResponseSchoolDto.builder()
                .HIGH(highSchoolDtos)
                .UNI(uniSchoolDtos)
                .GRAD(gradSchoolDtos)
                .build();

    }
DTO -> Entity
사용 이유
코드의 간소화!
생성자 대신 사용하면 코드가 예쁘다
보기도 편하고! Dto 객체를 활용할 수 있다는 점이 굳이다.
사용 방법
1. 엔티티에 메서드 생성: makeEntity(RequestDto dto)
@Entity
@Getter
@NoArgsConstructor(access = AccessLevel.PROTECTED)
public class Project {

    @Id
    @GeneratedValue(strategy = GenerationType.IDENTITY)
    private Long projectId;

    @JoinColumn(name = "user_id")
    @ManyToOne(fetch = FetchType.LAZY)
    private User user;

    private String title;
    private String organization;
    private String award;
    private String description;

    private LocalDateTime startDate;
    private LocalDateTime endDate;

    public static Project makeProject(User user, RequestProjectDto request){
        Project response = new Project();

        response.user = user;
        response.title = request.getTitle();
        response.organization = request.getOrganization();
        response.award = request.getAward();
        response.description = request.getDescription();
        response.startDate = request.getStartDate();
        response.endDate = request.getEndDate();

        return response;
    }
}
서비스 로직
@Transactional
public void saveProject(List<RequestProjectDto> requestProjectDtos, User user) {

	List<Project> projects = requestProjectDtos.stream()
		.map(requestProjectDto -> Project.makeProject(user, requestProjectDto))
		.collect(Collectors.toList());

        projectRepository.saveAll(projects);
}
이렇게 메서드를 쓰면 생성자를 만들었을 때보다 훨씬 간결하게 코드를 작성할 수 있다.
무엇보다 서비스단이 코드가 깔끔하다!
기존 방식의 서비스 로직
엔티티에 내에서 생성자를 만들어 이렇게 작성해주었다.
틀린 코드는 아니지만 코드가 너무 길어져 서비스 단에서 코드가 지저분해진다고 판단함.
    @Transactional
    public void saveProject(List<RequestProjectDto> requestProjectDtos, User user) {

	List<Project> projects = requestProjectDtos.stream()
		.map(dto -> new Project(user, dto.getTitle(), dto.getOrganization(), dto.getAward(), dto.getDescription(), dto.getStartDate(), dto.getEndDate()))
		.collect(Collectors.toList());

        projectRepository.saveAll(projects);
    }
소감
짱 신기하다 .. 한끗차이인데 오늘도 한 수 배웠다.

개발의, 개발에 의한, 개발을 위한 기록장