객체 생성자
객체 생성자는 함수를 통해서 새로운 객체를 만들고 그 안에 넣고 싶은 값 혹은 함수들을 구현 할 수 있게 해줍니다.
function Animal(type, name, sound) {
  this.type = type;
  this.name = name;
  this.sound = sound;
  this.say = function() {
    console.log(this.sound);
  };
}

const dog = new Animal('개', '멍멍이', '멍멍');
const cat = new Animal('고양이', '야옹이', '야옹');

dog.say();
찍히는 값 = 멍멍
cat.say();
찍히는 값 = 야옹
유의해야 할 점 !
1. 객체 생성자를 사용 할 때는 보통 함수의 이름을 대문자로 시작하고, 2. 새로운 객체를 만들 때에는 new 키워드를 앞에 붙여주어야 합니다.
프로토타입
프로토타입은 다음과 같이 객체 생성자 함수 아래에 .prototype.[원하는키] = 코드를 입력하여 설정 할 수 있습니다.
어떤 값을 함께 재사용하고 싶을 때 사용
function Animal(type, name, sound) {
  this.type = type;
  this.name = name;
  this.sound = sound;
}

Animal.prototype.say = function() {
  console.log(this.sound);
};

const dog = new Animal('개', '멍멍이', '멍멍');
const cat = new Animal('고양이', '야옹이', '야옹');

dog.say();
찍히는 값 = 멍멍
cat.say();
찍히는 값 = 야옹
객체 생성자 상속받기
function Animal(type, name, sound) {
  this.type = type;
  this.name = name;
  this.sound = sound;
}

Animal.prototype.say = function() {
  console.log(this.sound);
};

function Dog(name, sound) {
  Animal.call(this, '개', name, sound);
}
Dog.prototype = Animal.prototype;

function Cat(name, sound) {
  Animal.call(this, '고양이', name, sound);
}
Cat.prototype = Animal.prototype;

const dog = new Dog('멍멍이', '멍멍');
const cat = new Cat('야옹이', '야옹');

dog.say();
cat.say();
새로 만든 Dog 와 Cat 함수에서 Animal.call 을 호출해주고 있는데요, 여기서 첫번째 인자에는 this 를 넣어주어야 하고, 그 이후에는 Animal 객체 생성자 함수에서 필요로 하는 파라미터를 넣어주어야 합니다.
추가적으로 prototype 을 공유해야 하기 때문에 상속받은 객체 생성자 함수를 만들고 나서 prototype 값을 Animal.prototype 으로 설정해줍니다.
ES6 - class
ES6 에서부터는 class 라는 문법이 추가되었는데요, 우리가 객체 생성자로 구현했던 코드를 조금 더 명확하고, 깔끔하게 구현 할 수 있게 해줍니다. 추가적으로, 상속도 훨씬 쉽게 해줄 수 있습니다.
class Animal {
  constructor(type, name, sound) {
    this.type = type;
    this.name = name;
    this.sound = sound;
  }
  say() {
    console.log(this.sound);
  }
}

class Dog extends Animal {
  constructor(name, sound) {
    super('개', name, sound);
  }
}

class Cat extends Animal {
  constructor(name, sound) {
    super('고양이', name, sound);
  }
}

const dog = new Dog('멍멍이', '멍멍');
const cat = new Cat('야옹이', '야옹');

dog.say();
찍히는 값 = 멍멍
cat.say();
찍히는 값 = 야옹
상속을 할 때는 extends 키워드를 사용하며, constructor에서 사용하는 super() 함수가 상속받은 클래스의 생성자를 가르킵니다.
연습
class Food{
    constructor(name){
      this.name = name;
      this.brands = [];
    }
    addBrand(brand){
      this.brands.push(brand);
    }
    print(){
      console.log(`${this.name}파는 음식점`)
      console.log(this.brands.join(', '));
    }
}

const pizza = new Food('피자');
pizza.addBrand('피자헛');
pizza.addBrand('도미노 피자');

const chicken = new Food('치킨');
chicken.addBrand('굽네 치킨');
chicken.addBrand('bhc');

pizza.print();
chicken.print();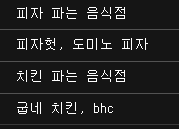
프로토타입과 클래스를 배우며 !
한번에 이해하고 응용하기엔 너무나 어렵게 느껴졌다. 아직 익숙하지 않아서겠지.. velopert 슨생님에 의하면 이렇게 예제로 공부하는 것보다 나중에 프로젝트를 하며 사용하고, 모르면 검색하고 하는 과정에서 더 많이 늘고 성장한다고 하셨다.
기죽지 말고 오늘도 화이팅!!
study by. 벨로퍼트와 함께하는 모던 자바스크립트