일반적인 Android의 권장 앱 아키텍처는 코드를 클래스로 분할하여 관심사를 분리하는 것을 목표로 한다. 관심사 분리는 각 클래스가 정의된 하나의 책임을 갖는 원칙이다. 이렇게 하면 더 많은 작은 클래스들이 연결되기에 서로가 서로의 종속성을 충족해야한다.
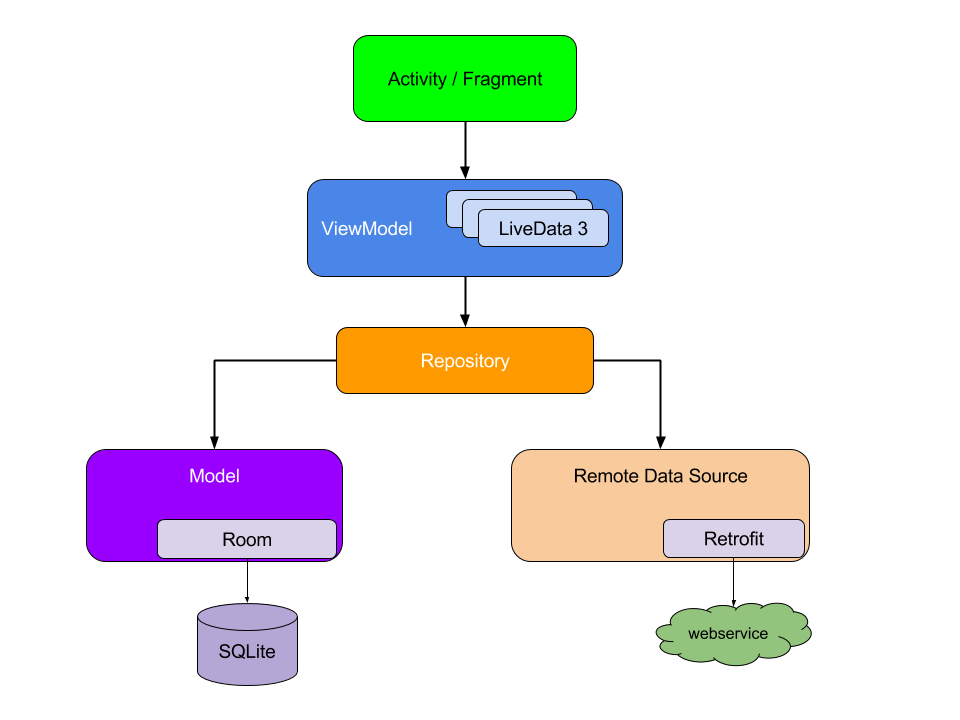
위 이미지에서 클래스간 종속성은 그래프로 표시할 수 있다. 클래스 A(ViewModel)이 클래스 B(Repository)에 종속되므로 A에서 B까지 화살표가 이어져있다.
수동 DI의 기본 사항
이 포스트에서는 DI를 수동으로 진행해봄으로써 방법을 익혀 Dagger와 같은 자동화 라이브러리가 처리해주는 것과 유사해지는 지점까지 계속 진행한다.
Android 앱의 로그인 흐름을 처리할 때, 각 클래스별 종속 상태는 아래 이미지와 같다.
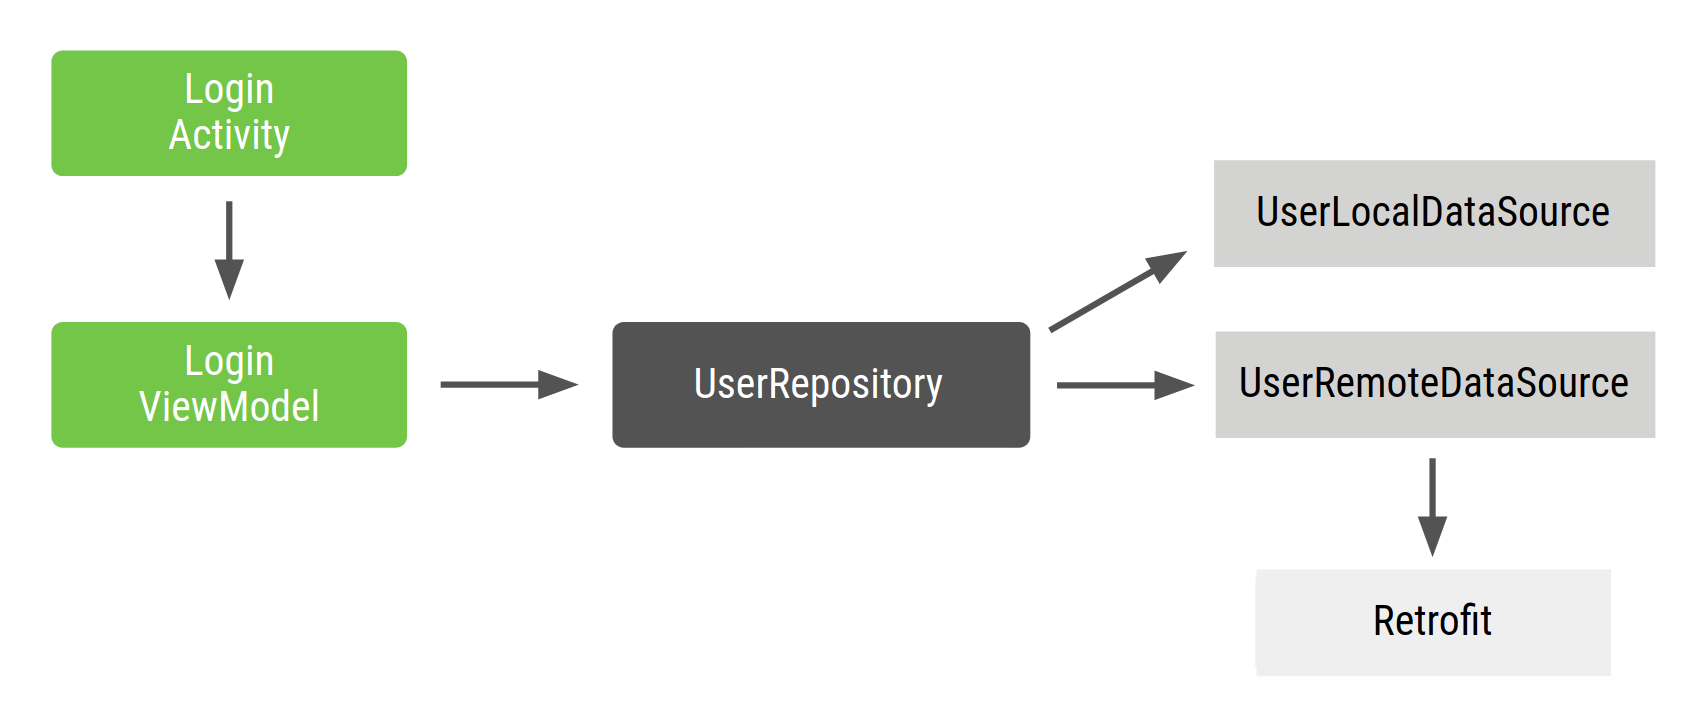
LoginActivity 가 로그인 흐름의 진입점이며 사용자는 이 Activity와 상호작용한다. 따라서 LoginActivity 는 모든 종속 항목이 있는 LoginViewModel 을 만들어야한다.
이 플로우에서 Repository 및 DataSource, LoginActivity 는 아래와 같다.
class UserRepository(
    private val localDataSource: UserLocalDataSource,
    private val remoteDataSource: UserRemoteDataSource
) { ... }

class UserLocalDataSource { ... }
class UserRemoteDataSource(
    private val loginService: LoginRetrofitService
) { ... }
class LoginActivity: Activity() {
private lateinit var loginViewModel: LoginViewModel
override fun onCreate(savedInstanceState: Bundle?) {
super.onCreate(savedInstanceState)
// In order to satisfy the dependencies of LoginViewModel, you have to also
// satisfy the dependencies of all of its dependencies recursively.
// First, create retrofit which is the dependency of UserRemoteDataSource
val retrofit = Retrofit.Builder()
.baseUrl("https://example.com")
.build()
.create(LoginService::class.java)
// Then, satisfy the dependencies of UserRepository
val remoteDataSource = UserRemoteDataSource(retrofit)
val localDataSource = UserLocalDataSource()
// Now you can create an instance of UserRepository that LoginViewModel needs
val userRepository = UserRepository(localDataSource, remoteDataSource)
// Lastly, create an instance of LoginViewModel with userRepository
loginViewModel = LoginViewModel(userRepository)
}
}위 방식은 여러 문제점이 있다.
- 상용구 코드가 많다. 코드의 다른 곳에서
LoginViewModel의 다른 인스턴스를 필요로한다면 같은 코드를 또 써야한다. - 종속 항목은 순서대로 선언해야 한다.
UserRepository를 만들려면LoginViewModel전에 인스턴스화해야 한다. - 객체 재사용이 어렵다. 여러 기능에 걸쳐
UserRepository를 재사용하려면 싱글톤 패턴을 따르게 해야 한다.
컨테이너로 종속 항목 관리
재사용 문제를 해결하려면 종속 항목을 가져오는 데 사용하는 자체 종속 항목 컨테이너 클래스를 만들면 된다. 이 컨테이너에서 제공하는 모든 인스턴스는 public 한 상태이며 어떤 클래스든 접근해서 가져올 수 있다.
// Container of objects shared across the whole app
class AppContainer {

    // Since you want to expose userRepository out of the container, you need to satisfy
    // its dependencies as you did before
    private val retrofit = Retrofit.Builder()
                            .baseUrl("https://example.com")
                            .build()
                            .create(LoginService::class.java)

    private val remoteDataSource = UserRemoteDataSource(retrofit)
    private val localDataSource = UserLocalDataSource()

    // userRepository is not private; it'll be exposed
    val userRepository = UserRepository(localDataSource, remoteDataSource)
}
위 종속항목은 전체 애플리케이션에 걸쳐 사용되므로 모든 활동에서 사용할 수 있는 일반적인 위치, 즉 Application 클래스에 배치해야한다.
// Custom Application class that needs to be specified
// in the AndroidManifest.xml file
class MyApplication : Application() {

    // Instance of AppContainer that will be used by all the Activities of the app
    val appContainer = AppContainer()
}
이제 LoginActivity 에서 AppContainer 의 인스턴스를 가져와서 UserRepository 인스턴스를 획득할 수 있다.
class LoginActivity: Activity() {

    private lateinit var loginViewModel: LoginViewModel

    override fun onCreate(savedInstanceState: Bundle?) {
        super.onCreate(savedInstanceState)

        // Gets userRepository from the instance of AppContainer in Application
        val appContainer = (application as MyApplication).appContainer
        loginViewModel = LoginViewModel(appContainer.userRepository)
    }
}
만약 LoginViewModel 또한 LoginActivity 뿐만 아니라 더 많은 곳에서 필요로 한다면 한 곳에서 LoginViewModel 의 인스턴스를 만드는 것이 좋다. 만들어진 LoginViewModel 을 컨테이너로 이동시키고 해당 객체 타입의 팩토리를 제공할 수 있다.
// Definition of a Factory interface with a function to create objects of a type
interface Factory<T> {
    fun create(): T
}

// Factory for LoginViewModel.
// Since LoginViewModel depends on UserRepository, in order to create instances of
// LoginViewModel, you need an instance of UserRepository that you pass as a parameter.
class LoginViewModelFactory(private val userRepository: UserRepository) : Factory {
    override fun create(): LoginViewModel {
        return LoginViewModel(userRepository)
    }
}
LoginViewModelFactory 를 AppContainer 에 포함시킴으로써 LoginActivity 에서 호출할 수 있게 한다.
// AppContainer can now provide instances of LoginViewModel with LoginViewModelFactory
class AppContainer {
    ...
    val userRepository = UserRepository(localDataSource, remoteDataSource)

    val loginViewModelFactory = LoginViewModelFactory(userRepository)
}

class LoginActivity: Activity() {

    private lateinit var loginViewModel: LoginViewModel

    override fun onCreate(savedInstanceState: Bundle?) {
        super.onCreate(savedInstanceState)

        // Gets LoginViewModelFactory from the application instance of AppContainer
        // to create a new LoginViewModel instance
        val appContainer = (application as MyApplication).appContainer
        loginViewModel = appContainer.loginViewModelFactory.create()
    }
}
상당히 많이 좋아졌지만 여전히 문제점이 존재한다.
AppContainer를 직접 관리해야하며 모든 종속 항목의 인스턴스를 수동으로 만들어야한다.- 여전히 상용구 코드가 많다. 객체의 재사용 여부에 따라 수동으로 팩토리나 매개변수를 만들어야한다.
애플리케이션 흐름에서 종속 항목 관리
프로젝트에 기능이 많아질 수록 AppContainer 는 복잡해진다. 앱이 커지고 다양한 기능 흐름을 도입하기 시작하면 더 많은 문제가 발생한다.
- 흐름이 다양해지면 특정 객체가 해당 흐름의 범위 안에만 있도록 구성하는 것이 좋다. 예를 들어
LoginUserData를 만들 때, 다른 사용자의 이전 로그인 흐름의 데이터를 유지하지 않고 모든 새 흐름에 새 인스턴스를 만들고 싶을 수 있다. 이는 아래 코드 예시와 같이AppContainer내에FlowContainer객체를 따로 만들면 가능하다. - 최적화에 문제가 생길 수 있다. 흐름에 따라 필요하지 않은 인스턴스는 바로바로 삭제해야한다.
1개의 LoginActivity 와 여러 프래그먼트 (LoginUsernameFragment, LoginPasswordFragment) 로 구성된 로그인 흐름을 가정해보자. 이 뷰는 아래 2가지 규칙을 지켜야한다.
- 로그인 플로우가 완료될 때까지 공유해야하는 동일한
LoginUserData인스턴스에 액세스한다. - 플로우가 재시작되면
LoginUserData의 새 인스턴스를 만든다.
로그인 플로우 컨테이너를 따로 구성하고 로그인 플로우가 시작될 때 생성하며 끝날 때 메모리에서 삭제되도록 하면 가능하다.
class LoginContainer(val userRepository: UserRepository) {

    val loginData = LoginUserData()

    val loginViewModelFactory = LoginViewModelFactory(userRepository)
}

// AppContainer contains LoginContainer now
class AppContainer {
    ...
    val userRepository = UserRepository(localDataSource, remoteDataSource)

    // LoginContainer will be null when the user is NOT in the login flow
    var loginContainer: LoginContainer? = null
}
LoginContainer 가 언제 만들어지고 언제 삭제될지 판단해야하며 이 주체는 LoginActivity 에서 담당한다.
class LoginActivity: Activity() {

    private lateinit var loginViewModel: LoginViewModel
    private lateinit var loginData: LoginUserData
    private lateinit var appContainer: AppContainer

    override fun onCreate(savedInstanceState: Bundle?) {
        super.onCreate(savedInstanceState)
        appContainer = (application as MyApplication).appContainer

        // Login flow has started. Populate loginContainer in AppContainer
        appContainer.loginContainer = LoginContainer(appContainer.userRepository)

        loginViewModel = appContainer.loginContainer.loginViewModelFactory.create()
        loginData = appContainer.loginContainer.loginData
    }

    override fun onDestroy() {
        // Login flow is finishing
        // Removing the instance of loginContainer in the AppContainer
        appContainer.loginContainer = null
        super.onDestroy()
    }
}