Terraform module 작성하기
앞 글을 통해서 module 사용법에 대해서 정리해 보았다.
Registry를 통해서 이미 작성된 모듈을 사용하는 것 또한 좋은 구현 방법 이지만 다른 모듈에 종속성이 걸리는 문제가 발생한다
또한 필요에 의해서 변경하고자 하더라고 주도권을 갖고 수정 할 수가 없게 된다.
이를 위해서 사용하는 module의 Repo를 fork해서 사용하는 방법도 있지만
필요한 module을 직접 작성하고 배포 하여서 사용하는 것도 운영의 깊이를 더하는데 좋은 방법이라 생각한다.
이를 위해서 이번 글에선 가벼운 module 작성법에 대해서 설명해 보도록 하겠다.
root module & child module
- root module : 현재 커맨드 창에서 실행되어지는 모듈을 root module이라고 한다
- child module : root module에서 활용하기 위해서 참조하는 모듈을 child module이라고 한다.
- root module에서는 다른 child module를 호출하여 출력 값을 다른 child module의 입력 값으로 전달하여 module들을 연결시킬 수 있다.
- 다른 root 모듈에서 활용하기 위한 child 모듈을 작성해 보도록 하겠다.
child module 만들어보기
- child module이라고 해서 다른 부분은 없다.
- 기존 테라폼을 공부하면서 사용했던 코드들 모두가 모듈이 될 수 있다.
- 테라폼은 폴더 안의 모든 .tf 파일을 읽어와서 사용 하기에 필요한 리소스.tf 파일을 작성함으로써 모듈을 작성 할 수 있다.
- 중첩 module의 경우는 "modules/"의 하에 위치해야 한다.
메모리 출력 child module 만들기
root module main.tf 에서 child 모듈을 사용해 본다.
- 간단한 구조는 다음과 같다
$ tree
.
├── child
│   ├── input.tf
│   └── outputs.tf
├── main.tf- main.tf 파일을 작성해 본다.
-- main.tf
module "child" {
	source = "./child"
}
Inputs/Outputs 만들기
- child 폴더 밑에 필요한 리소스 관련 .tf 파일을 생성한다
- 모듈의 입력은 "변수" 이고 출력은 "출력" 이다.
- 입력(변수) 파일을 추가한다
-- inputs.tf
variable "memory" {}- 출력(출력) 파일을 추가한다
-- ouputs.tf
output "received" {
	value = "${var.memory}"
}- root main.tf 에서 child 모듈을 활용해 보자
-- main.tf
module "child" {
	source = "./child"

    memory = "1G"
}

output "child_memory" {
	value = "${module.child.received}"
}
tfi & tfp & tfa 실행하기
$ tfi
Initializing modules...
- child in child

Initializing the backend...

Initializing provider plugins...

Terraform has been successfully initialized!

You may now begin working with Terraform. Try running "terraform plan" to see
any changes that are required for your infrastructure. All Terraform commands
should now work.

If you ever set or change modules or backend configuration for Terraform,
rerun this command to reinitialize your working directory. If you forget, other
commands will detect it and remind you to do so if necessary.
$ tfp

Changes to Outputs:
  + child_memroy = "1G"

You can apply this plan to save these new output values to the Terraform state, without changing any real infrastructure.

───────────────────────────────────────────────────────────────────────────────────────────────────────────────────────────────────────────────────────────────────────────

Note: You didn't use the -out option to save this plan, so Terraform can't guarantee to take exactly these actions if you run "terraform apply" now.
$ tfa
Changes to Outputs:
+ child_memroy = "1G"
You can apply this plan to save these new output values to the Terraform state, without changing any real infrastructure.
Apply complete! Resources: 0 added, 0 changed, 0 destroyed.
Outputs:
child_memroy = "1G"- memory 값을 리턴해 주는 child 모듈을 생성해서 사용해 보았다.
- 실제 환경에서 사용하기 위해선 더 많은 모듈에 대한 리소스 파일들이 필요하겠지만 기본적인 구성 및 작성법에 대해서 알아보았다.
vpc child module 만들어보기
- 만들고자 하는 모듈의 구조는 다음과 같다
$ tree
.
├── main.tf
├── outputs.tf
└── vpc
    ├── main.tf
    ├── outputs.tf
    └── variable.tf
VPC/[Input(variable)/Output] 만들기
- vpc 폴더 밑에 필요한 리로스 관련 .tf 파일을 생성한다
- variable 파일을 작성한다.
-- variable.tf
variable "vpc_cidr_block" {
  type = string
}

variable "public_subnet_cidr_block" {
  type = string
}

variable "private_subnet_cidr_block" {
  type = string
}- outputs 파일을 작성한다.
-- outputs.tf
output "vpc_id" {
  value = aws_vpc.main.id
}

output "public_subnet_id" {
  value = aws_subnet.public.id
}

output "private_subnet_id" {
  value = aws_subnet.private.id
}
VPC/[main] 파일 만들기
- main 파일을 작성한다.
-- 사용하고자 하는 vpc를 생성한다
-- pubic/private subnet을 생성한다.
-- public subnet에서 사용하는 internet gateway를 생성한다
-- 생성한 route table을 public subnet에 연결시킨다.
-- main.tf
resource "aws_vpc" "main" {
  cidr_block = var.vpc_cidr_block
}

resource "aws_subnet" "public" {
  vpc_id     = aws_vpc.main.id
  cidr_block = var.public_subnet_cidr_block
}

resource "aws_subnet" "private" {
  vpc_id     = aws_vpc.main.id
  cidr_block = var.private_subnet_cidr_block
}

resource "aws_internet_gateway" "main" {
  vpc_id = aws_vpc.main.id
}

resource "aws_eip" "nat" {
  vpc = true
}

resource "aws_route_table" "public" {
  vpc_id = aws_vpc.main.id

  route {
    cidr_block = "0.0.0.0/0"
    gateway_id = aws_internet_gateway.main.id
  }
}

resource "aws_route_table_association" "public" {
  subnet_id      = aws_subnet.public.id
  route_table_id = aws_route_table.public.id
}
Root Module/[main] 파일 만들기
- main 파일을 작성한다
provider "aws" {
  region     = "ap-northeast-2"
}

module "vpc" {
  source                    = "./vpc"
  vpc_cidr_block            = "10.0.0.0/16"
  public_subnet_cidr_block  = "10.0.0.0/24"
  private_subnet_cidr_block = "10.0.1.0/24"
}
Root Module/[outputs] 파일 만들기
- outputs 파일을 작성한다.
output "vpc_id" {
  value = module.vpc.vpc_id
}

output "public_subnet_id" {
  value = module.vpc.public_subnet_id
}

output "private_subnet_id" {
  value = module.vpc.private_subnet_id
}
tfi & tfp & tfa 실행하기
$ tfi
Initializing modules...
- vpc in vpc

Initializing the backend...

Initializing provider plugins...
- Finding latest version of hashicorp/aws...
- Installing hashicorp/aws v4.46.0...
- Installed hashicorp/aws v4.46.0 (signed by HashiCorp)

Terraform has created a lock file .terraform.lock.hcl to record the provider
selections it made above. Include this file in your version control repository
so that Terraform can guarantee to make the same selections by default when
you run "terraform init" in the future.

Terraform has been successfully initialized!
$ tfp
Terraform used the selected providers to generate the following execution plan. Resource actions are indicated with the following symbols:
+ create
Terraform will perform the following actions:
# module.vpc.aws_eip.nat will be created
+ resource "aws_eip" "nat" {
+ allocation_id = (known after apply)
+ association_id = (known after apply)
+ carrier_ip = (known after apply)
+ customer_owned_ip = (known after apply)
+ domain = (known after apply)
+ id = (known after apply)
+ instance = (known after apply)
+ network_border_group = (known after apply)
+ network_interface = (known after apply)
+ private_dns = (known after apply)
+ private_ip = (known after apply)
+ public_dns = (known after apply)
+ public_ip = (known after apply)
+ public_ipv4_pool = (known after apply)
+ tags_all = (known after apply)
+ vpc = true
}
==== 중략 ====
Plan: 10 to add, 0 to change, 0 to destroy.
Changes to Outputs:
+ private_subnet_id = (known after apply)
+ public_subnet_id = (known after apply)
+ vpc_id = (known after apply)$ tfa
Terraform used the selected providers to generate the following execution plan. Resource actions are indicated with the following symbols:
+ create
Terraform will perform the following actions:
# module.vpc.aws_internet_gateway.main will be created
+ resource "aws_internet_gateway" "main" {
+ arn = (known after apply)
+ id = (known after apply)
+ owner_id = (known after apply)
+ tags_all = (known after apply)
+ vpc_id = (known after apply)
}
==== 중략 ====
Plan: 6 to add, 0 to change, 0 to destroy.
Changes to Outputs:
+ private_subnet_id = (known after apply)
+ public_subnet_id = (known after apply)
+ vpc_id = (known after apply)
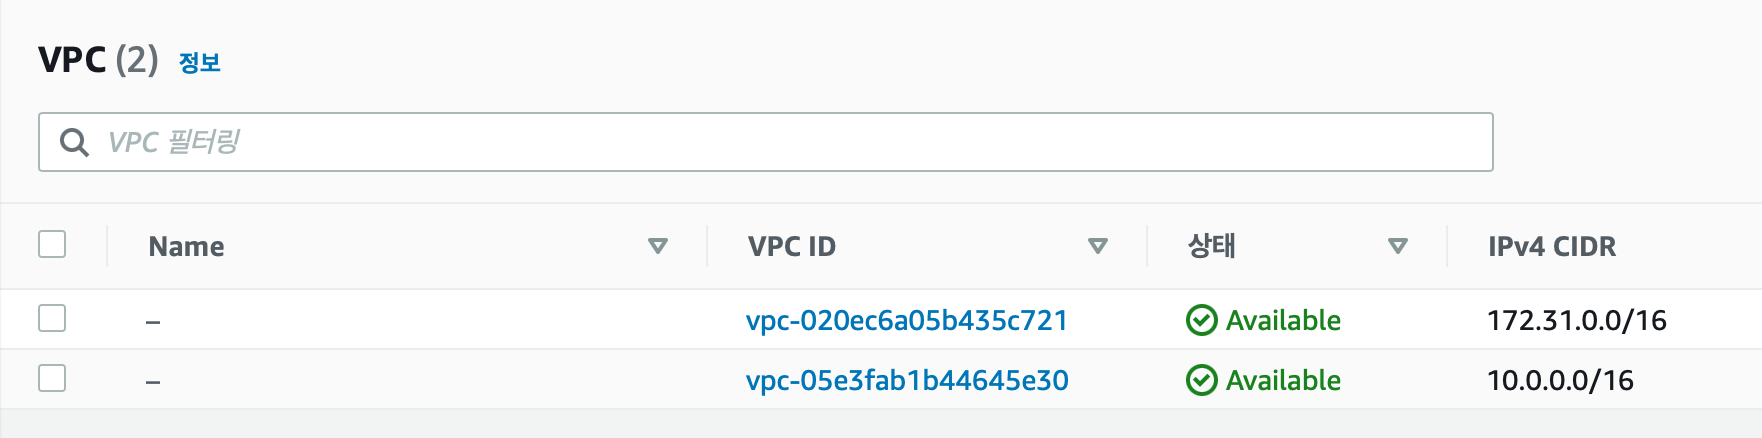
module.vpc.aws_vpc.main: Creating...
module.vpc.aws_vpc.main: Creation complete after 1s [id=vpc-05e3fab1b44645e30]
module.vpc.aws_internet_gateway.main: Creating...
module.vpc.aws_subnet.public: Creating...
module.vpc.aws_subnet.private: Creating...
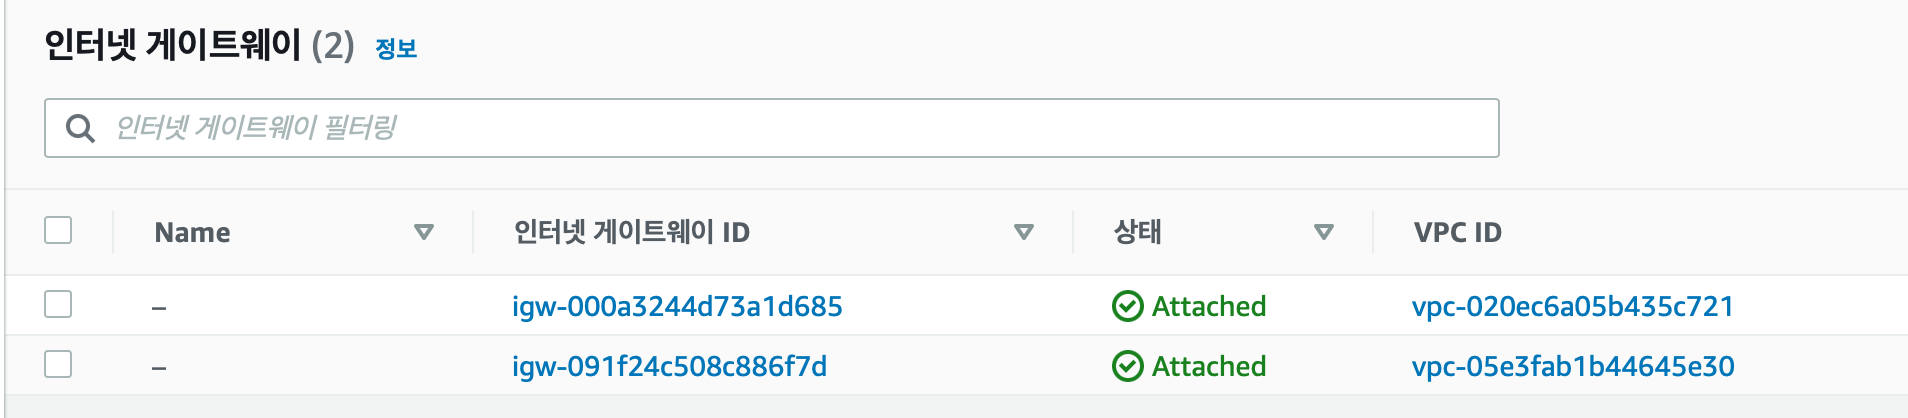
module.vpc.aws_internet_gateway.main: Creation complete after 0s [id=igw-091f24c508c886f7d]
module.vpc.aws_route_table.public: Creating...
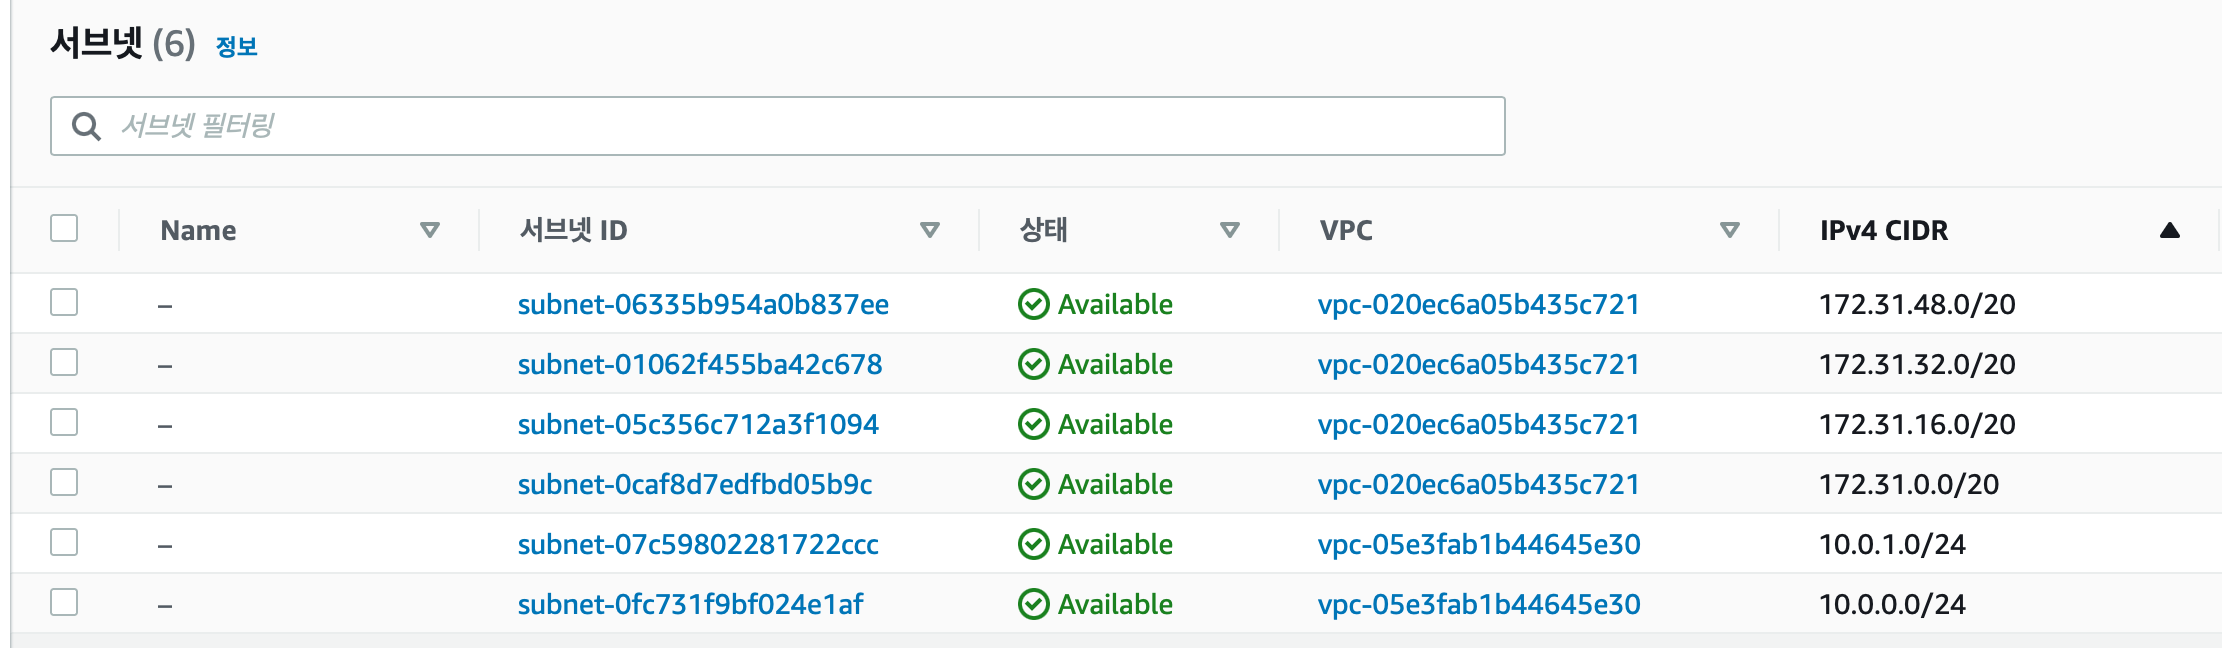
module.vpc.aws_subnet.private: Creation complete after 1s [id=subnet-07c59802281722ccc]
module.vpc.aws_subnet.public: Creation complete after 1s [id=subnet-0fc731f9bf024e1af]
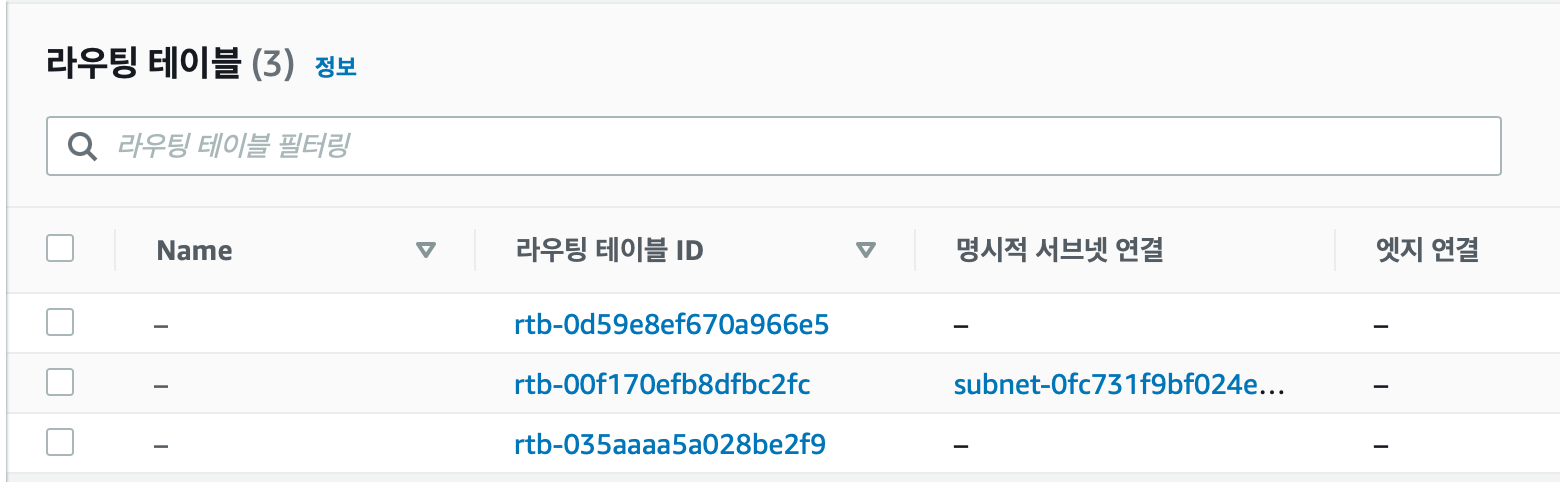
module.vpc.aws_route_table.public: Creation complete after 1s [id=rtb-00f170efb8dfbc2fc]
module.vpc.aws_route_table_association.public: Creating...
module.vpc.aws_route_table_association.public: Creation complete after 0s [id=rtbassoc-06ed757d604be598f]
Apply complete! Resources: 6 added, 0 changed, 0 destroyed.
Outputs:
private_subnet_id = "subnet-07c59802281722ccc"
public_subnet_id = "subnet-0fc731f9bf024e1af"
vpc_id = "vpc-05e3fab1b44645e30"
console에서 확인
결론
간단한 예제 2개를 통해서 child 모듈 생성법에 대해서 설명해 보았다.
실제 prod 환경에서 사용을 하려면 많은 부분을 다듬어야 하겠지만 Terraform의 모듈 작성법을 익히기엔 충분하다고 생각이 든다.
개인 또는 팀에서 운영하기 위해 필요한 모듈 활용 법을 익힐 수 있는 시간이 되었으면 한다.
참고

인프라 운영하는 개발자