Eureka(Discovery 등록)
1) discovery-service
dependacy
        <dependency>
            <groupId>org.springframework.cloud</groupId>
            <artifactId>spring-cloud-starter-netflix-eureka-server</artifactId>
        </dependency>
application.yml
server:
  port: 8761

spring:
  application:
    name: discoveryservice


eureka:
  client:
    register-with-eureka: false
    fetch-registry: false
main > @EnableEurekaServer 추가
@SpringBootApplication
@EnableEurekaServer
public class DiscoveryserviceApplication {
public static void main(String[] args) {
SpringApplication.run(DiscoveryserviceApplication.class, args);
}
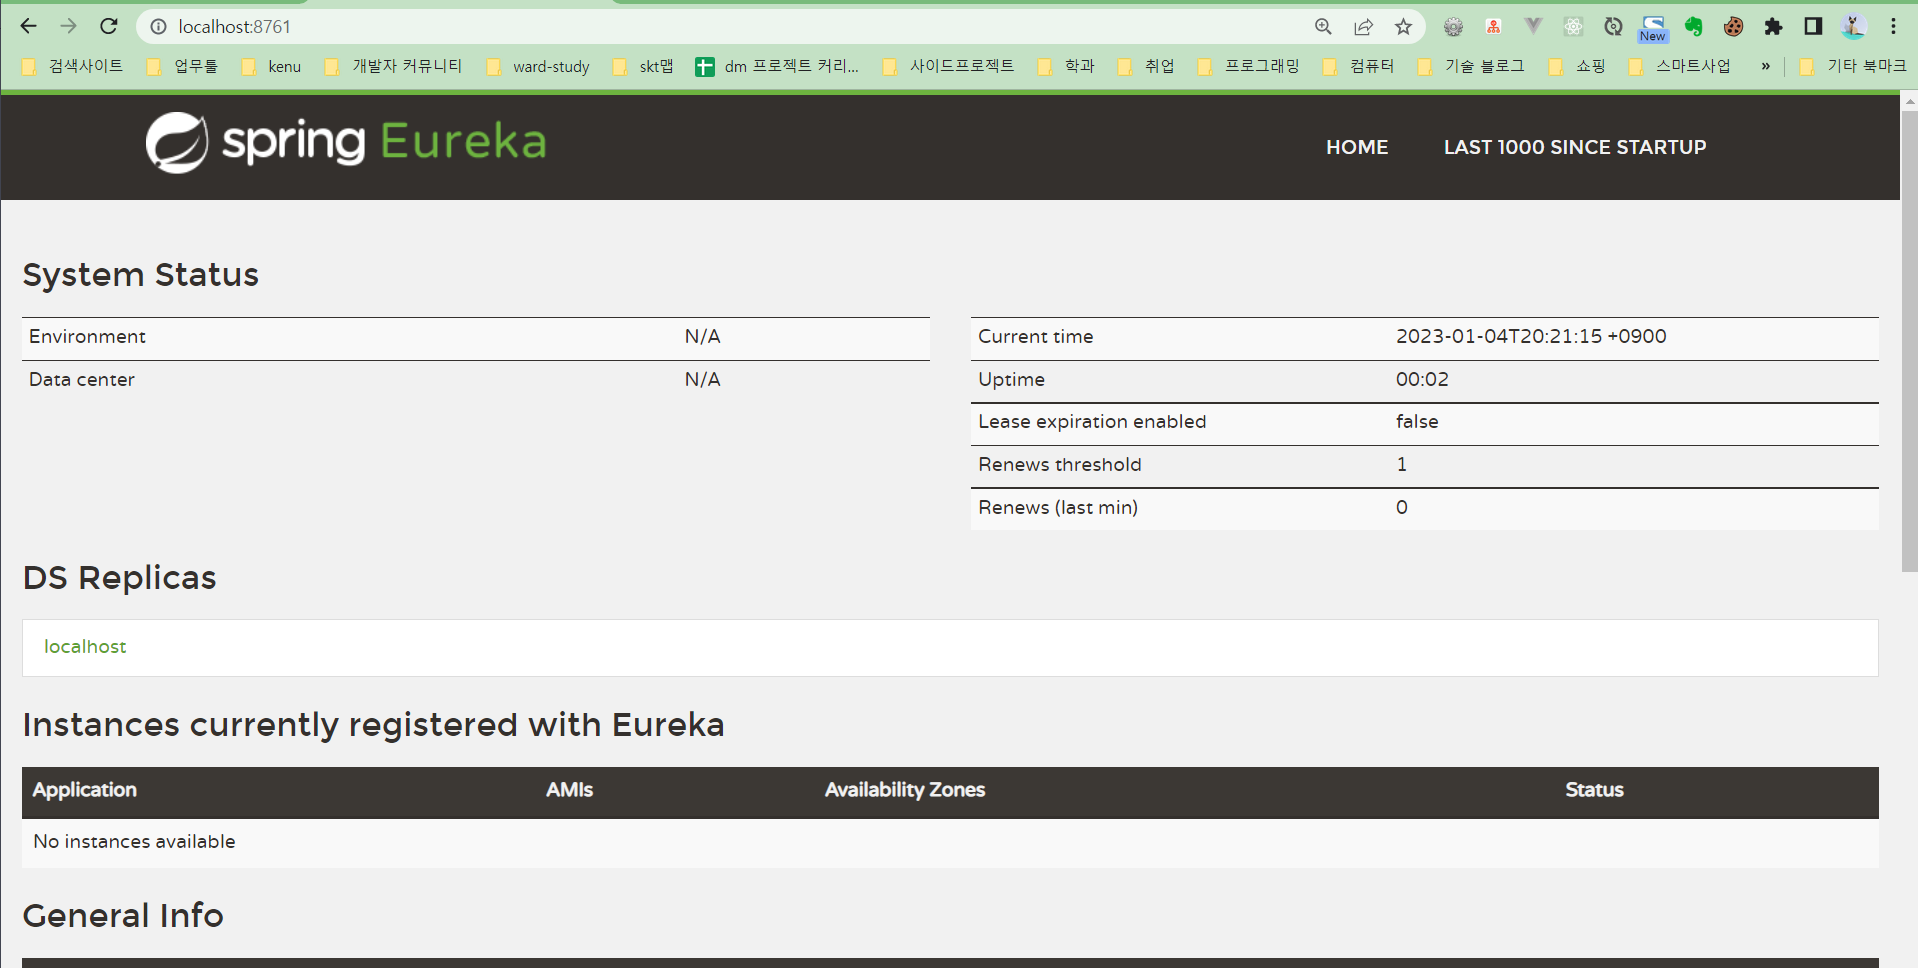
}Eureka 화면
localhost:8761
2) user-service
dependacy
        <dependency>
            <groupId>org.springframework.cloud</groupId>
            <artifactId>spring-cloud-starter-netflix-eureka-client</artifactId>
        </dependency>
application.yml
spring:
server:
  port: 0

spring:
  application:
    name: user-service
  h2:
    console:
      enabled: true
      settings:
        web-allow-others: true
      path: /h2-console
  datasource:
    driver-class-name: org.h2.Driver
    url: jdbc:h2:mem:testdb
#    username: sa
#    password: 1234

eureka:
  instance:
    instance-id: ## 랜덤 id 로 등록 ${spring.application.name}:${spring.application.instance_id:${random.value}}
  client:
    register-with-eureka: true
    fetch-registry: true
    service-url:
      defaultZone: http://127.0.0.1:8761/eureka

greeting:
  message: welcome to the Simple E-commerce.

logging:
  level:
    com.example.userservice: DEBUG
main > @EnableDiscoveryClient 추가
@SpringBootApplication
@EnableDiscoveryClient
public class UserServiceApplication {
public static void main(String[] args) {
SpringApplication.run(UserServiceApplication.class, args);
}
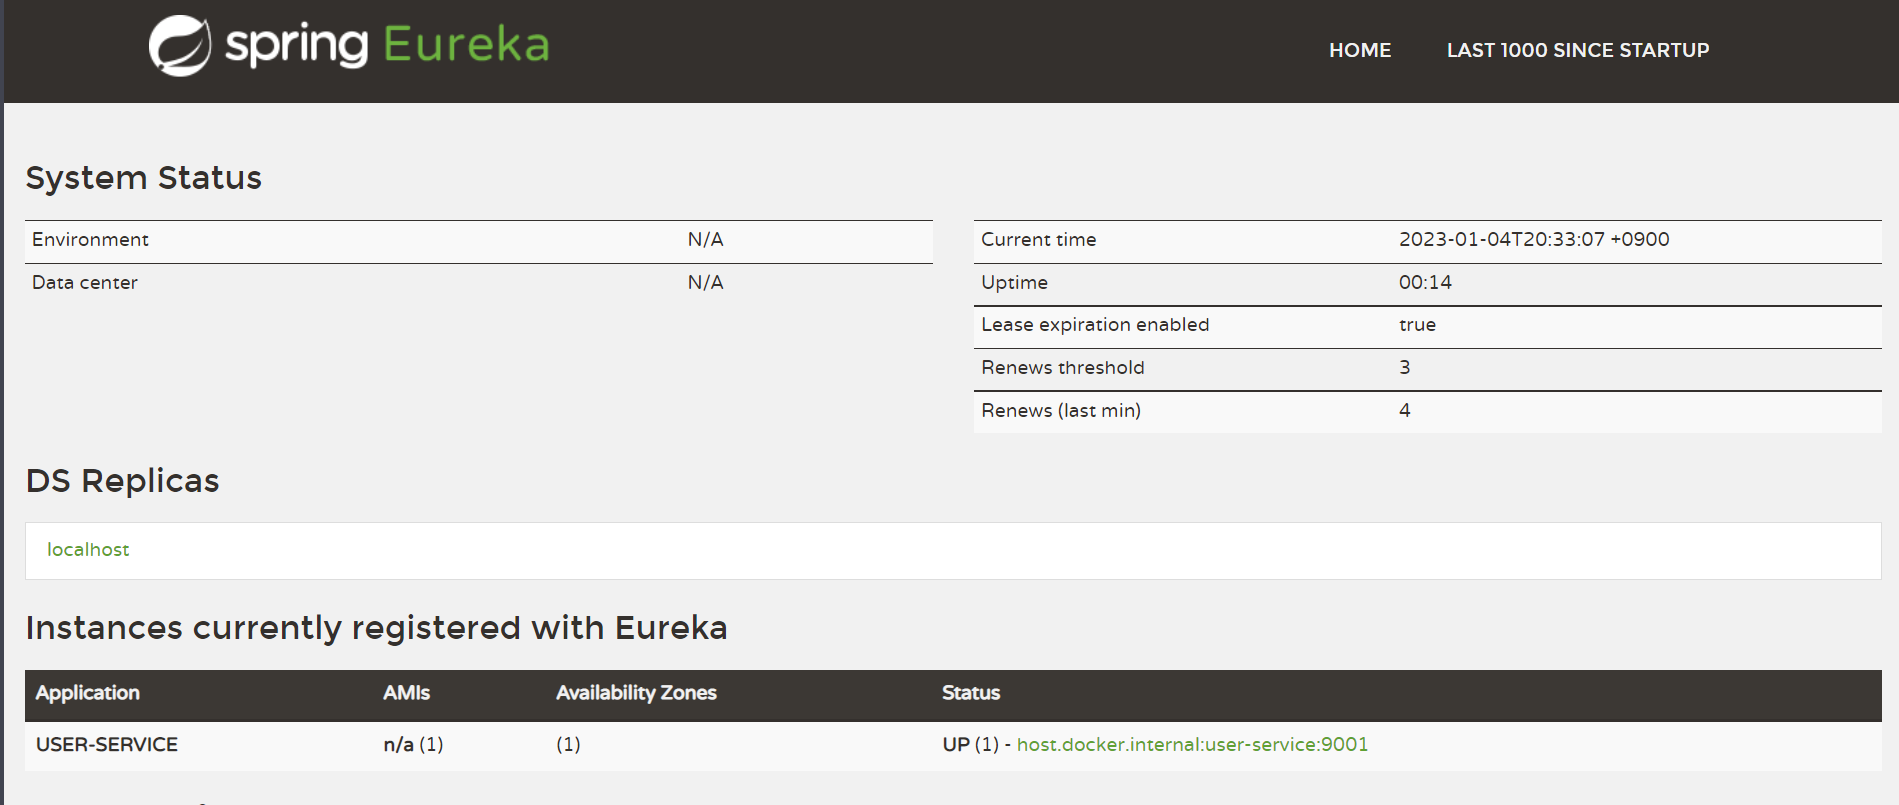
}eureka 대쉬보드 홈페이지(localhost:8087)에서 서비스user-service url 등록이 된 것을 확인 가능하다.
Application을 여러개 띄우고 싶다면?
1) VM options > -Dserver.port
Server port를 바꾸고 싶다면 Run Configuration 창에서
VM options > -Dserver.port={다른 포트번호} 을 넣어주고 실행하면 된다.
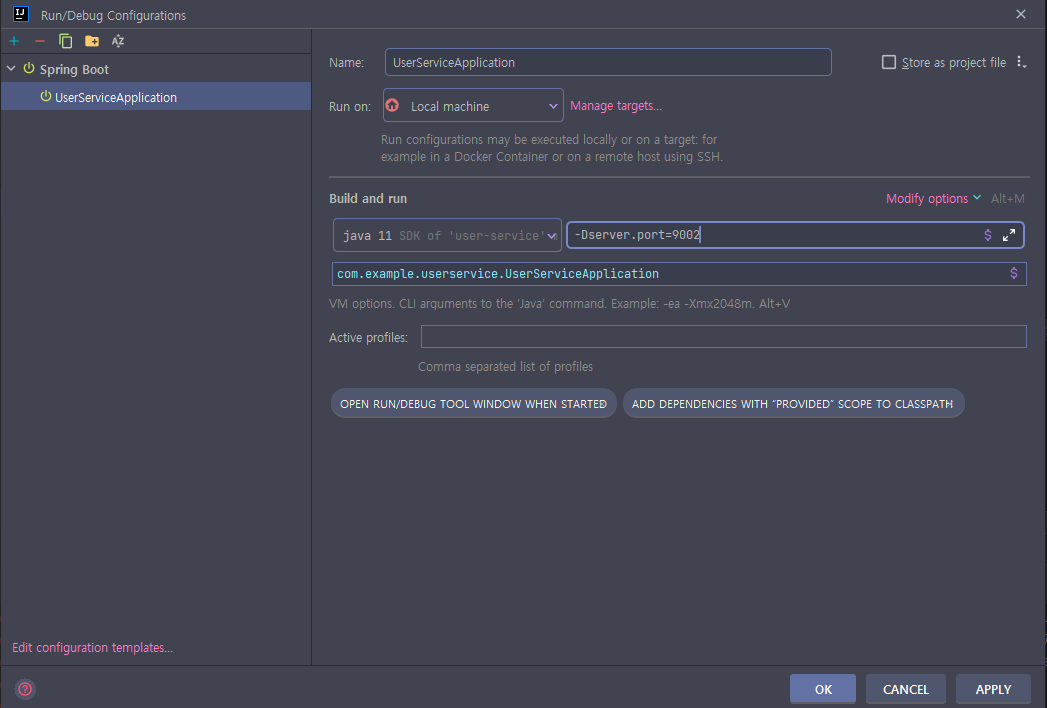
2) maven 패키징 명령어
./maven clean package 로 target 폴더 안에 jar 파일이 생기고 java명령어로 port변경 옵션을 추가해서 jar를 실행해주면 된다.
cd target
java -jar -Dserver.port=9002 user-service-0.0.1-SNAPSHOT.jar
이런식으로 eureka client Service를 여러개(9001,9002) 실행해주면
eureka 대쉬보드 안에 서비스로 등록된 것을 볼 수 있다.

service 랜덤 id로 등록
application.yml
eureka:
## 랜덤 id 로 등록
  instance:
    instance-id: ${spring.application.name}:${spring.application.instance_id:${random.value}}
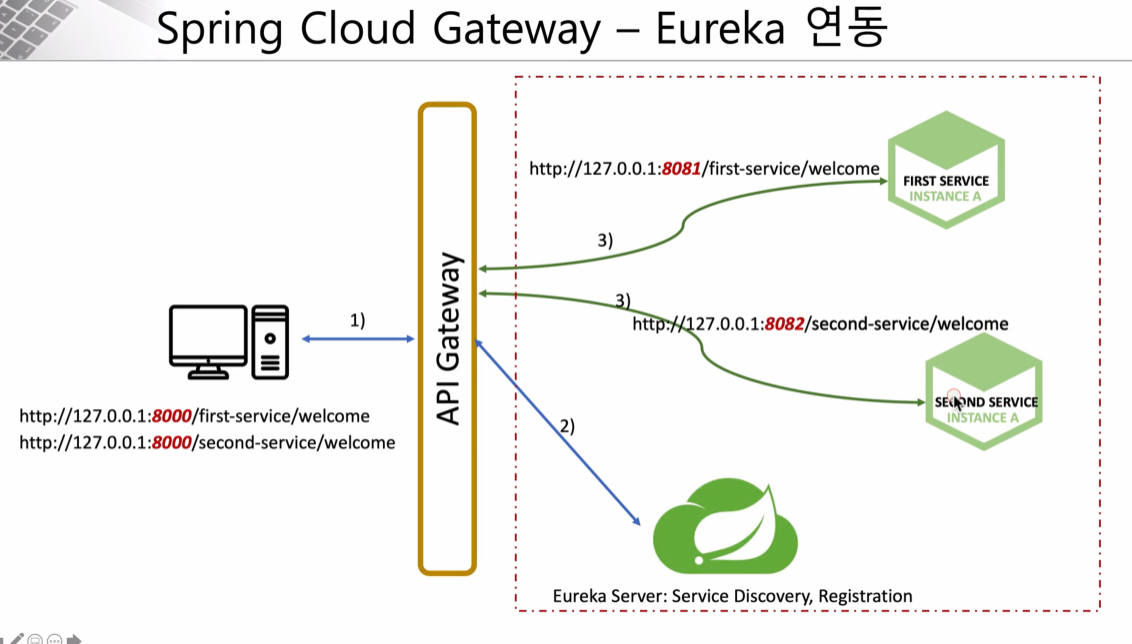
Spring Cloud Gateway(API Gateway)
확인하는건 eurka 대쉬보드에서, 그리고 API url 경로를 라우팅하는 게 APIGateway이다.
APIGateway 종류로는 Netfix Ribbon과 Zuul, 그리고 Spring Cloud Gateway가 있다. 현재는 Spring Cloud Gateway가 대세다.
❗ Spring Cloud Zuul은 Spring Boot 2.4에서 정지된(
Maintenance) 상태이다.
Spring Cloud Gateway 기능으로는 Filter, Eureka, Load Balancer 가 있다.
apigateway-service
dependacy
이는 first, second service도 마찬가지이다.
        <dependency>
            <groupId>org.springframework.cloud</groupId>
            <artifactId>spring-cloud-starter-netflix-eureka-client</artifactId>
        </dependency>
application.yml
라우팅 uri: lb://USER-SERVICE 여기서 lb는 로드밸런싱을 의미한다.
spring:
  application:
    name: apigateway-service
  cloud:
    gateway:
      default-filters:
        - name: GlobalFilter
          args:
            baseMessage: Spring Cloud Gateway Global Filter
            preLogger: true
            postLogger: true
      routes:
        #        - id: user-service
        #          uri: lb://USER-SERVICE
        #          predicates:
        #            - Path=/user-service/**
        - id: user-service
          uri: lb://USER-SERVICE
          predicates:
            - Path=/user-service/login
            - Method=POST
          filters:
            - RemoveRequestHeader=Cookie
            - RewritePath=/user-service/(?<segment>.*), /$\{segment}
first-service
@RestController
@RequestMapping("/first-service")
@Slf4j
public class FirstServiceController {

    Environment env;

    @Autowired
    public FirstServiceController(Environment env) {
        this.env = env;
    }

    @GetMapping("/welcome")
    public String welcome() {
        return "Welcome to the First service";
    }

    @GetMapping("/message")
    public String message(@RequestHeader("first-request") String header) {
        log.info(header);
        return "hello world in First Service";
    }

    @GetMapping("/check")
    public String check(HttpServletRequest request) {
        log.info("Server port={}", request.getServerPort());
        return String.format("Hi, there. This is a message from First Service on PORT %s", env.getProperty("local.server.port"));
    }
}
e-commerce 애플리케이션 개오
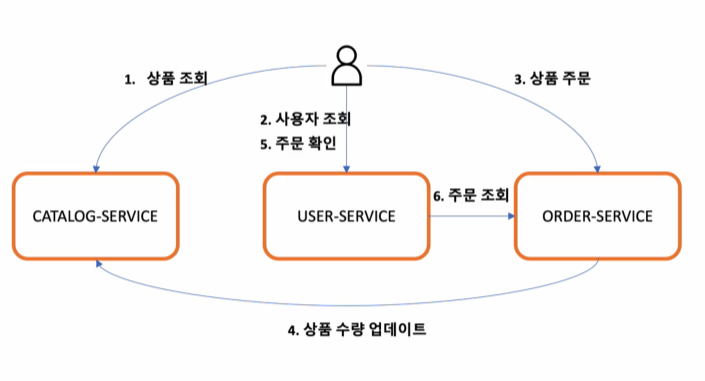
각각 service 들은 MSA 통신(RestTmeplate, FeignClient)을 한다.
구성요소
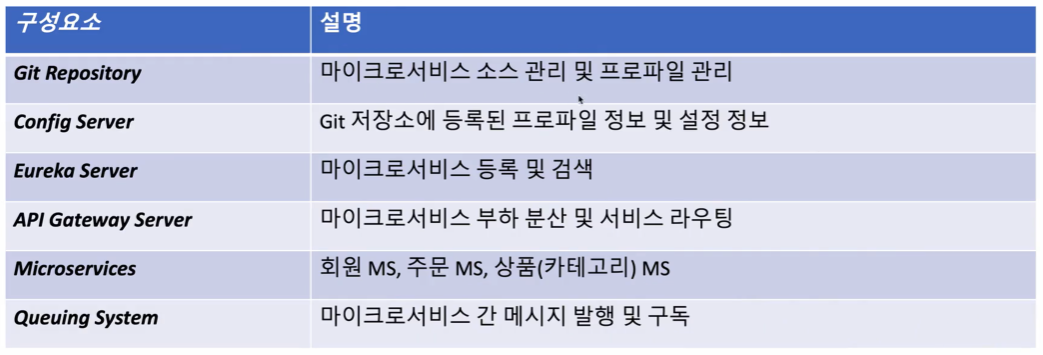
api 명세서
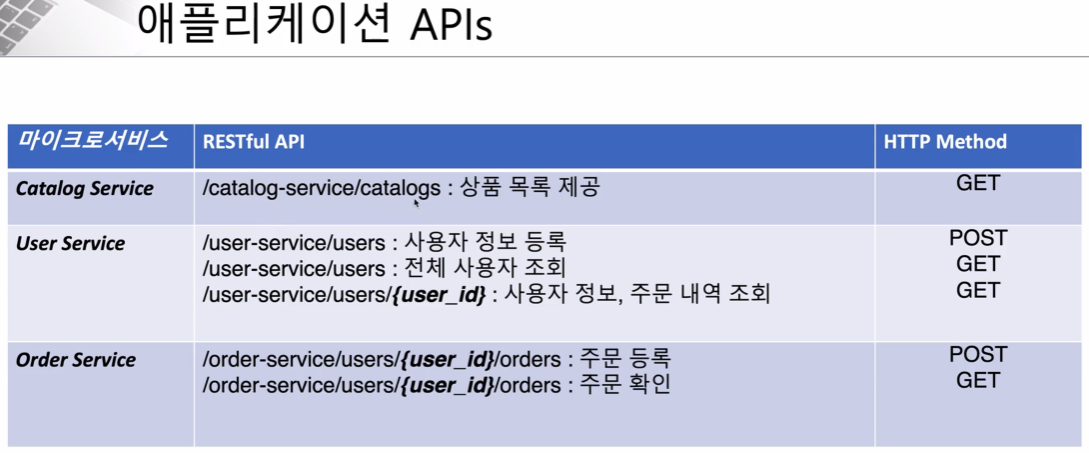
User-service
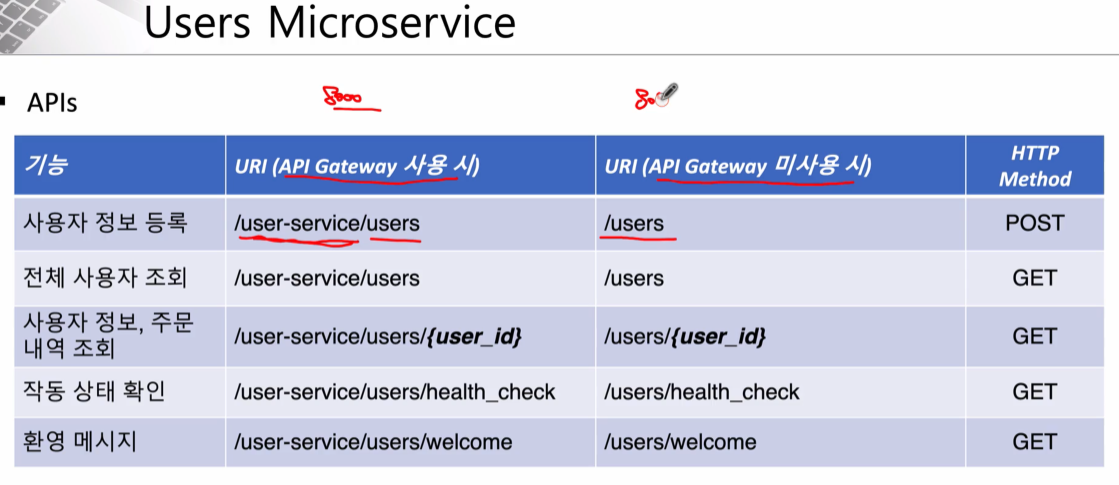
main 클래스에 @EnableDiscoveryClient를 추가
UserController
    @GetMapping("/health_check")
    public String status() {
        return String.format("It's working in User Service on PORT %s",
                env.getProperty("local.server.port"));
    }
application.yml
greeting:
  message: welcome to the Simple E-commerce.
@Value 사용
    @Autowired
    private Greeting greeting;

    @Value("${greeting.message}")
    private String message;

    @GetMapping("/welcome")
    public String welcome() {
//        return env.getProperty("greeting.message");
//        return greeting.getMessage();
        return message;
    }
Spring Cloud bus(RabbitMQ)
분산시스템의 노드(micro service)를 경량 메시지 브로커(RabbitMQ, 중간의 미들웨어)와 연결
상태 및 구성에 대한 변경 사항을 연결된 노드에게 전달(Broadcast)
AMQP(메시지 지향 미들웨어 응용 계층 프로토콜
, 메시지 지향 큐링 라우팅 (p2p publisher-subcriber) 신뢰성, 보안
Erlang, RabbitMQ에서 사용
)
설치
Erlang 설치
https://www.erlang.org/patches/otp-23.1
환경변수 추가
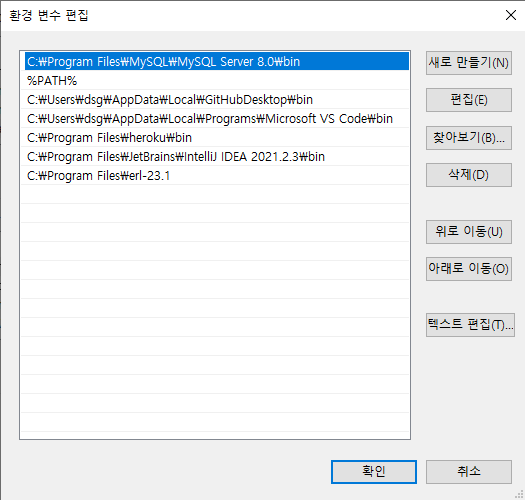
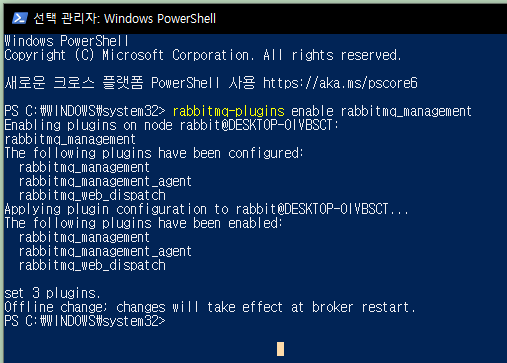
powershell 에다 입력
rabbitmq-plugins enable rabbitmq_management