6주차 4/30 ~ 5/7
데이터 불변성과 가변성
원시형 데이터의 경우 데이터 자체가 변하지 않은 성질을 가지고 있기 때문에(데이터불변성), 메모리 주소까지 참조해서 비교하며 이해할 필요 없이 생긴 모습이 똑같으면 같은 데이터라고 이해를 해도 괜찮다.
할당 연산자를 사용할 때 새로운 데이터가 만들어지는 개념(복사X)이 아니라, 단순히 메모리의 참조 주소만 옮겨가게 되는 것이다.
비동기
//비동기 코드 예시
fetch('https://www.omdbapi.com?apikey=/*/=title=3')
//영화정보를 요청 key = value

//?가 나오면 쿼리 스트링으로 속성과 값이 들어 있다.
// 주소 부분에 정보를 담을 수 있으며 예로 정보를 요청시 쓸 수 있는 함수 fetch()가 있다.

fetch('https://www.omdbapi.com?apikey=7035c60c&s=frozen&page=3')
  .then(res => res.json())
  .then(res => {
    console.log(res)
  })

// res 결과
// {
//   "Search": [
//       {
//           "Title": "Winter of Frozen Dreams",
//           "Year": "2009",
//           "imdbID": "tt0960098",
//           "Type": "movie",
//           "Poster": "https://m.media-amazon.com/images/M/MV5BMjIxNDI4MTQ1MF5BMl5BanBnXkFtZTcwMDU4NjY0Mg@@._V1_SX300.jpg"
//       },
//       {
//           "Title": "Into the Unknown: Making Frozen 2",
//           "Year": "2020",
//           "imdbID": "tt10196382",
//           "Type": "series",
//           "Poster": "https://m.media-amazon.com/images/M/MV5BYmQ5ZWE0ZWUtNzY0Zi00MmZhLWIzNTgtNDk1MTBiMDNmMmZjXkEyXkFqcGdeQXVyMTkxNjUyNQ@@._V1_SX300.jpg"
//       },
//       {
//           "Title": "Frozen Silence",
//           "Year": "2011",
//           "imdbID": "tt1847584",
//           "Type": "movie",
//           "Poster": "https://m.media-amazon.com/images/M/MV5BMjAyMTc4NTIxOV5BMl5BanBnXkFtZTgwNzkzOTcwMzE@._V1_SX300.jpg"
//       },
//       {
//           "Title": "Lego Frozen Northern Lights",
//           "Year": "2016",
//           "imdbID": "tt6110430",
//           "Type": "series",
//           "Poster": "https://m.media-amazon.com/images/M/MV5BYTIzODRkNGMtNTFkOS00NTBiLTk5OTAtMmVjOWQ5MDYxNDQyXkEyXkFqcGdeQXVyODQ4MjU1MDk@._V1_SX300.jpg"
//       },
//       {
//           "Title": "Frozen",
//           "Year": "2005",
//           "imdbID": "tt0376606",
//           "Type": "movie",
//           "Poster": "https://m.media-amazon.com/images/M/MV5BMTcyOTk3MDU2N15BMl5BanBnXkFtZTcwNzk0OTc0NQ@@._V1_SX300.jpg"
//       } /
//   ], // 생략
//   "totalResults": "329",
//   "Response": "True"
// }

// fetch 이외에 axios를 사용할 수 있다.
Promise
//기초 Promise 예시
function getData() {
  return new Promise(function(resolve, reject) {
    $.get('url 주소/products/1', function(response) {
      if (response) {
        resolve(response);
      }
      reject(new Error("Request is failed"));
    });
  });
}

// 위 $.get() 호출 결과에 따라 'response' 또는 'Error' 출력
getData().then(function(data) {
  console.log(data); // response 값 출력
}).catch(function(err) {
  console.error(err); // Error 출력
});
Promise States
new Promise() 메서드를 호출할 때 콜백 함수를 선언할 수 있고, 콜백 함수의 인자는 resolve, reject이다.
new Promise(function(resolve, reject) {
  // ...
});resolve를 실행하면 이행(Fulfilled) 상태가 되며
이행 상태가 되면 아래와 같이 then()을 이용하여 처리 결과 값을 받을 수 있다.
function getData() {
  return new Promise(function(resolve, reject) {
    var data = 100;
    resolve(data);
  });
}

// resolve()의 결과 값 data를 resolvedData로 받음
getData().then(function(resolvedData) {
  console.log(resolvedData); // 100
});function getData() {
return new Promise(function(resolve, reject) {
reject(new Error("Request is failed"));
});
}
// reject()의 결과 값 Error를 err에 받음
getData().then().catch(function(err) {
console.log(err); // Error: Request is failed
});Promise Chaining
new Promise(function(resolve, reject){
  setTimeout(function() {
    resolve(1);
  }, 2000);
})
.then(function(result) {
  console.log(result); // 1
  return result + 10;
})
.then(function(result) {
  console.log(result); // 11
  return result + 20;
})
.then(function(result) {
  console.log(result); // 31
});
resolve() 가 호출된 이후 대기 -> 이행 상태로 넘어가 첫번째 .then() 로직 결과를 받아
.then() => .then() 을 반복하여 최종 결과 값 31을 출력한다.
Promise Error, Catch
Prmise 로직이 에러가 났을 경우 reject() 메서드가 호출되어 실패 상태가 된 경우에 실행되며, then () 의 두번째 인자로도 Promise 에러를 처리할 수 있지만 안정성을 위해 가급적 catch() 를 쓰도록 한다.
// catch()로 오류를 감지하는 코드
function getData() {
  return new Promise(function(resolve, reject) {
    resolve('hi');
  });
}

getData().then(function(result) {
  console.log(result); // hi
  throw new Error("Error in then()");
}).catch(function(err) {
  console.log('then error : ', err); // then error :  Error: Error in then()
});
Async, Await
자바스크립트의 비동기 처리 문법 중 가장 최근에 만들어진 문법이다.
// 기본 문법
async function 함수명() {
  await 비동기_처리_메서드_명();
}Then, Try, Catch ,Finally
function getMovie() {
  fetch('https://omdbapi.com123/?apikey=***=***')
    .then(res => res.json()) // fetch가 정상적으로 실행
    .then(res => res) // fetch가 정상적으로 실행
    .catch(error => alert('~~~~')) // fetch가 에러가 발생했을 경우
    .finally(() => { console.log('Done!')}) // 진행 결과 상관없이 실행
}

const res = getMovie() // fetch 가 반환한 promise instance 반환
console.log(res)

// .then
.then() // 정상적으로 실행시
.catch() // 오류가 났을 때
.finally() // 진행 결과 상관없이 실행

// async / await
try { // 시도할 코드, 예외 상황 발생할 수 있음

} catch (err) { // 에러가 났을시 실행

} finally { // 무조건 실행할 코드, try 코드 마무리

}
Class
//예제 1

// function Hello(str) {
//   this.msg = str
// }
// Hello.prototype.getMsg = function () {
//   return this.msg
// } // function 함수로 만든 코드

class Hello { // class
  constructor(str) { // 초기값 설정
    this.msg = str
  }
  getMsg() { // 메소드 생성
    return this.msg
  }
} // function Hello 코드를 class를 이용한 코드로 바꾼 코드

/////////////////////
const res1 = new Hello('팥')
console.log(res1)

const res2 = new Hello('슈크림')
console.log(res2)

console.log(res1.getMsg === res2.getMsg) // true
console.log(res1.getMsg()) // 팥
console.log(res2.getMsg()) // 슈크림
//예제 2
class Fonty {
constructor(selector, customOptions) {
const defaultOptions = {
fontSize: '16px',
fontWeight: '700',
color: 'black'
}
//옵션 병합
this.options = { // 얕은 복사
... defaultOptions, // ...전개연산자를 통한 괄호 날림
... customOptions
}
// this.options = { // 얕은 복사
// fontSize: '16px',
// fontWeight: '700',
// color: 'black'
// ... customOptions , // 중복적으로 옵션을 사용했다면 나중으로 오는 옵션으로 적용된다.
// }
//요소 검색
this.els = document.querySelectorAll(selector) //this는 인스턴스
this.setStyle(this.options)
}
//{ color: 'red', fontsize: '20px'}
setStyle(style) { // prototype 매소드 각 인스턴스에서 사용
this.els.forEach(el => {
//el.style.color = 'red'// js에서 제어하는 css 스타일
Object.assign(el.style, style)
})
}
//static
static setRed(instance) {
instance.setStyle({
color: 'red'
})
}
}
//사용예제
const instance = new Fonty('.font1', {
fontSize: '40px',
fontWeight: '400',
color: 'blue'
})
instance.setStyle()
const instance2 = new Fonty('.font2', {
fontSize: '40px',
fontWeight: '400',
color: 'green'
})
document.querySelector('button').addEventListener('click', () => {
instance2.setStyle({
color: 'yellowgreen'
})
// Fonty.setRed(instance2)
})Getter, Setter
프로퍼티의 종류
일반적으로 사용하는 프로퍼티는 데이터 프로퍼티이다.
프로퍼티를 읽거나 쓸 때 호출하는 함수를 값 대신에 지정할 수 있는 프로퍼티이다.
접근자 프로퍼티의 본질은 함수인데, 이 함수는 값을 획득(get)하고 설정(set)하는 역할을 담당합니다.
외부 코드에서는 함수가 아닌 일반적인 프로퍼티처럼 보입니다.
// getter, setter 기본 구조 예시
let abc = {
 get propName() {
   // getter, abc.propName을 실행할 때 실행되는 코드
 },

 set propName(value) {
   // setter, abc.propNAme = value를 실행할 때 실행되는 코드
 }
};

// getter 메서드는 abc.propName을 사용해 프로퍼티를 읽으려고 할 때 실행된다.
// setter 메서드는 abc.propNAme = value으로 프로퍼티에 값을 할당하려 할 때 실행된다.
// class 를 통한 getter, setter 예시 1
class Fonty {
constructor(selector, customOptions) {
const defaultOptions = {
fontSize: '16px',
fontWeight: '700',
color: 'black'
}
// 옵션 병합
this.options = {
...defaultOptions,
...customOptions
}
// 요소 검색
this.els = document.querySelectorAll(selector)
this.setStyle(this.options)
}
setStyle(style) {
this.els.forEach(el => {
Object.assign(el.style, style)
})
}
static setRed(instance) {
instance.setStyle({
color: 'red'
})
}
static getFamilies() {
return ['serif', 'sans-serif', 'monospace', 'cursive']
}
// Getter
get fontSize() {
console.log('in Getter', this.options.fontSize)
return this.options.fontSize
}
// Setter
set fontSize(value) {
console.log('in Setter', value)
// this.options.fontSize = value
}
}
// 사용 예시!
new Fonty('.font1', {
fontSize: '40px',
fontWeight: '400',
color: 'blue'
})
const fonty = new Fonty('.font2', {
fontSize: '30px',
fontWeight: '400',
color: 'green'
})
// console.log(Fonty.getFamilies())
document.querySelector('button')
.addEventListener('click', () => {
// fonty.setStyle({
// color: 'yellowgreen'
// })
// Fonty.setRed(fonty)
console.log(fonty.fontSize)
fonty.fontSize = '99px'
})
// class 를 통한 getter, setter 예시 2

class User {
  constructor(first, last) {
    this.first = first
    this.last = last
  }
  get fullName() {
    return `${this.first} ${this.last}`
  }
  set fullName(v) {
    const [first, last] = v.split(' ')
    this.first = first
    this.last = last
  }
}

const heorpy = new User('Heropy', 'Park')
console.log(heorpy.fullName)

heorpy.fullName = 'Leon Miller'
console.log(heorpy.fullName)
Moduels
import, export
<!-- index.html -->
<script type="module" defer src="./main.js"></script>
// main.js
import {hello} from './test.js'
hello() //seeseeesee you
// 모듈 안에서의 this 는 'undefined'이다.
console.log(this)// test.js
export function hello() {
console.log('seeseeesee you ')
}모듈은 main.js와 test.js를 모듈이라는 틀 안에 가둔다
=>모듈 안에서의 this는 undefined이다.
import {hello} from './test.js'

hello()//seeseeesee you

// 모듈 안에서의 this 는 'undefined'이다.
console.log(this)

const a = function () {
  console.log(this) // 호출되는 위치에서 this가 정의됨. 하지만 지금은 모르기 때문에 undefind
}

const b = () => {
  console.log(this) // 모듈 영역 안에서 undefined, 선언되는 그 위치에서 this가 정의됨.
}
이름을 가지는 내보내기, 중복 가능( 다중 출구 )
export function hello() {
  console.log('seeseeesee you ')
}
export function world() {
  a: 1,
  b: 2
}
가져올때 이름을 명시해야 한다.
import {hello, world} from './test.js'export default
import flyda, {hello} from './test.js' // 기본, {이름, 이름}이름으로 내보내는 export은 이름이 필수이고 기본 내보내기에서는 선택이다. 기본은 이름을 지정할 필요가 없고, 받을때도 다른 이름으로 받아도 된다.
// 기본 내보내기(단일 출구)
// export default 데이터
export default function flyda () {

}
예시
import haha, {hello} from './test.js' // 기본, {이름, 이름}
// 기본 내보내기(단일 출구)
// export default 데이터
export default function () {

}
싹다 하나로 퉁처서 가져올 수 있다
import * as abcd from './test.js'Callstack, Event Loop
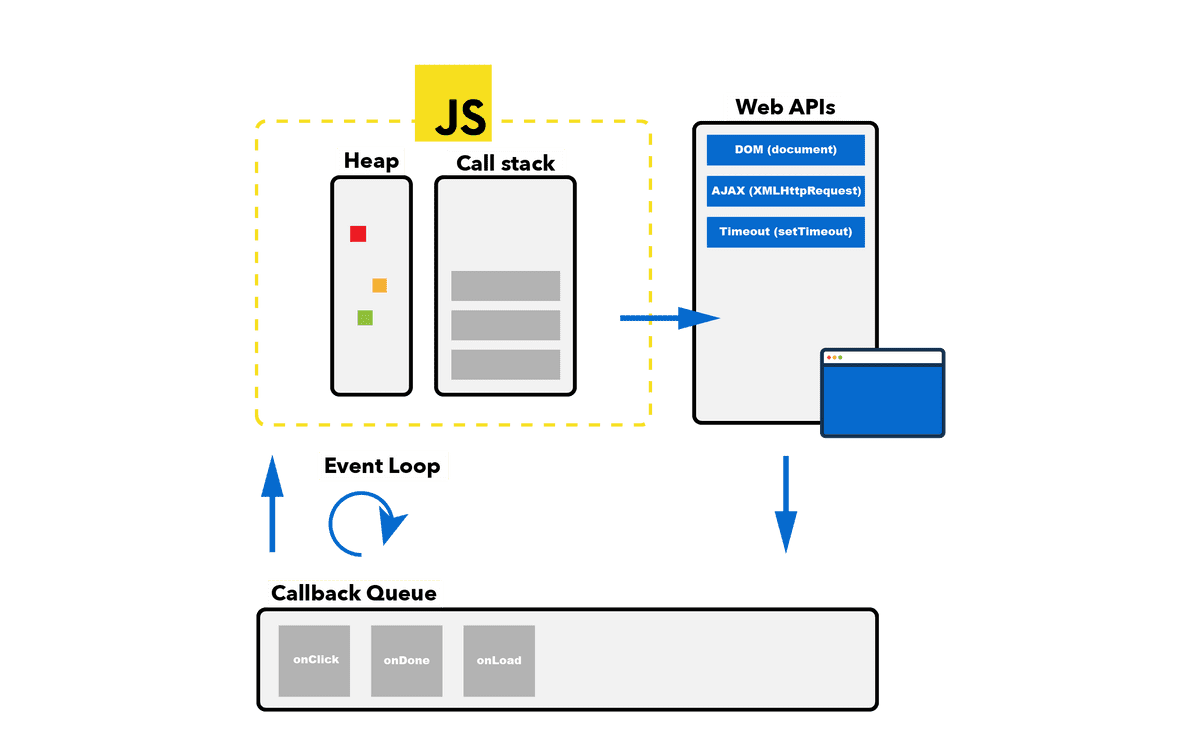
// call stack && event loop

setTimeout( () => {
  console.log('timeout')
}, 0)
function a() {
  console.log('a')
  function b() {
    console.log('b')
  }
  b()
}

a()
// a
// b
//timeout
setTimeout의 콜백은 Web APIs라서 0초로 설정되어 있지만 callback queue에 쌓여 callstack을 쌓지 못한다.
그래서 call stack에 있는 미리 쌓여있는 a, b함수가 먼저 실행되고 callstack이 비워지면 그 다음에 event loop로 call stack으로 들어갈 수 있다.
js 를 브라우저라는 런타임이나 node js 의 런타임에서 들어간다.
setTimeout이 브라우저가 실행하는 명령이기 때문에 나중에 실행될 수 밖에 없다.
비동기는 Web APIs이기 때문에 call stack이 다 비워지면 비동기가 callback queue에서 나와서 callstack에서 실행될 수 있다.
DOM (Document Object Model)
Element, Node
Reference