The Mongod
- mongod - MongoDB Daemon
- mongo - MongoDB REPL
- mongosh - MongoDB Shell https://docs.mongodb.com/mongodb-shell/ (mongo 대체)
Mongod Options
dbpath
--dbpath <directory path>- 기본 값으로
/data/db로 지정되지만, 원하는 위치로 지정하고 싶은 경우 directory path를 지정하면 된다.
port
--port <port number>- 기본 값은 27017, 원하는 값으로 지정
auth
--auth- 해당 옵션 없이 실행할 경우 인증 없이 아무나 접속이 가능하다.
bind_ip
--bind_ip <ip>--bind_ip <ip>,<ip>- 기본 값으로 127.0.0.1 이 바인딩되어 있어 로컬에서만 접속이 가능하다. 외부에서 접속을 하기 위해서는 접속하고자하는 client의 외부 IP를 지정해줘야 한다.
- 모든 외부 접속을 허용하려면
0.0.0.0을 지정하면 된다.
Configuration File
mongod 옵션
-
Command Line Options으로 지정할 수 있지만, 매 실행마다 입력해야 되는 불편함이 있다. 그래서 Configuration File로 관리하는데, Command Line과 Configuration File Option의 맵핑은 아래와 같다.
-
Command Line Options (https://docs.mongodb.com/manual/reference/program/mongod/#options)
--dbpath--logpath--bind_ip--replSet--keyFile--sslPEMKey--sslCAKey--sslMode--fork
-
Configuration File Options (https://docs.mongodb.com/manual/reference/configuration-options/)
- storage.dbPath
- systemLog.path and systemLog.destination
- net.bind_ip
- replication.replSetName
- security.keyFile
- net.ssl.sslPEMKey
- net.ssl.sslCAKey
- net.sslMode
- processManagement.fork
-
Configuration File은 YAML 파일로 작성되며 아래와 같다.
storage:
  dbPath: "/data/db"

systemLog:
  path: "/data/log/mongod.log"
  destination: "file"

replication:
# 주석을 달 수 있음
replSetName: "M103" - Command Line Options과 Configuration File Options을 비교해 보면, 반복 실행의 편의성 뿐만 아니라 가독성도 좋아진 것을 알 수 있다.
# Command Line Options
mongod --dbpath /data/db --logpath /data/log/mongod.log --fork --replSet "M103" --keyFile /data/keyfile --bind_ip "127.0.0.1,192.168.103.100" --tlsMode requireTLS --tlsCAFile "/etc/tls/TLSCA.pem" --tlsCertificateKeyFile "/etc/tls/tls.pem"

# Configuration File Options
storage:
  dbPath: "/data/db"
systemLog:
  path: "/data/log/mongod.log"
  destination: "file"
replication:
  replSetName: M103
net:
  bindIp : "127.0.0.1,192.168.103.100"
tls:
  mode: "requireTLS"
  certificateKeyFile: "/etc/tls/tls.pem"
  CAFile: "/etc/tls/TLSCA.pem"
security:
  keyFile: "/data/keyfile"
processManagement:
fork: true- Configuration File로 실행하는 방법 (
/etc/mongod.conf는 Linux에 설치시 기본으로 설정 파일이 생성되는 곳)
mongod --config "/etc/mongod.conf"

mongod -f "/etc/mongod.conf"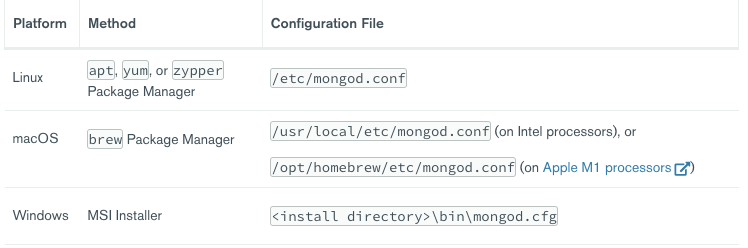
File Structure
- WiredTiger : WiredTiger 스토리지 엔진이 클러스터 메타데이터 및 WiredTiger 관련 구성 옵션 등을 지속적으로 체크
- WiredTiger.lock : MongoD 프로세스의 중복 실행을 방지
- collection-*.wt : Collection 관련 데이터 저장
- index-*.wt : Index 관련 데이터 저장
- 기본 collection, index가 존재하기 때문에 새롭게 설치 한 경우에도 collection, index 파일은 존재한다.
- diagnostic.data : MongoDB 서포트 엔지니어의 진단 목적으로만 사용
- journal : 장애가 발생했을 경우 생성 된 체크포인트를 기준으로 복구하기 위해 데이터를 저장
- WiredTiger는 100 ms 간격으로 journal commit을 생성 (1 - 500 ms 설정 가능)
- mongod.lock
- WiredTiger.lock과 비슷한 역할
- 파일이 비어 있지 않으면 해당 디렉터리에서 MongoD가 활성 상태임을 의미
- sizeStorer.wt, storage.bson : WiredTiger에 대한 추가 지원 및 메타데이터 파일
- /tmp/mongodb-27017.sock : MongoDB가 지정된 포트에서 소켓 연결을 생성하는데 사용하는 소켓 파일
Basic Commands
Basic Helper Groups
- db.() : DB 관련
- db..() : Collection 관련
- rs.() : ReplicaSet 관련
- sh.() : Sharding 관련
User Management
- db.createUser() : 사용자 생성
- db.dropUser() : 사용자 삭제
Collection Management
- db.renameCollection() : Collection 이름 변경
- db.collection.createIndex() : Index 생성
- db.collection.drop() : Index 삭제
Database Management
- db.dropDatabase() : DB 삭제
- db.createCollection() : Collection 생성
Database Status
- db.serverStatus() : 서버 상태 확인
Database Command vs Shell Helper
- 동일한 명령을 실행하더라도, Shell Helper를 이용하는 것이 더 간결하게 표현된다.
// Creating index with Database Command
db.runCommand({
   "createIndexes":"<collection_name>",
       "indexes":[
          {
             "key":{ "product": 1 },
             "name": "name_index"
          }
       ]
    }
 )

// Creating index with Shell Helper
db.<collection>.createIndex(
  { "product": 1 },
  { "name": "name_index" }
)
Logging Basics
Process Log
db.getLogComponents()를 실행하면 Log 설정을 확인할 수 있음- 아래와 같은 설정을 볼 수 있는데, 가장 상위의 verbosity가 존재하고 그 하위로 항목 별 verbosity가 존재한다.
- 각 항목 별 verbosity가 -1 인 경우에는 상위 설정을 상속 받아 사용한다.
- verbosity는 1 ~ 5 범위 내에서 설정 가능하며, 숫자가 높을수록 더 상세한 디버그 메시지를 출력한다.
- -1 : 상위 설정 상속
- 0 : 기본 값, 정보성 메시지를 포함
- 1 ~ 5 : 숫자를 높일수록 디버그 메시지가 상세해짐
"verbosity" : 0,
	"accessControl" : {
		"verbosity" : -1
	},
	"command" : {
		"verbosity" : -1
	},
	"control" : {
		"verbosity" : -1
	},
	"executor" : {
		"verbosity" : -1
	},
	"geo" : {
		"verbosity" : -1
	},
	"index" : {
		"verbosity" : -1
	},
	"network" : {
		"verbosity" : -1,
		"asio" : {
			"verbosity" : -1
		},
		"bridge" : {
			"verbosity" : -1
		},
		"connectionPool" : {
			"verbosity" : -1
		}
}-
Log Message Serverity Levels
- F - Fatal
- E - Error
- W - Warning
- I - Informational (Verbosity Level 0)
- D - Debug (Verbosity Level 1-5)
-
Log를 확인할 수 있는 방법
- Mongo shell 에서
db.adminCommand({ "getLog": "global" })실행 - Command line 에서
tail -f <log 저장 위치>실행
- Mongo shell 에서
Profiling the Database
Profiler가 수집하는 이벤트
- CRUD
- Administration operations
- Configuration operations
Profiling Level 종류
- 0 (기본 값) - 아무것도 수집하지 않음
- 1 - slowms(기본 값 : 100) 값으로 지정한 시간보다 오래 걸리는 operations
- 2 - 모든 operations
Profiling Level 확인 및 설정
- Profiling Level을 설정하면
system.profile이라는 collection이 생성된다.
db.getProfilingLevel()
db.setProfilingLevel(1)
Basic Security: Part1
- Authentication : 사용자의 신분을 검증하는 과정
- Authorization : 사용자의 권한을 검증하는 과정
Authentication Mechanisms
- Community and Enterprise
- SCRAM (Salted Challenge Response Authentication Mechanisms) : MongoDB의 기본 인증 메커니즘
- X.509 : X.509 인증서를 이용한 인증 메커니즘
- Enterprise Only
- LDAP
- KERBEROS : MIT에서 설계한 강력한 인증 메커니즘
Cluster Authentication Mechanisms

Authorization: Role Based Access Control
- 각 사용자는 1개 이상의 역할(Role)을 가지고 있음
- 각 역할은 1개 이상의 권한(Privilege)를 가지고 있음
- 이러한 권한은 작업(Actions) 그룹과 해당 작업이 적용되는 리소스(Resources)를 나타냄
Basic Security: Part2
- Mongod Configuration File의 아래 설정이 Authorization, Authentication을 모두 활성화 시킴
security:
  authorization: enabled
Localhost Exception
- security 설정을 해도 처음에는 사용자가 없기 때문에 적용이 안됨.
- 이때 Localhost Exception을 이용해서 첫번째 사용자를 생성해 줘야 됨
- MongoDB가 실행되는 서버에서 Mongo Shell을 실행
- 첫번째 사용자를 생성하면 자동으로 Localhost Exception이 닫히게 됨
- 반드시 첫번째 사용자는 최고 권한(administrative privileges)을 갖게 만들어야 됨
db.createUser(
  {
    user: "root",
    pwd: "root",
    roles: ["root"]
  }
)

// 권한 없이 접속했기 때문에 만들수 없음
db.createUser(
  {
    user: "modolee",
    pwd: "modolee123",
    roles: ["readWrite"]
  }
)
// uncaught exception: Error: couldn't add user: command createUser requires authentication- 생성한 root 사용자로 인증하여 접속하려면 아래와 같이 입력해야 됨
mongo --host 127.0.0.1:27017 \
--username root \
--password root \
--authenticationDatabase admin
Built-In Roles: Part1
Roles in MongoDB
- Custom Roles : 다루지 않음
- Built-in Roles : 기본 제공 역할
- Role Structure
- Privileges
- Action + Resource
- 역할(Role)은 권한(Privilege)의 집합으로 이뤄져 있으며, 권한은 리소스(Resource)에 대해 수행할 수 있는 작업(Action)을 정의한다.
Resources
- Database
- Collection
- Set of Collections
- Cluster
- Replica Set
- Shard Cluster
// 특정 database와 collecion을 지정
{ db: "products", collection: "inventory" }

// 모든 database와 collection을 지정
{ db: "", collection: "" }

// 모든 database와 특정 collection을 지정
{ db: "", collection: "accounts" }

// 특정 database와 모든 collection을 지정
{ db: "products", collection: "" }

// cluster를 지정
{ cluster: true }
Privilege
// cluster에서 shutdown을 허용
{ resource: { cluster: true }, actions: ["shutdown"] }
Network Authentication Restrictions
- clientSource
- serverAddress
Built-In Roles
- Database User
- read
- readWrite
- readAnyDatabase (All Database)
- readWriteAnyDatabase (All Database)
- Database Administration
- dbAdmin
- userAdmin
- dbOwner
- dbAdminAnyDatabase (All Database)
- userAdminAnyDatabase (All Database)
- Cluster Administration
- clusterAdmin
- clusterManager
- clusterMonitor
- hostManager
- Backup/Restore
- backup
- restore
- Super User
- root (All Database)
Built-In Roles: Part 2
- userAdmin 역할의 사용자 생성
- 시스템 데이터에 대해서는 아무것도 할수 없고, 오직 사용자 관련 권한만 가지는 역할
db.createUser(
  {
    user: 'security_officer',
    pwd: 'h3ll0th3r3',
    roles: [{ db: 'admin', role: 'userAdmin' }]
  }
)- dbAdmin 역할의 사용자 생성
- 사용자 관련 권한은 없으며, 오직 데이터 관련 권한만 가지는 역할
db.createUser(
  {
    user: 'dba',
    pwd: 'c1lynd3rs',
    roles: [{ db: 'm103', role: 'dbAdmin' }]
  }
)- 기존 사용자에게 특정 db의 dbOwner 역할을 추가
db.grantRolesToUser('dba', [{ db: 'playround', role: 'dbOwner' }])- 역할의 권한 조회
db.runCommand({rolesInfo: {role:'dbOwner', db:'playground'}, showPrivileges: true})Server Tools Overview
- mongostat : 통계 제공 유틸리티
-
실행 명령
mongostat --port 27000 --username root --authenticationDatabase=admin -
실행 결과
insert query update delete getmore command dirty used flushes vsize res qrw arw net_in net_out conn time *0 *0 *0 *0 0 0|0 0.0% 0.0% 0 6.58G 37.0M 0|0 1|0 111b 50.5k 3 Mar 22 20:37:33.603 *0 *0 *0 *0 0 1|0 0.0% 0.0% 1 6.58G 37.0M 0|0 1|0 112b 50.7k 3 Mar 22 20:37:34.601 *0 *0 *0 *0 0 0|0 0.0% 0.0% 0 6.58G 37.0M 0|0 1|0 111b 50.5k 3 Mar 22 20:37:35.602 *0 *0 *0 *0 0 1|0 0.0% 0.0% 0 6.58G 37.0M 0|0 1|0 112b 50.6k 3 Mar 22 20:37:36.602 -
기본 포트를 사용할 경우 접속이 안되지 반드시 다른 포트로 지정해서 사용할 것
could not connect to server: connection() error occured during connection handshake: auth error: unable to authenticate using mechanism "SCRAM-SHA-256": (AuthenticationFailed) Authentication failed.
-
- mongodump, mongorestore : BSON 파일 형태로 데이터를 내보내고 가져옴
- mongoexport, mongoimport : JSON, CSV 파일 형태로 데이터를 내보내고 가져옴

기초가 탄탄한 백엔드 개발자를 꿈꿉니다.