네트워크
여러 대의 컴퓨터를 통신 회선으로 연결한 것
서버와 클라이언트
서버 : 서비스를 제공
클라이언트 : 서비스를 받는 사람
IP주소
IP주소 : 컴퓨터가 가지고 있는 식별번호 (집주소)
InetAddress
ip 주소를 다루는 클래스
InetAddress의 주요 메서드
-
getAddress() - InetAddress 객체의 IP주소를 반환
-
getHostAddress() - IP주소를 반환
-
getHostName() - 호스트 이름을 문자열로 반환
포트(Port)
각 프로그램을 구별할 수 있는 번호 (방번호)
💡클라이언트의 서버연결 요청 시 ip주소와 포트번호를 알아야함
소켓 프로그래밍
소켓을 이용한 통신 프로그래밍
소켓
소켓 (수화기) : 통신에 사용하는 양 끝단
TCP
손상되지 않았는지 검사하는 작업으로 조금 느리나 안정성은 뛰어난 프로토콜
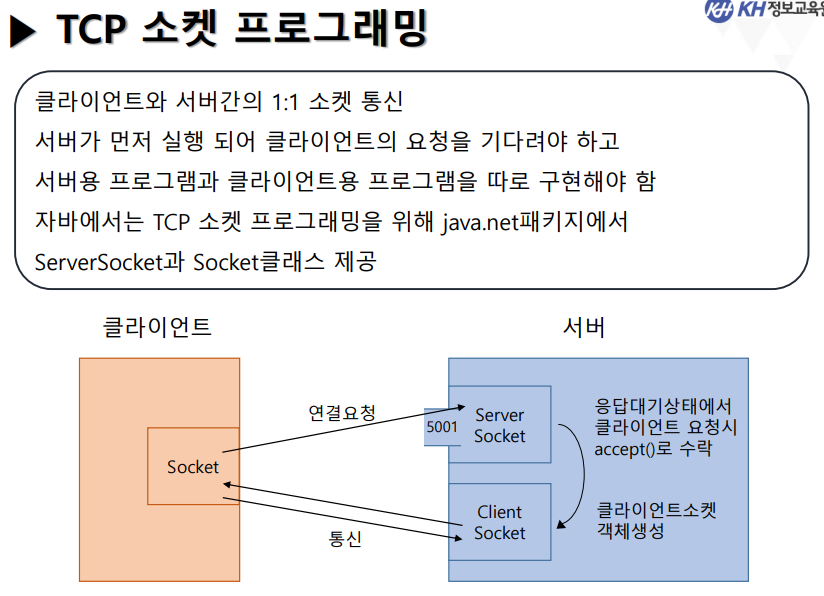
- ServerSocket : 클라이언트 요청이 들어왔는지 확인하는 역할
- (Client)Socket : 클라이언트와 통신하는 소켓
💡클래스명은 그냥 Socket
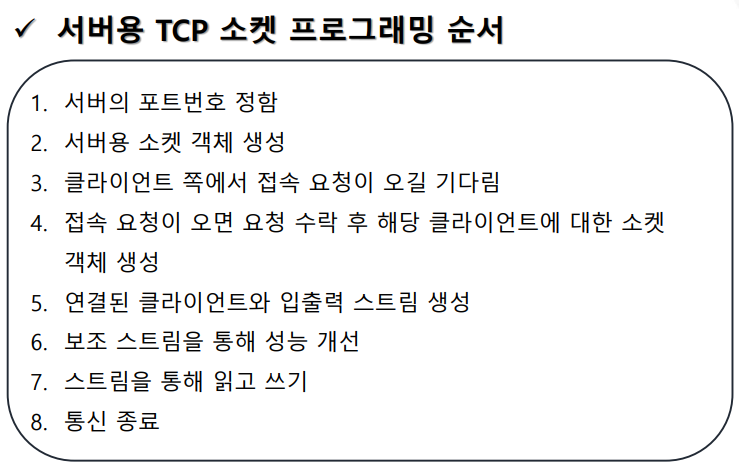
TCP 소켓 프로그래밍 순서
package com.kh.example.chap02_tcp.sendMsg.controller;
import java.io.BufferedReader;
import java.io.IOException;
import java.io.InputStream;
import java.io.InputStreamReader;
import java.io.OutputStream;
import java.io.PrintWriter;
import java.net.ServerSocket;
import java.net.Socket;
public class Server {
public void serverStart() {
//1. 서버의 포트번호 지정
int port = 10000;
//8. finally 이후 초기화
ServerSocket server = null;
Socket client = null;
InputStream input = null;
OutputStream output = null;
BufferedReader br = null;
PrintWriter pw = null;
try {
//2. 서버용 소켓 객체 생성(포트와 결합)
server = new ServerSocket(port);
//3. 클라이언트 쪽에서 접속 요청이 오길 기다림
System.out.println("클라이언트의 요청을 기다리고 있습니다...");
//4. 접속 요청이 오면 요청 수락(accept()) 후 클라이언트에 대한 소켓객체 생성
client = server.accept(); //client에 대한 소켓 요청 (clinet를 통해 통신할 목적)
String clientIP = client.getInetAddress().getHostAddress(); //ip주소가져옴
System.out.println(clientIP + "와(과) 연결됨...");
//5. 클라이언트와 입출력 스트림 생성(보조스트림 통해 성능 개선)
input = client.getInputStream();
output = client.getOutputStream();
//byte 기반이라 한글은 깨져서 char형식으로 변환 == InputStreamReader 보조스트림 사용
//보조스트림 BufferedReader로 감싸주면서 성능 향상
br = new BufferedReader(new InputStreamReader(input));
pw = new PrintWriter(output);
//6. 스트림을 통해 읽고 쓰기
// 클라이언트가 서버로 보낸 메세지 읽기
String message = br.readLine();
System.out.println("Client " + clientIP + "가 보낸 메시지 : " + message);
pw.println("만나서 반갑습니다.");
pw.flush(); //★flush를 해주지 않으면 메시지가 잘 전달되지 않음
} catch (IOException e) {
e.printStackTrace();
} finally {
//7. 통신 종료
try {
pw.close();
br.close();
output.close();
input.close();
server.close();
} catch (IOException e) {
e.printStackTrace();
}
}
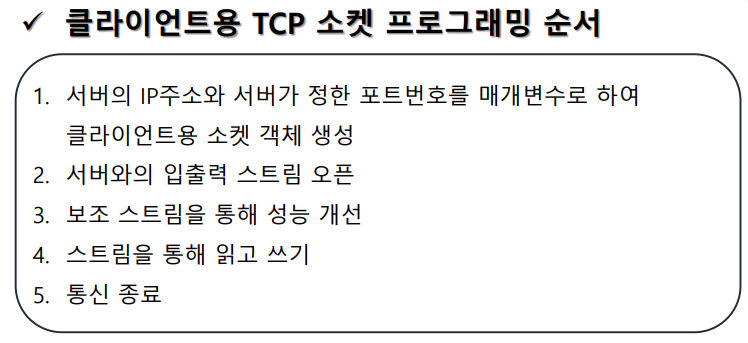
}클라이언트용 tcp 소켓 프로그래밍 순서
package com.kh.example.chap02_tcp.sendMsg.controller;

import java.io.BufferedReader;
import java.io.IOException;
import java.io.InputStream;
import java.io.InputStreamReader;
import java.io.OutputStream;
import java.io.PrintWriter;
import java.net.InetAddress;
import java.net.Socket;
import java.net.UnknownHostException;

public class Client {
		BufferedReader br = null;
		PrintWriter pw = null;
		Socket socket = null;

	public void ClientStart() {
		try {
			//1. 서버의 IP주소와 포트번호를 매개변수로 하여 클라이언트용 소켓 객체 생성
			int port = 10000;
			//원래 서버용 ip주소와 client ip주소는 다른데,
			//지금은 실습으로 내컴퓨터에서 핑퐁하고 있기 때문에 같은거임!!!
			String serverIP = InetAddress.getLocalHost().getHostAddress();
			socket = new Socket(serverIP,port);

			if(socket != null) {// 연결 안되면 null값이 뜨기 때문
			//2. 서버와 입출력 스트림 생성(보조스트림을 통해 성능)

				InputStream in = socket.getInputStream();
				OutputStream out = socket.getOutputStream();
				br = new BufferedReader(new InputStreamReader(in));
				pw = new PrintWriter(out);

		//3. 스트림을 통해 읽고쓰기
		// 클라이언트가 서버한테 메시지 전송
		pw.println("반갑습니다");
		pw.flush();

		System.out.println(br.readLine());//반환값 프린트
		//4. 통신종료
		}
			} catch (UnknownHostException e) {
			e.printStackTrace();
		} catch (IOException e) {
			e.printStackTrace();
		} finally {//br, pw가 각각 in과 out을 가지고 있기때문에 걔네만 닫아주면됨
			try {
				br.close();
				pw.close();
				socket.close();
			} catch (Exception e) {
				e.printStackTrace();
			}
		}
	}
}
나의 코딩 다이어리🖥️👾✨