OS 는 Dual-Mode-Operation으로 불리는 Kernel mode 와 User mode 를 지원한다.
user application 이 실행되는 영역(User mode) 과 kernel 이 실행되는 영역(Kernel mode)을 나누고 privilege 차등을 두어 안전성을 보안을 유지한다.
이번 포스팅에서 Dual-Mode-Operation에 대해 알아보려 한다. 특히 PintOS project2의 코드를 통해, 추상적으로 설명되던 Kernel mode 와 User mode 사이 전환(transition) 과정을 자세히 살펴보자.
-
참고사항
1. KAIST PintOS Project2베이스로 작성된 글입니다. 하지만 Project 2 정답코드에 대한 설명은 포함 되어있지 않습니다.
2. PintOS 프로젝트를 수행하지 않아도, PintOS 내용을 제외하고는 이해할 수 있는 글을 작성하는게 목표입니다.
3. PintOS 내용 부분은 직접 함수를 따라가면서 알게된 내용을 정리했습니다. 틀린부분이 있다면 댓글로 알려주시기 바랍니다. -
목차
1. Protection ring
2. System Call
3. PintOS system call(transition between kernel and user mode)
4. Appendix : interrupt handler vs fast system call
1. Protection ring
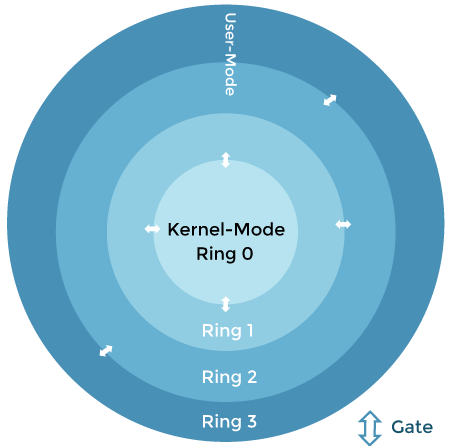
보호 링(protection rings)은 결함 (결함 내성) 및 악성 행동 (컴퓨터 보안)으로부터 데이터와 기능을 보호하는 매커니즘이다 -위키백과(보호링)
<이미지출처>
위 그림을 보면 권한(privileaged)에 따라 layer를 나눈것을 확인 할 수 있다. Ring 3에 위치한 Application(User mode)는 Ring 0에 위치한 Kernel(Kernel mode) 보다 적은 권한을 갖고있다.(참고로 Ring 1, 2는 option 이고 Ring 0, 3은 모든 OS가 갖고있다)
예를들어 CPU자원 혹은 메모리를 사용하는 것은 Ring0의 privileged를 갖고있어야 하기 때문에 User mode 에서는 CPU 자원 및 메모리를 사용하지 못한다.
privileaged 에 따라 접근을 제한 한 이유는 뭘까? 간단한 예를 들어보자 현재 2개의 process가 실행되고 있고, Kernel mode로 전환하지 않고 RAM에 직접 접근 할 수 있다고 가정해보자.

위 그림 처럼 Application 2개가 실행되어 RAM에 맵핑되어있다.(Virtual memory로 lazy 하게 맵핑되는 경우는 지금 생각하지 않기로 한다.)
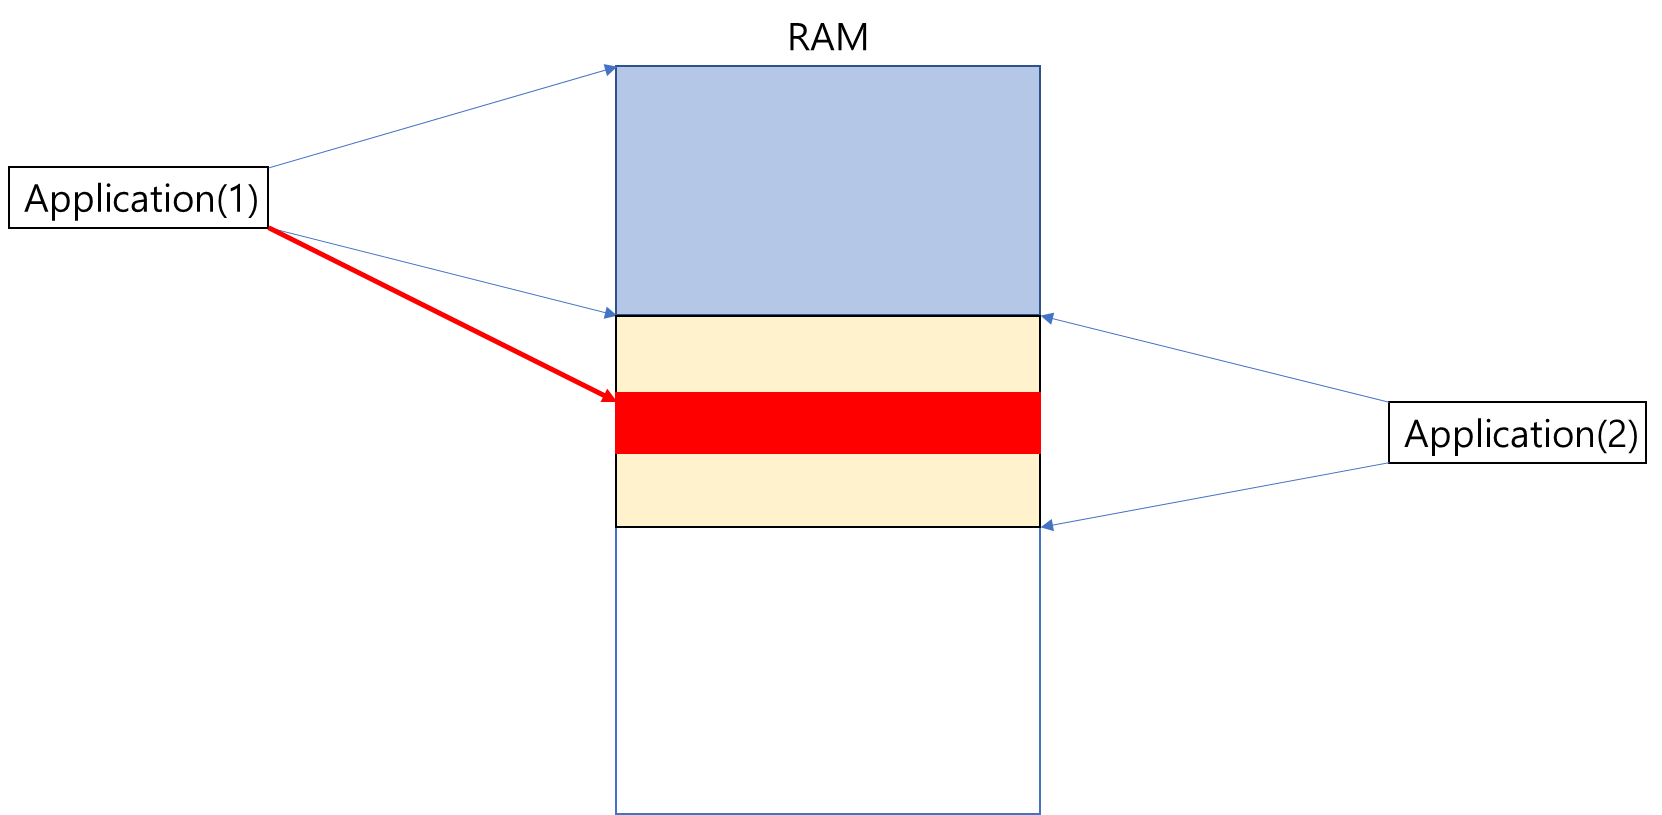
Application(1)이 메모리를 더 할당 하기 위해 Applicatoin(2)가 맵핑되어있는 주소값에 자신의 메모리를 맵핑시킨다. 이렇게 되면 Application(1)과 Application(2)가 충돌을 일으킬 수 있다.
이러한 경우(실제로는 여러 문제점 중 하나)를 방지하기 위해 User mode는 메모리 및 CPU자원을 사용하려면 Kernel에 요청하고, Kernel mode에서 요청이 유효한지 확인후 적절한 Policy에 따라 자원을 할당한다.
그렇다면 User가 Kernel 에게 자원을 요청할 수 있도록, Kernel은 Userd에게 Interface를 제공해야한다.
Kernel이 User에게 제공하는 API를 System Call 이라고 한다.
2. System Call
Application의 요청에 따라 kernel 로 접근하기 위해 Kernel이 제공하는 API
Application은 원하는 커널 서비스에 따라 System Call을 요청한다. 간단히 Application이 printf() 호출해 System Call을 요청하는 과정을 살펴보자.
-
printf()는 system call중 하나인 write()을 호출한다.
int main(){

	printf("System Call Example")
   return -1;

     }
-
Application 이 printf()를 호출한다.
-
printf()는 write() System Call을 호출한다.
-
System Call 을 호출하면, Interrupt 가 발생하고 Syscall handler(kerel mode) 를 호출한다.
- 참고로 System call도 일종의 interrupt이기 때문에 interrupt handler를 호출한다. 그러나 PintOS는 msr 레지스터를 사용해 interrupt handler를 거치지 않고 직접 Syscall handler를 호출한다.(Fast System Call)
-
handler는 syscall number(write()은 10번)를 확인하여 해당 함수 를 호출한다.
-
kernel mode에서 결과를 반환하고, 다시 User mode로 돌아간다.
위와 같은 과정을 거쳐서 system Call은 실행된다. 하지만 여기서 3 ~ 5에서 의문점이 생길거라고 생각한다.
- Kernel mode로 진입한다는게 어떤 의미인지
- 어떻게 transition 이 일어날때 Application 에 context를 저장하는지
- System Call 결과를 어떻게 User mode에 반환하는지
결과적으로 또 interrupt frame을 사용한다! 이제 PintOS 코드를 살펴보며 좀 더 자세히 살펴보자.
3. PintOS system call(transition between kernel and user mode)
다시 printf()를 호출하는 예시를 한 단계씩 자세히 살펴보자
1) Application이 printf()를 호출 한다
int main(){

	printf("System Call Example")
   return -1;

     }
2) printf()가 write() System Call을 호출한다.
	int write (int fd, const void *buffer, unsigned size) {
		return syscall3 (SYS_WRITE, fd, buffer, size);
}#define syscall3(NUMBER, ARG0, ARG1, ARG2) ( \
syscall(((uint64_t) NUMBER), \
((uint64_t) ARG0), \
((uint64_t) ARG1), \
((uint64_t) ARG2), 0, 0, 0))__attribute__((always_inline))
static __inline int64_t syscall (uint64_t num_, uint64_t a1_, uint64_t a2_,
uint64_t a3_, uint64_t a4_, uint64_t a5_, uint64_t a6_) {
int64_t ret;
register uint64_t *num asm ("rax") = (uint64_t *) num_;
register uint64_t *a1 asm ("rdi") = (uint64_t *) a1_;
register uint64_t *a2 asm ("rsi") = (uint64_t *) a2_;
register uint64_t *a3 asm ("rdx") = (uint64_t *) a3_;
register uint64_t *a4 asm ("r10") = (uint64_t *) a4_;
register uint64_t *a5 asm ("r8") = (uint64_t *) a5_;
register uint64_t *a6 asm ("r9") = (uint64_t *) a6_;
__asm __volatile(
			"mov %1, %%rax\n" //인자들(num,a1_,a2_ 등등)을 registr에 저장
			"mov %2, %%rdi\n"
			"mov %3, %%rsi\n"
			"mov %4, %%rdx\n"
			"mov %5, %%r10\n"
			"mov %6, %%r8\n"
			"mov %7, %%r9\n"
			"syscall\n"
			: "=a" (ret)  // syscall이 끝난 후 %rax값을 ret에 저장
			: "g" (num), "g" (a1), "g" (a2), "g" (a3), "g" (a4), "g" (a5), "g" (a6)
			: "cc", "memory");
	return ret;
}-
lib/user 에 존재하는 syscall.c 의 write()을 호출된다.
-
write은 다시 syscall3를 호출한다.(syscall3는 syscall number를 제외한 인자가 3개인 syscall의 macro 이다)
-
syscall에서 인자들을 각 레지스터에 저장하고 syscall entry가 호출된다.
여기서 기억할 점은 syscall 함수 어셈블리어 부분에서, 인자를 저장하는 레지스터와 system call이후 반환값으로 사용될 ret(%rax)이다.
좀더 자세히 살펴보면
"mov %1, %%rax\n" //인자들(num,a1_,a2_ 등등)을 registr에 저장
"mov %2, %%rdi\n"
"mov %3, %%rsi\n"
"mov %4, %%rdx\n"
"mov %5, %%r10\n"
"mov %6, %%r8\n"
"mov %7, %%r9\n"
"syscall\n"
: "=a" (ret) // syscall이 끝난 후 %rax값을 ret에 저장
: "g" (num), "g" (a1), "g" (a2), "g" (a3), "g" (a4), "g" (a5), "g" (a6)
: "cc", "memory");
return ret; - mov 로 인자들을 register에 저장한다.
- "=a" (ret) 은 %rax 값을 ret에 저장한다는 의미이다.
syscall의 return 값은 ret이기 때문에, application write()이 반환하는값은 %rax값을 의미함을 알수 있다.
3) System Call 을 호출하면, Syscall handler 를 호출한다.
syscall 이 호출되면 미리 등록되어있던 msr레지스터에 등록되어있던 syscall_entry(userprog/syscall_entry.S) 어셈블리어가 호출된다.
- msr 레지스터에 등록하는 과정은 Appendix에서 설명 하겠다.
너무 많은 어셈블리어에 겁먹을 필요없다. 먼저 syscall_entry: 부분을 다시 봐보자
syscall_entry:
	movq %rbx, temp1(%rip)
	movq %r12, temp2(%rip)     /* callee saved registers */
	movq %rsp, %rbx            /* Store userland rsp    */
	movabs $tss, %r12
	movq (%r12), %r12
	movq 4(%r12), %rsp         /* Read ring0 rsp from the tss */
	/* Now we are in the kernel stack */
	push $(SEL_UDSEG)      /* if->ss */
	push %rbx              /* if->rsp */
	push %r11              /* if->eflags */
	push $(SEL_UCSEG)      /* if->cs */
	push %rcx              /* if->rip */
	subq $16, %rsp         /* skip error_code, vec_no */
	push $(SEL_UDSEG)      /* if->ds */
	push $(SEL_UDSEG)      /* if->es */
	push %rax
	movq temp1(%rip), %rbx
	push %rbx
	pushq $0
	push %rdx
	push %rbp
	push %rdi
	push %rsi
	push %r8
	push %r9
	push %r10
	pushq $0 /* skip r11 */
	movq temp2(%rip), %r12
	push %r12
	push %r13
	push %r14
	push %r15
	movq %rsp, %rdi
Read ring0 rsp from tss 라는 주석에 주목해 보자
ring0 는 앞서 protection ring에서 설명했듯이, kernel 영역을 의미한다. 즉 주석은 커널영역에 rsp 즉 커널영역에 stack pointer를 rsp레지스터에 저장한다는 의미이다.
그럼 여기서 tss 값은 kernel stack pointer여야 할것이다. tss 값이 kernel stack pointer 값이 맞는지 확인해보자.
void
tss_init (void) {
	/* Our TSS is never used in a call gate or task gate, so only a
	 * few fields of it are ever referenced, and those are the only
	 * ones we initialize. */
	tss = palloc_get_page (PAL_ASSERT | PAL_ZERO);
	tss_update (thread_current ());
}

/* Sets the ring 0 stack pointer in the TSS to point to the end
 * of the thread stack. */
void
tss_update (struct thread *next) {
	ASSERT (tss != NULL);
	tss->rsp0 = (uint64_t) next + PGSIZE;
}
여기서 tss_init은 thread/init.c 의 main함수에서 호출된다. 즉 pintos 실행시 호출된다는 의미이다.
tss_init이 호출하는 tss_update를 살펴보자,
tss->rsp0의 저장되는 값은 thread 구조체의 주소값 + (PAGE SIZE) 이다. 처음에 kernel stack이 1 PAGE SIZE로 할당되고, kernel stack 가장 낮은 주소의 thread 구조체가 저장되었음을 기억하자.
즉 thread 구조체 주소값 + PAGE SIZE 는 kernel stack 에서 가장 높은주소, kernel stack 이 init되었을때 stack pointer 임을 알 수 있다!
다시 돌아와서 어셈블리를 계속 읽어보자, 어셈블리어는 push 명령을 통해 현재 CPU register 즉 context 를 stack에 저장한다. 그후 마지막에
mov %rsp, %rdi
을 통해 저장된 값을 %rdi에 저장한다. %rdi는 그다음 명령어를 보면 그의미를 알수 있다.
no_sti:
	movabs $syscall_handler, %r12
	call *%r12
	popq %r15
	popq %r14
	popq %r13
	popq %r12
	popq %r11
	popq %r10
	popq %r9
	popq %r8
	popq %rsi
	popq %rdi
	popq %rbp
	popq %rdx
	popq %rcx
	popq %rbx
	popq %rax
	addq $32, %rsp
	popq %rcx              /* if->rip */
	addq $8, %rsp
	popq %r11              /* if->eflags */
	popq %rsp              /* if->rsp */
	sysretq
바로 syscall_handler를 호출하고 있다. 즉 %rdi는 syscall_handler의 첫번째 인자로 사용될 것이다. syscall을 호출할때까지의 context가 syscall_handler의 첫번째 인자로 넘어가고 있다
다시 정리해보자.
- 현재 context 가 syscall_hadler 인자로 넘아가고 있고
- rsp 는 kernel stack pointer 를 가리키고 있다.
rsp 가 kernel stack pointer로 넘어갔다는 것은 이제 cpu는 kernel space를 바라볼 것이다.
즉 드디어 kernel mode에 진입했음을 알 수 있다!
4) handler는 syscall number(write()은 10번)를 확인하여 해당 함수 를 호출한다.
userprog/syscall에 위치한 syscall_handler 이다.
void syscall_handler(struct intr_frame *f)
{
	// TODO: Your implementation goes here.
}
현재 비어있지만 이곳에 구현해야할 것은 이제 자명하다. 잘기억이 나지 않다면 다시한번 과정을 살펴보고 오자.
- 인자로 넘어온 interrupt frame에서 syscall number와 argument를 꺼내온다.
- syscall number에 따라 알맞는 함수를 호출한다.
- interrupt frame 의 rax값에 return 해줄 값을 저장한다.
syscall_handler가 return 되면, 위에 no_sti: 어셈블리어에 명령에 따라 sysretq가 실행되고
User mode로 다시 돌아갈 것이다.
정답 코드는 따로 쓰지 않겠지만, 이해에 도움이 되었기를 바란다.
4. Appendix : interrupt handler vs fast system call
PintOS 에서는 interrupt 가 발생하면 interrupt_stub_S 어셈블리가 실행되어 intterupt handler가 호출된다.
그리고 interrupt_handler 에서 vec_no를 확인해 각 interrupt가 발생한 원인에 따라 동작한다.
(timer_intterrupt/Page_fualt/keyboard interrupt 등)
그렇다면 sw interrupt의 일종인 system call 또한 interrupt handler의 등록되어있어야 하는거 아닐까?
이전에는 system call 또한 intterrupt hadler를 통해 호출되었다. 그러나 x86-64 이후 msr 레지스터를 통해 syscall이 호출되면 syscall_enrty가 호출될수 있게 에약을 할 수 있게 되었다.
덕분에 interrupt hadnler를 호출하는 번거롭고 느린 과정대신, 하드웨어를 이용해 빠르게 system call을 호출 할 수 있게 되었고. 이를 fast syste call 이라고 한다.
이렇게 msr에 syscall_entry를 등록하는 과정은 userprog/syscall.c 에서 확인 할 수 있다.
#define MSR_STAR 0xc0000081			/* Segment selector msr */
#define MSR_LSTAR 0xc0000082		/* Long mode SYSCALL target */
#define MSR_SYSCALL_MASK 0xc0000084 /* Mask for the eflags */

struct lock filesys_lock;

syscall_init(void)
{
	lock_init(&filesys_lock);
	write_msr(MSR_STAR, ((uint64_t)SEL_UCSEG - 0x10) << 48 |
							((uint64_t)SEL_KCSEG) << 32);
	write_msr(MSR_LSTAR, (uint64_t)syscall_entry);

	/* The interrupt service rountine should not serve any interrupts
	 * until the syscall_entry swaps the userland stack to the kernel
	 * mode stack. Therefore, we masked the FLAG_FL. */
	write_msr(MSR_SYSCALL_MASK,
			  FLAG_IF | FLAG_TF | FLAG_DF | FLAG_IOPL | FLAG_AC | FLAG_NT);
}- 참고로 syscall_init은 init.c의 main()함수에서 호출된다.
