
📖서론
이번에는 Next.js를 설치하고 tailwind와 emotion의 방식을 섞은 twin.macro라는 새로운 라이브러리를 적용할 것이다.🙇♂️
참고로 Next.js는 설치 설정을 어떻게 하냐에 따라 twin.macro를 적용하는 방식이 약간씩 다르기 때문에 적용방식은 따로 또 적어보도록 하겠다.
Next.js 설치하기
‼️일단 저번 Vite 설치방식에서 말했다시피 될 수 있으면 node 버전은 18이상을 권장한다.‼️
아래 사진과 같이 npx create-next-app@latest --ts(typescript 적용 안할 땐 --ts는 없애도 좋다.)를 입력하고 설정을 해주면 된다.
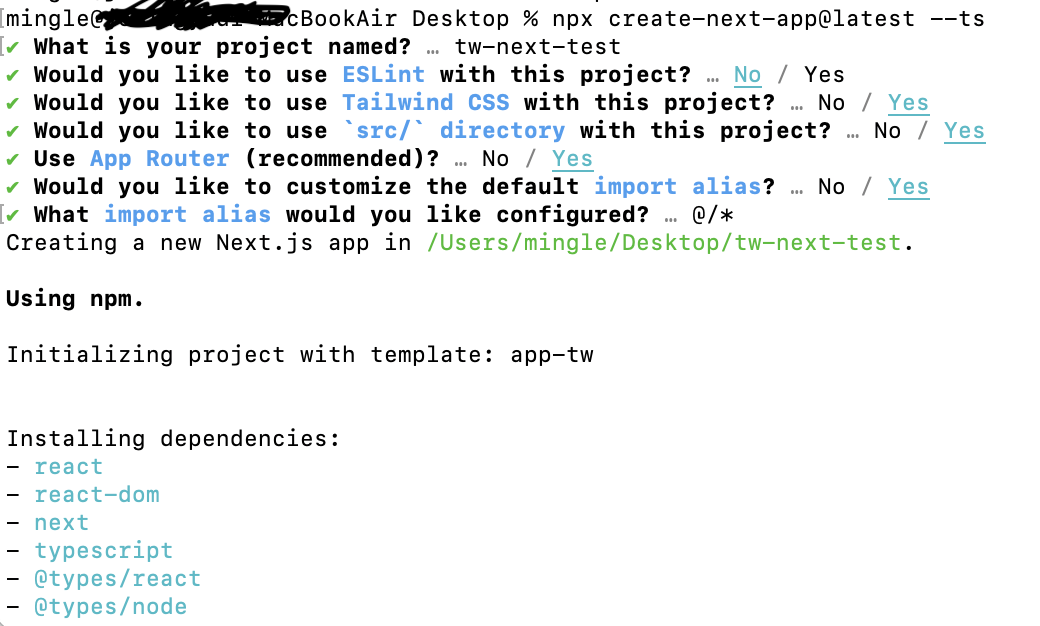
설정여부는 ESLint, Tailwind CSS, src/ 디렉토리 여부가 있는데 사진에서는 ESLint를 No로 하였지만 실제에서는 3개 다 Yes를 해주었다. TailwindCSS를 쓰기 싫은 경우에는 No로 지정해주면 된다.
❗️하지만 twin.macro를 쓸 거라면 무조건 Yes를 해서 번거로움을 줄이자❗️ src 디렉토리도 자유지만 웬만하면 하는 걸 추천한다. 나중에 폴더가 많아지면 전체 폴더에서 보여지는 게 더러울 수 있기 때문이다.
App Router (recommended) ? 이게 Yes냐 No냐에 따라 구조가 약간 달라진다. App Router는 설정하면서 많이 낯설었는데 공식문서에 따르면 다음과 같은 특징을 가지고 있다고 한다.
참고문헌 : https://engineering.udacity.com/what-is-next-js-app-router-is-it-ready-for-the-main-stage-bed07ef9519f
Next.js는 항상 파일 시스템의 강력함을 활용하여 고유한 라우팅 처리 방식을 가지고 왔습니다.
App Router는 이전의 Page Router 구현을 개선하여 다음과 같은 새로운 기능을 포함합니다:
- 여러 페이지에서 공유할 수 있는 레이아웃(Layouts).
- URL에 영향을 주지 않고 라우트를 조직화할 수 있는 Route Groups.
- 의미 있는 로딩 상태를 생성하는 데 도움이 되는 로딩 UI.
- 컨텍스트에 따라 다양한 방식으로 라우트를 로드할 수 있는 Intercepting Routes.
이 외에도 포함된 많은 기능이 더 있으며, 더 자세한 내용은 공식 문서를 확인하는 것을 추천합니다.
이거는 프로젝트 사람들끼리 의논해서 어떻게 할 지 결정하면 될 것이다.
마지막으로, import alias 파트는 Yes를 하길 추천한다. No를 해도 상관은 없지만 ../../파일이름 이런식으로 약간 지저분한거를 간단하게 적용할 수 있다. @/*를 기본으로 설정해두면 무난하게 할 수 있을 것이다.
설치가 완료되면 해당 폴더에 들어간 뒤 npm run dev를 하면 된다.
yarn으로 설치를 할 시에는
yarn create-next-app으로 해주면 되고
yarn dev로 시행을 해주면 된다.
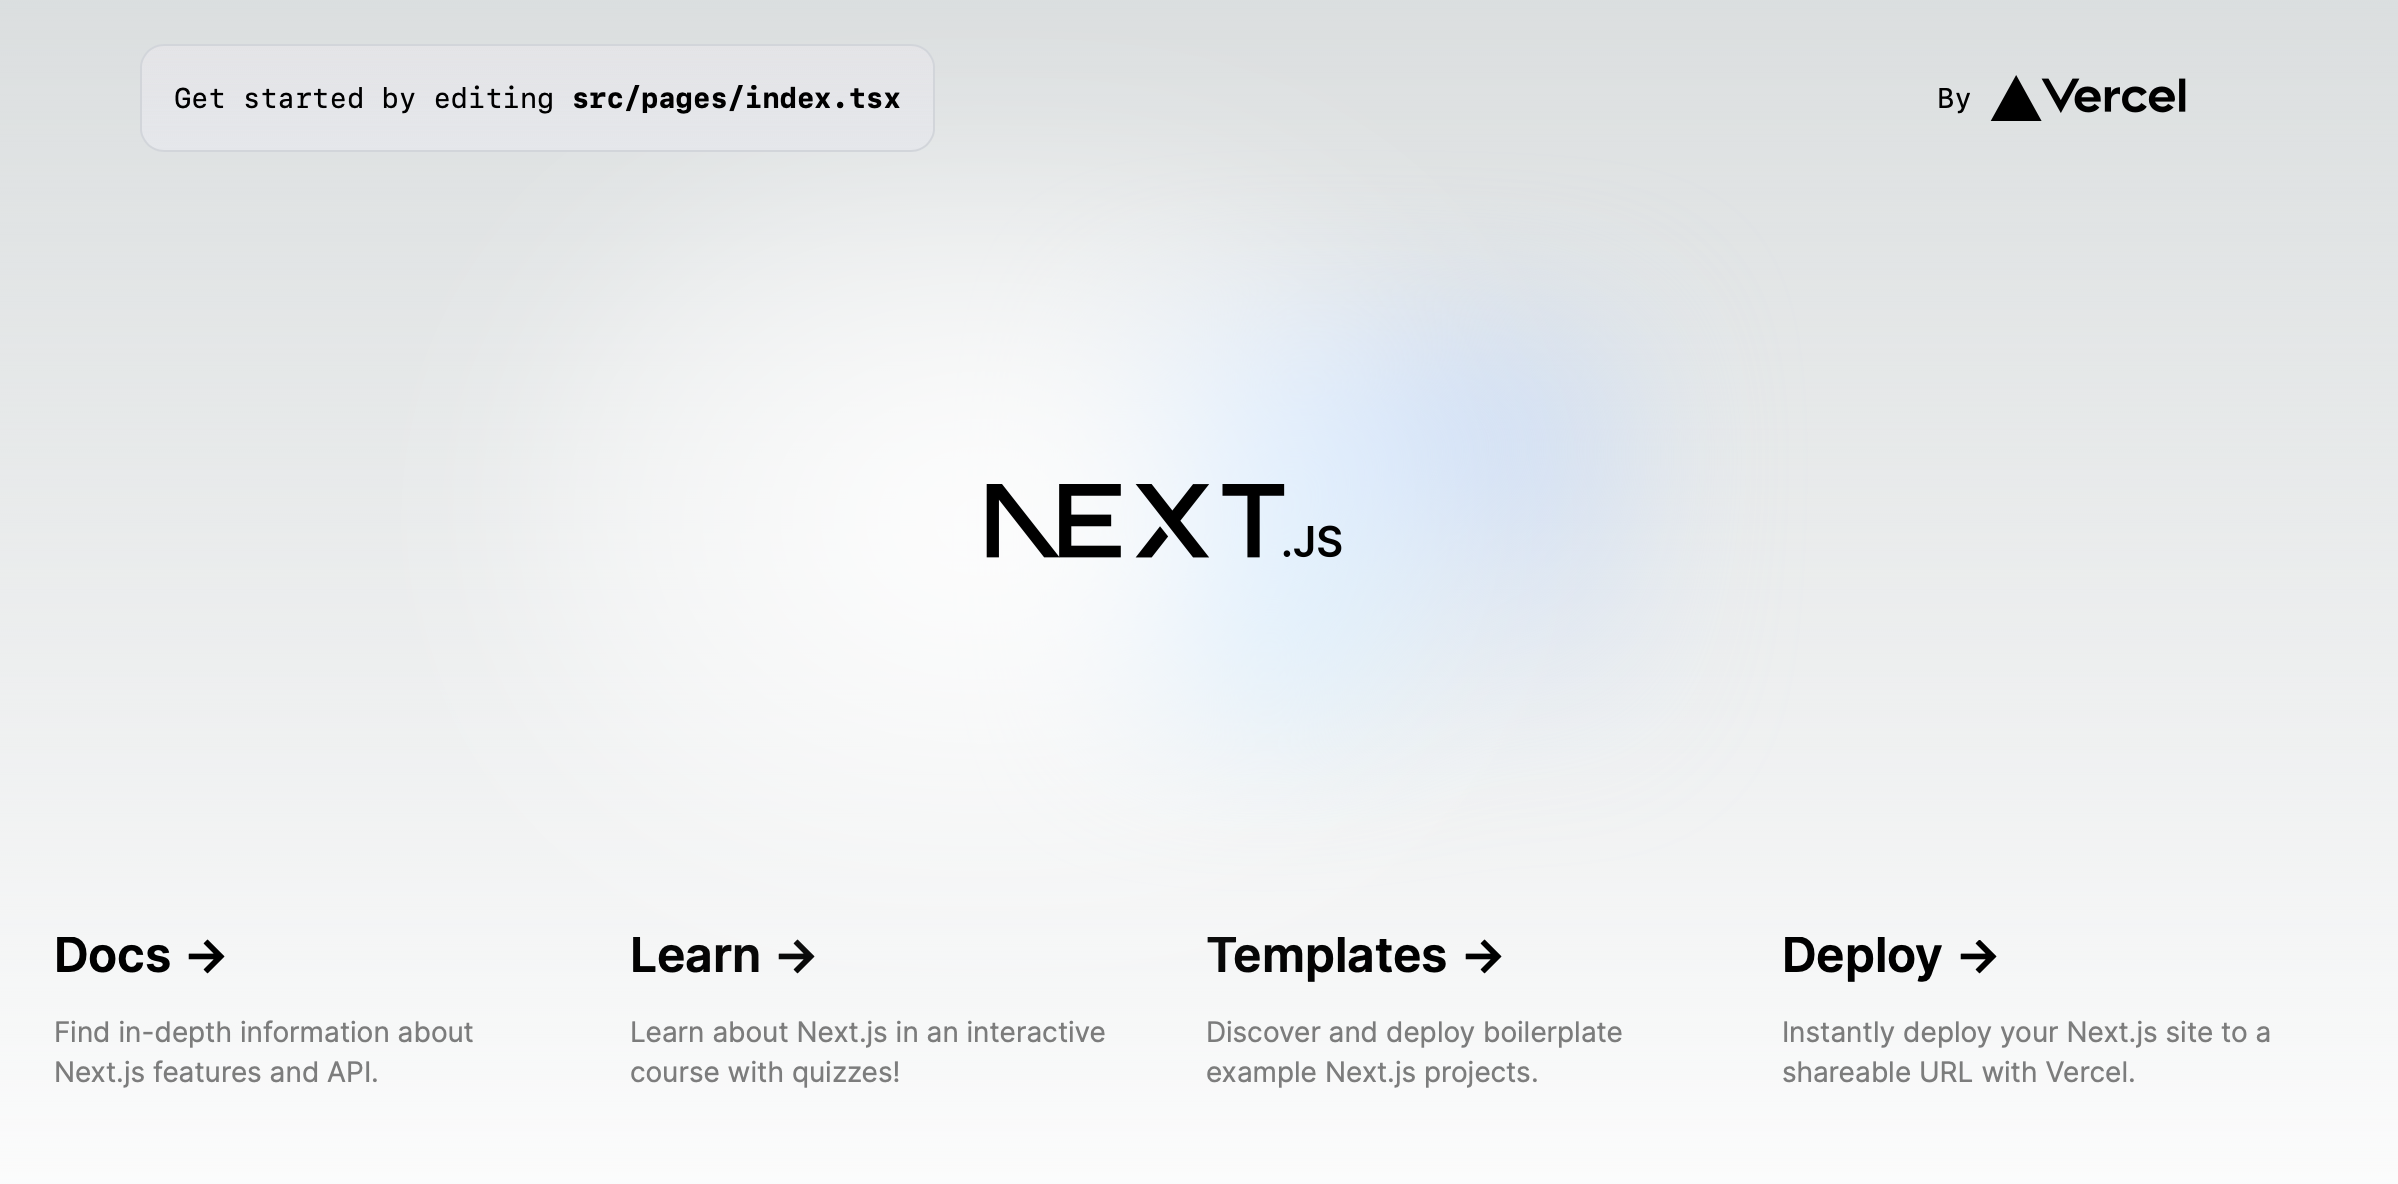
실행했을 때 다음과 같은 메인페이지가 뜨면 성공이다.
Twin.macro
이번에 새롭게 도입할 twin.macro는 Tailwind의 장점과 css-in-js의 유연성을 함께 느낄 수 있다고 공식문서에 나와있다. 무슨 소리인가 하면 tailwind에도 props에 따라 스타일을 다르게 주는 것이 가능하고 styled components처럼 다음과 같이 설정하는 것도 가능하다.
import tw, { styled } from 'twin.macro'

const StyledInput = styled.input(({ hasBorder }) => [
  `color: black;`,
  hasBorder && tw`border-purple-500`,
])
const Input = () => <StyledInput hasBorder />
그러면 이걸 어떻게 초기설정을 하면 되냐 다음과 같이 설정해주면 된다. 참고한 사이트는 나중에 참고문헌으로 남길 것이다.
1. 설치 항목 및 설정
npm i @emotion/react @emotion/styled
npm i -S @emotion/serialize
npm i -D twin.macro babel-loader @emotion/babel-plugin babel-plugin-macros @babel/plugin-syntax-typescript @babel/preset-react
yarn일 경우에는 yarn add로 저 위를 다 설치해주면 된다.😅
2. 최상단에 withTwin.js를 만들어주고 다음과 같이 작성해준다.
/* eslint-disable no-param-reassign */
const path = require('path');

const includedDirs = [path.resolve(__dirname, 'src')];

module.exports = function withTwin(nextConfig) {
  return {
    ...nextConfig,
    webpack(config, options) {
      const { dev, isServer } = options;
      config.module = config.module || {};
      config.module.rules = config.module.rules || [];
      config.module.rules.push({
        test: /\.(tsx|ts)$/,
        include: includedDirs,
        use: [
          options.defaultLoaders.babel,
          {
            loader: 'babel-loader',
            options: {
              sourceMaps: dev,
              presets: [
                [
                  '@babel/preset-react',
                  { runtime: 'automatic', importSource: '@emotion/react' },
                ],
              ],
              plugins: [
                require.resolve('babel-plugin-macros'),
                require.resolve('@emotion/babel-plugin'),
                [
                  require.resolve('@babel/plugin-syntax-typescript'),
                  { isTSX: true },
                ],
              ],
            },
          },
        ],
      });

      if (!isServer) {
        config.resolve.fallback = {
          ...(config.resolve.fallback || {}),
          fs: false,
          module: false,
          path: false,
          os: false,
          crypto: false,
        };
      }

      if (typeof nextConfig.webpack === 'function') {
        return nextConfig.webpack(config, options);
      }
      return config;
    },
  };
};
3. src파일에 types를 만들어주고 twin.d.ts 파일을 다음과 같이 작성한다.
import 'twin.macro';
import { css as cssImport } from '@emotion/react';
import styledImport from '@emotion/styled';
import CSSInterpolation from '@emotion/serialize';

declare module 'twin.macro' {
  const styled: typeof styledImport;
  const css: typeof cssImport;
}

declare module 'react' {
  interface DOMAttributes<T> {
    tw?: string;
    css?: CSSInterpolation;
  }
}
4. tsconfig.json 및 next.config.js설정
//tsconfig.json
 "types": ["types"] // add
//next.config.js
const withTwin = require('./withTwin');
/** @type {import('next').NextConfig} */
const nextConfig = withTwin({
reactStrictMode: true,
swcMinify: true,
});
module.exports = nextConfig;5. 적용시켜보기 (Pages Router version)
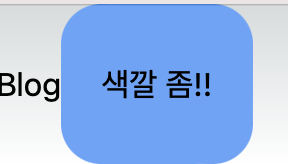
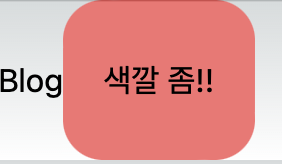
1️⃣ pages 폴더 안에 원하는 이름의 폴더를 만들고 index.tsx를 생성한 뒤 만들고 싶은 style을 넣는다.
//예시
import tw, { css, styled } from "twin.macro";

const ChangeButton = styled.button(
  ({ hasTrue }: { hasTrue: boolean }) => [
    tw`w-24 h-20`,
    css`
      border-radius: 20px;
    `,
    hasTrue ? tw`bg-red-400` : tw`bg-blue-400`,
  ]
);
2️⃣ index.tsx에 해당 스타일을 가져다 쓴다.
const Blog = () => {
const [color, setColor] = useState(false);
return (
<div>
Blog
<ChangeButton
hasTrue={color}
onClick={() => {
setDark(!color);
}}
>
색깔 좀!!
</ChangeButton>
</div>
);
};
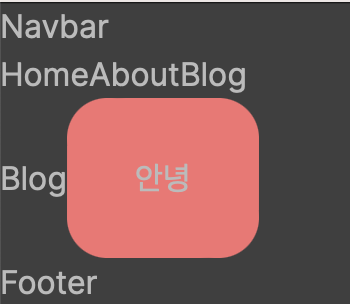
export default Blog;3️⃣ [http://localhost:3000/폴더이름] 으로 이동한다. 그러면 다음과 같은 그림이 나오게 된다.
6. 적용시켜보기 (App Router version)
방법은 다 똑같은데 다음과 같은 차이점을 가진다.
1️⃣ app 폴더 안에 원하는 이름의 폴더를 만들고 page.tsx를 생성한 뒤 만들고 싶은 style을 넣는다.
2️⃣ page.tsx에 해당 스타일을 가져다 쓴다. 단, 맨 윗줄에 무조건 "use client";를 추가해줘야 한다!
⭐️또한 useState가 안된다면 React를 import한뒤 React.useState를 해보자
3️⃣ 그리고 layout.tsx파일에서 해당 부분을 주석처리를 해준다. 여기도 마찬가지로 "use client"를 추가해준다.
//주석 처리 할 부분
// export const metadata = {
// title: "Create Next App",
// description: "Generated by create next app",
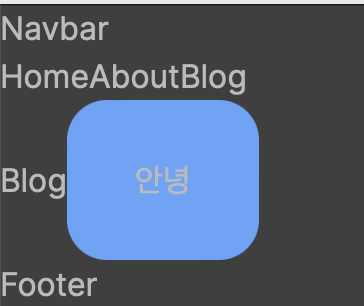
// };4️⃣ 이동하는 방식은 똑같다. 아래 사진은 좀 다르기 때문에 다음과 같이 나타나면 성공이다.
🚨만약 실행이 안된다면🚨
npm install -D babel-loader @babel/core @babel/preset-env webpack를 하고 다시 시행해보자!
yarn은 yarn add로 저 위를 다시 install해주면 된다!
그리고 next.config.js에 swcMinify: true 부분을 없애면 된다.
이번에는 Next.js를 설치하였고 twin.macro를 설정하고 설치한 방식에 따라 적용하는 방식을 보여주었다. 처음에 했을 때는 오류도 많이 나고 해서 눈물났지만 🥲 막상 되는 모습을 보니깐 뿌듯하다. 😆 다음에는 기초적인 부분을 다룰 예정이다.
📚 twin.macro 참고문헌
https://github.com/MyeonghoonNam/eslint-prettier-setting-practice/tree/main/next-typescript-twinmacro
https://github.com/ben-rogerson/twin.macro