최근에 포스팅을 잘 못했다🥲 그렇지만 다시 열심히 작성을 해보고자 한다. 이번 5부에서는 프로토타입과 클래스(static part까지)에 다뤄보도록 하겠다.🙇♂️
프로토타입
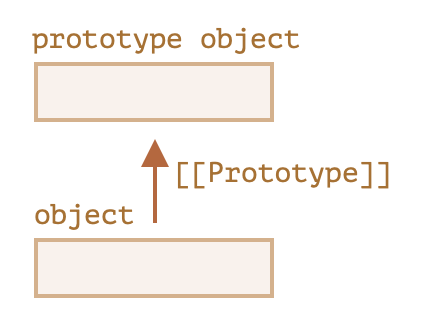
자바스크립트의 객체는 명세서에서 명명한
[[Prototype]]이라는 숨김 프로퍼티를 갖는다. 이 숨김 프로퍼티 값은 null이거나 다른 객체에 대한 참조가 되는데, 다른 객체를 참조하는 경우 참조 대상을 '프로토타입(prototype)'이라 부른다.
프로토타입 상속
프로토타입 동작 방식은 다음과 같은 특징을 가진다.
1️⃣ object에서 프로퍼티를 읽으려고 하는데 해당 프로퍼티가 없으면 자바스크립트는 자동으로 프로토타입에서 프로퍼티를 찾는다.
2️⃣[[Prototype]]프로퍼티는 내부 프로퍼티이면서 숨김 프로퍼티이지만 다양한 방법을 사용해 개발자가 값을 설정할 수 있다.
-> 특별한 이름인__proto__을 사용하면 값을 설정할 수 있다.
‼️__proto__는[[Prototype]]용 getter·setter이다.
➡️ 즉, 둘은 다른 개념이다.
// __proto__ 예시
let Food = {
   smell() {alert("냄새가 난다");}
};

let myFood = {
  name : "pizza"
};

let yourFood = {
  name : "chicken"
};

myFood.__proto__ = Food;
yourFood.__proto__ = Food;

// 프로퍼티 smell과 name을 각 object에서 사용할 수 있다.

myFood.smell(); // Food의 smell()이 실행
alert(myFood.name); //pizza
yourFood.smell(); //Food의 smell()이 실행
alert(yourFood.name); //chicken
그림으로 나타내면 다음과 같이 나타낼 수 있다.
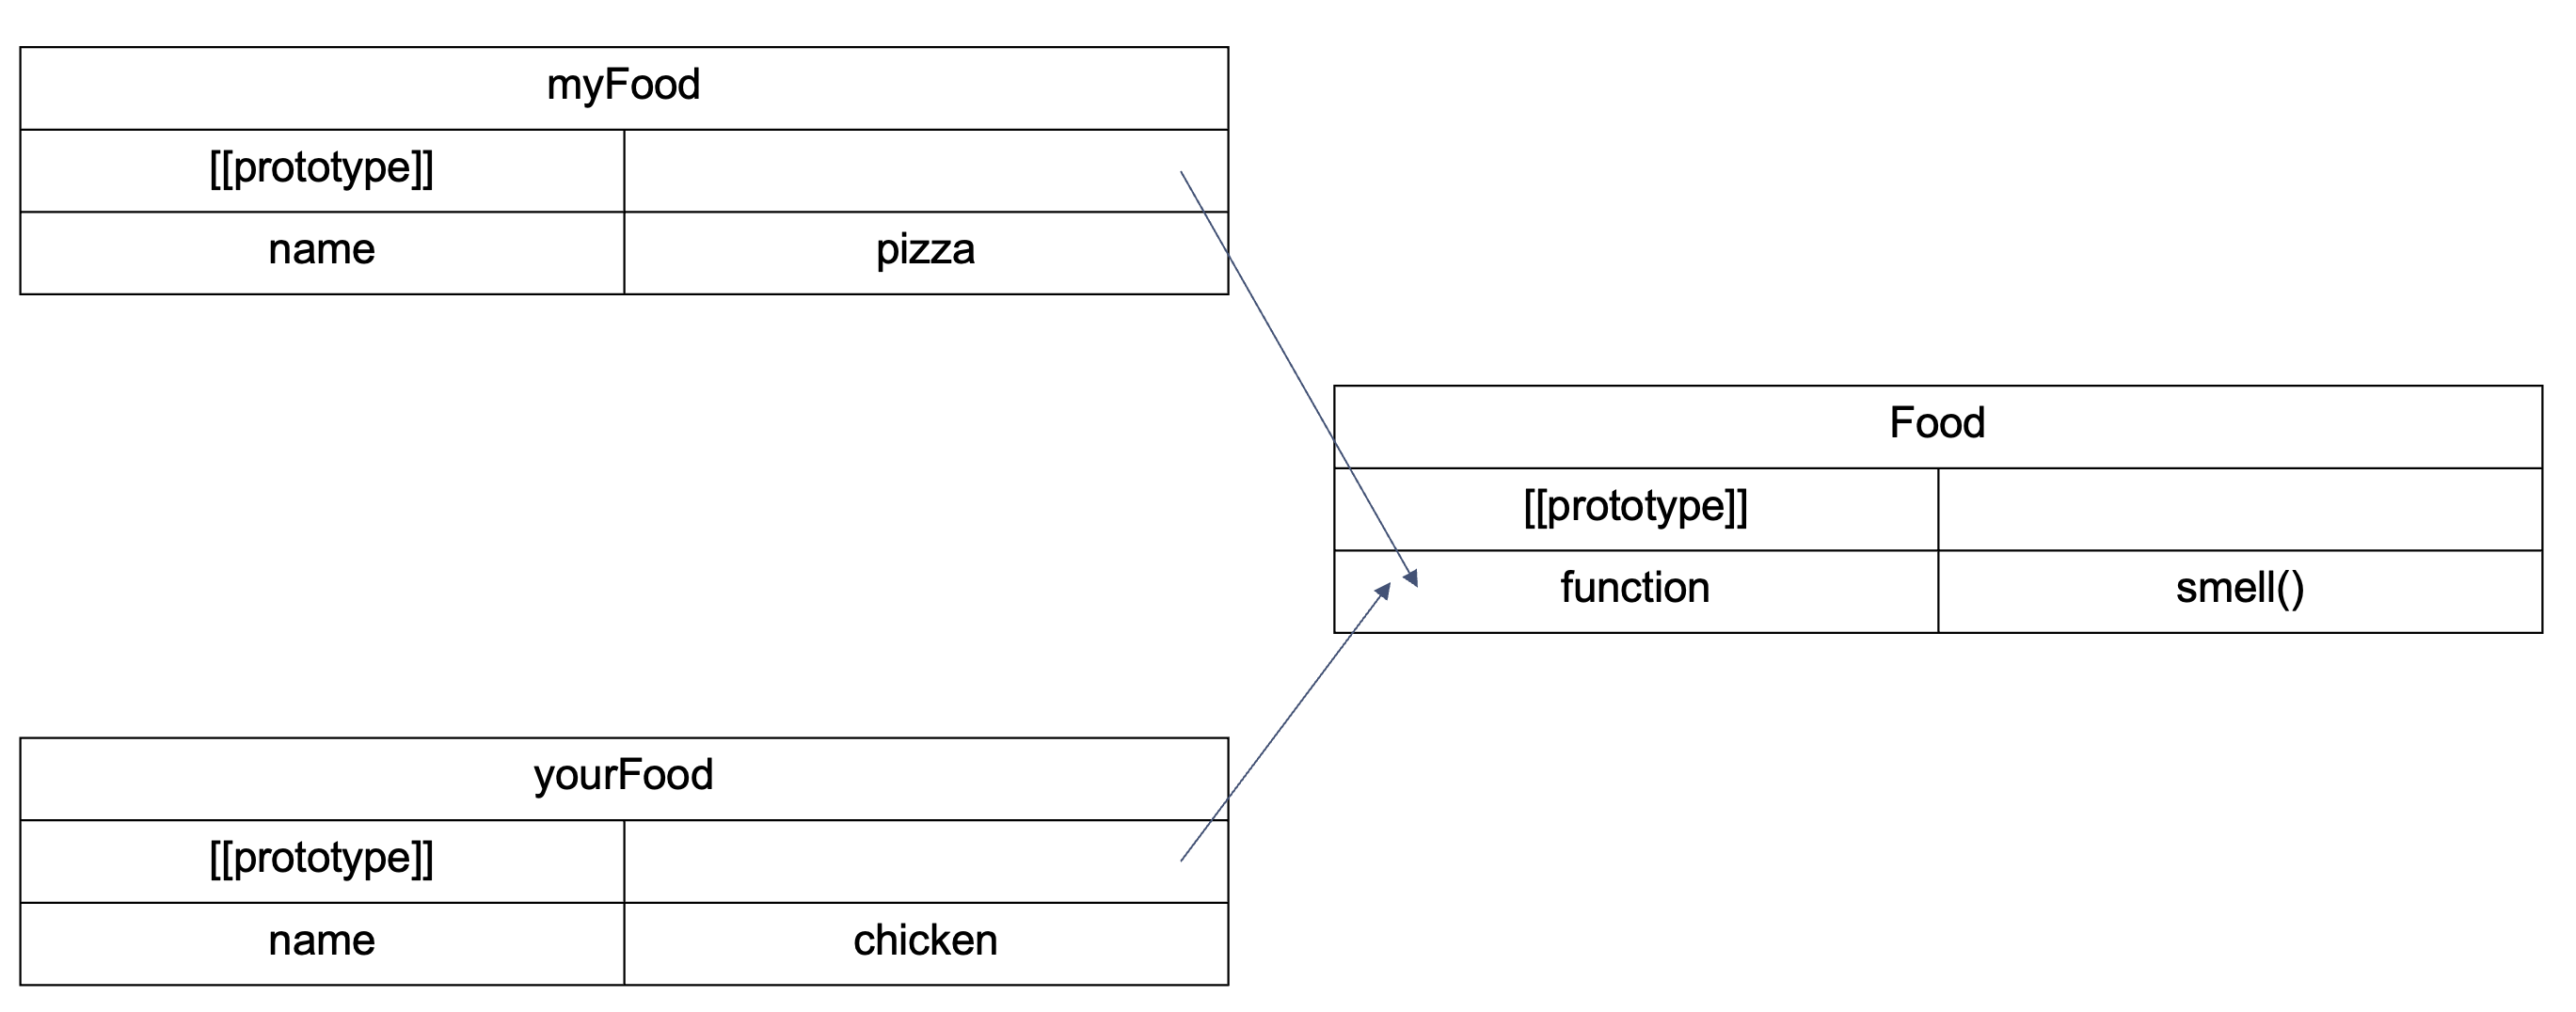
프로토타입을 설정해 준 덕분에 myFood나 yourFood에서도 Food에 구현된 유용한 프로퍼티와 메서드를 사용할 수 있게 된다. 이렇게 프로토타입에서 상속받은 프로퍼티를 '상속 프로퍼티(inherited property)'라고 한다.
여기서 알아둬야 할 것은 다음과 같다.
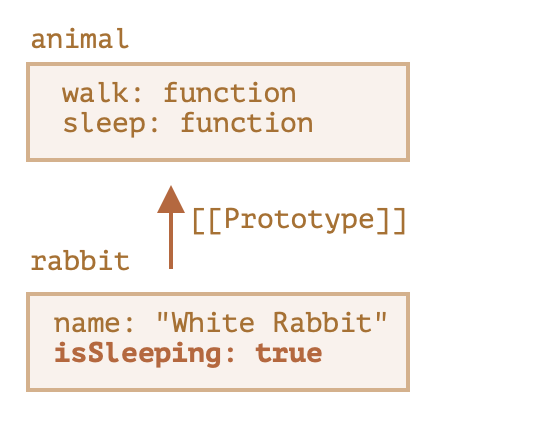
1️⃣ 메서드를 객체에서 호출했든 프로토타입에서 호출했든 상관없이 this는 언제나 . 앞에 있는 객체이다. 예시 코드는 다음과 같다.
//this를 활용한 예시
let animal = {
  walk() {
    if (!this.isSleeping) {
      alert(`동물이 걸어갑니다.`);
    }
  },
  sleep() {
    this.isSleeping = true;
  }
};
let rabbit = {
  name: "하얀 토끼",
  __proto__: animal
};
// rabbit에 새로운 프로퍼티 isSleeping을 추가하고 그 값을 true로 변경한다.
rabbit.sleep();
alert(rabbit.isSleeping); // true
alert(animal.isSleeping); // undefined (프로토타입에는 isSleeping이라는 프로퍼티가 없다.)
2️⃣ 프로토타입은 읽기 전용이기 때문에 프로퍼티를 추가, 수정하거나 지우는 연산은 객체에 직접 해야 한다.
3️⃣__proto__의 값은 객체나 null만 가능합니다. 다른 자료형은 무시됩니다.
내장 객체의 프로토타입
obj = new Object()를 줄이면 obj = {}가 된다. 여기서 Object는 내장 객체 생성자 함수인데, 이 생성자 함수의 prototype은 toString을 비롯한 다양한 메서드가 구현되어있는 거대한 객체를 참조하게 된다.
아래의 그림을 보면 되는데 new Object()를 호출하거나 리터럴 문법 {...}을 사용해 객체를 만들 때, 새롭게 생성된 객체의 [[Prototype]]은 바로 앞 챕터에서 언급한 규칙에 따라 Object.prototype을 참조하게 된다.
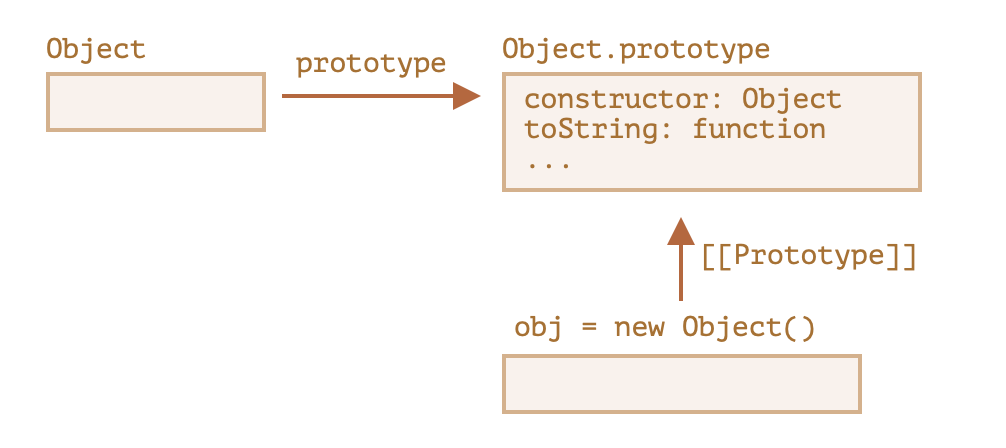
‼️Object.prototype 위에 [[Prototype]] 체인이 없다는 점을 주의할 것‼️
Array, Date, Function을 비롯한 내장 객체들 역시 프로토타입에 메서드를 저장해 놓는 방식이다.
프로토타입 메서드
__proto__는 다소 구식이고 이 방법을 통해서 기존 객체의 [[Prototype]]을 변경하는 것은 최적화에 좋지 않는 방향이기 때문에 아래와 같은 메서드를 사용하는 것을 추천한다고 한다.
- Object.create(proto, [descriptors]) – [[Prototype]]이 proto를 참조하는 빈 객체를 만든다. 이때 프로퍼티 설명자를 추가로 넘길 수 있다.
- Object.getPrototypeOf(obj) – obj의 [[Prototype]]을 반환한다.
- Object.setPrototypeOf(obj, proto) – obj의 [[Prototype]]이 proto가 되도록 설정한다.
let animal = {
  eats: true
};

//설명자를 추가로 넘기는 방식
let rabbit = Object.create(animal, {
  jumps: {
    value: true
  }
});

alert(rabbit.eats); // true

alert(rabbit.jumps); // true

alert(Object.getPrototypeOf(rabbit) === animal); // true

Object.setPrototypeOf(rabbit, {}); // rabbit의 프로토타입을 {}으로 변경
클래스
클래스는 객체 지향 프로그래밍에서 특정 객체를 생성하기 위해 변수와 메소드를 정의하는 일종의 틀로, 객체를 정의하기 위한 상태(멤버 변수)와 메서드(함수)로 구성된다. -위키백과
기본 문법
class Student {
  prop = value;//프로퍼티
  //생성자 메서드
  constructor(inputAge, inputName) {
    this.age = inputAge;
    this.name = inputName;
  }
  method(...) {} // 메서드

  get something(...) {} // getter 메서드
  set something(...) {} // setter 메서드
}

let student = new Student(17,"John");

alert(student.age); //17
상속
클래스 상속을 사용하면 클래스를 다른 클래스로 확장할 수 있다.
즉, 기존에 존재하던 기능을 토대로 새로운 기능을 만들 수 있다.
방법은 extends 키워드를 이용하면 된다. 사용 코드는 다음과 같다.
class Student {
  constructor(inputAge, inputName) {
    this.age = inputAge;
    this.name = inputName;
  }
  say(){
  	alert(`내 이름은 ${this.name}이야`);
  }
}

class HighSchoolStudent extends Student {
  constructor(inputAge, inputName){
    //super를 사용해서 기존 클래스의 constructor를 실행시킨다.
    //반드시 먼저 실행되어야 한다.
    super(inputAge, inputName);
  }
  say(){
    //super로 기존 클래스의 say()함수를 불러온다.
    super.say();
    alert("난 고등학생이다!");
  }
}

class UnivStudent extends Student {
  constructor(inputAge, inputName, inputMajor){
    super(inputAge, inputName);
    this.major = inputMajor;
  }
  say(){
    alert(`난 대학생이고 ${this.major} 전공이야!`);
  }
}

let John = new HighSchoolStudent(17,"John");
//오버라이딩으로 각각 자체 메서드가 실행된다
John.say(); // 내이름은 John이야. -> 난 고등학생이다!
let Amy = new UnivStudent(21,"Amy","영문학과");
Amy.say(); //난 대학생이고 영문학과 전공이야!
정적 메서드와 정적 프로퍼티
정적 메서드
클래스 함수 자체에 메서드를 설정할 수도 있다. 이런 메서드를 정적(static) 메서드라고 부른다.
정적 메서드는 아래와 같이 클래스 안에서 static 키워드를 붙여 만들 수 있다.
예시코드는 다음과 같다.
class Article {
  constructor(title, date) {
    this.title = title;
    this.date = date;
  }
//정적 메서드
  static createTodays() {
    // this는 Article를 가리킨다.
    return new this("Today's digest", new Date());
  }
}

let article = Article.createTodays();

alert( article.title ); // Today's digest
alert( article.date ); // 실행한 현재 시간이 뜬다.
정적 프로퍼티
정적 프로퍼티는 일반 클래스 프로퍼티와 유사하게 생겼는데 앞에 static이 붙는다는 점만 다르다.
class Animal {
  static planet = "지구";

  constructor(name, speed) {
    this.speed = speed;
    this.name = name;
  }

  run(speed = 0) {
    this.speed += speed;
    alert(`${this.name}가 속도 ${this.speed}로 달립니다.`);
  }

  static compare(animalA, animalB) {
    return animalA.speed - animalB.speed;
  }

}

// Animal을 상속받음
class Rabbit extends Animal {
  hide() {
    alert(`${this.name}가 숨었습니다!`);
  }
}

let rabbits = [
  new Rabbit("흰 토끼", 10),
  new Rabbit("점박이 토끼", 3),
  new Rabbit("검은 토끼", 5)
];

rabbits.sort(Rabbit.compare);

rabbits[2].run(); // 흰 토끼가 속도 10로 달립니다.

alert(Rabbit.planet); // 지구