참고
https://www.mongodb.com/docs/manual
https://boying-blog.tistory.com/35
https://guide.ncloud-docs.com/release-20211221/docs/database-database-10-3
MongoDB의 sharded cluster 구조를 docker-compose를 통해서 구성해 본 과정과 오류(삽질)을 정리해 두려고 한다.
클러스터 구조 개념이 궁금하다면? (MongoDB 구조 개념 (샤딩, 샤드 클러스터, 레플리카셋)
해야 할 동작은 크게
- docker-compose.yml 작성한 후 실행
- Replica Set 구성
- Mongos에 Shard 정보 추가
3단계로 이루어져 있다.
구조
- Mongos 2개
- PS 구조로 구성된 Config Server 1개
- PSA 구조로 구성된 Sharded Server 2개
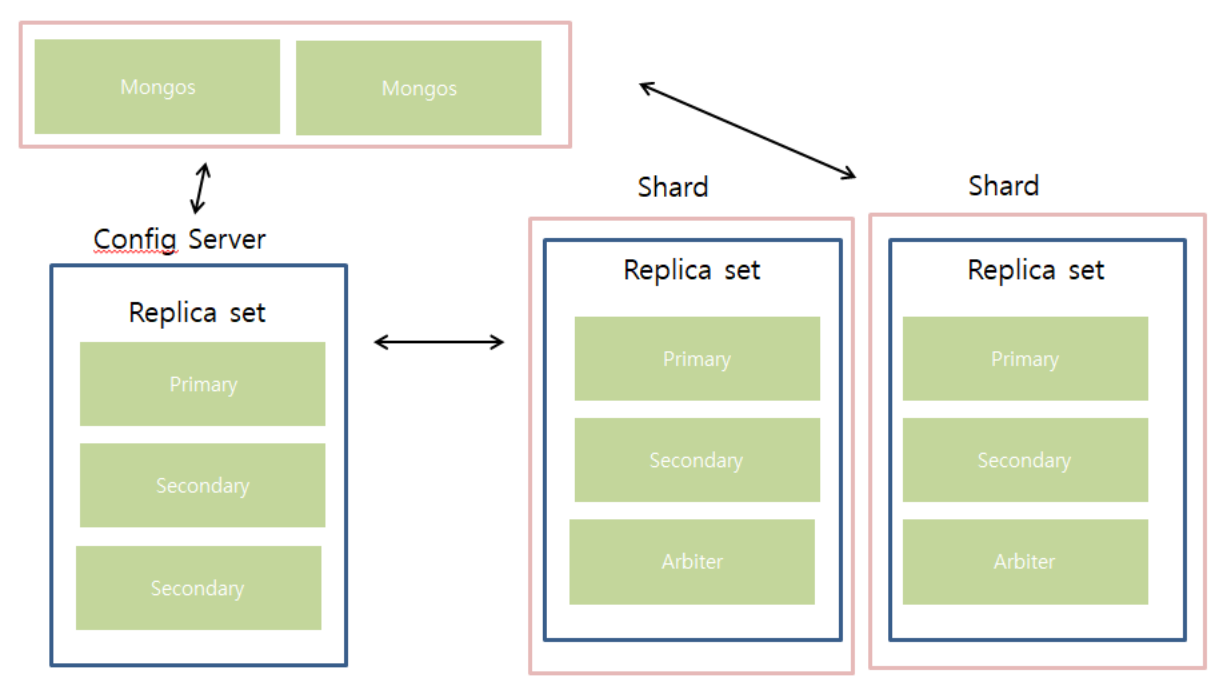
간단하게 그려 본 구성하고자 하는 cluster 구조이다.
🚩 docker-compose.yml 작성
version: '3'

services:
  # config
  config1:
    image: mongo:4.4.3
    restart: always
    command: mongod --configsvr --replSet configReplica --port 27017 --dbpath /data/db
    ports:
      - 10011:27017
    volumes:
      - config1:/data/db

  config2:
    image: mongo:4.4.3
    restart: always
    command: mongod --configsvr --replSet configReplica --port 27017 --dbpath /data/db
    ports:
      - 10012:27017
    volumes:
      - config2:/data/db

  config3:
    image: mongo:4.4.3
    restart: always
    command: mongod --configsvr --replSet configReplica --port 27017 --dbpath /data/db
    ports:
      - 10013:27017
    volumes:
      - config3:/data/db

  # shard
  shard1primary:
    image: mongo:4.4.3
    restart: always
    command: mongod --shardsvr --replSet shard1Replica --port 27017 --dbpath /data/db
    ports:
      - 10021:27017
    volumes:
      - shard1primary:/data/db

  shard1secondary:
    image: mongo:4.4.3
    restart: always
    command: mongod --shardsvr --replSet shard1Replica --port 27017 --dbpath /data/db
    ports:
      - 10022:27017
    volumes:
      - shard1secondary:/data/db

  shard1arbiter:
    image: mongo:4.4.3
    restart: always
    command: mongod --shardsvr --replSet shard1Replica --port 27017 --dbpath /data/db
    ports:
      - 10023:27017
    volumes:
      - shard1arbiter:/data/db

  shard2primary:
    image: mongo:4.4.3
    restart: always
    command: mongod --shardsvr --replSet shard2Replica --port 27017 --dbpath /data/db
    ports:
      - 10031:27017
    volumes:
      - shard2primary:/data/db

  shard2secondary:
    image: mongo:4.4.3
    restart: always
    command: mongod --shardsvr --replSet shard2Replica --port 27017 --dbpath /data/db
    ports:
      - 10032:27017
    volumes:
      - shard2secondary:/data/db

  shard2arbiter:
    image: mongo:4.4.3
    restart: always
    command: mongod --shardsvr --replSet shard2Replica --port 27017 --dbpath /data/db
    ports:
      - 10033:27017
    volumes:
      - shard2arbiter:/data/db

  # mongos
  mongos1:
    image: mongo:4.4.3
    restart: always
    environment:
        MONGO_INITDB_ROOT_USERNAME: root
        MONGO_INITDB_ROOT_PASSWORD: 비밀번호
    command: mongos --configdb configReplica/config1:10011,config2:10012,config3:10013 --bind_ip 0.0.0.0 --port 27017
    ports:
      - 60001:27017

  mongos2:
    image: mongo:4.4.3
    restart: always
    environment:
        MONGO_INITDB_ROOT_USERNAME: root
        MONGO_INITDB_ROOT_PASSWORD: 비밀번호
    command: mongos --configdb configReplica/config1:10011,config2:10012,config3:10013 --bind_ip 0.0.0.0 --port 27017
    ports:
      - 60002:27017

volumes:
  config1: {}
  config2: {}
  config3: {}
  shard1primary: {}
  shard1secondary: {}
  shard1arbiter: {}
  shard2primary: {}
  shard2secondary: {}
  shard2arbiter: {}
컨테이너들을 실행 해 준 다음에 Replica Set 지정 및 Mongos에서 Shard를 추가하는 과정을 진행해 줘야 한다.
🤔 의문
이 과정에서 의문이 들었던 것이 command 옵션으로 replica set 이름을 지정해주는데 왜 자동으로 묶이지 않고 또 들어가서 rs.initiate()을 해주는 과정을 한 번 더 진행해줘야 하는지 잘 이해가 되지 않았다. 귀찮은 중복 과정으로 느껴졌다.
그러던 차에 --eval 이라는 mongo 명령어 옵션을 알게 되었다. 아마 shell 스크립트로 mongo command를 실행하고 싶은 경우에 사용하는 옵션으로 느껴지는데 왜! 이 과정을 해야 하는지에 대한 의문점은 풀리지 않지만 일단 이걸 추가하면 굳이 또 인스턴스에 접속해서 replica set 날리는 쿼리를 실행하는 수고를 하지 않아도 되긴 한다. 이건 아직 테스트를 못 해봐서 상단 docker-compose.yml 파일에 적용하진 않았다. 수정하면 추가하겠다.
🚩 Replica Set 구성
$ mongo mongodb://${primary로 지정할 mongodb 접근 주소}

# Replica Set 구성
rs.initiate(
  {
		# Replica Set 이름
    _id: "configReplica",
		# config 서버인 경우 true
    configsvr: true,
    members: [
      { _id : 0, host : "172.16.1.10:10011" },
      { _id : 1, host : "172.16.1.10:10012" },
      { _id : 2, host : "172.16.1.10:10013" }
    ]
  }
)

# Replica Set 구성 확인
rs.status()
😒 오류
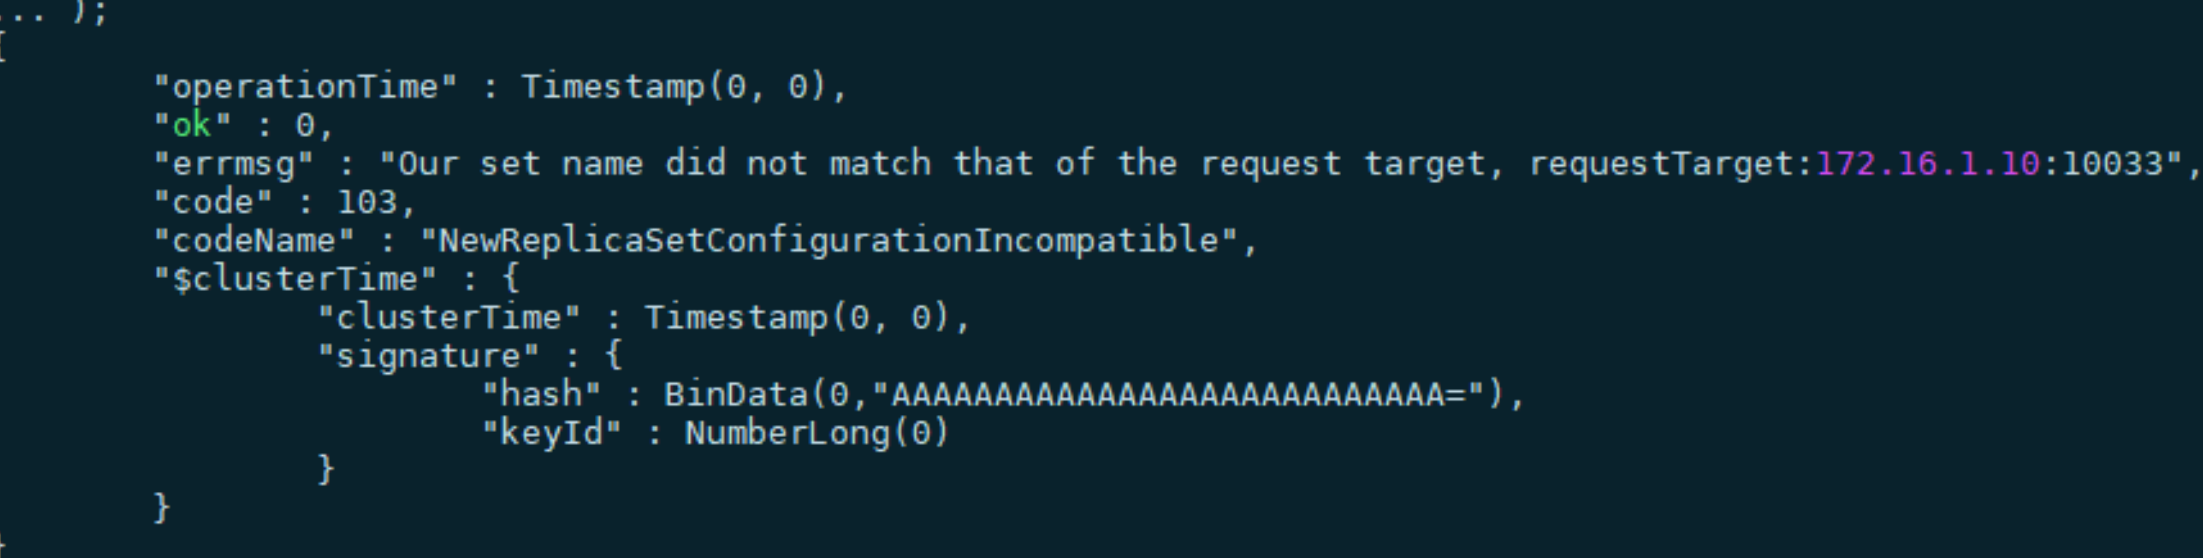
Our set name did not match that of the request target
NewReplicaSetConfigurationIncompatible
일단 오류가 발생한 이유는 rs.initiate() 함수에서 _id 값이 docker-compose.yml에서 command 옵션으로 지정해 준 이름과 동일하지 않기 때문이다.
동일하게 이름을 맞춰주니까 문제가 해결 되었다.
🚩 Mongos에 Shard 추가
# mongos에 접속해서 shard 정보를 추가해준다.
# Arbiter를 제외한 Primary 및 Secondary 정보만 입력한다.
sh.addShard("${replica set이름}/172.16.1.10:10021, 172.16.1.10:10022");

# shard 정보를 확인한다.
sh.status();
😒 오류
    mongos> sh.addShard("shard1/172.16.1.10:10021, 172.16.1.10:10022, 172.16.1.10:10023");
    {
    "ok" : 0,
    "errmsg" : "the provided connection string (shard1/172.16.1.10:10021, 172.16.1.10:10022, 172.16.1.10:10023) does not match the actual set name shard1Replica",
    "code" : 96,
    "codeName" : "OperationFailed",
    "operationTime" : Timestamp(1652325776, 1),
    "$clusterTime" : {
    "clusterTime" : Timestamp(1652325776, 1),
    "signature" : {
    "hash" : BinData(0,"AAAAAAAAAAAAAAAAAAAAAAAAAAA="),
    "keyId" : NumberLong(0)
    }
    }
    }
❓ 로그를 보면 확인 할 수 있다. shard1 이라는 Replica set 이름이 맞지 않아서 생기는 문제였다. shard1ReplicaSet으로 변경해주니까 정상 동작했다.
    {
    "ok" : 0,
    "errmsg" : "in seed list shard1Replica/172.16.1.10:10021, 172.16.1.10:10022, 172.16.1.10:10023, host  172.16.1.10:10022 does not belong to replica set shard1Replica; found { t              opologyVersion: { processId: ObjectId('627c74bf98eb5e428ce23632'), counter: 6 }, hosts: [ \"172.16.1.10:10021\", \"172.16.1.10:10022\" ], arbiters: [ \"172.16.1.10:10023\" ], setName:               \"shard1Replica\", setVersion: 1, ismaster: true, secondary: false, primary: \"172.16.1.10:10021\", me: \"172.16.1.10:10021\", electionId: ObjectId('7fffffff0000000000000001'), lastW              rite: { opTime: { ts: Timestamp(1652325780, 1), t: 1 }, lastWriteDate: new Date(1652325780000), majorityOpTime: { ts: Timestamp(1652325780, 1), t: 1 }, majorityWriteDate: new Date(165              2325780000) }, maxBsonObjectSize: 16777216, maxMessageSizeBytes: 48000000, maxWriteBatchSize: 100000, localTime: new Date(1652325786542), logicalSessionTimeoutMinutes: 30, connectionI              d: 25, minWireVersion: 0, maxWireVersion: 9, readOnly: false, compression: [ \"snappy\", \"zstd\", \"zlib\" ], ok: 1.0, $clusterTime: { clusterTime: Timestamp(1652325780, 1), signatur              e: { hash: BinData(0, 0000000000000000000000000000000000000000), keyId: 0 } }, operationTime: Timestamp(1652325780, 1) }",
    "code" : 96,
    "codeName" : "OperationFailed",
    "operationTime" : Timestamp(1652325785, 1),
    "$clusterTime" : {
    "clusterTime" : Timestamp(1652325786, 1),
    "signature" : {
    "hash" : BinData(0,"AAAAAAAAAAAAAAAAAAAAAAAAAAA="),
    "keyId" : NumberLong(0)
    }
    }
    }
❓ 원래는 sh.addShard() 명령어에 전체 Replica Set에 속하는 모든 서버의 ip 주소를 추가해줬었는데 그냥 primary 서버만 sh.addShard("shard1Replica/172.161.10:10021") 등록하니까 해결됬다.
이렇게 설정하면 우선 전체적인 클러스터 구조는
mongos에서 sh.status() 명령어로 설정이 된 것을 확인 할 수 있다.
mongos> sh.status()
--- Sharding Status ---
  sharding version: {
        "_id" : 1,
        "minCompatibleVersion" : 5,
        "currentVersion" : 6,
        "clusterId" : ObjectId("627c760da8bac0ec78d7d5a3")
  }
  shards:
        {  "_id" : "shard1Replica",  "host" : "shard1Replica/172.16.1.10:10021,172.16.1.10:10022",  "state" : 1 }
        {  "_id" : "shard2Replica",  "host" : "shard2Replica/172.16.1.10:10031,172.16.1.10:10032",  "state" : 1 }
  active mongoses:
        "4.4.3" : 2
  autosplit:
        Currently enabled: yes
  balancer:
        Currently enabled:  yes
        Currently running:  no
        Failed balancer rounds in last 5 attempts:  0
        Migration Results for the last 24 hours:
                512 : Success
  databases:
        {  "_id" : "config",  "primary" : "config",  "partitioned" : true }
                config.system.sessions
                        shard key: { "_id" : 1 }
                        unique: false
                        balancing: true
                        chunks:
                                shard1Replica   512
                                shard2Replica   512
                        too many chunks to print, use verbose if you want to force print