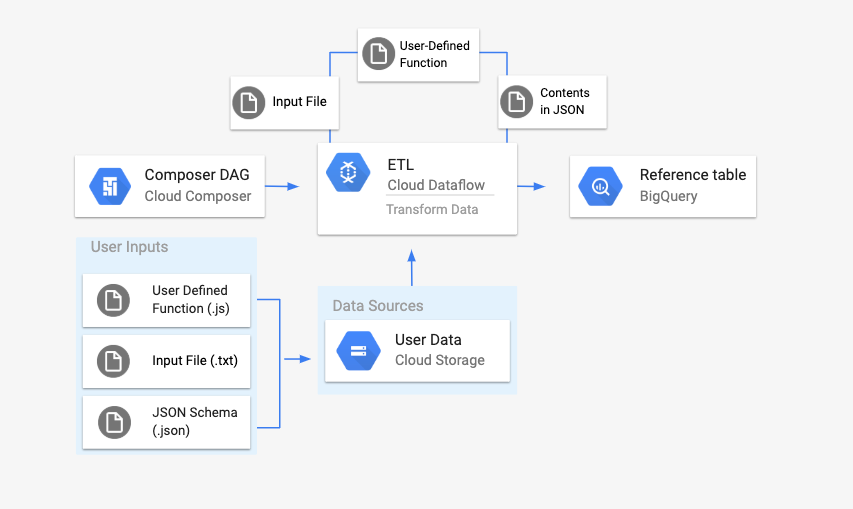
DataflowTemplatedJobStartOperator를 사용하여 Cloud Composer에서 Dataflow 파이프라인을 실행해볼 것이다.
Composer 환경을 생성하는데 Composer 버전이 1.9이상이어야 한다고 문서에 적혀있기 때문에 Composer 1버전(1.19버전)로 생성해줬다.
average_weather 데이터 세트, average_weather 테이블 생성
테이블 생성 시 스키마에 텍스트로 편집을 설정하여 아래 JSON코드를 넣어준다.
[
{
"name": "location",
"type": "GEOGRAPHY",
"mode": "REQUIRED"
},
{
"name": "average_temperature",
"type": "INTEGER",
"mode": "REQUIRED"
},
{
"name": "month",
"type": "STRING",
"mode": "REQUIRED"
},
{
"name": "inches_of_rain",
"type": "NUMERIC"
},
{
"name": "is_current",
"type": "BOOLEAN"
},
{
"name": "latest_measurement",
"type": "DATE"
}
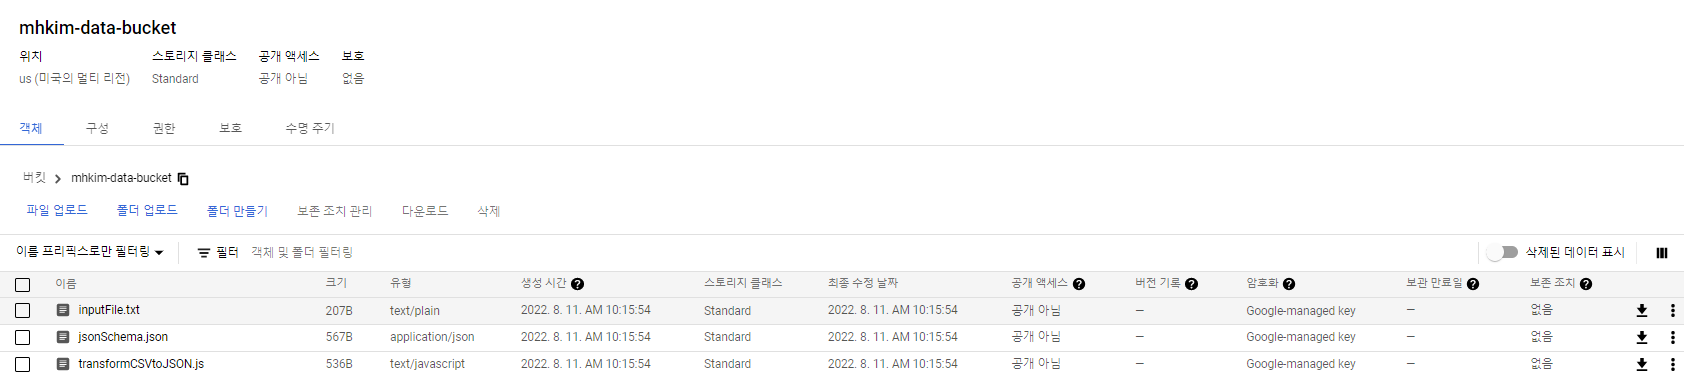
]Cloud Storage 버킷 생성
아래의 파일들을 올릴 것이다.
앞에서 만든 출력 테이블과 일치하는 JSON 형식의 BigQuery 스키마 파일 생성
jsonSchema.json
{
    "BigQuery Schema": [
    {
        "name": "location",
        "type": "GEOGRAPHY",
        "mode": "REQUIRED"
    },
    {
        "name": "average_temperature",
        "type": "INTEGER",
        "mode": "REQUIRED"
    },
    {
        "name": "month",
        "type": "STRING",
        "mode": "REQUIRED"
    },
    {
        "name": "inches_of_rain",
        "type": "NUMERIC"
    },
    {
        "name": "is_current",
        "type": "BOOLEAN"
    },
    {
        "name": "latest_measurement",
        "type": "DATE"
    }]
}
입력 파일의 텍스트 줄을 변환하는 UDF
transformCSVtoJSON.js
function transformCSVtoJSON(line) {
  var values = line.split(',');
  var properties = [
    'location',
    'average_temperature',
    'month',
    'inches_of_rain',
    'is_current',
    'latest_measurement',
  ];
  var weatherInCity = {};

  for (var count = 0; count < values.length; count++) {
    if (values[count] !== 'null') {
      weatherInCity[properties[count]] = values[count];
    }
  }

  var jsonString = JSON.stringify(weatherInCity);
  return jsonString;
}
입력 파일
inputFile.txt
POINT(40.7128 74.006),45,'July',null,true,2020-02-16
POINT(41.8781 87.6298),23,'October',13,false,2015-02-13
POINT(48.8566 2.3522),80,'December',null,true,null
POINT(6.5244 3.3792),15,'March',14,true,null
위의 파일 3개 만들어준 버킷에 업로드
주의할 점! 오류를 방지하려면 위의 txt파일 각 문장의 끝에 공백이 없어야 한다.
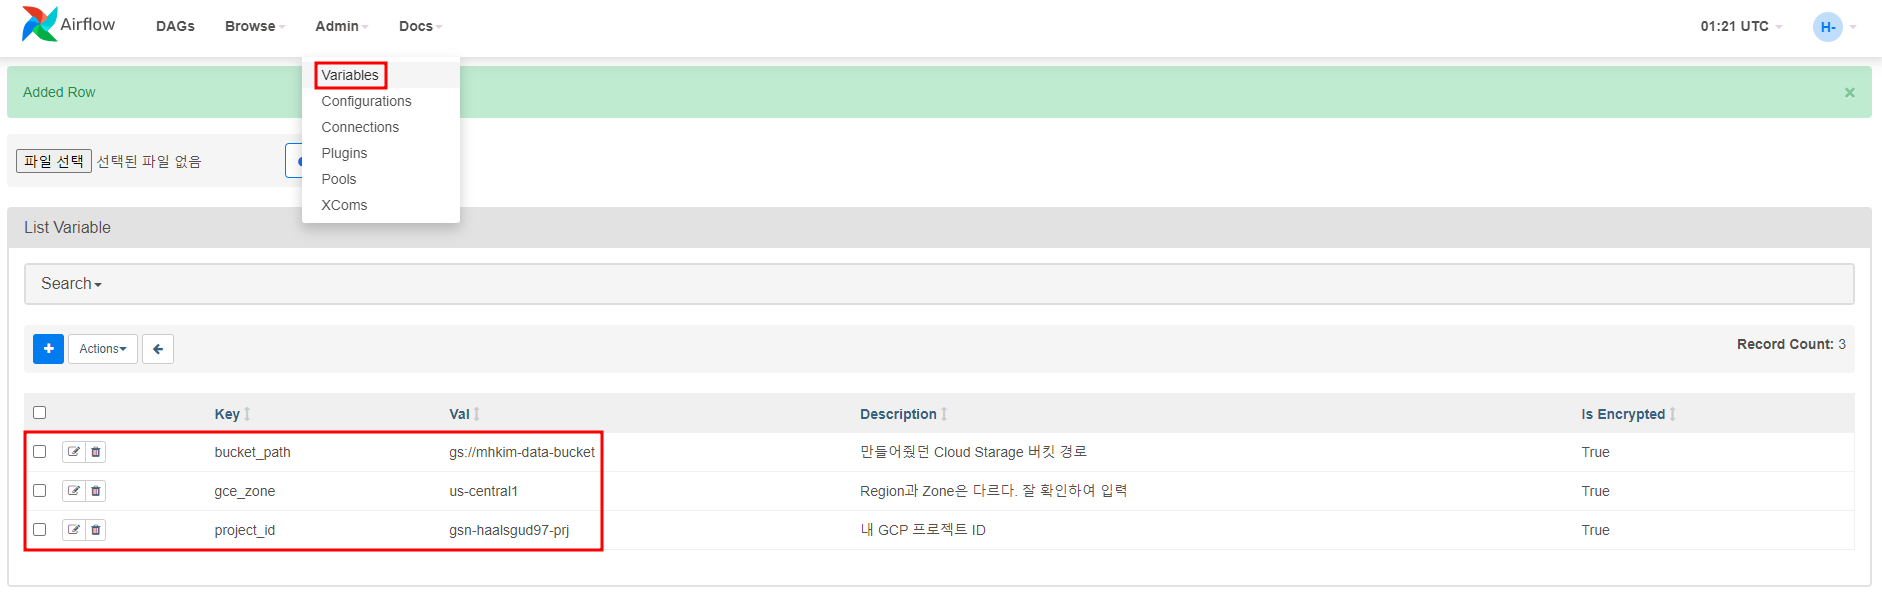
그리고 DAG에서 쓸 Airflow 변수들을 Airflow UI에서 등록시켜줄 것이다.
앞서 만든 파일을 참조하여 Dataflow 워크플로를 시작하는 DAG 생성.
아래 파일을 Composer가 생성되면서 만들어진 Cloud Storage 버킷의 dags폴더에 업로드
composer-dataflow-dag.py
"""Example Airflow DAG that creates a Cloud Dataflow workflow which takes a
text file and adds the rows to a BigQuery table.

This DAG relies on four Airflow variables
https://airflow.apache.org/docs/apache-airflow/stable/concepts/variables.html
* project_id - Google Cloud Project ID to use for the Cloud Dataflow cluster.
* gce_zone - Google Compute Engine zone where Cloud Dataflow cluster should be
  created.
For more info on zones where Dataflow is available see:
https://cloud.google.com/dataflow/docs/resources/locations
* bucket_path - Google Cloud Storage bucket where you've stored the User Defined
Function (.js), the input file (.txt), and the JSON schema (.json).
"""

import datetime

from airflow import models
from airflow.providers.google.cloud.operators.dataflow import DataflowTemplatedJobStartOperator
from airflow.utils.dates import days_ago

bucket_path = models.Variable.get("bucket_path")
project_id = models.Variable.get("project_id")
gce_zone = models.Variable.get("gce_zone")

default_args = {
    # Tell airflow to start one day ago, so that it runs as soon as you upload it
    "start_date": days_ago(1),
    "dataflow_default_options": {
        "project": project_id,
        # Set to your zone
        "zone": gce_zone,
        # This is a subfolder for storing temporary files, like the staged pipeline job.
        "tempLocation": bucket_path + "/tmp/",
    },
}

# Define a DAG (directed acyclic graph) of tasks.
# Any task you create within the context manager is automatically added to the
# DAG object.
with models.DAG(
    # The id you will see in the DAG airflow page
    "composer_dataflow_dag",
    default_args=default_args,
    # The interval with which to schedule the DAG
    schedule_interval=datetime.timedelta(days=1),  # Override to match your needs
) as dag:

    start_template_job = DataflowTemplatedJobStartOperator(
        # The task id of your job
        task_id="dataflow_operator_transform_csv_to_bq",
        # The name of the template that you're using.
        # Below is a list of all the templates you can use.
        # For versions in non-production environments, use the subfolder 'latest'
        # https://cloud.google.com/dataflow/docs/guides/templates/provided-batch#gcstexttobigquery
        template="gs://dataflow-templates/latest/GCS_Text_to_BigQuery",
        # Use the link above to specify the correct parameters for your template.
        parameters={
            "javascriptTextTransformFunctionName": "transformCSVtoJSON",
            "JSONPath": bucket_path + "/jsonSchema.json",
            "javascriptTextTransformGcsPath": bucket_path + "/transformCSVtoJSON.js",
            "inputFilePattern": bucket_path + "/inputFile.txt",
            "outputTable": project_id + ":average_weather.average_weather",
            "bigQueryLoadingTemporaryDirectory": bucket_path + "/tmp/",
        },
    )
에러가 났다...

문제는 region과 zone을 헷갈려서이다.
Airflow UI에서 등록해준 us-central1은 region이다.
zone은 us-central1-a, us-central1-b ... 이다.
때문에 zone을 us-central1-a로 변경한 후 다시 실행
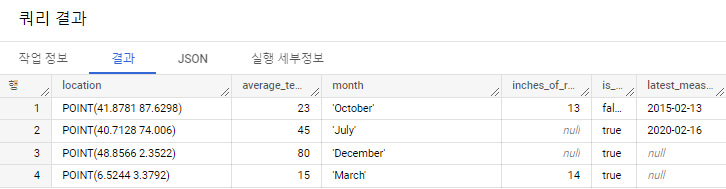
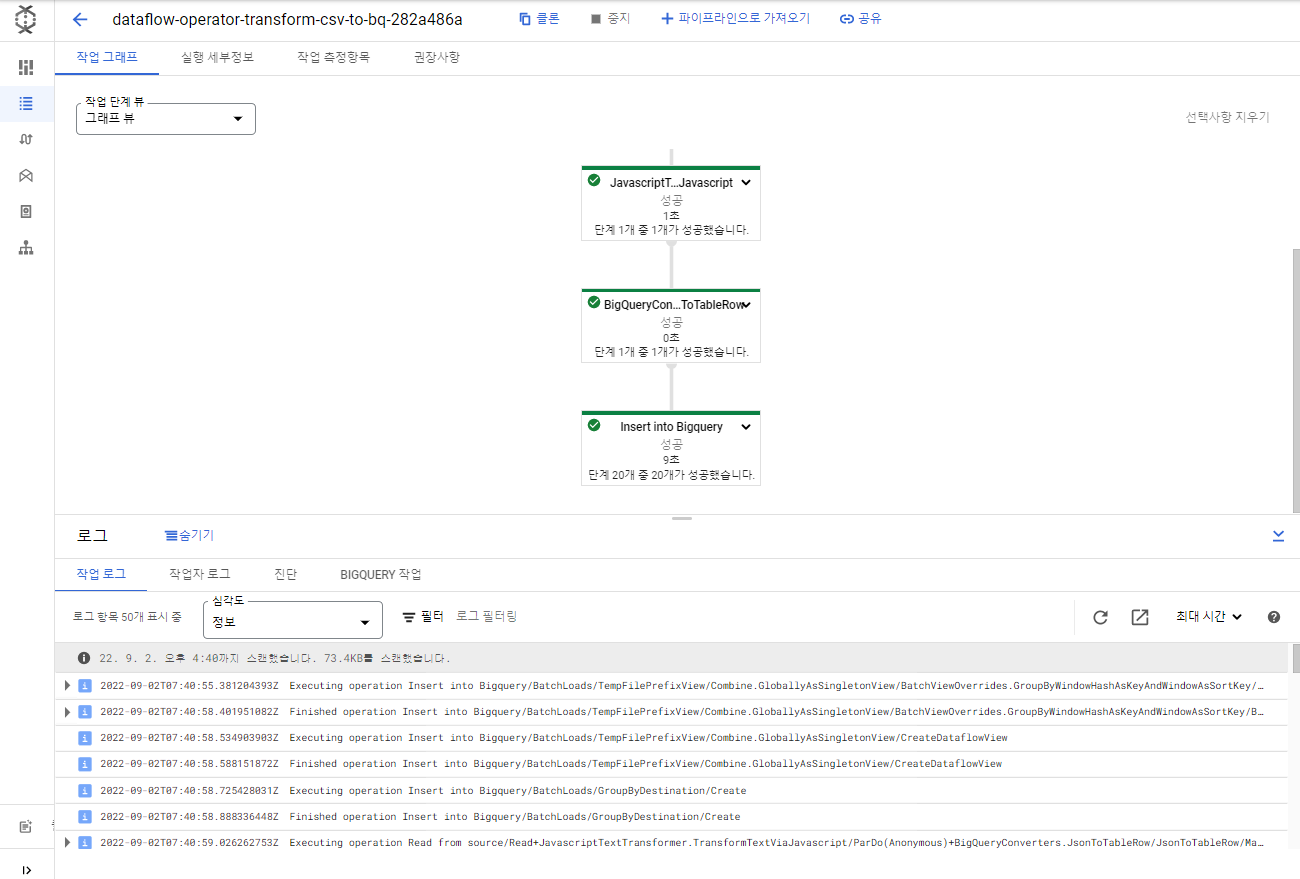
성공한 것 확인
빅쿼리에서 잘 적재됐는지 확인