NestJS의 공식문서를 보며 정리한 글입니다.
Nest란?
https://docs.nestjs.com/
Introduction
Nest (NestJS) is a framework for building efficient, scalable Node.js
server-side applications. It uses progressive JavaScript, is built with
and fully supports TypeScript (yet still enables developers to code in
pure JavaScript) and combines elements of OOP (Object Oriented Programming),
FP (Functional Programming), and FRP (Functional Reactive Programming).
Under the hood, Nest makes use of robust HTTP Server frameworks like
Express (the default) and optionally can be configured to use Fastify
as well! Nest provides a level of abstraction above these common Node.js
frameworks (Express/Fastify), but also exposes their APIs directly to the
developer. This gives developers the freedom to use the myriad of
third-party modules which are available for the underlying platform.
Progressive Javascript를 사용하고 Typescript를 완전하게 지원하며 (그래도 순수
자바스크립트로 코딩할 수 있다.) 객체지향프로그래밍과 함수형프로그래밍 그리고
함수반응형프로그래밍으로 결합되어 있습니다. Nest는 Express(기본)과 같은 강력한
HTTP 서버 프레임워크를 사용하며 선택적으로 Fastify를 사용하여 구성할 수도 있습니다.
Nest는 이러한 공통적인 Node.js 프레임워크 위에 추상적인 수준을 제공하지만,
개발자에게 직접 API를 드러내기도 합니다. 이것은 개발자들에게 기본 플랫폼 위에 무수한
써드 파티 모듈을 사용할 수 있게 합니다.! NestJS는 Node.js 서버 프레임워크 위에서 효율적으로 확장 가능한 서버 사이드 어플리케이션이라고 한다! 개발문서를 더 읽어보면 React와 같은 프로젝트들이 프론트엔드 개발자의 향상성을 높여주지만, 백엔드에는 이러한 아키텍처를 가진 라이브러리가 없어 만들어졌다고 한다. Angular에서 많은 영감을 받았고, 테스트와 확장이 가능하다고 한다.
npm i -g @nestjs/cli
cli를 설치하여 nest와 관련된 명령어를 터미널에서도 사용할 수 있다.
다음은 NestJS의 기초적이고 핵심인 아키텍처들을 살펴보겠다.
Controller
Controllers are responsible for handling incoming requests and returning responses to the client.
컨트롤러는 들어오는 요청을 다루고, 클라이언드에 응답을 반환합니다.
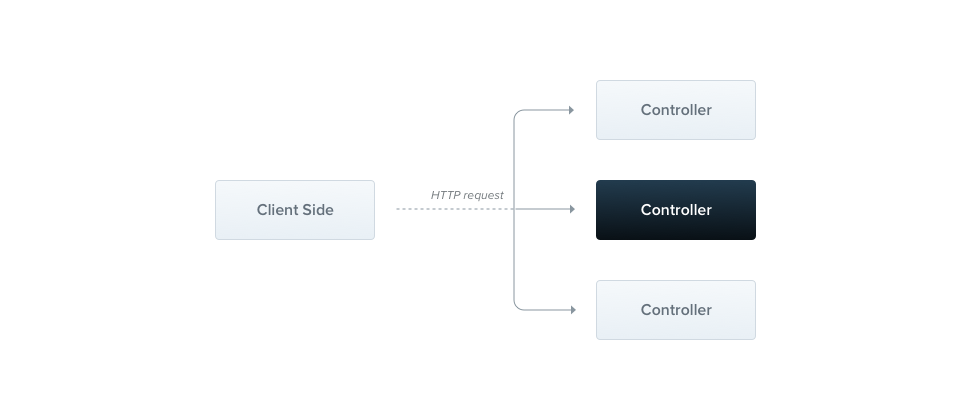
여러 컨트롤러가 있고 클라이언트의 HTTP request에 따라 (경로에 따라) Controller로 매핑하여 처리합니다.
// cats.controller.ts
import { Controller, Get, Query, Post, Body } from '@nestjs/common';
import { CreateCatDto, ListAllEntities } from './dto';
@Controller('cats')
export class CatsController {
  @Post()
  create(@Body() createCatDto: CreateCatDto) {
    return 'This action adds a new cat';
  }
  @Get()
  findAll(@Query() query: ListAllEntities) {
    return `This action returns all cats (limit: ${query.limit} items)`;
  }
}
위 코드와 같이 Nest는 @로 시작되는 Decorator에서 어떠한 함수를 반환하고 대상, 이름 및 속성 설명자를 인수로 사용합니다.
Provider
Providers are a fundamental concept in Nest. Many of the basic Nest
classes may be treated as a provider – services, repositories, factories,
helpers, and so on. The main idea of a provider is that it can be
injected as dependency; this means objects can create various
relationships with each other, and the function of "wiring up" instances
of objects can largely be delegated to the Nest runtime system.
Provider는 Nest의 근본적인 개념입니다. Nest의 많은 기본 클래스들은 Servicse, Repositories , Factories, helper 등과 같은 공급자로 취급될 수 있습니다. 즉, 객체가 서로 다양한 관계를 만들 수 있고, 객체의 인스턴스를 Nest 런타임 시스템에 위임할 수 있다는 것입니다.
Dependency injection
constructor(private catsService: CatsService) {}
@Injectable() 데코레이터를 통해 생성된 클래스는 IoC(제어 역전)를 통해 Nest 컨테이너가 생성자를 관리합니다.
import { Module } from '@nestjs/common';
import { CatsController } from './cats/cats.controller';
import { CatsService } from './cats/cats.service';

@Module({
  controllers: [CatsController],
  providers: [CatsService],
})
export class AppModule {}
CatsService를 @Injectable() 데코레이터로 정의 했기 때문에, 소비자에게 주입을 할 수 있도록 Nest의 @Module() 데코레이터의 Providers 배열에 서비스를 추가하면 됩니다!
Module
A module is a class annotated with @Module() decorator. The @Module() decorator
provides metadata that Nest makes use of to organize the application structure.
모듈은 @Module의 데코레이터로 주석을 단 클래스입니다. Module 데코레이터는 네스트가 어플리케이션 구조를 조직화 할 수 있게 하는 metadata를 제공합니다.
import { Module } from '@nestjs/common';

@Module({
  imports: [],
  controllers: [],
  providers: [],
  exports: [],
})
export class Module {
  constructor(private serviceClass: ServiceClass) {}
}
위와 같이 @Module() 데코레이터에 imports, controllers, providers, exports 배열에 등록을 하면 의존성 주입을 통해 모듈을 사용할 수 있습니다.
Middleware
Middleware is a function which is called before the route handler. Middleware
functions have access to the request and response objects ,and the next()
middleware function in the application's request-response cycle.
The next middleware function is commonly denoted by a variable named next.
미들웨어는 라우트 핸들러 이전에 불러지는 함수입니다. 미들웨어 함수는 요청과 응답 오브젝트를 액세스하고, next() 미들웨어 함수는 어플리케이션의 요청-응답 사이클을 호출합니다. 다음 미들웨어 함수는 일반적인 next라는 이름을 가진 변수로 표현됩니다.
// logger.middleware.ts
import { Injectable, NestMiddleware } from '@nestjs/common';
import { Request, Response, NextFunction } from 'express';

@Injectable()
export class LoggerMiddleware implements NestMiddleware {
  use(req: Request, res: Response, next: NextFunction) {
    console.log('Request...');
    next();
  }
}
미들웨어 클래스는 NestMiddleware라는 인터페이스를 implements합니다.
또한 @Injectable() 데코레이터를 통해 공급자로서 등록하여 주입할 수 있습니다.
import { Module, NestModule, MiddlewareConsumer } from '@nestjs/common';
import { LoggerMiddleware } from './common/middleware/logger.middleware';
import { CatsModule } from './cats/cats.module';

@Module({
  imports: [CatsModule],
})
export class AppModule implements NestModule {
  configure(consumer: MiddlewareConsumer) {
    consumer
      .apply(LoggerMiddleware)
      .forRoutes('cats');
  }
}
위 코드는 configure 메서드를 통해 소비자에게 LoggerMiddleware를 적용하고 cats 경로에 라우팅을 하는 코드입니다.
Exception filters
Nest comes with a built-in exceptions layer which is responsible for processing
all unhandled exceptions across an application. When an exception is not handled
by your application code, it is caught by this layer, which then automatically
sends an appropriate user-friendly response.
Nest는 어플리케이션 전체에 걸쳐 처리되지 않은 예외를 처리하는 예외처리 레이어가 내장되어 있습니다. 어플리케이션에서 에러를 처리하지 않으면, 이 계층에 의해 자동적으로 적절하게 사용자 친화적인 응답을 보내게 됩니다.
@Get()
async findAll() {
  throw new HttpException('Forbidden', HttpStatus.FORBIDDEN);
}
HTTP 403 에러를 보내는 코드입니다. 해당 엔드포인트로 Get 요청을 보내면
{
  "statusCode": 403,
  "message": "Forbidden"
}
이러한 응답을 받게 됩니다.
이외에도 여러 Exception이 내장되어 있고 커스텀 필터를 만들어서 @UseFileter(argv) 데코레이터를 통해 등록할 수 있습니다.
Pipes
A Pipe is a class annotated with the @Injectable() decorator. Pipes should implement
the PipeTransform interface.
파이프는 @Injectable() 데코레이터가 달린 클래스입니다.
파이프는 PipeTransform 인터페이스를 implements를 해야 합니다.
파이프는 2가지 사례로 이용됩니다.
- transformation
- validation
기본적으로 validationPipe, ParseIntPipe 등이 내장되어 있으며
@Injectable() 데코레이터가 달린 클래스에서 PipeTranfrom 인터페이스를 상속받아 커스텀할 수 있습니다.
import { PipeTransform, Injectable, ArgumentMetadata, BadRequestException } from '@nestjs/common';

@Injectable()
export class ParseIntPipe implements PipeTransform<string, number> {
  transform(value: string, metadata: ArgumentMetadata): number {
    const val = parseInt(value, 10);
    if (isNaN(val)) {
      throw new BadRequestException('Validation failed');
    }
    return val;
  }
}
위 코드는 ParseIntPipe라는 파이프가 어떻게 구성되었는지 보여주는 클래스입니다.
Guards
A guard is a class annotated with the @Injectable() decorator.
Guards should implements the CanActive interface.
guard는 @Injectable() 데코레이터가 달린 클래스입니다.
Guards는 CanActive 인터페이스를 implements 해야 합니다.
가드는 1개의 책임을 가집니다. 특정 조건에 따라 라우트를 통해 들어온 요청을 핸들러에 의해 처리되는 지 결정합니다. 미들웨어로 이를 처리하게 되면 next()함수로 무엇이 호출될지 알 수 없기 때문에 가드를 통해 처리하는 방법이 더 좋습니다.
HINT
Guards are executed after each middleware, but before any interceptor or pipe.
가드는 미들웨어 이후에 실행되지만 인터셉터나 파이프보다는 늦습니다.
import { Injectable, CanActivate, ExecutionContext } from '@nestjs/common';
import { Observable } from 'rxjs';

@Injectable()
export class AuthGuard implements CanActivate {
  canActivate(
    context: ExecutionContext,
  ): boolean | Promise<boolean> | Observable<boolean> {
    const request = context.switchToHttp().getRequest();
    return validateRequest(request);
  }
}
CanActivate 인터페이스를 상속받아 구현되는 guard.
@Controller('cats')
@UseGuards(new RolesGuard())
export class CatsController {}
@UseGuards() 데코레이터를 통해 생성하여 메소드 레벨에서 사용할 수 있다..
Interceptors
An Interceptor is a class annotated with @Injectable() decorator.
Interceptors should implements the NestInterceptor interface.
인터셉터는 @Injectable()데코레이터가 달린 클래스입니다.
인터셉터들은 NestInterceptor 인터페이스를 implements를 해야 합니다.
인터셉터들은 AOP 기술에서 영감을 받아 만들어졌고 다음과 같은 내용이 가능합니다.
- 메서드 실행 전/후에 추가 논리를 바인딩합니다.
- 함수에서 반환된 결과를 변환합니다.
- 함수에서 던져진 예외를 바꿉니다.
- 기본 기능 행동을 확대합니다.
- 특정 조건(예: 캐싱 목적)에 따라 함수를 완전히 재정의합니다.
import { Injectable, NestInterceptor,
        ExecutionContext, CallHandler } from '@nestjs/common';
import { Observable } from 'rxjs';
import { tap } from 'rxjs/operators';

@Injectable()
export class LoggingInterceptor implements NestInterceptor {
  intercept(context: ExecutionContext, next: CallHandler): Observable<any> {
    console.log('Before...');

    const now = Date.now();
    return next
      .handle()
      .pipe(
        tap(() => console.log(`After... ${Date.now() - now}ms`)),
      );
  }
}
위 코드는 인터셉터를 구현한 코드입니다.
@UseInterceptors(LoggingInterceptor)
export class CatsController {}
구현된 인터셉터는 @UseInterceptors() 데코레이터를 통해 사용할 수 있습니다.
마무리
지금까지 NestJS 공식 홈페이지의 Overview에 소개된 Nest의 기본적인 개념에 대한 소개를 읽고
사용법을 알아보았습니다. 본격적으로 NestJS로 백엔드를 구현하기 전에 정독하면 개념을
확실하게 잡을 수 있어 좋았던 것 같고 개발하면서 필요한 부분들은 이제 공식 Docs를 읽으면서
기본 개념과 합쳐 적용할 수 있을 것입니다!