https://github.com/lhartikk/naivechain
본 글을 작성하는 이유?
블록체인 공부를 위해 직접 개발해보고 싶은 욕심이 있었지만, 너무 어려웠다. 블록 구조부터 해싱 알고리즘, 머클트리, P2P 통신, 트랜잭션 등 처음부터 혼자 코딩하기엔 너무 방대했다. 그러나 Naivechain은 200줄의 코드로 블록체인을 구현해냈다. 그래서 Naivechain을 분석해보고 필요한 기능을 추가하여 나만의 블록체인을 구현해보고자 한다.
Naivechain - a blockchain implementation in 200 lines of code
동기
현재 블록체인의 모든 구현(implementation)은 그들이 해결하려는 더 큰 context와 problem(예: Bitcoin or Ethereum)와 밀접하게 결합되어 있다. 이것은 블록체인을 이해하는 것을 필연적으로 어렵게 한다. 특히 소스 코드별로. Naivechain은 블록체인에 대한 간결하고 단순한 구현체를 제공하고자 하는 프로젝트이다. Javascript 기반이다.
블록체인이란 무엇인가
블록체인은 관리 대상 데이터를 '블록'이라고 하는 소규모 데이터들이 P2P 방식을 기반으로 생성된 체인 형태의 연결고리 기반 분산 데이터 저장 환경에 저장하여 누구라도 임의로 수정할 수 없고 누구나 변경의 결과를 열람할 수 있는 분산 컴퓨팅 기술 기반의 원장 관리 기술이다.
-위키백과-
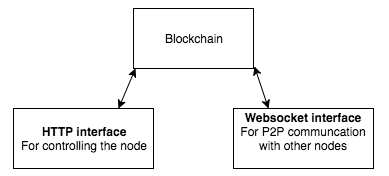
Naivechain의 키컨셉
- node를 제어하는 HTTP interface
- 다른 node와 P2P 통신하기 위한 Websockets
- 매우 간단한 P2P 통신 protocols
- 데이터는 node에 저장되지 않는다.
- PoW와 PoS 없음: 블록은 경쟁없이 체인에 추가될 수 있다.


블록 구조
class Block {
    constructor(index, previousHash, timestamp, data, hash) {
        this.index = index;
        this.previousHash = previousHash.toString();
        this.timestamp = timestamp;
        this.data = data;
        this.hash = hash.toString();
    }
}
Naivechain의 블록 구조는 간단하다. 체인을 유지하기 위해 가장 필수적인 것만을 유지한다. 이전 블록의 해시는 체인의 무결성(integrity)를 유지하기 위해 반드시 현재 블록에 포함되어야 한다.
- index
- timestamp
- data
- hash
- previous hash
블록 해시
var calculateHash = (index, previousHash, timestamp, data) => {
    return CryptoJS.SHA256(index + previousHash + timestamp + data).toString();
};
현재 블록의 해시는 현재 블록 넘버, 이전 블록 해시, 현재 timestamp, 현재 data를 해싱한 값이다. 비트코인이나 이더리움에선 PoW 알고리즘을 사용하기 때문에 "mining" 작업으로 해시값을 얻어야하지만, Naivechain은 PoW를 쓰지않는 간단한 블록체인이므로 채굴 작업 또한 필요없다.
블록 생성
var generateNextBlock = (blockData) => {
    var previousBlock = getLatestBlock();
    var nextIndex = previousBlock.index + 1;
    var nextTimestamp = new Date().getTime() / 1000;
    var nextHash = calculateHash(nextIndex, previousBlock.hash, nextTimestamp, blockData);
    return new Block(nextIndex, previousBlock.hash, nextTimestamp, blockData, nextHash);
};
비트코인에서는 트랜잭션이 일정량 쌓였을 때 블록을 생성한다. 여기서는 1트랜잭션에 1블록이다. 트랜잭션으로 blockData가 들어오면, 체인의 마지막 블록을 가져와서 index, previous hash, data, timestamp, hash으로 블록 객체를 만들어 return한다.
블록 저장
var getGenesisBlock = () => {
    return new Block(0, "0", 1465154705, "my genesis block!!", "816534932c2b7154836da6afc367695e6337db8a921823784c14378abed4f7d7");
};
var blockchain = [getGenesisBlock()];
in-memory Javascript 배열은 블록체인을 저장하는 데 사용된다. 블록체인의 첫 번째 블록은 항상 hard coding된 "genesis-block"이다.
블록 integrity 검증
var isValidNewBlock = (newBlock, previousBlock) => {
    if (previousBlock.index + 1 !== newBlock.index) {
        console.log('invalid index');
        return false;
    } else if (previousBlock.hash !== newBlock.previousHash) {
        console.log('invalid previoushash');
        return false;
    } else if (calculateHashForBlock(newBlock) !== newBlock.hash) {
        console.log(typeof (newBlock.hash) + ' ' + typeof calculateHashForBlock(newBlock));
        console.log('invalid hash: ' + calculateHashForBlock(newBlock) + ' ' + newBlock.hash);
        return false;
    }
    return true;
};
특정한 시간에 우리는 블록 또는 블록체인이 무결성 측면에서 유효한지(valid) 검증할 수 있어야 한다. 이것은 특히 다른 node로부터 새로운 블록을 수신하고 이 블록을 체인에 추가하는 것을 수락할지의 여부를 결정할 때 해당된다.
간단하게 이전 블록과 현재 블록의 index, previous hash, hash 만을 비교해보는 코드이다.
가잔 긴 chain 선택하기
var replaceChain = (newBlocks) => {
    if (isValidChain(newBlocks) && newBlocks.length > blockchain.length) {
        console.log('Received blockchain is valid. Replacing current blockchain with received blockchain');
        blockchain = newBlocks;
        broadcast(responseLatestMsg());
    } else {
        console.log('Received blockchain invalid');
    }
};
특정 시간에 체인에는 하나의 명시적 블록 집합만 있어야 한다. 충돌이 발생하는 경우(예: 두 노드가 모두 블록번호 72를 생성함), 우리는 블록 수가 가장 긴 체인을 선택한다.
다른 node와 통신하기
node의 필수적인 부분은 다른 node와 블록체인을 공유하고 동기화하는 것이다. 다음의 규칙은 네트워크의 동기화를 유지하는 데 사용된다.
- node가 새 블록을 생성하면, 네트워크에 broadcast한다.
- node가 새 peer와 연결되면, 새 peer는 node에게 블록 정보를 query(요청)하여 sync(동기화)한다.
- node가 현재 블록보다 큰 index의 블록을 수신하면, 체인에 블록을 추가하거나 전체 블록체인을 요청한다.
node 제어
var initHttpServer = () => {
    var app = express();
    app.use(bodyParser.json());

    app.get('/blocks', (req, res) => res.send(JSON.stringify(blockchain)));
    app.post('/mineBlock', (req, res) => {
        var newBlock = generateNextBlock(req.body.data);
        addBlock(newBlock);
        broadcast(responseLatestMsg());
        console.log('block added: ' + JSON.stringify(newBlock));
        res.send();
    });
    app.get('/peers', (req, res) => {
        res.send(sockets.map(s => s._socket.remoteAddress + ':' + s._socket.remotePort));
    });
    app.post('/addPeer', (req, res) => {
        connectToPeers([req.body.peer]);
        res.send();
    });
    app.listen(http_port, () => console.log('Listening http on port: ' + http_port));
};
user는 어떤 방식으로든 노드를 제어할 수 있어야 한다. 이 작업은 HTTP 서버를 설정하야 수행한다. user는 다음과 같은 방식으로 노드와 상호작용할 수 있다.
- List all blocks
- Create a new block with a content given by the user
- List or add peers
노드를 제어하는 가장 간단한 방법은 예를 들어 Curl을 사용하는 것이다.
#노드로부터 모든 블록을 받아온다.
curl http://localhost:3001/blocks
아키텍처
node는 두 웹서버에서 작동된다. 하나는 user가 node를 제어하는 HTTP 서버이고, 다른 하나는 노드 간 P2P 통신을 위한 웹소켓 HTTP 서버이다.