앞으로의 목표 👍
- javascript 능력 및 고난도 알고리즘 풀이 능력
- Nest, Graphql등 최신 기술 스택 활용 능력
- 기초 미니프로젝트 포트폴리오
- 로그인, 결제기반 심화프로젝트 포트폴리오
- 배포를 위한 네트워크 및 CI/CD 배포자동화 능력
- 120% 백엔드 개발 지식
오늘부터 꾸준히 해야할 일 👍
- 영타실력 늘리기
- 단축키 사용 익숙해지기
- 코드리딩 실력 키우기
- 데일리 퀴즈
- 포트폴리오 작성
- 독스에 친숙해지기
- MDN 보는 연습하기
오늘의 수업 👍
📝 class
-
물건 만드는 설명서
-
붕어빵 만드는 방법
-
컴포넌트 - 부품을 만들어 놓고, 조립하는 방식
-
컴포넌트에 들어가는 부품도 class로 만들 수 있다.
-
class 안에 함수는 function, const, let을 붙이지 않는다.
-
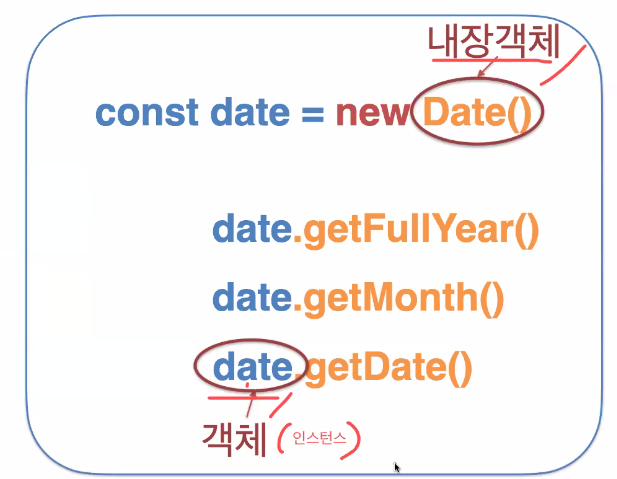
date.getFullYear()에서 .뒤에 따라오는 함수는 메서드라고 한다.
📝 객체지향 프로그래밍 - OOP
-
객체를 기반으로 프로그래밍 한다.
-
관련된 함수들을 객체로 묶어준다
-
유지보수가 편하다.
📝 클래스 실습
// 설명서를 바탕으로 API를 찍어내기 위한 연습
class Monster{
    atk = 10 // => this.atk
    def

    constructor(qqq) { // 생성자 함수 qqq => 매개변수
        this.atk = qqq
    }

    attack() {  // => this.attack
        console.log("공격하자!!")
        console.log(`내 공격력은 ${this.atk}이야!!`)
    } // 함수 선언식

    run = () => {  // => this.run
        console.log("도망가자!!")
    } // 화살표 함수
}

const myMonster1 = new Monster(20) // 설명서대로 몬스터가 생성된다. 20 => 인자
myMonster1.attack()
myMonster1.run()

const myMonster2 = new Monster(50) // 설명서대로 몬스터가 생성된다.
myMonster2.attack()
myMonster2.run()- 결과값
공격하자!!
내 공격력은 20이야!!
도망가자!!
공격하자!!
내 공격력은 50이야!!
도망가자!!
📝 상속 실습
-
extends === 상속
-
오버라이딩 - 만약 상속 받은 함수가 원래 있던 함수에 있으면 원래 있던 함수가 저장된다.(부모의 함수를 덮어쓴다.)
-
인자에서 보내준 값은 공중몬스터 생성자(매개변수)에 넘기고 Monster생성자(매개변수)에 다시 재전달한다.
-
공중몬스터는 자식이고, Monster은 부모이다.
// 설명서를 바탕으로 API를 찍어내기 위한 연습
class Monster{
    atk = 10 // => this.atk
    def

    constructor(qqq) { // 생성자 함수 qqq => 매개변수
        this.atk = qqq
    }

    attack() {  // => this.attack
        console.log("공격하자!!")
        console.log(`내 공격력은 ${this.atk}이야!!`)
    } // 함수 선언식

    run = () => {  // => this.run
        console.log("도망가자!!")
    } // 화살표 함수
}

class 공중몬스터 extends Monster {

    constructor(aaa){
        super(aaa + 1) // 공중몬스터는 atk + 1
    }

    // 오버라이딩(부모의 run을 덮어쓰기)
    run = () => {  // => this.run
        console.log("날아서 도망가자!!")
    }
}

class 지상몬스터 extends Monster {

    constructor(bbb){
        super(bbb) // Monster의 constructor에 들어가게 된다.
    }

    // 오버라이딩(부모의 run을 덮어쓰기)
    run = () => {  // => this.run
        console.log("뛰어서 도망가자!!")
    }
}

const  myMonster1 = new 공중몬스터(20) // 설명서대로 몬스터가 생성된다. 20 => 인자
myMonster1 .attack()
myMonster1 .run()

const myMonster2 = new 지상몬스터(50) // 설명서대로 몬스터가 생성된다.
myMonster2.attack()
myMonster2.run()- 결과값
공격하자!!
내 공격력은 21이야!!
날아서 도망가자!!
공격하자!!
내 공격력은 50이야!!
뛰어서 도망가자!!
📝 상속과 전략패턴 실습
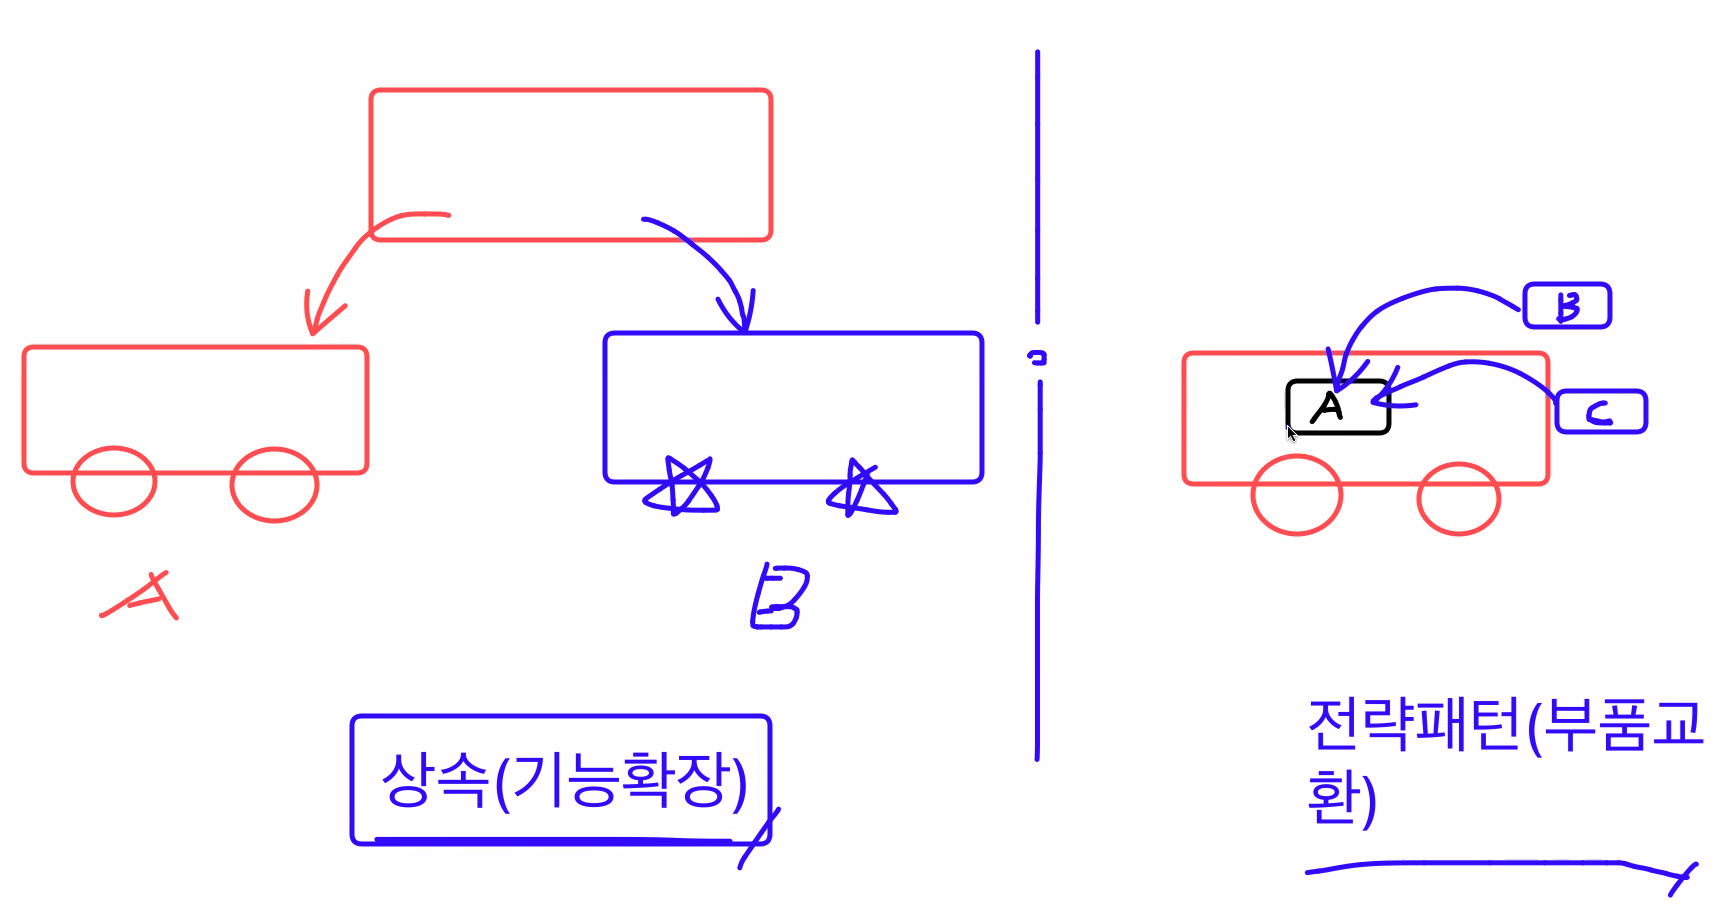
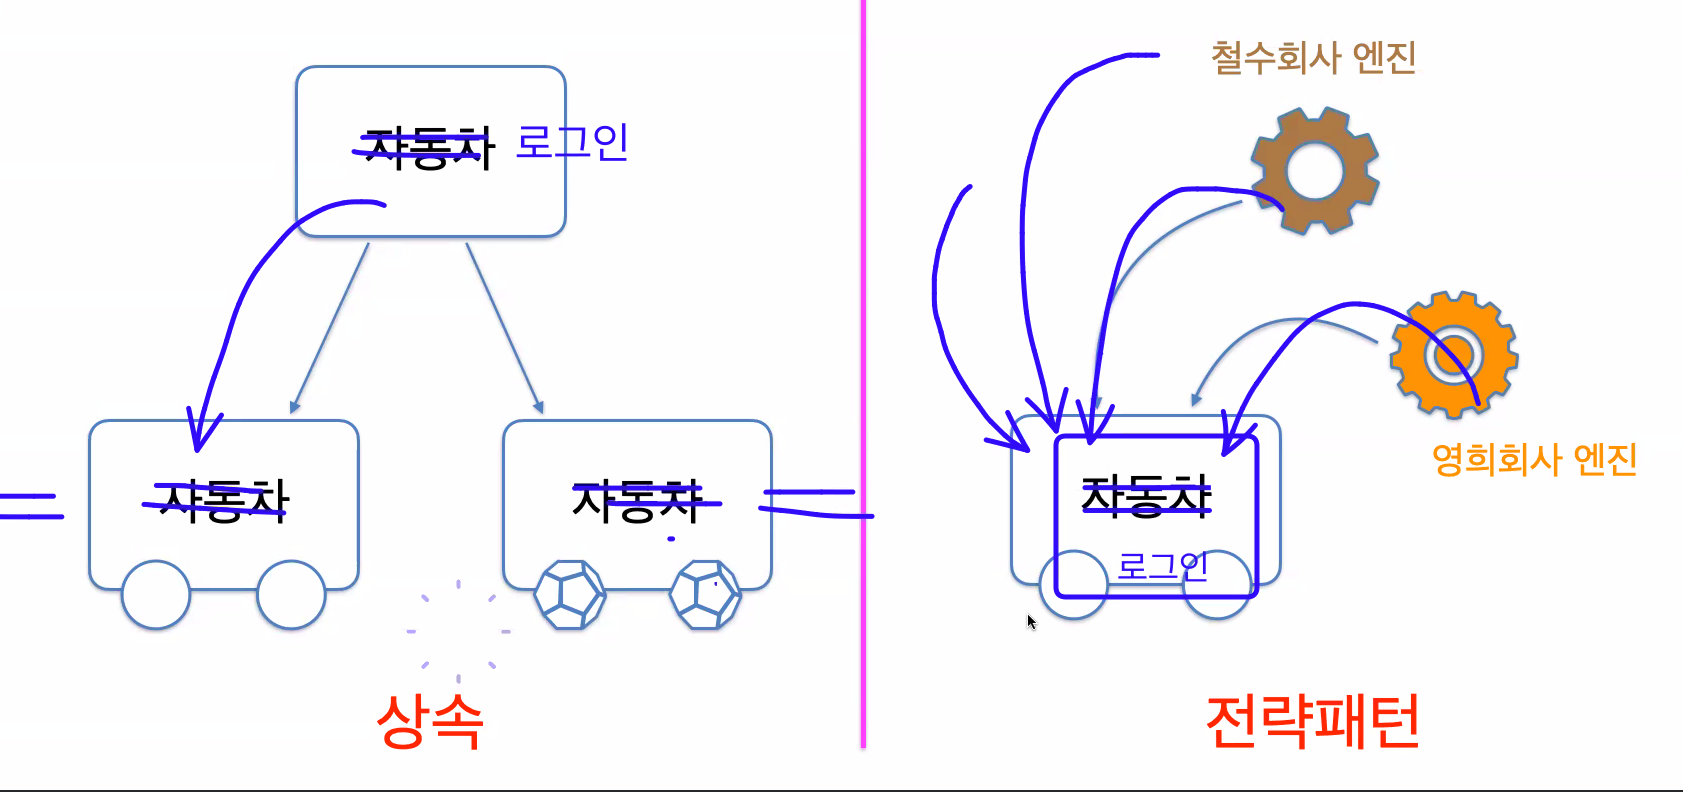
-
상속은 최종 제품이 나온다.
-
전략패턴은 부품이 나온다.(부품만 갈아끼우면 됨)
// 설명서를 바탕으로 API를 찍어내기 위한 연습

class 공중부품 {
    run = () => {  // => this.run
        console.log("날아서 도망가자!!")
    }
}

class 지상부품 {
    run = () => {  // => this.run
        console.log("뛰어서 도망가자!!")
    }
}

class Monster{
    atk = 10 // => this.atk
    부품;     // => this.부품

    constructor(qqq) { // 생성자 함수 qqq => 매개변수
        this.부품 = qqq.run // qqq.run() === 공중부품.run()
    }

    attack() {  // => this.attack
        console.log("공격하자!!")
        console.log(`내 공격력은 ${this.atk}이야!!`)
    }

    run = () => {  // => this.run
        this.부품.run()
    }
}

const  myMonster1 = new Monster(new 공중부품())
myMonster1 .attack()
myMonster1 .run()

const myMonster2 = new Monster(new 지상부품())
myMonster2.attack()
myMonster2.run()- 결과값
공격하자!!
내 공격력은 21이야!!
날아서 도망가자!!
공격하자!!
내 공격력은 50이야!!
뛰어서 도망가자!!
📝 express를 이용한 API 만들기 실습
- 흐름을 파악하기 위한 코드이기 때문에 대충 작성함
▷ index.js
// 상품 구매하기 API
app.post("/products/buy", function (req, res) {
  // 1. 가진 돈을 검증하는 코드 (대략 10줄 작성)
  // ...
  // ...
  // ...

  // 2. 재고파악 및 판매여부를 검증하는 코드 (대략 10줄 작성)
  // ...
  // ...
  // ...

  // 3. 상품을 구매하는 코드 ()
  if(돈있음 && !판매완료){
    res.send("상품 구매가 완료되었습니다.");
  }
});

// 상품 환불하기 API
app.post("/products/refund", function (req, res) {
  // 1. 판매여부 검증하는 코드 (대략 10줄 작성)
  // ...
  // ...
  // ...

  // 2. 상품 환불하는 코드
  if(판매완료) {
    res.send("상품 환불이 완료되었습니다.");
  }
});

app.listen(3000);
📝 서비스 만들기 실습
-
중복된 함수를 따로따로 만들어서 뿌려주는 것도 가능하지만
-
class에 묶어서 넣어주는게 더 효율적이다.
-
class는 보통 대문자로 시작하고 변수나 객체는 소문자로 시작한다.
▷ index.js
// const express = require('express') // 옛날방식 => commonjs
import express from "express"; // 요즘방식 => module
import { ProductService } from "./product.js"
import { CashService } from "./cash.js"

const app = express();

// 상품 구매하기 API
app.post("/products/buy", function (req, res) {
  // 1. 가진 돈을 검증하는 코드 (대략 10줄 작성 => 2줄로 줄었다)
  const cashService = new CashService()
  const hasMoney = cashService.checkValue()

  // 2. 재고파악 및 판매여부를 검증하는 코드 (대략 10줄 작성 => 2줄로 줄었다)
  const productService = new ProductService()
  const isSoldOut = productService.checkSoldOut()

  // 3. 상품을 구매하는 코드 ()
  if(hasMoney && !isSoldOut){
    res.send("상품 구매가 완료되었습니다.");
  }
});

// 상품 환불하기 API
app.post("/products/refund", function (req, res) {
  // 1. 재고파악 및 판매여부 검증하는 코드 (대략 10줄 작성 => 2줄로 줄었다.)
  const productService = new ProductService()
  const isSoldOut = productService.checkSoldOut()

  // 2. 상품 환불하는 코드
  if(isSoldOut) {
    res.send("상품 환불이 완료되었습니다.");
  }
});

app.listen(3000);
▷ product.js
// 이런식으로 따로따로 해줘도 되지만
checkSoldOut = () => {

}


// 함수가 많아지면 구분하기 힘들기 때문에 class를 쓴다
export class ProductService {
    checkSoldOut = () => {
        // 2. 재고파악 및 판매여부를 검증하는 코드 (대략 10줄 작성)
        // ...
        // ...
        // ...
    }
}
📝 MVC 패턴 실습
-
controllers에서는 미들웨어 함수를 분리해서 관리해 줍니다 -
models에서는 DB 생성을 관리해주는 곳으로 이전에 배운 Schema 정의를 해 준 폴더와 동일합니다. -
view에는 화면에 보여지는 파일들(html 파일)을 관리해주는 폴더입니다. -
함수를 실행하면 안되고 연결만 해줘야한다. ( index.js : 10, 12 )
▷ index.js (메인 파일)
// const express = require('express') // 옛날방식 => commonjs
import express from "express"; // 요즘방식 => module
import {ProductController} from "./mvc/controllers/product.controller.js"

const app = express();

// 상품 API
const productController = new ProductController

app.post("/products/buy", productController.buyProduct) // 상품 구매하기 API

app.post("/products/refund", productController.refundProduct) // 상품 환불하기 API

// // 게시판 API
// app.get("/boards/...")

app.listen(3000);
▷ product.controller.js (controller 파일)
export class ProductController {
  buyProduct = (req, res) => {
    // 1. 가진 돈을 검증하는 코드 (대략 10줄 작성 => 2줄로 줄었다)
    const cashService = new CashService();
    const hasMoney = cashService.checkValue();

    // 2. 재고파악 및 판매여부를 검증하는 코드 (대략 10줄 작성 => 2줄로 줄었다)
    const productService = new ProductService();
    const isSoldOut = productService.checkSoldOut();

    // 3. 상품을 구매하는 코드 ()
    if (hasMoney && !isSoldOut) {
      res.send("상품 구매가 완료되었습니다.");
    }
  };

  refundProduct = () => {
    // 1. 재고파악 및 판매여부 검증하는 코드 (대략 10줄 작성 => 2줄로 줄었다.)
    const productService = new ProductService();
    const isSoldOut = productService.checkSoldOut();

    // 2. 상품 환불하는 코드
    if (isSoldOut) {
      res.send("상품 환불이 완료되었습니다.");
    }
  };
}
📝 API 만들기 + MVC 분리 실습
- 유지보수가 좋다.
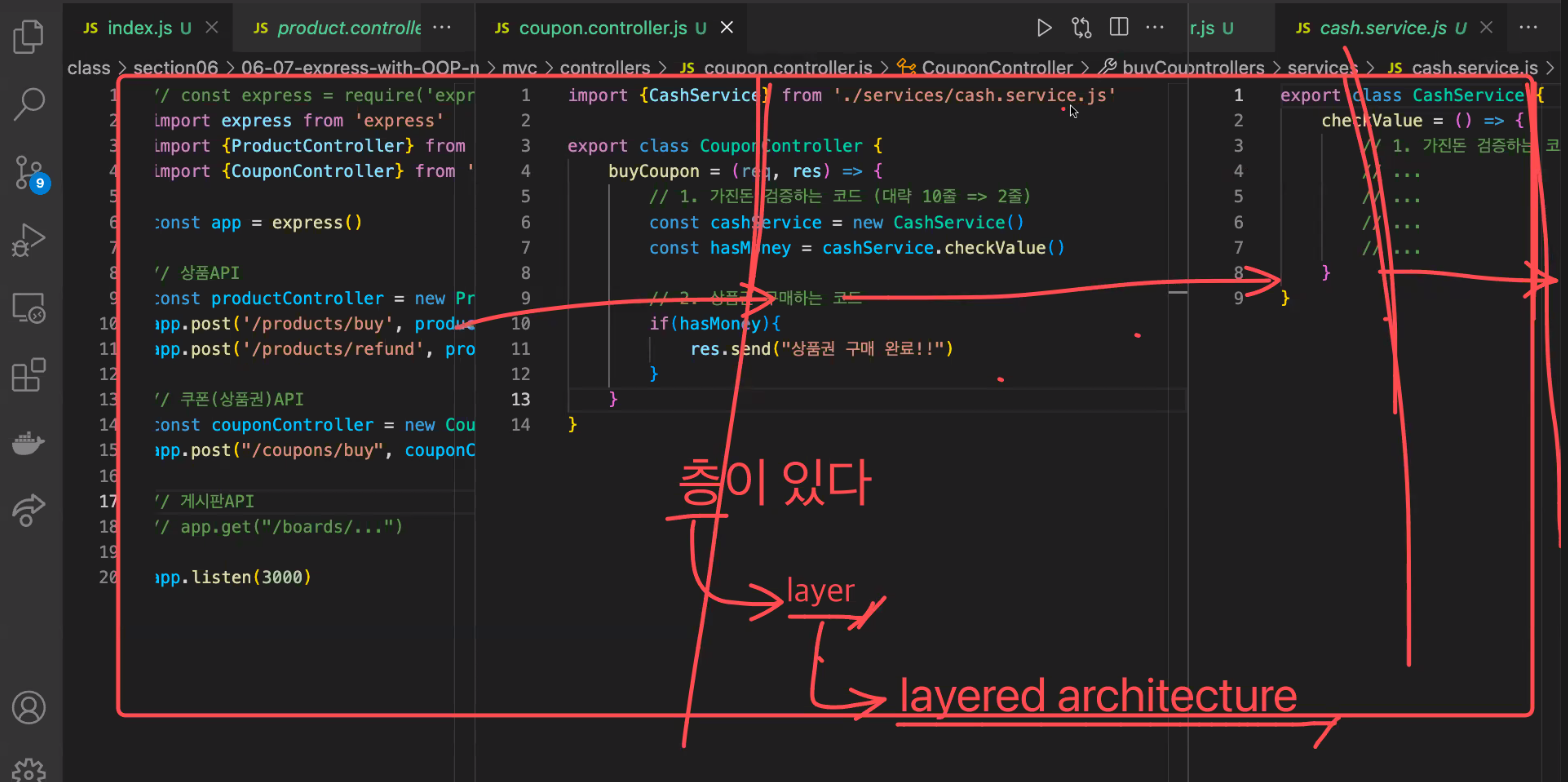
- 층이 있다 -> layer -> layered architecture
▷ index.js 추가
// 쿠폰(상품권) API
const couponController = new CouponController();
app.post("/coupons/buy", couponController.buyCoupon); // 쿠폰 구매하기 API
▷ coupon.controller.js
import { CashService } from "./services/cash.service.js"

export class CouponController {
    buyCoupon = (req, res) => {
        // 1. 가진 돈을 검증하는 코드 (대략 10줄 작성 => 2줄로 줄었다)
        const cashService = new CashService()
        const hasMoney = cashService.checkValue()

        // 2. 상품권 구매하는 코드
        if(hasMoney) {
            res.send('상품권 구매가 완료되었습니다.')
        }
    }
}
오늘의 마무리 👍
- 복습
- github 공부
- 블로그 포스팅
- 데일리 퀴즈
- 알고리즘 문제 풀기
항상 겸손한 자세로 배우면서 성장하자, 할 수 있다!! 💪
출처 : 코드캠프

개발자 블로그 / 항상 겸손한 자세로 배우면서 성장하자 할 수 있다!