
Velopert님의 블로그를 보면서 공부한 내용을 정리한 글입니다. Redux-Thunk
1. Redux-Thunk를 쓰는 이유
이전에는 Redux로 전역 상태 관리를 하는 방법을 알아보았다. Redux로 전역 관리를 하는 패턴을 요약하자면 액션 타입 선언 -> 액션 생성함수(필수는 아님) -> 리듀서 생성하는 형태이다.
Redux에서 액션 생성함수에서는 일반적인 액션 객체밖에 사용할 수 없다. (Redux에서 액션은 순수한 객체로 이루어져 있어야 하기 때문에 비동기 작업을 처리할 때에는 Redux의 기본 동작과 맞지 않다.) 그런데 Redux-Thunk를 사용하면 액션 생성 함수에서 일반적인 액션 객체뿐만 아니라, 함수를 반환하여 비동기 작업을 수행할 수 있다.
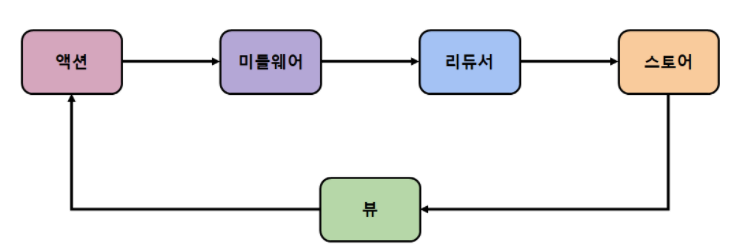
Redux-Thunk는 Redux의 미들웨어 중 하나이다. 비동기 작업을 처리하는 액션 생성자 함수를 반환하는 대신, 함수를 반환하여 Redux-Thunk 미들웨어에 의해 처리된다. 이 함수를 dispath를 인자로 받아서 사용할 수 있으며, 비동기 작업을 수행한 후에 원하는 타이밍에 액션을 디스패치 할 수 있다.
2. Redux-Thunk
코드로 살펴보면 다음과 같다.
npm install redux-thunkimport React from 'react';
import ReactDOM from 'react-dom/client';
import App from './App';
import reportWebVitals from './reportWebVitals';
import { applyMiddleware, legacy_createStore as createStore } from 'redux';
import { Provider } from 'react-redux';
import rootReducer from './modules';
import logger from 'redux-logger';
import { composeWithDevTools } from 'redux-devtools-extension';
import ReduxThunk from "redux-thunk";
import {
BrowserRouter,
} from "react-router-dom";
// logger를 사용하려면 logger를 제일 마지막에 두어야함.
const store = createStore(
rootReducer,
composeWithDevTools(
applyMiddleware(
ReduxThunk,
logger
))
);
const root = ReactDOM.createRoot(document.getElementById('root'));
root.render(
<React.StrictMode>
<BrowserRouter >
<Provider store={store}>
<App />
</Provider>
</BrowserRouter>
</React.StrictMode>
);
// If you want to start measuring performance in your app, pass a function
// to log results (for example: reportWebVitals(console.log))
// or send to an analytics endpoint. Learn more: https://bit.ly/CRA-vitals
reportWebVitals();간단한 delay를 이용한 비동기 작업을 Thunk로 처리해보았다.
// 액션 타입
const INCREASE = 'INCREASE';
const DECREASE = 'DECREASE';

// 액션 생성 함수
export const increase = () => ({ type: INCREASE });
export const decrease = () => ({ type: DECREASE });


// 위에서 언급했듯이 dispatch를 인자로 받고, getState로 현재 상태를 조회도 할 수 있다.
// getState를 쓰지 않는다면 굳이 파라미터로 받아올 필요 없습니다.
export const increaseAsync = () => dispatch => {
  setTimeout(() => dispatch(increase()), 1000);
};
export const decreaseAsync = () => dispatch => {
  setTimeout(() => dispatch(decrease()), 1000);
};

// 초깃값 (초기 상태)
const initialState = 0;

export default function counter(state = initialState, action) {
  switch (action.type) {
    case INCREASE:
      return state + 1;
    case DECREASE:
      return state - 1;
    default:
      return state;
  }
}
// store 생성
// modules/index.js
import { combineReducers } from 'redux';
import counter from './counter';
const rootReducer = combineReducers({ counter });
export default rootReducer;이제 dispatch로 액션을 발생시키는 코드는 다음과 같다.
import React from 'react';
import Counter from '../components/Counter';
import { useSelector, useDispatch } from 'react-redux';
import { increaseAsync, decreaseAsync } from '../modules/counter';

function CounterContainer() {
  const number = useSelector(state => state.counter);
  const dispatch = useDispatch();

  const onIncrease = () => {
    dispatch(increaseAsync());
  };
  const onDecrease = () => {
    dispatch(decreaseAsync());
  };

  return (
    <Counter number={number} onIncrease={onIncrease} onDecrease={onDecrease} />
  );
}

export default CounterContainer;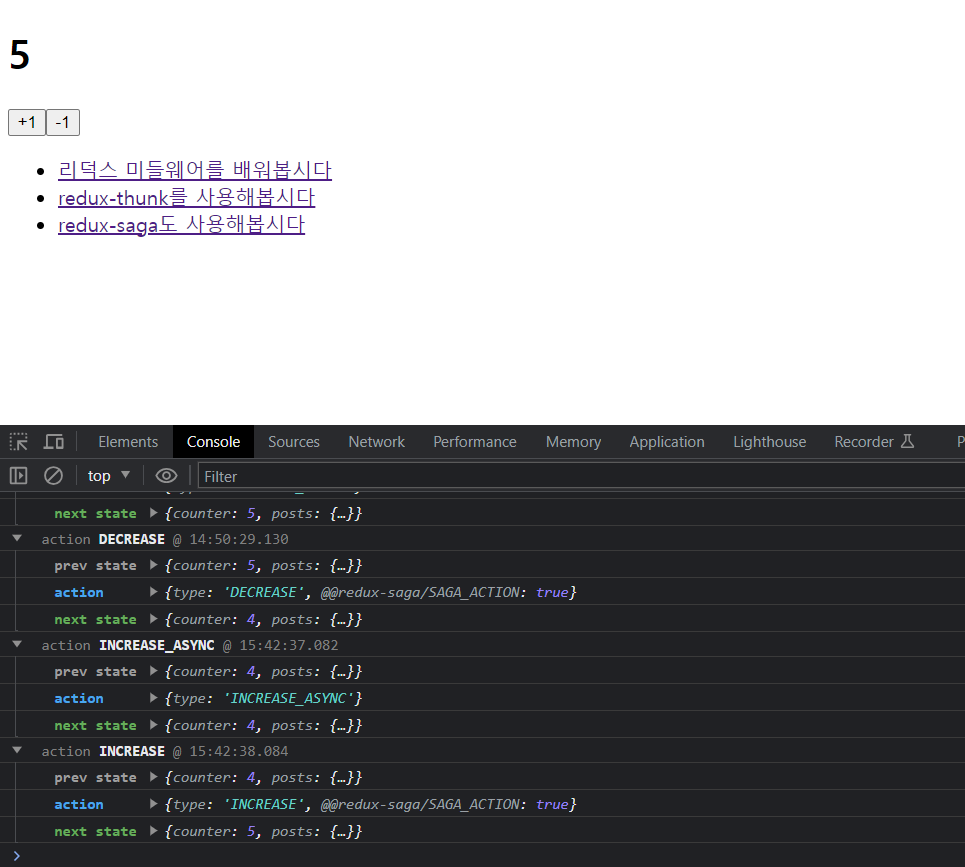
확인해보면 +1버튼을 눌렀을때 1초가 딜레이되는 것을 확인할 수 있다. redux-logger를 함께 사용하면 console로 샅태 변화를 바로 확인할 수 있다.