Elasticsearch plugin 형태로 ingest를 구성하게 되면, 운영중인 서비스를 계속 배포 및 재시작의 과정이 필요하다. 재배포의 과정을 없에기 위해 ES에서 제공하는 Script(Painless)를 직접 작성하여 처리하는 방안을 작성한다.
Painless ? (출처 : ChatGPT)
Elasticsearch는 검색 및 분석 엔진으로서, 데이터의 색인(indexing) 및 검색(searching)을 위한 기능을 제공합니다. Elasticsearch는 다양한 언어로 검색 쿼리를 작성할 수 있지만, 그 중에서도 Painless는 Elasticsearch에서 사용하는 내부 스크립트 언어입니다.
Painless는 Java Virtual Machine (JVM) 상에서 실행되며, Elasticsearch에서 사용되는 모든 스크립트를 작성하는 데 사용됩니다. 이 언어는 매우 간단한 구문과 함수를 가지고 있으며, Elasticsearch의 모든 기능을 지원합니다. Painless는 안전하고, 보안적인 이슈를 방지하며, 검색 및 분석 작업에서 빠르게 실행됩니다.
Painless는 다양한 데이터 타입을 지원하며, Java와 비슷한 문법을 가지고 있습니다. 이 언어를 사용하면, Elasticsearch 색인(index) 내에서 특정 필드의 값을 변환하거나, 동적으로 문서(document)를 생성하거나, 복잡한 검색 쿼리를 작성할 수 있습니다.
Painless 스크립트는 검색, 집계, 업데이트, 삭제 등 다양한 작업에서 사용될 수 있으며, Elasticsearch에서 제공하는 많은 API에서 이용됩니다. 예를 들어, 매핑(mapping)을 정의할 때, 필드 타입을 정의하기 위해 Painless를 사용하거나, 집계(aggregation)를 계산하거나, 필드 값을 조작하기 위해 사용할 수 있습니다.
요약하자면, Painless는 Elasticsearch에서 내부적으로 사용되는 안전하고 빠르게 실행되는 스크립트 언어입니다. 이 언어를 사용하면, Elasticsearch에서 제공하는 많은 API에서 작업할 수 있으며, Elasticsearch 사용자들은 검색 및 분석 작업에서 보다 유연하게 데이터를 처리할 수 있습니다.
전체 흐름도
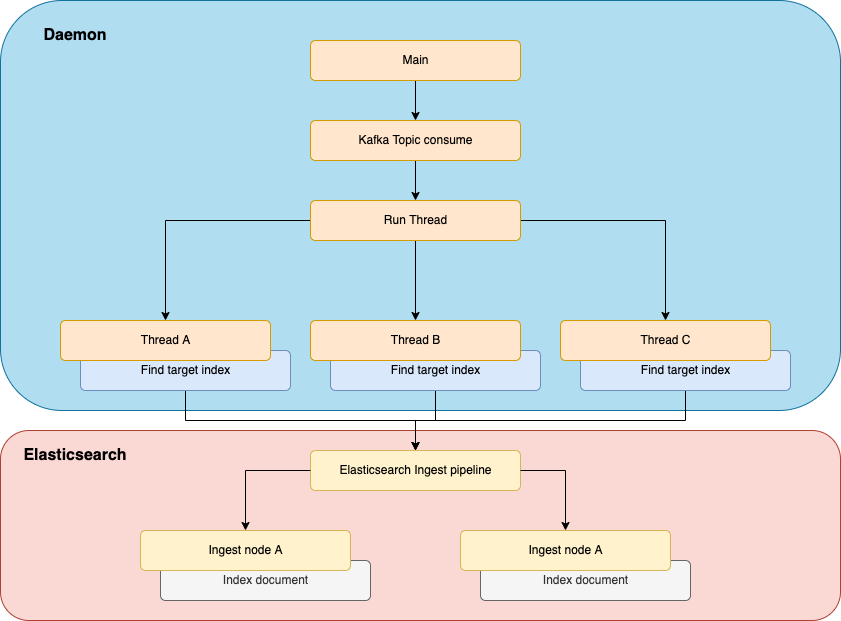
Ingest pipeline
유입되는 데이터의 종류에 따라서 각각의 파이프라인을 구성한다. 이때 각 기능을 다시 공통 파이프라인으로 묶어서 같은 기능을 가진 코드에 대해 의존성을 가지게 한다.
코드에서 말하는 리팩토링과 같다.
로그의 데이터 양식이 비슷하게 되어 있는데 이때 변경에 대해서 모든 파이프라인을 수정하지 않고, 기능별로 파이프라인을 구성하여 해당 기능만을 수정하여 모든 로그 파이프라인이 적용되도록 한다.
공통 기능 파이프라인
여기에서 정의한 파이프라인은 코드에서 말하는 메소드이다. 공통으로 사용할 메소드들을 정의한다.
프로세스 시작 전 파이프라인별 변수 할당 작업
파이프라인 → 파이프라인일 경우, 정상적으로 파라미터의 전달이 되질 않아. 처리하는 Document에 필요한 파라미터값을 할당하여 처리한다.
ChatGPT를 통한 여러 예제를 테스트 해보았지만, 모두 실행이 되질 않는다.
PUT _ingest/pipeline/pipeline_init_params
{
  "description": "파이프라인별 초기화 변수 설정",
  "processors": [
      {
        "script": {
          "source": """
              //ctx.params = [:];
              String pipeline = ctx.params.pipeline;

              ctx.params.pipeline_delete_insert = [:];
              ctx.params.pipeline_delete_insert.delete = ['eventData.service', 'eventData'];
              ctx.params.pipeline_delete_insert.insert = ['service'          , 'meta'     ];

              ctx.params.pipeline_string_to_integer = [:];
		      if (pipeline.equals('totalsearch')) {
                ctx.params.pipeline_string_to_integer.fields = ['eventData.discountPrice'];
              }

              ctx.params.pipeline_remove_field = [:];
              ctx.params.pipeline_remove_field.fields = ['params'];
          """,
        "on_failure": [
          {
            "set": {
              "field": "_ingest.error.pipeline_init_params",
              "value": "{{ _ingest.on_failure_message }}"
            }
          }
        ]
      }
    }
  ]
}
Input document의 필드 위치 변경
특정 깊이의 필드값을 다른 깊이, 이름의 필드값으로 변경해야 할 때, 삭제 → 삽입의 방식으로 위치를 변경 시킨다. 이때 중요한 것은 원하는 위치의 깊이가 다르므로, 모든 노드를 탐색해서 위치값을 찾아야 한다. (재귀)
PUT _ingest/pipeline/pipeline_move_field
{
  "description": "노드값의 위치를 변경",
  "processors": [
      {
        "script": {
          "source": """
            String join(String[] fields, int index) {
              String result = '';
              for (int i = index; i < fields.length; i++) {
                if (i + 1 == fields.length) {
                  result += fields[i];
                } else {
                  result += fields[i] + '.';
                }
              }
              return result;
            }

            // 노드값을 삭제하고, 그때 삭제된 값을 반환한다.
            Object deleteNode(Map map, String field) {
              if (field.contains('.')) {
                // exist
                def fields = field.splitOnToken('.');
                if (map[fields[0]] != null) {
                  return deleteNode(map[fields[0]], join(fields, 1));
                }
              }
              // Delete & Return value
              return map.remove(field);
            }

            // 삭제된 노드값을 다른 노드 위치에 삽입한다.
            void insertNode(Map map, String field, def value) {
              if (field.contains('.')) {
                // Map
                def fieldParts = field.splitOnToken('.');
                  if (map[fieldParts[0]] != null) {
                      insertNode(map[fieldParts[0]], join(fieldParts, 1), value);
                  }
              } else {
                // last
                map.put(field, value);
              }
            }

            List inserts = ctx.params.pipeline_delete_insert.insert;
            List deletes = ctx.params.pipeline_delete_insert.delete;

            for (int i = 0; i < inserts.size(); i++) {
              // Execute
              insertNode(ctx, inserts[i], deleteNode(ctx, deletes[i]));
            }
        """,

        "on_failure": [
          {
            "set": {
              "field": "_ingest.error.pipeline_move_field",
              "value": "{{ _ingest.on_failure_message }}"
            }
          }
        ]
      }
    }
  ]
}
문자열로 감싸진 Null 처리
들어오는 데이터의 값이 null이 아니라 문자열인 "null"로 들어오는 특정 필드가 존재한다. 이때 문자열값을 null 로 치환한다. 어느 필드가 조건에 해당하는지 알 수 없으므로 모든 노드를 탐색해야한다.
PUT _ingest/pipeline/pipeline_explore_null
{
  "description": "모든 객체의 값을 탐색하여, null이 문자열로 되어 있으면 변경",
  "processors": [
      {
        "script": {
        "source": """
          void explore(Map map) {
            for (def entry : map.entrySet()) {
              String key = entry.getKey();
              Object value = entry.getValue();

              if (value instanceof Map) {
                  explore((Map) value);
              } else if (value instanceof List) {
                for (def item : (List)value) {
                  if (item instanceof Map) {
                    explore((Map)item);
                  }
                }
              } else if (value instanceof String) {
                if ((String)value == 'null') {
                    map.put(key, null);
                }
              }
            }
          }
          // Excute recursive
          explore(ctx);
        """,
        "on_failure": [
          {
            "set": {
              "field": "_ingest.error.pipeline_explore_null",
              "value": "{{ _ingest.on_failure_message }}"
            }
          }
        ]
      }
    }
  ]
}
숫자 문자열을 숫자 타입으로 변경
금액, 명확한 숫자 필드가 문자열로 들어오는 경우, 숫자형태로 변경한다. 이 경우 모든 문자열을 검증할 수 없으므로, 초기 변수할당작업에서 각 파이프라인별 필요한 필드값을 지정한다.
PUT _ingest/pipeline/pipeline_string_to_integer
{
  "description": "문자열로 이루어진 필드를 숫자형으로 변경",
  "processors": [
      {
        "script": {
          "source": """
            Integer stringToInteger(def input) {
              if (input instanceof String) {
                return Integer.parseInt(input);
              }
              return input;
            }

            String join(String[] fields, int index) {
              String result = '';
              for (int i = index; i < fields.length; i++) {
                if (i + 1 == fields.length) {
                  result += fields[i];
                } else {
                  result += fields[i] + '.';
                }
              }
              return result;
            }

            void convertNode(Map map, String field) {
              if (field.contains('.')) {
                def fields = field.splitOnToken('.');
                if (map[fields[0]] != null) {
                    convertNode(map[fields[0]], join(fields, 1));
                }
              } else {
                // last
                def value = map[field];
                if (value instanceof List) {

                  def result = new ArrayList();
                  for (def item : (List)value) {
                    result.add(stringToInteger(item));
                  }

                  // list replace put
                  map.put(field, result);
                } else {

                  // other replace put
                  map.put(field, stringToInteger(value));
                }
              }
            }

            // Execute
            List fields = ctx.params.pipeline_string_to_integer.fields;
            for (def field : fields) {
              convertNode(ctx, field)
            }
          """,
        "on_failure": [
          {
            "set": {
              "field": "_ingest.error.pipeline_string_to_integer",
              "value": "{{ _ingest.on_failure_message }}"
            }
          }
        ]
      }
    }
  ]
}
날짜 값을 이용하여 여러가지 필요한 날짜 타입필드 추가
yyyyMMddHHmmss형태의 필드값을 이용하여 여러가지 날짜 형태 필드를 추가한다. 이때, 필드값은 UTC Zone이므로 KST Zone으로 변경해서 처리 한다.
PUT _ingest/pipeline/pipeline_date_parse
{
  "description": "날짜 관련 필드 추가",
  "processors": [
    {
      "script": {
        "source": """
             // 날짜를 파싱하여 LocalDateTime 객체 생성
            DateTimeFormatter formatter = DateTimeFormatter.ofPattern('yyyyMMddHHmmss');
            LocalDateTime localDateTime = LocalDateTime.parse(ctx.connHms, formatter);

            // ZonedDateTime 객체로 변환 (이때 KST로 변환하기 위해 +9 시간을 지정한다.)
            ZonedDateTime utcZone = localDateTime.atZone(ZoneId.of('UTC'));
            LocalDateTime kstDateTime = LocalDateTime.ofInstant(utcZone.toInstant(), ZoneOffset.ofHours(9));

            // UTC Time
            ctx.put('logUnixTime', localDateTime.toInstant(ZoneOffset.ofHours(0)).toEpochMilli());

            // KST Time
            ctx.put('connHmsKst', kstDateTime.format(DateTimeFormatter.ofPattern('yyyyMMddHHmmss')));
            ctx.put('logUnixTimeKst', kstDateTime.toInstant(ZoneOffset.ofHours(0)).toEpochMilli());
            ctx.put('logMonth', kstDateTime.format(DateTimeFormatter.ofPattern('yyyyMM')));
            ctx.put('logWeek', ZonedDateTime.of(kstDateTime, ZoneId.of('Asia/Seoul'))
              .get(IsoFields.WEEK_OF_WEEK_BASED_YEAR)
            );
            ctx.put('logDay', kstDateTime.format(DateTimeFormatter.ofPattern('yyyyMMdd')));
            ctx.put('logHour', kstDateTime.format(DateTimeFormatter.ofPattern('HH')));
          """,
          "on_failure": [
          {
            "set": {
              "field": "_ingest.error.pipeline_date_parse",
              "value": "{{ _ingest.on_failure_message }}"
            }
          }
        ]
      }
    }
  ]
}
Ingest pipeline script 작성 방법 ( 시뮬레이션 )
POST _ingest/pipeline/_simulate
{
  "pipeline": {
    "processors": [
      {
        "script": {
          "lang": "painless",
          "source": """
            // script code
          """
        }
      }
    ]
  },
  "docs": [
    {
      "_source": {
        // test data
      }
    }
  ]
}