React 상태 관리 Tool 사용 & 비교 - (Redux VS MobX VS Context API)
1. Context API
참고링크 :
https://ko.reactjs.org/docs/context.html#when-to-use-context
https://www.youtube.com/watch?v=5LrDIWkK_Bc
- context는 React 컴포넌트 트리 안에서 전역적(global)이라고 볼 수 있는 데이터를 공유할 수 있도록 고안된 방법임/ 그러한 데이터로는 현재 로그인한 유저, 테마, 선호하는 언어 등
사용 시 주의할 점
- Context를 사용하면 컴포넌트를 재사용하기가 어려워지므로 꼭 필요할 때만 사용할 것
- Provider 하위에서 context를 구독하는 모든 컴포넌트는 Provider의 value prop가 바뀔 때마다 다시 렌더링됨
- 다시 렌더링할지 여부를 정할 때 참조(reference)를 확인하기 때문에, Provider의 부모가 렌더링 될 때마다 불필요하게 하위 컴포넌트가 다시 렌더링 되는 문제가 생길 수도 있으므로, 이를 해결하기 위해서는 부모 컴포넌트에 state 값으로 할당 한 후에, 이 state 변수 값을 Provider의 value 값으로 넣어야 함 (공식문서 주의사항 참조)
- class type 컴포넌트는 사용하는 컴포넌트에서
<ThemeContext.Consumer>식으로 감싸야 하지만, functional type 컴포넌트는 useContext Hooks를 활용함여러 Context 구독하기
- 기본적으로 하나의 context를 구독하도록 설계되어 있음.
- 다만, 여러 Context를 구독하기 위해서는, 그 값들을 한 번에 받는 render prop 컴포넌트를 만들 수 있음
실제 적용 예시 (Functional Component 기준)
실습내용
:themecolor와 colorupdate 함수를 전역 state로 공유할 수 있도록 상태관리 구현
1. 버튼 클릭 시 themeColor를 boolean 변화값에 의해 변경되도록 구현 예정 (실제 dart <-> light mode 변경 시 활용)**
2. React.CreateContext() 함수를 활용하여 context 객체 생성const ThemeContext = React.createContext(); const ThemeUpdateContext = React.createContext();3. ThemeProvider라는 글로벌 변수를 정하고 하위로 전파시키는 컴포넌트를 정의
- 예제에서는 themeColor라는 boolean 변수와, 이를 바꾸는 toggle 함수 변수를 정의하고 value로 할당
export const ThemeProvider = ({ children }) => {
  const [themeColor, setThemeColor] = useState(true);
  const themeToggle = () => {
    setThemeColor((prevThemeColor) => !prevThemeColor);
  };
  return (
    <ThemeContext.Provider value={themeColor}>
      <ThemeUpdateContext.Provider value={themeToggle}>
        {children}
      </ThemeUpdateContext.Provider>
    </ThemeContext.Provider>
  );
};
4. 사용하고자 하는 하위 컴포넌트에서 간단하게 쓸 수 있도록 custom hooks를 정의
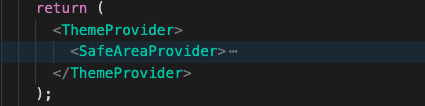
export function useTheme() {
  return useContext(ThemeContext);
}
export function useThemeUpdate() {
  return useContext(ThemeUpdateContext);
}
5. 적용하고자 하는 범위에 해당하는 최상위 컴포넌트로 wrap (in App.js)
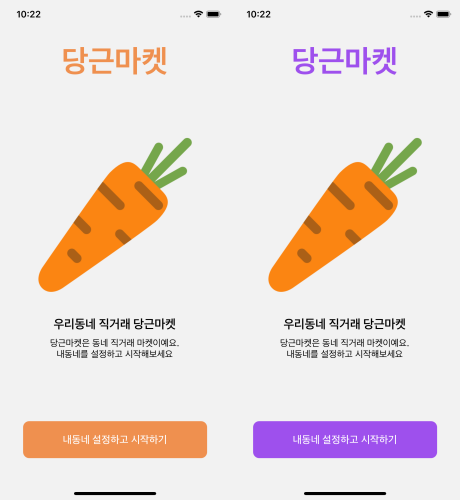
6. 사용하고자 하는 하위 컴포넌트에서 custom hooks를 import하고, 변수로 할당하여, 사용원하는 곳에 삽입하면 끝!import { useTheme, useThemeUpdate } from '../hooks/ThemeContext';const themeColor = useTheme(); const colorUpdate = useThemeUpdate();<Text style={[styles.title, { color: themeColor ? '#EF904F' : '#9e50ed' }]}> 당근마켓 </Text><TouchableOpacity style={[ styles.button, { backgroundColor: themeColor ? '#EF904F' : '#9e50ed' }, ]} onPress={() => colorUpdate()} > <Text style={styles.buttonText}>내동네 설정하고 시작하기</Text> </TouchableOpacity>
2.Redux
참고사이트: https://velopert.com/3528
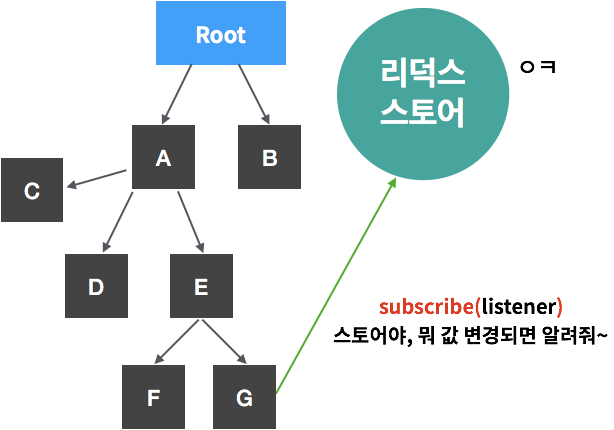
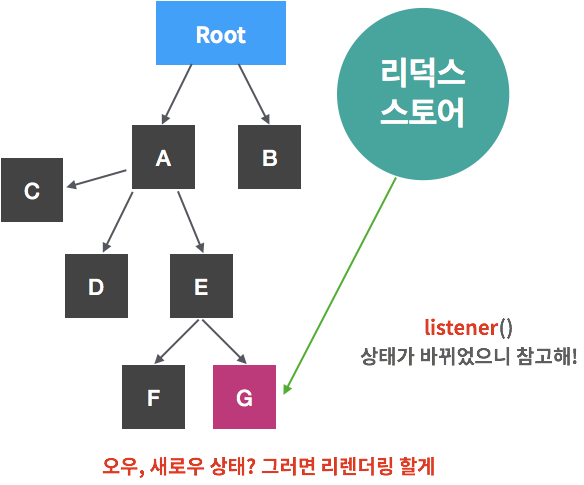
Redux는 자바스크립트 앱을 위한 예측가능한 컨테이너React-Redux는 리액트를 위한 공식 Redux UI binding Library. (React와 Redux를 함께 사용하는 경우, 두 라이브러리를 결합하기 위해 React Redux를 사용해야 함- 기존에는 부모에서 자식의 자식의 자식까지 상태가 흘렀었는데, 리덕스를 사용하면 스토어를 사용하여 상태를 컴포넌트 구조의 바깥에 두고, 스토어를 중간자로 두고 상태를 업데이트 하거나, 새로운 상태를 전달받을 수 있음
- 기존 방식대로 하면, 계층구조가 복잡한 경우, 불필요하게 계속 사용되는 컴포넌트로 내려야 하는 문제, 사용되는 상태값(명칭)이 변경되면, 전부 수정해야 하는 문제, 그리고, 최상위 컴포넌트에서 상태를 관리하기 때문에 불필요하게 하위에 있는 모든 컴포넌트가 재랜더 되는 효율상의 문제가 있음
Redux 3가지 원칙
1. 전체 상태 값이 하나의 자바스크립트 객체로 표현됨
- 하나의 객체를 직렬화(serialize)해서 서버와 클라이언트가 프로그램의 전체 상태값을 주고 받을 수 있음.
- 프로그램이 특정한 상태에 있을 때 발생하는 버그를 확인하기 위해 그 상탯값을 저장한 후 반복해서 재현할 수 있음.
- 최근의 상탯값을 버리지 않고 저장해 놓으면, 실행 취소(undo)와 다시 실행(redo) 기능을 쉽게 구현할 수 있음. (무한 스크롤 시 스크롤 위치 저장 → 페이지를 이동해도 같은 위치로 돌아옴)
- 하지만 프로그램의 전체 상탯값을 리덕스로 관리하는 것은 쉬운 일이 아님.
- 애니메이션을 위한 데이터, 문자열 입력창의 현재 상태값은 컴포넌트에서 관리하는게 더 나음.
- 전체 상탯값을 리덕스로 관리하면 시간 여행 등의 기능을 쉽게 구현 가능 ⇒ 하지만 그렇지 않다면 프로그램의 일부 상태만 리덕스를 활용해도 좋음.
2. 상태 값은 읽기 전용의 불변객체로 관리
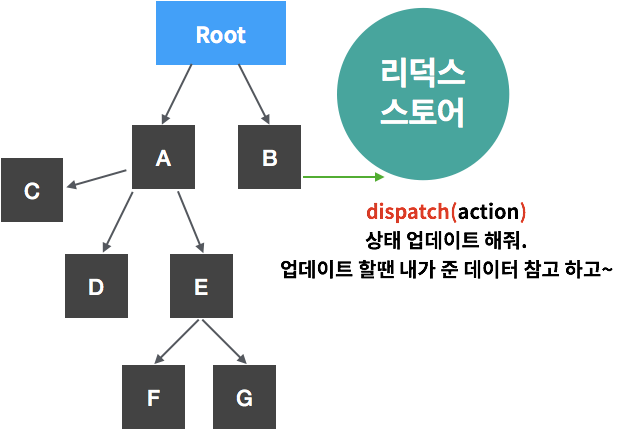
- 리덕스의 상탯값을 수정하는 유일한 방법 ⇒ 액션 객체와 함께
dispatch를 호출하는 것 (마치setState) - dispatch 메서드가 호출된 순서대로 리덕스 내부에서 변경 ⇒ 변경된 순서를 쉽게 이해
- 액션 객체는 평범한 자바스크립트 객체 ⇒ 입력된 순서 저장하고 나중에 그 과정을 쉽게 재현
- 불변성을 전제로 했을때 얻을 수 있는 성능 상의 이점이 존재
3. 오직 순수함수에 의해서만 상태값을 변경
- 리듀서(reducer)는 이전 상탯값과 액션 객체를 입력으로 받아 새로운 상태값을 만드는 순수함수 (순수함수 아닌 경우 - fetch 등의 비동기 로직, new Date(), Math.random()은 같은 input에 다른 return ⇒ 유닛 테스트 불가)
- 순수 함수는 테스트 코드를 작성하기 쉬움 ⇒ 같은 입력에 대해 같은 출력(따라서 실행된 액션 객체를 순서대로 저장했다가 나중에 똑같은 순서대로 dispatch 메서드를 호출하면 쉽게 리플레이(replay) 기능을 구현할 수 있다.)
실제 적용 연습
실습내용
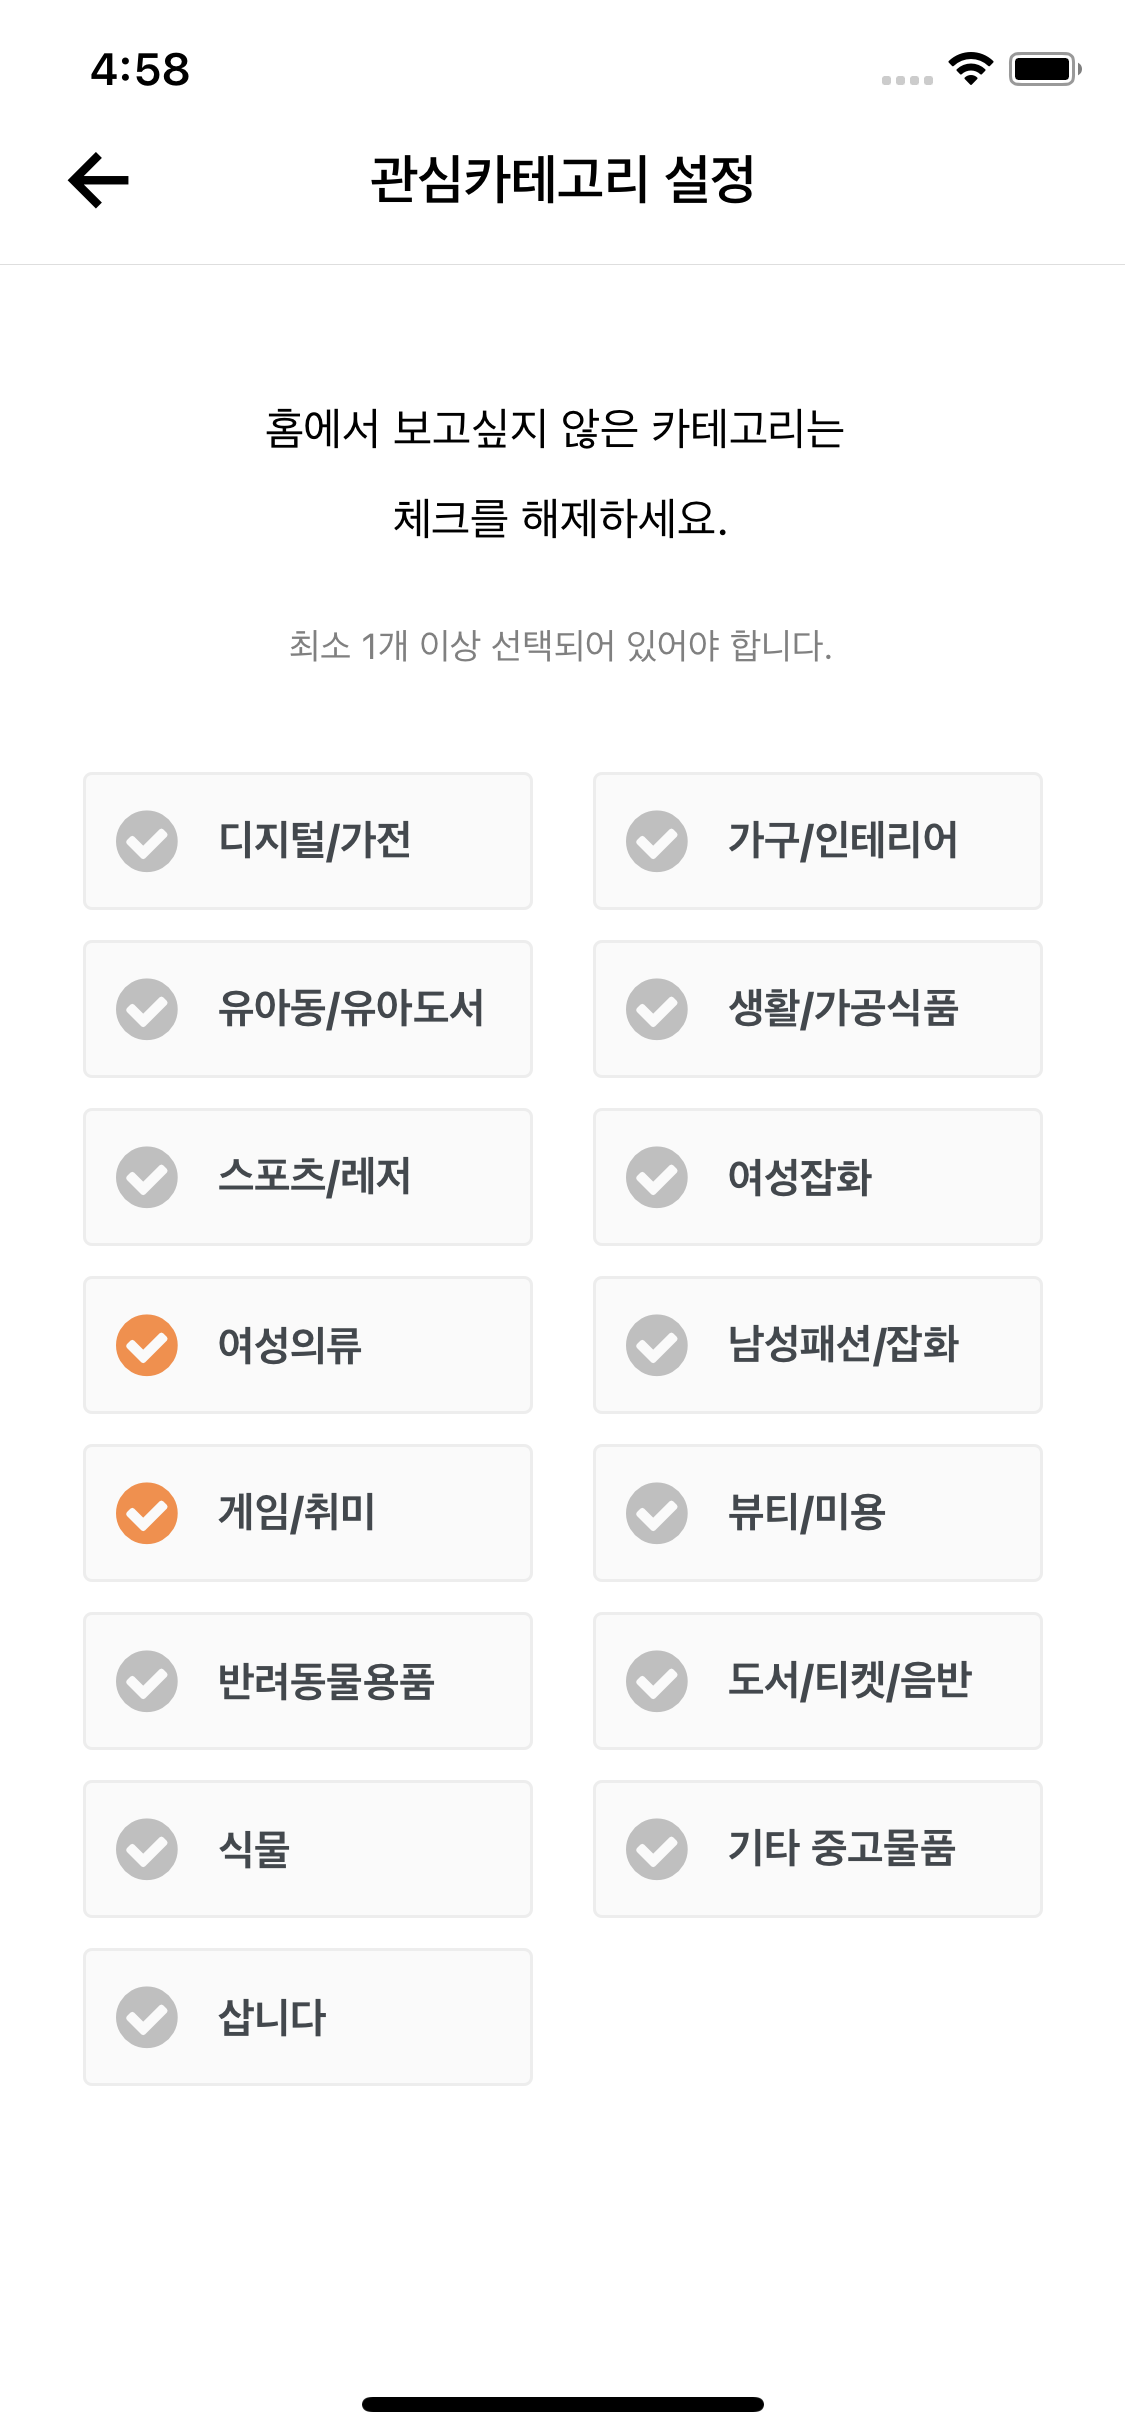
: 기존 React Native 앱에서 i) 유저의 로그인 여부와 ii) 유저가 선택한 카테고리 리스트(필터링 키워드)에 대한 state를 redux 적용하여 변환해보기
1. 액션 생성함수 정의(액션 객체를 생성)// src > store > actions.js export const loginUser = (isLoggedIn) => { return { type: 'VERIFY_LOGIN', payload: isLoggedIn, }; }; export const addCategory = (selectedItem) => { return { type: 'ADD_CATEGORY', payload: selectedItem, }; }; export const deleteCategory = (selectedItems) => { return { type: 'DELETE_CATEGORY', payload: selectedItems, }; };스토어에 액션 객체를 전달하기 위하여, 스토어의 내장함수인 dispatch hooks 정의
- 인자로 위의 액션객체를 전달해야 함
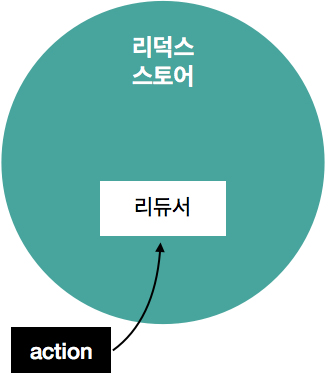
- dispatch가 실행되면 액션 객체는 리듀서로 전달 되고, 리듀서 내에 미리 정의해둔 조건문과 action.type에 따라 따라 스토어가 업데이트 됨
const dispatch = useDispatch()
2. dispatch를 통해 전달된 액션객체에 따라 새로운 상태값을 만드는 ruducer 함수 정의// store > reducers > index.js import { combineReducers } from 'redux'; import loginReducer from './loginReducer'; import categoryReducer from './categoryReducer'; export default combineReducers({ loginReducer, categoryReducer }); // loginReducer.js export const loginReducer = (state = false, action) => { switch (action.type) { case 'VERIFY_LOGIN': return (state = !state); default: return state; } }; // categoryReducer.js const categoryReducer = (state = INITIAL_STATE, action) => { switch (action.type) { case 'ADD_CATEGORY': return [...state, action.payload]; case 'DELETE_CATEGORY': return [...action.payload]; default: return state; } }; const INITIAL_STATE = []; export default categoryReducer;
3.스토어(store)의 값에 영향범위에 있는 컴포넌트를 감싸주기 (App.js)
- 스토어는 리덕스의 상탯값을 가지는 단일 객체이며, 프로젝트 어디서든 접근할 수 있다 (Provider)
- 액션 ⇒ 미들웨어 ⇒ 리듀서 ⇒ 스토어 업데이트 ⇒ 컴포넌트 업데이트
//App.js
..
import { createStore } from 'redux';
import { Provider } from 'react-redux';
import rootReducer from './src/store/reducers';
..
const store = createStore(rootReducer);
..
<Provider store={store}>
..
</Provider>
4. 상태 값을 사용하고자 하는 컴포넌트에서 useSlector과 useDispatch를 활용하여 사용 (styled Components의 themeProvider와 같은 원리)
- useSelector 는 엄격한 비교 ( === )를 하여, 참조가 달라지면 무조건 업데이트 해준다.
- useSelector에는 두 번째 인자로 동일성을 검사하는 함수를 넣어줄 수 있다. react-redux가 제공하는 shallowEqual을 사용할 수 있으나, 일반적으로 불필요.
//categorySearch.js
..
import { useSelector, useDispatch } from 'react-redux';
import { addCategory, deleteCategory } from '../store/actions';
..
export default function CategorySearch() {
  const checkedItems = useSelector((store) => store.categoryReducer);
  const dispatch = useDispatch();
  ..
  const listRenderUnit = ({ item, index }) => (
    <View style={{ width: 170 }}>
      <CheckBox
        id={index}
        title={item.name}
        checkedColor="#EF904F"
        uncheckedIcon="check-circle"
        checkedIcon="check-circle"
        onPress={() => {
          if (!checkedItems.includes(item)) {
            return dispatch(addCategory(item));
          } else {
            const filteredItems = checkedItems.filter(
              (each) => each.id !== item.id
            );
            dispatch(deleteCategory(filteredItems));
          }
        }}
        checked={checkedItems.includes(item) ? true : false}
      />
    </View>
  );
  ..
  }
=> 아래와 같이, 너무 잘 작동한다. 신세계다! 원하는 카테고리명을 한번 클릭하면, store의 state 값인 리스트에 추가되고, 두번 클릭하면 제거된다.

(기타- middleware)
const middleWare = store => next => action => next(action);
- 미들웨어는 리듀서가 액션을 처리하기 전에 실행되는 함수
- 디버깅 목적으로 상탯값 변경 시 로그를 출력하거나, 리듀서에서 발생한 예외를 서버로 전송하는 등의 목적
- 미들웨어를 설정하지 않으면 dispatch한 액션은 곧바로 리듀서로 보내짐
- 대표적인 리덕스 미들웨어로 redux-logger, redux-thunk, redux-saga 등이 있음
3. MobX
참고링크
https://mobx.js.org/getting-started
https://www.youtube.com/watch?v=tjHljJRooHU
https://wix.github.io/react-native-navigation/docs/third-party-mobx/
- MobX는 Redux와 함께 React 앱의 유용한 상태 관리 라이브러리
- 기본적으로 MobX는 클래스형 컴포넌트 기준으로 맞춰져 있음(함수형도 가능은 하지만..) 함수형 컴포넌트에서 Hooks를 함께 사용하려고 하면, 오류 발생/ observer API가 클래스형 컴포넌트를 리턴하기 때문
- 따라서, Hooks를 함께 사용하려면, mobx-react v6 또는 mobx-react-lite를 사용해야 함
- 공식 문서를 포함한 참고할 만한 여러 내용들을 검색해보았지만, 버전 별, decorator 적용 여부, 프로젝트 내용에 따라 내용이 조금씩 차이가 있었고, 쉽고 간단히 참고할 만한 내용이 보이지 않았지만, 함수형 컴포넌트에서 가장 쉽고 간단하게 적용해보는데 참고할 만한 좋은 사이트를 발견!
https://wix.github.io/react-native-navigation/docs/third-party-mobx/
주요개념
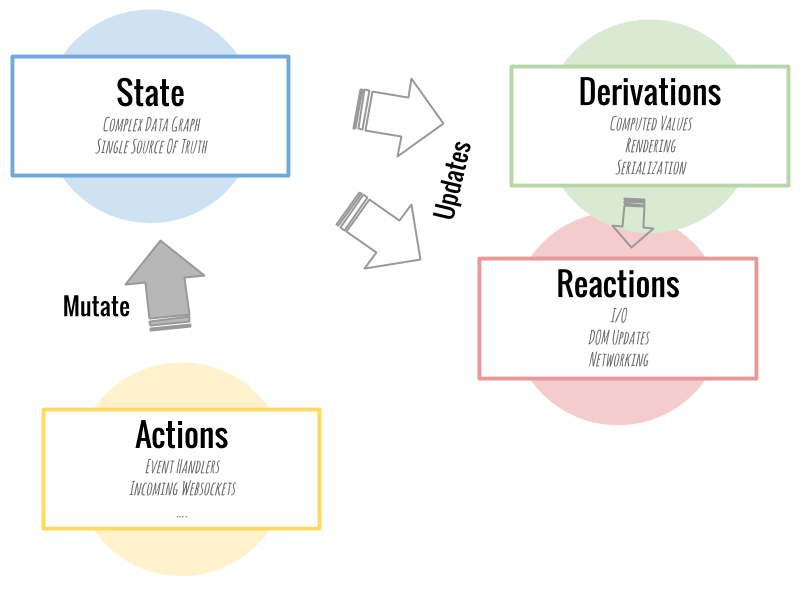
1. (Observable) State
: Graphs of objects, arrays, primitives, references that forms the model of your application.
: These values are the “data cells” of your application.
2. Derivation
: Basically, any value that can be computed automatically from the state of your application.
: These derivations, or computed values, can range from simple values, like the number of unfinished todos, to complex stuff like a visual HTML representation of your todos.
(In spreadsheet terms: these are the formulas and charts of your application.)
3. Reactions
:Reactionsare very similar to derivations.
: The main difference is these functions don't produce a value. Instead, they run automatically to perform some task.
: Usually this is I/O related. They make sure that the DOM is updated or that network requests are made automatically at the right time.
4. actions
: Actions are all the things that alter the state.
: MobX will make sure that all changes to the application state caused by your actions are automatically processed by all derivations and reactions. Synchronously and glitch-free.
실제 적용 연습
(내용) 당근마켓 클로닝 프로젝트에서, 위에서 Redux 적용 대상이었던, category list state를 전역으로 관리하도록 구현
1. store 파일 생성
- class 형태로, 카테고리 목록과 업데이트 함수가 들어가는 CategoryStore를 만들고, 이를 instance화 한 객체를 React.createContext를 이용하여 Context객체와, 이를 이용한 custom hook을 만듦
import React from 'react';
import { makeObservable, observable, action } from 'mobx';
class CategoryStore {
  categories = [];
  constructor() {
    makeObservable(this, {
      categories: observable,
      addCategory: action,
      removeCategory: action,
    });
  }
  addCategory = (item) => {
    this.categories = [...this.categories, item];
  };
  removeCategory = (item) => {
    this.categories = this.categories.filter((each) => {
      each.id !== item.id;
    });
  };
}
const categoryStore = new CategoryStore();
export const CategoryStoreContext = React.createContext(categoryStore);
export const useCategoryStore = () => React.useContext(CategoryStoreContext);
2. store를 사용하고자하는 컴포넌트에서 사용
- observable(
categories)의 변화를 감지하기 위한 observer와 custom hook을 import
import { observer } from 'mobx-react';
import { useCategoryStore } from '../store/CategoryStore';
그리고, 전체 컴포넌트를 observer로 감싸주기
export default observer(CategorySearch);
- 변수할당 (Destructuring)
const { categories, addCategory, removeCategory } = useCategoryStore(); - 원하는 곳에 삽입
<CheckBox
        id={index}
        title={item.name}
        checkedColor="#EF904F"
        uncheckedIcon="check-circle"
        checkedIcon="check-circle"
        onPress={() => {
          !categories.includes() ? addCategory(item) : removeCategory(item);
          console.log(categories);
        }}
        checked={categories.some((each) => each.id === item.id) ? true : false}
      />
결과 확인
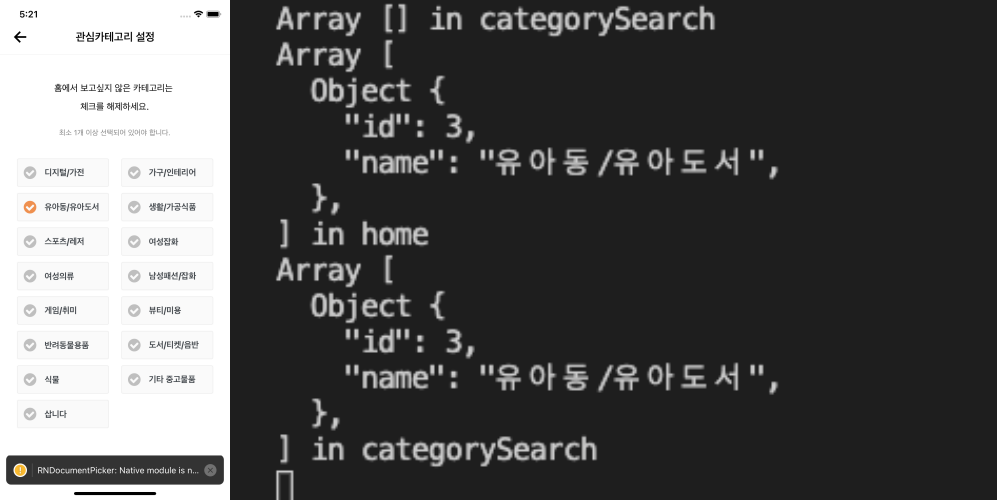
- 카테고리 선택 페이지(CategorySearch)에서는 실시간으로 체크박스 체크 여부에 따라 categories 리스트를 업데이트 해야하고, 이에 따라 home 화면에서 목록이 필터링 되어 보여줘야 함
- 따라서, mobX로 글로벌 state로 관리하려고 테스트 해보았고, 실제 CategorySearch에서 업데이트하면, store를 구독하고 있는 Home과 CartegorySearch 컴포넌트 모두 리랜더링 되고 있음을 확인
<실제로 동일한 store에서 state를 공유해야 하는 컴포넌트는 붉은색 표시된 2개의 컴포넌트>
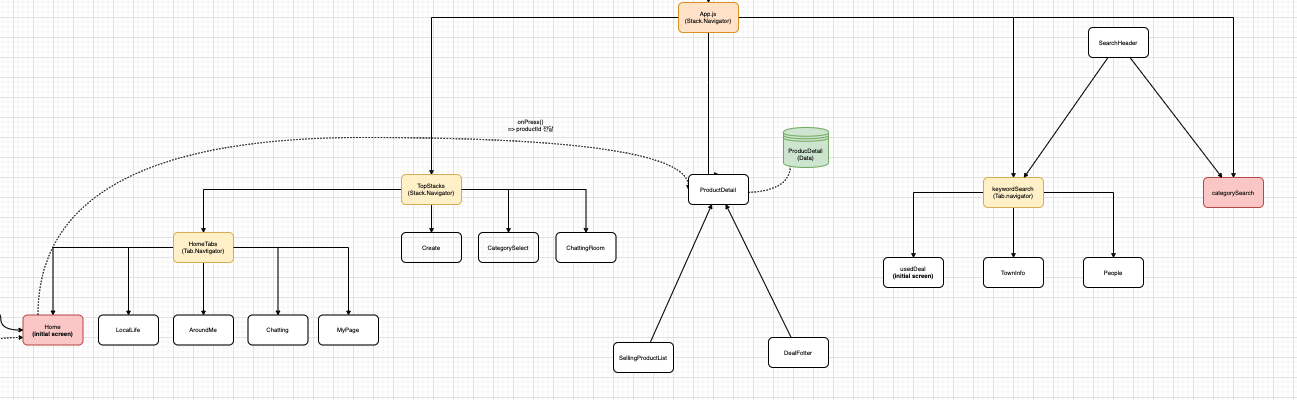
- 체크박스 클릭하면, home과 categorySearch 컴포넌트 코드 내 console.log에 의해 각각 리랜더 되고 있음을 확인!